
Owners Manual
Page 1
TFT-LED LCD TV LEC32B1380 LEC32B1380W
TFT-LED LCD TV LEC32B1380 LEC32B1380W
Owners Manual
Page 4
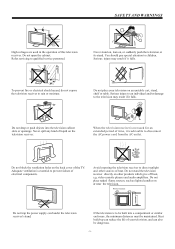
... AND WARNINGS High voltages are used for an extended period of time, it is advisable to rain or moisture. Never spill any kind of the TV. Avoid exposing the television receiver to the television may result if it falls. Do not place your television, and can reduce the life of heat...
... AND WARNINGS High voltages are used for an extended period of time, it is advisable to rain or moisture. Never spill any kind of the TV. Avoid exposing the television receiver to the television may result if it falls. Do not place your television, and can reduce the life of heat...
Owners Manual
Page 5
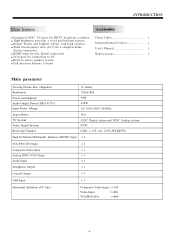
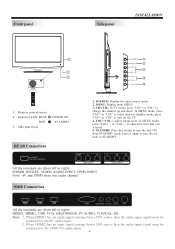
...User s Manual 1 Battery(AAA 2 Main parameter Viewing Picture Size (diagonal) Resolution: Power consumption: Audio Output Power (THD 7%): Input Power Voltage: Aspect Ratio: TV System: Video Signal System: Receiving Channel: 32 inches 1920x1080 90W 2x8W AC 100V-240V 50/60Hz 16:9 ATSC Digital system and NTSC Analog system NTSC... YCb(Pb)Cr(Pr) Input x 1 Composite Video Input x 1 Analog RGB (VGA) Input x 1 Audio Input x 2 Headphone Output x 1 Coaxial Output x 1 USB Input x 1 Horizontal definition (TV line) Composite Video Input >=350 Video Input >=400 YCb(Pb)Cr(Pr) >=400 -4-
...User s Manual 1 Battery(AAA 2 Main parameter Viewing Picture Size (diagonal) Resolution: Power consumption: Audio Output Power (THD 7%): Input Power Voltage: Aspect Ratio: TV System: Video Signal System: Receiving Channel: 32 inches 1920x1080 90W 2x8W AC 100V-240V 50/60Hz 16:9 ATSC Digital system and NTSC Analog system NTSC... YCb(Pb)Cr(Pr) Input x 1 Composite Video Input x 1 Analog RGB (VGA) Input x 1 Audio Input x 2 Headphone Output x 1 Coaxial Output x 1 USB Input x 1 Horizontal definition (TV line) Composite Video Input >=350 Video Input >=400 YCb(Pb)Cr(Pr) >=400 -4-
Owners Manual
Page 6
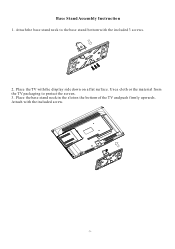
Attach the base stand neck to protect the screen. 3. Use a cloth or the material from the TV packaging to the base stand bottom with the included 3 screws. 2. Attach with the display side down on the bottom of the TV and push firmly upwards. Place the TV with the included screw. -5- Place the base stand neck in the slot on a flat surface. Base Stand Assembly Instruction 1.
Attach the base stand neck to protect the screen. 3. Use a cloth or the material from the TV packaging to the base stand bottom with the included 3 screws. 2. Attach with the display side down on the bottom of the TV and push firmly upwards. Place the TV with the included screw. -5- Place the base stand neck in the slot on a flat surface. Base Stand Assembly Instruction 1.
Owners Manual
Page 7
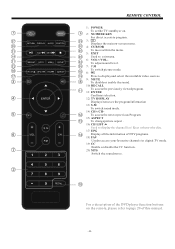
... from STANDBY mode. When HDMI2 has an input signal coming from a DVI source then the audio input signal must be connected to turn on the TV. 4. STANDBY. 1. " to STANDBY. VOL+/VOL-: Adjust sound level. STANDBY: Press this button to the YPbPr/AV audio input. -6- MENU: Display main ... (from left to the PC audio input. 2. Press it again to turn the set back to adjust the item that you selected. 5. CH+/CH-: In TV mode, press "CH+" or "CH-" to right): HDMI1, HDMI2, USB, VGA, HEADPHONE, PC AUDIO, COAXIAL, RF. STANDBY 5 1: Remote control sensor. 2: Indicator ...
... from STANDBY mode. When HDMI2 has an input signal coming from a DVI source then the audio input signal must be connected to turn on the TV. 4. STANDBY. 1. " to STANDBY. VOL+/VOL-: Adjust sound level. STANDBY: Press this button to the YPbPr/AV audio input. -6- MENU: Display main ... (from left to the PC audio input. 2. Press it again to turn the set back to adjust the item that you selected. 5. CH+/CH-: In TV mode, press "CH+" or "CH-" to right): HDMI1, HDMI2, USB, VGA, HEADPHONE, PC AUDIO, COAXIAL, RF. STANDBY 5 1: Remote control sensor. 2: Indicator ...

Owners Manual
Page 8
HDMI1 HDMI2 USB VGA HEADPHONE PC AUDIO COAXIAL RF -7- PC STEPS: Be sure both the TV and computer are set to Power off. 1.Connect VGA and audio cable. 2.Connect the power cord. 3.Power on the TV, switch to PC mode. 4.Power on the PC. Input impendance:75 unbalanced. ANTENNA INSTALLATION Note: Aerial connections: IEC (female). This sequence is very important.
HDMI1 HDMI2 USB VGA HEADPHONE PC AUDIO COAXIAL RF -7- PC STEPS: Be sure both the TV and computer are set to Power off. 1.Connect VGA and audio cable. 2.Connect the power cord. 3.Power on the TV, switch to PC mode. 4.Power on the PC. Input impendance:75 unbalanced. ANTENNA INSTALLATION Note: Aerial connections: IEC (female). This sequence is very important.
Owners Manual
Page 10
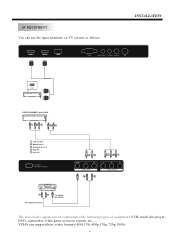
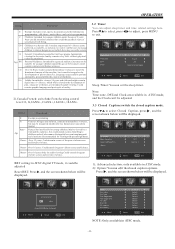
... AUDIO OUTPUTS The television's inputs can support these video formats:480i,576i,480p,576p,720p,1080i. -9- AV EQUIPMENT You can use the input terminals on TV set rear as follows.
... AUDIO OUTPUTS The television's inputs can support these video formats:480i,576i,480p,576p,720p,1080i. -9- AV EQUIPMENT You can use the input terminals on TV set rear as follows.
Owners Manual
Page 11
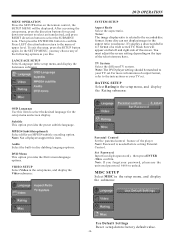
... video sources. 9: MUTE 8 To disable or enable the sound. 10: RECALL To access the previously viewed program. 11 11: ENTER Confirms selection. 12: TV DISPLAY Displays/removes the program Information 13: S.M To switch sound mode. 14: CH+/CH- 12 To access the next or previous Program. 15: ASPECT 13.../ Eject or Insert the disc. 17: EPG 14 Display all the information of DTV programs. 18: FAV Used to access your favourite channels in digital TV mode. 19: CC Enable or disable the CC function. 20: MTS Switch the sound stereo. 2 10 For a description of the DVD player function ...
... video sources. 9: MUTE 8 To disable or enable the sound. 10: RECALL To access the previously viewed program. 11 11: ENTER Confirms selection. 12: TV DISPLAY Displays/removes the program Information 13: S.M To switch sound mode. 14: CH+/CH- 12 To access the next or previous Program. 15: ASPECT 13.../ Eject or Insert the disc. 17: EPG 14 Display all the information of DTV programs. 18: FAV Used to access your favourite channels in digital TV mode. 19: CC Enable or disable the CC function. 20: MTS Switch the sound stereo. 2 10 For a description of the DVD player function ...
Owners Manual
Page 12
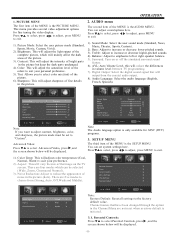
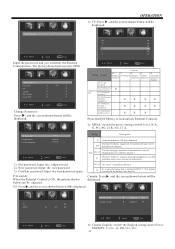
... adjust the intensity of fine details in the Channel Menu are not reset when a restore default is initiated. 3.1. Surround: Turn on the TV screen. AVL: Auto Volume Level, this will output from (Strong, Auto, Off, Weak and Middle). You can adjust sound options here... Reduction: Adjust to the factory default value. There are four modes which will vary the size of Menu Settings > noise in volume level between TV programming. 7). Aspect Noise Reduction < Normal > < Wide > < Middle > Adjust Select Menu Exit Adjust Select Menu Exit Note: Restore Default...
... adjust the intensity of fine details in the Channel Menu are not reset when a restore default is initiated. 3.1. Surround: Turn on the TV screen. AVL: Auto Volume Level, this will output from (Strong, Auto, Off, Weak and Middle). You can adjust sound options here... Reduction: Adjust to the factory default value. There are four modes which will vary the size of Menu Settings > noise in volume level between TV programming. 7). Aspect Noise Reduction < Normal > < Wide > < Middle > Adjust Select Menu Exit Adjust Select Menu Exit Note: Restore Default...
Owners Manual
Page 13
... Menu Exit Content Rating Content FV V S L D (Fantasy (Violence) (Sexual (Adult (Sexually violence) situation) language) suggestive dialog) TV-Y (All children) TV-Y7(Direct to lock/unlock Parental Controls. 2). Restrict. P.G switch: When the Parental Control is 0000. Adjust Select Menu Exit Rating Description ... admitted. X X is an orderrating that is unifiedwith NC-17 but maybe encoded in the dataof older movies. OPERATION 1): TV:Press , and the screen shown below will be displayed. Under 17 requires accompanyingparent or adult R guardian (age varies insome ...
... Menu Exit Content Rating Content FV V S L D (Fantasy (Violence) (Sexual (Adult (Sexually violence) situation) language) suggestive dialog) TV-Y (All children) TV-Y7(Direct to lock/unlock Parental Controls. 2). Restrict. P.G switch: When the Parental Control is 0000. Adjust Select Menu Exit Rating Description ... admitted. X X is an orderrating that is unifiedwith NC-17 but maybe encoded in the dataof older movies. OPERATION 1): TV:Press , and the screen shown below will be displayed. Under 17 requires accompanyingparent or adult R guardian (age varies insome ...
Owners Manual
Page 14
... BG color FG opacity BG opacity Adjust Select Custom > Default > Default > Default > Default Default > Default > Default > Default > Menu Exit NOTE: Only available in ATSC digital TV mode, it mustbe integral to the development of plot orcharacter. Rating Description E G 8ans+ Age Exempt programming General: Allages and children, contains minimaldirect violence, but it...
... BG color FG opacity BG opacity Adjust Select Custom > Default > Default > Default > Default Default > Default > Default > Default > Menu Exit NOTE: Only available in ATSC digital TV mode, it mustbe integral to the development of plot orcharacter. Rating Description E G 8ans+ Age Exempt programming General: Allages and children, contains minimaldirect violence, but it...
Owners Manual
Page 15
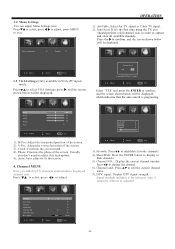
...selected or adjusted. Phase: Fine tune the phase of the screen. 3). DTV signal: Display DTV signal strength. Air/Cable: Select Air TV signal or Cable TV signal. 2). Press to confirm, and the screen shown below will be displayed, which indicates that the auto search is for reference only,... it 's the first time using the TV, you don't need to confirm, and the screen shown below will be displayed. Channel NO. : Display the current channel number. Signal strength...
...selected or adjusted. Phase: Fine tune the phase of the screen. 3). DTV signal: Display DTV signal strength. Air/Cable: Select Air TV signal or Cable TV signal. 2). Press to confirm, and the screen shown below will be displayed, which indicates that the auto search is for reference only,... it 's the first time using the TV, you don't need to confirm, and the screen shown below will be displayed. Channel NO. : Display the current channel number. Signal strength...
Owners Manual
Page 17
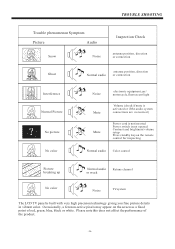
... on the remote control for inspecting Normal audio Color control Picture breaking up Normal audio Retune channel or weak No color Noise TVsystem The LCD TV panel is not opened Contrast and brightness/volume setup Press standby key on the screen as a fixed point of the product. -16- TROUBLE SHOOTING Trouble...
... on the remote control for inspecting Normal audio Color control Picture breaking up Normal audio Retune channel or weak No color Noise TVsystem The LCD TV panel is not opened Contrast and brightness/volume setup Press standby key on the screen as a fixed point of the product. -16- TROUBLE SHOOTING Trouble...

Owners Manual
Page 18
.... Place DVD disc in to the player and begin to play a DVD disc 1. Do not attempt to a qualified professional. Use of the unit. 3. Change TV input source to "DVD" mode by this copyright protection technology must be authorized by Macro vision Corporation. The product complies with the KODAK Picture CD... This DVD Player has a Class 1 laser which may be harmful to your eyes. Reverse engineering or disassembly is protected by method claims of the TV. To eject the DVD disc, press CH LIST/ Eject/Insert button on remote or the OPEN/CLOSE button on CD-R/CD-RW 16:9 LB...
.... Place DVD disc in to the player and begin to play a DVD disc 1. Do not attempt to a qualified professional. Use of the unit. 3. Change TV input source to "DVD" mode by this copyright protection technology must be authorized by Macro vision Corporation. The product complies with the KODAK Picture CD... This DVD Player has a Class 1 laser which may be harmful to your eyes. Reverse engineering or disassembly is protected by method claims of the TV. To eject the DVD disc, press CH LIST/ Eject/Insert button on remote or the OPEN/CLOSE button on CD-R/CD-RW 16:9 LB...
Owners Manual
Page 19
...) Select different MPEG4 subtitle encoding option. Set Password Input four digits (password), then press ENTER /Okto confirm. Note: If you forget your TV set. Some disc can not display images in the setup menu, and display the Language submenu: DVD OPERATION SYSTEM SETUP Aspect Ratio Select the ... of the television you like. LANGUAGE SETUP Select Language in the aspect ratio you play a disc recorded in 4:3 format on a wide screen TV, black bars will appear on the remote control, the SETUP MENU willbe displayed.After accessing the setup menu, press the direction buttons for the...
...) Select different MPEG4 subtitle encoding option. Set Password Input four digits (password), then press ENTER /Okto confirm. Note: If you forget your TV set. Some disc can not display images in the setup menu, and display the Language submenu: DVD OPERATION SYSTEM SETUP Aspect Ratio Select the ... of the television you like. LANGUAGE SETUP Select Language in the aspect ratio you play a disc recorded in 4:3 format on a wide screen TV, black bars will appear on the remote control, the SETUP MENU willbe displayed.After accessing the setup menu, press the direction buttons for the...
Owners Manual
Page 21
... track numbers.When a numeric item is ejected but could not get it to work press the INSERT/EJECT key on the remote or on the TV unit to eject the disc. FWD During DVD, CD,MP3, or VCD playback, press FWD to confirm your choice on the screen, press the 0-9 keys... chapter, title or track. Insert a disc into the DVD player but not take out, press the INSERT/EJECT key on the remote or on the TV unit to insert the disc. STOP Press the button once and the player will cue the disc at different times speed. DVD OPERATION Function Buttons...
... track numbers.When a numeric item is ejected but could not get it to work press the INSERT/EJECT key on the remote or on the TV unit to eject the disc. FWD During DVD, CD,MP3, or VCD playback, press FWD to confirm your choice on the screen, press the 0-9 keys... chapter, title or track. Insert a disc into the DVD player but not take out, press the INSERT/EJECT key on the remote or on the TV unit to insert the disc. STOP Press the button once and the player will cue the disc at different times speed. DVD OPERATION Function Buttons...


