
User Manual
Page 38
... 74 minutes 74 minutes Disc diameter 12cm 30cm/20cm 12cm 12cm 12cm Horizontal resolution Picture proportion Subtitle Sound quality More than 500 line Multiple kinds 32 kinds 48KHz, 96KHz/ 6, 20, 24bit No more than No more than No more than 430 line 350 line 250 line One kind 16 kinds at...
... 74 minutes 74 minutes Disc diameter 12cm 30cm/20cm 12cm 12cm 12cm Horizontal resolution Picture proportion Subtitle Sound quality More than 500 line Multiple kinds 32 kinds 48KHz, 96KHz/ 6, 20, 24bit No more than No more than No more than 430 line 350 line 250 line One kind 16 kinds at...
User Manual
Page 85
42 TV LCD-TFT
42 TV LCD-TFT

User Manual
Page 87
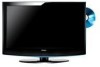
MODELS: HLC26R HLC32R R TFT-LCD TV/DVD Combo USER MANUAL Please READ this manual carefully before operating your TV, and retain it for future reference.
MODELS: HLC26R HLC32R R TFT-LCD TV/DVD Combo USER MANUAL Please READ this manual carefully before operating your TV, and retain it for future reference.
User Manual
Page 88
... the manufacturer. 12) Use only with the cart, stand, tripod, bracket, or table specified by qualified service personnel only. LOCATION: INSIDE, NEAR THE DECK MECHANISM. 2 TV LCD-TFT REFER SERVICING TO QUALIFIED SERVICE PERSONNEL. CAUTION: TO PREVENT ELECTRIC SHOCK DO NOT USE THIS POLARIZED PLUG WITH AN EXTENSION CORD, RECEPTACLE OR OTHER...
... the manufacturer. 12) Use only with the cart, stand, tripod, bracket, or table specified by qualified service personnel only. LOCATION: INSIDE, NEAR THE DECK MECHANISM. 2 TV LCD-TFT REFER SERVICING TO QUALIFIED SERVICE PERSONNEL. CAUTION: TO PREVENT ELECTRIC SHOCK DO NOT USE THIS POLARIZED PLUG WITH AN EXTENSION CORD, RECEPTACLE OR OTHER...

User Manual
Page 89
...that may cause harmful interference to radio or television reception, which the receiver is connected. *Consult the dealer or an experienced radio/TV technician for help. and maintain at least 40cm spacing to video equipment; Operation is subject to the following measures: *Reorient or ... can radiate radio frequency energy and, if not installed and used when connecting this device must be not cause harmful interference. (2) this LCD display to other peripheral device. This equipment generates, use and can be determined by one or more of the following two conditions: ...
...that may cause harmful interference to radio or television reception, which the receiver is connected. *Consult the dealer or an experienced radio/TV technician for help. and maintain at least 40cm spacing to video equipment; Operation is subject to the following measures: *Reorient or ... can radiate radio frequency energy and, if not installed and used when connecting this device must be not cause harmful interference. (2) this LCD display to other peripheral device. This equipment generates, use and can be determined by one or more of the following two conditions: ...

User Manual
Page 90
Remember to your manual. Model number serial number Date of purchase Staple your receipt to record the model and serial number. They are on label in getting the best use manual will need it to -use of your product. You will guide you for purchasing the Haier product. This easy-to obtain warranty service. 4 TV LCD-TFT Safety Instructions SAVE THESE INSTRUCTIONS Thank you in back of the unit.
Remember to your manual. Model number serial number Date of purchase Staple your receipt to record the model and serial number. They are on label in getting the best use manual will need it to -use of your product. You will guide you for purchasing the Haier product. This easy-to obtain warranty service. 4 TV LCD-TFT Safety Instructions SAVE THESE INSTRUCTIONS Thank you in back of the unit.

User Manual
Page 91
... s 9 Antenna Connection 9 Co nn ec ti ng a V CR 10 External A/V Source Setup 11 Co nn ec ti ng a D VD p la ye r 11 Connecting a DTV(digital TV 12 Connecting digital audio output 12 Co nn ec ti ng a c om pu te r 13 Monitor Out Setup 14 HD MI a nd D VI i np ut... 14 Cable sample 15 Connecting Headphones 16 Power source 16 Removing the table stand and installing a wall mount bracket 17 Operation Switching On/Off the TV set 18 Choose the Menu Language 18 Choose the input source 18 Channel Menu Channel Scan 19 Ch an ne l Sk ip 19 Adding your...
... s 9 Antenna Connection 9 Co nn ec ti ng a V CR 10 External A/V Source Setup 11 Co nn ec ti ng a D VD p la ye r 11 Connecting a DTV(digital TV 12 Connecting digital audio output 12 Co nn ec ti ng a c om pu te r 13 Monitor Out Setup 14 HD MI a nd D VI i np ut... 14 Cable sample 15 Connecting Headphones 16 Power source 16 Removing the table stand and installing a wall mount bracket 17 Operation Switching On/Off the TV set 18 Choose the Menu Language 18 Choose the input source 18 Channel Menu Channel Scan 19 Ch an ne l Sk ip 19 Adding your...

User Manual
Page 92
... program. PREV Press to pause the DVD program. To scan quickly through channels. Controls This is a simplified representation of the DVD position. 6 TV LCD-TFT OPEN/CLOSE: Press to close the tray. Do not put anything near the sensor ,as up/down either +/- . Front panel controls Introduction... INPUT VOL+ VOL- Here shown may be somewhat different from the remote control. Please see the real set of front panel. In the MENU,TV/AV screen, these buttons serve as left/right buttons. 4.CH +/- : Press to scan through channels, press and hold down buttons. 5.POWER:...
... program. PREV Press to pause the DVD program. To scan quickly through channels. Controls This is a simplified representation of the DVD position. 6 TV LCD-TFT OPEN/CLOSE: Press to close the tray. Do not put anything near the sensor ,as up/down either +/- . Front panel controls Introduction... INPUT VOL+ VOL- Here shown may be somewhat different from the remote control. Please see the real set of front panel. In the MENU,TV/AV screen, these buttons serve as left/right buttons. 4.CH +/- : Press to scan through channels, press and hold down buttons. 5.POWER:...
User Manual
Page 93
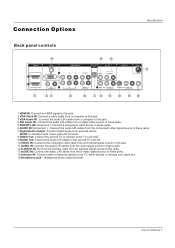
...Manual 7 NOTE: In standby mode, these ports will not work. 8.VIDEO Out: Connect the second TV or monitor to the TV`s AV OUT. 9.AUDIO Out: Connect the audio L/R cables to the second TV`s AV IN. 10.VIDEO IN: Connects the composite video cable from an external signal source to ... jacks. 6.AUDIO IN(Component ): Connect the audio L/R cables from the S-Video signal source to these jacks. 7.Digital Audio Output: Connect digital audio to the TV, either directly or through your cable box. 15.Headphone jack : Headphone audio output terminal. R VIDEO L-AUDIO-R VIDEO IN ANT IN L- R 1 VIDEO L-...
...Manual 7 NOTE: In standby mode, these ports will not work. 8.VIDEO Out: Connect the second TV or monitor to the TV`s AV OUT. 9.AUDIO Out: Connect the audio L/R cables to the second TV`s AV IN. 10.VIDEO IN: Connects the composite video cable from an external signal source to ... jacks. 6.AUDIO IN(Component ): Connect the audio L/R cables from the S-Video signal source to these jacks. 7.Digital Audio Output: Connect digital audio to the TV, either directly or through your cable box. 15.Headphone jack : Headphone audio output terminal. R VIDEO L-AUDIO-R VIDEO IN ANT IN L- R 1 VIDEO L-...

User Manual
Page 94
...PBC SEARCH AUDIO PROGRAM ZOOM D.CALL 10+ EXIT ARC GUIDE CH.LIST FAV.LIST POWER DVD Open/close Input selection TV Sleep button TV/DVD MUTE Return to previous channel in TV mode Program Infromation Program Number Select MONO,STEREO, SAP in NTSC system CC( closed caption) On / Off Select ...DVD TITLE/PBC DVD PROGRAM Zoom Function DVD CALL DVD 10+ Exit On Screen Display Select the aspect ratio Shows program schedule in TV Open the channel list in TV Open the favourite channel list in TV 8 TV LCD-TFT When using the remote control, aim it at the remote sensor on the...
...PBC SEARCH AUDIO PROGRAM ZOOM D.CALL 10+ EXIT ARC GUIDE CH.LIST FAV.LIST POWER DVD Open/close Input selection TV Sleep button TV/DVD MUTE Return to previous channel in TV mode Program Infromation Program Number Select MONO,STEREO, SAP in NTSC system CC( closed caption) On / Off Select ...DVD TITLE/PBC DVD PROGRAM Zoom Function DVD CALL DVD 10+ Exit On Screen Display Select the aspect ratio Shows program schedule in TV Open the channel list in TV Open the favourite channel list in TV 8 TV LCD-TFT When using the remote control, aim it at the remote sensor on the...

User Manual
Page 95
... Multi-family Dwellings/Apartments (Connect to enjoy a clearer picture, we recommend that you use a CATV system or an outdoor antenna .Over-the-air TV reception quality will depend on your antenna type, antenna location and antenna positioning. If the antenna needs to bend the bronze wire when connecting the... REPEAT A-B PLAY/ENTER SLOW ANGLE TITLE/PBC SEARCH AUDIO PROGRAM ZOOM D.CALL 10+ EXIT ARC GUIDE CH.LIST FAV.LIST TFT-LCD TV/DVD Combo OWNER'S MANUAL Please READ this manual carefully before operating your area. OK MENU CH- External Equipment Connections Accessories POWER...
... Multi-family Dwellings/Apartments (Connect to enjoy a clearer picture, we recommend that you use a CATV system or an outdoor antenna .Over-the-air TV reception quality will depend on your antenna type, antenna location and antenna positioning. If the antenna needs to bend the bronze wire when connecting the... REPEAT A-B PLAY/ENTER SLOW ANGLE TITLE/PBC SEARCH AUDIO PROGRAM ZOOM D.CALL 10+ EXIT ARC GUIDE CH.LIST FAV.LIST TFT-LCD TV/DVD Combo OWNER'S MANUAL Please READ this manual carefully before operating your area. OK MENU CH- External Equipment Connections Accessories POWER...

User Manual
Page 96
...to VCR, match the jack colors (Video = yellow, Audio Left = white, and Audio Right = red). Select the input source with the TV. R 10 TV LCD-TFT When connecting the TV to the Video input. 2. AV OUT VIDEO L-AUDIO-R VIDEO IN ANT IN 1 VIDEO L-AUDIO- Connection Option 1 Set VCR output switch ...to channel 3 or 4 and then tune the TV to the VCR owner`s manual.) 3. Insert a video tape into the VCR and press PLAY ...
...to VCR, match the jack colors (Video = yellow, Audio Left = white, and Audio Right = red). Select the input source with the TV. R 10 TV LCD-TFT When connecting the TV to the Video input. 2. AV OUT VIDEO L-AUDIO-R VIDEO IN ANT IN 1 VIDEO L-AUDIO- Connection Option 1 Set VCR output switch ...to channel 3 or 4 and then tune the TV to the VCR owner`s manual.) 3. Insert a video tape into the VCR and press PLAY ...
User Manual
Page 97
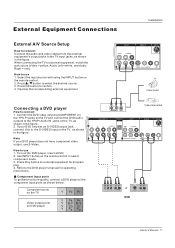
...the S-VIDEO input on the remote control to select component mode. 3. Connect the DVD video outputs (COMPONENT) to the Y Pb Pr jacks on the TV and connect the DVD audio outputs to the YPbPr Audio IN jacks on the DVD player, insert a DVD. 2. as shown below. R 1 VIDEO ...External Equipment Connections Installation External A/V Source Setup How to connect Connect the audio and video cables from the external equipment's output jacks to the TV input jacks, as shown in the figure. 2. How to use 1. Select the input source with using the INPUT button on external equipment ...
...the S-VIDEO input on the remote control to select component mode. 3. Connect the DVD video outputs (COMPONENT) to the Y Pb Pr jacks on the TV and connect the DVD audio outputs to the YPbPr Audio IN jacks on the DVD player, insert a DVD. 2. as shown below. R 1 VIDEO ...External Equipment Connections Installation External A/V Source Setup How to connect Connect the audio and video cables from the external equipment's output jacks to the TV input jacks, as shown in the figure. 2. How to use 1. Select the input source with using the INPUT button on external equipment ...

User Manual
Page 98
... ! Caution: Do not look into the optical output port. Digital Set-top Box OPTICAL OUT L-AUDIO- DVI AUDIO - R 1 VIDEO 12 TV LCD-TFT R 1 Y Pb Pr L-AUDIO- See the external audio equipment instruction manual for Digital Contents (480p,720p,1080i). Looking at the laser ... box. (Refer to select COMPONENT , VGA or HDMI source. R VIDEO OUT L-AUDIO- External Equipment Connections Installation Connecting a DTV(digital TV) This TV can receive Digital Over-the-air/Cable signals without an external digital set -top box or other end of an optical cable to the digital...
... ! Caution: Do not look into the optical output port. Digital Set-top Box OPTICAL OUT L-AUDIO- DVI AUDIO - R 1 VIDEO 12 TV LCD-TFT R 1 Y Pb Pr L-AUDIO- See the external audio equipment instruction manual for Digital Contents (480p,720p,1080i). Looking at the laser ... box. (Refer to select COMPONENT , VGA or HDMI source. R VIDEO OUT L-AUDIO- External Equipment Connections Installation Connecting a DTV(digital TV) This TV can receive Digital Over-the-air/Cable signals without an external digital set -top box or other end of an optical cable to the digital...

User Manual
Page 99
... toconnect 1. To get the best picture quality, adjust the VGAgraphics card to 1024x768 . 2. Use theTV`s VGAor DVI (DigitalVisual Interface)AudioIN port foraudio connections, dependingon your TV. If the graphic card on the menu until the picture is clear.
... toconnect 1. To get the best picture quality, adjust the VGAgraphics card to 1024x768 . 2. Use theTV`s VGAor DVI (DigitalVisual Interface)AudioIN port foraudio connections, dependingon your TV. If the graphic card on the menu until the picture is clear.

User Manual
Page 100
... please turn the TV speakers off. To get the best picture quality, adjust the output resolution of Select Main source menu. 14 TV LCD-TFT A separated audio connection is necessary. Select HDMI input source in input source option of the source device to the TV`s AV OUT. External... Equipment Connections Monitor Out Setup Connect the second TV or monitor to 1280x720p. To get ...
... please turn the TV speakers off. To get the best picture quality, adjust the output resolution of Select Main source menu. 14 TV LCD-TFT A separated audio connection is necessary. Select HDMI input source in input source option of the source device to the TV`s AV OUT. External... Equipment Connections Monitor Out Setup Connect the second TV or monitor to 1280x720p. To get ...

User Manual
Page 102
... have an electrician replace the obsolete outlet. Note Prolonged use of headphones at a high volume may damage your set if you wish to watch a TV programme without disturbing the other than the specified voltage. If you cause a static discharge when touching the unit and the unit fails to function, simply... to the system. It is the user`s responsibility to normal operation. Power source Wider Hole and Blade AC Outlet Polarized AC Cord Plug 16 TV LCD-TFT TO USE AC POWER SOURCE Use the AC polarized line cord provided for operation on the side panel of the set. Insert the AC...
... have an electrician replace the obsolete outlet. Note Prolonged use of headphones at a high volume may damage your set if you wish to watch a TV programme without disturbing the other than the specified voltage. If you cause a static discharge when touching the unit and the unit fails to function, simply... to the system. It is the user`s responsibility to normal operation. Power source Wider Hole and Blade AC Outlet Polarized AC Cord Plug 16 TV LCD-TFT TO USE AC POWER SOURCE Use the AC polarized line cord provided for operation on the side panel of the set. Insert the AC...

User Manual
Page 103
Remove 6X M4 screws securing the stand to the back of your TV. Owner s Manual 17 Use 4X M6 screws to secure the wall bracket (not supplied) to the TV, then remove the stand. Removing the table stand and installing a wall mount bracket HLC26R Installation Remove 4X M4 screws securing the stand to the back of your TV. HLC32R Use 4X M6 screws to secure the wall bracket (not supplied) to the TV, then remove the stand.
Remove 6X M4 screws securing the stand to the back of your TV. Owner s Manual 17 Use 4X M6 screws to secure the wall bracket (not supplied) to the TV, then remove the stand. Removing the table stand and installing a wall mount bracket HLC26R Installation Remove 4X M4 screws securing the stand to the back of your TV. HLC32R Use 4X M6 screws to secure the wall bracket (not supplied) to the TV, then remove the stand.

User Manual
Page 104
...of input signal . There are connected to be away on vacation, disconnect the power plug from your TV. 1. If you with some models, please see the object. 18 TV LCD-TFT Select Source TV Video1 Video2 S-Video Component1 Component2 VGA HDMI1 HDMI2 HDMI3 If there is just an example to help you... intend to your TV`s, because it is no signal , No Signal will display on the remote control. button to...
...of input signal . There are connected to be away on vacation, disconnect the power plug from your TV. 1. If you with some models, please see the object. 18 TV LCD-TFT Select Source TV Video1 Video2 S-Video Component1 Component2 VGA HDMI1 HDMI2 HDMI3 If there is just an example to help you... intend to your TV`s, because it is no signal , No Signal will display on the remote control. button to...
User Manual
Page 105
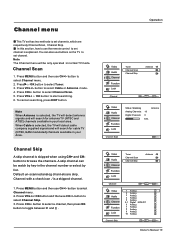
... 5-1 Digital KPIX-DT 6 Analog 7 Analog 8 Analog 9 Analog 10 Analog Channel Skip OK Set CH+/VOL+/- A skip channel can also use buttons on the TV to browse the channels. button to select Cable or Antenna mode. 4. button to select Channel menu. 2. Press CH+/- Press VOL+or OK button and then...your Area. Channel Scan 1. Press or OK button to select Channel menu. 2. When Cable is selected, the TV will detect cable company supplied signals and will search for cable TV (NTSC,QAM modulated) channels available in the channel number or select by key-in your local area. Press ...
... 5-1 Digital KPIX-DT 6 Analog 7 Analog 8 Analog 9 Analog 10 Analog Channel Skip OK Set CH+/VOL+/- A skip channel can also use buttons on the TV to browse the channels. button to select Cable or Antenna mode. 4. button to select Channel menu. 2. Press CH+/- Press VOL+or OK button and then...your Area. Channel Scan 1. Press or OK button to select Channel menu. 2. When Cable is selected, the TV will detect cable company supplied signals and will search for cable TV (NTSC,QAM modulated) channels available in the channel number or select by key-in your local area. Press ...


