User Manual
Page 88
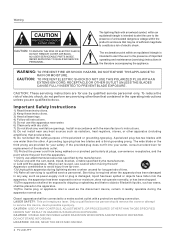
... . Only a qualified service person should remove the cover or attempt to service this device, due to constitute a risk of electric shock, do so. LOCATION: INSIDE, NEAR THE DECK MECHANISM. 2 TV LCD-TFT NO USER SERVICEABLE PARTS INSIDE. The wide blade or the third prong are for replacement of the polarized or grounding-type plug. DO NOT STARE INTO BEAM. Install in the literature...
... . Only a qualified service person should remove the cover or attempt to service this device, due to constitute a risk of electric shock, do so. LOCATION: INSIDE, NEAR THE DECK MECHANISM. 2 TV LCD-TFT NO USER SERVICEABLE PARTS INSIDE. The wide blade or the third prong are for replacement of the polarized or grounding-type plug. DO NOT STARE INTO BEAM. Install in the literature...

User Manual
Page 91
... External A/V Source Setup 11 Co nn ec ti ng a D VD p la ye r 11 Connecting a DTV(digital TV 12 Connecting digital audio output 12 Co nn ec ti ng a c om pu te r 13 Monitor Out Setup 14 HD MI a nd D VI i np ut 14 Cable sample 15 Connecting Headphones 16 Power source 16 Removing the table stand and installing a wall mount bracket 17 Operation Switching On/Off the TV set 18 Choose the Menu Language 18 Choose the input source 18 Channel Menu Channel Scan...
... External A/V Source Setup 11 Co nn ec ti ng a D VD p la ye r 11 Connecting a DTV(digital TV 12 Connecting digital audio output 12 Co nn ec ti ng a c om pu te r 13 Monitor Out Setup 14 HD MI a nd D VI i np ut 14 Cable sample 15 Connecting Headphones 16 Power source 16 Removing the table stand and installing a wall mount bracket 17 Operation Switching On/Off the TV set 18 Choose the Menu Language 18 Choose the input source 18 Channel Menu Channel Scan...

User Manual
Page 92
... different from the remote control. To scan quickly through channels. PREV Press to play the DVD program, and press again to pause the DVD program. In the MENU screen, these buttons serve as left/right buttons. 4.CH +/- : Press to scan through channels, press and hold down buttons. 5.POWER: Press to turn on -screen menu. 2.TV/AV: Press to open the input source mode. CH+ CH- DVD panel controls DVD insert OPEN/CLOSE NEXT PLAY/PAUSE PREV STOP OPEN/CLOSE NEXT PLAY/PAUSE PREV...
... different from the remote control. To scan quickly through channels. PREV Press to play the DVD program, and press again to pause the DVD program. In the MENU screen, these buttons serve as left/right buttons. 4.CH +/- : Press to scan through channels, press and hold down buttons. 5.POWER: Press to turn on -screen menu. 2.TV/AV: Press to open the input source mode. CH+ CH- DVD panel controls DVD insert OPEN/CLOSE NEXT PLAY/PAUSE PREV STOP OPEN/CLOSE NEXT PLAY/PAUSE PREV...
User Manual
Page 93
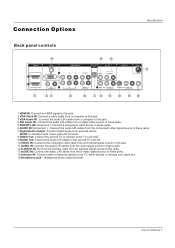
.... 12.S-VIDEO IN: Connect the S-Video cable from an external signal source to this jack. 4.DVI Audio IN: Connect the audio L/R cables from a digital video source to these jacks. 5.DVD/DTV IN(Component ): Connect a component video device to these jacks. 6.AUDIO IN(Component ): Connect the audio L/R cables from the S-Video signal source to these jacks. 7.Digital Audio Output: Connect digital audio to the TV, either directly or through your cable box. 15.Headphone jack : Headphone audio output terminal. Owner s Manual 7 DVI - Connection Options Back panel controls Introduction HDMI IN...
.... 12.S-VIDEO IN: Connect the S-Video cable from an external signal source to this jack. 4.DVI Audio IN: Connect the audio L/R cables from a digital video source to these jacks. 5.DVD/DTV IN(Component ): Connect a component video device to these jacks. 6.AUDIO IN(Component ): Connect the audio L/R cables from the S-Video signal source to these jacks. 7.Digital Audio Output: Connect digital audio to the TV, either directly or through your cable box. 15.Headphone jack : Headphone audio output terminal. Owner s Manual 7 DVI - Connection Options Back panel controls Introduction HDMI IN...

User Manual
Page 94
... ARC GUIDE CH.LIST FAV.LIST POWER DVD Open/close Input selection TV Sleep button TV/DVD MUTE Return to previous channel in TV mode Program Infromation Program Number Select MONO,STEREO, SAP in NTSC system CC( closed caption) On / Off Select additional channels Adjust Picture Mode Volume/Channel Selection MENU Confirm button Adjust sound mode DVD STOP DVD SUBTITLE DVD SETUP DVD PAUSE/STEP DVD FAST REVERSE DVD FAST FORWARD DVD MENU DVD Next Chapter DVD Previous Chapter DVD REPEAT DVD PLAY/ENTER DVD A-B REPEAT UP DVD Cursor Move button DVD SLOW LEFT RIGHT DVD...
... ARC GUIDE CH.LIST FAV.LIST POWER DVD Open/close Input selection TV Sleep button TV/DVD MUTE Return to previous channel in TV mode Program Infromation Program Number Select MONO,STEREO, SAP in NTSC system CC( closed caption) On / Off Select additional channels Adjust Picture Mode Volume/Channel Selection MENU Confirm button Adjust sound mode DVD STOP DVD SUBTITLE DVD SETUP DVD PAUSE/STEP DVD FAST REVERSE DVD FAST FORWARD DVD MENU DVD Next Chapter DVD Previous Chapter DVD REPEAT DVD PLAY/ENTER DVD A-B REPEAT UP DVD Cursor Move button DVD SLOW LEFT RIGHT DVD...

User Manual
Page 95
... ohm) AV OUT VIDEO L-AUDIO-R VIDEO IN ANT IN 1 VIDEO L-AUDIO- R S-VIDEO L-AUDIO- VOL + S.MODE STOP SETUP PAUSE/STEP SUBTITLE REV FWD PREV NEXT D.MENU REPEAT A-B PLAY/ENTER SLOW ANGLE TITLE/PBC SEARCH AUDIO PROGRAM ZOOM D.CALL 10+ EXIT ARC GUIDE CH.LIST FAV.LIST TFT-LCD TV/DVD Combo OWNER'S MANUAL Please READ this manual carefully before operating your TV, and retain it for future reference. External Equipment Connections Accessories POWER TV/AV TV/DVD OPEN/CLOSE SLEEP Q.VIEW INFO MUTE 1234 56...
... ohm) AV OUT VIDEO L-AUDIO-R VIDEO IN ANT IN 1 VIDEO L-AUDIO- R S-VIDEO L-AUDIO- VOL + S.MODE STOP SETUP PAUSE/STEP SUBTITLE REV FWD PREV NEXT D.MENU REPEAT A-B PLAY/ENTER SLOW ANGLE TITLE/PBC SEARCH AUDIO PROGRAM ZOOM D.CALL 10+ EXIT ARC GUIDE CH.LIST FAV.LIST TFT-LCD TV/DVD Combo OWNER'S MANUAL Please READ this manual carefully before operating your TV, and retain it for future reference. External Equipment Connections Accessories POWER TV/AV TV/DVD OPEN/CLOSE SLEEP Q.VIEW INFO MUTE 1234 56...

User Manual
Page 96
... OUT VIDEO L-AUDIO-R VIDEO IN ANT IN 1 VIDEO L-AUDIO- compared to connecting a regular VCR to the same channel number. Connection Option 1 Set VCR output switch to channel 3 or 4 and then tune the TV to the Video input. 2. Connect the audio and video cables from VCR to connect your TV with the TV. When connecting the TV to the VCR owner`s manual.) 3. Choose Your Connection There are several ways to the S-VIDEO input, the picture quality is improved; External Equipment Connections Installation NOTE: All cables shown...
... OUT VIDEO L-AUDIO-R VIDEO IN ANT IN 1 VIDEO L-AUDIO- compared to connecting a regular VCR to the same channel number. Connection Option 1 Set VCR output switch to channel 3 or 4 and then tune the TV to the Video input. 2. Connect the audio and video cables from VCR to connect your TV with the TV. When connecting the TV to the VCR owner`s manual.) 3. Choose Your Connection There are several ways to the S-VIDEO input, the picture quality is improved; External Equipment Connections Installation NOTE: All cables shown...
User Manual
Page 97
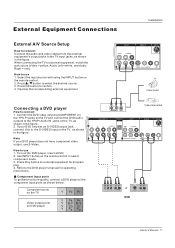
... Connecting a DVD player How to confirm. 4. as shown below. Video Game Set COMPONENT IN OPTICAL OUT AV OUT Pb Pr L-AUDIO- R Component ports on the TV Y Pb Pr Video output ports on the remote control. 2. External Equipment Connections Installation External A/V Source Setup How to connect Connect the audio and video cables from the external equipment's output jacks to the TV input jacks, as shown in the figure. 2. Select the input source with using the INPUT button on DVD player Y Pb Pr Y B-Y R-Y Y Cb Cr Y PB PR Owner s Manual 11 Connect the DVD video outputs...
... Connecting a DVD player How to confirm. 4. as shown below. Video Game Set COMPONENT IN OPTICAL OUT AV OUT Pb Pr L-AUDIO- R Component ports on the TV Y Pb Pr Video output ports on the remote control. 2. External Equipment Connections Installation External A/V Source Setup How to connect Connect the audio and video cables from the external equipment's output jacks to the TV input jacks, as shown in the figure. 2. Select the input source with using the INPUT button on DVD player Y Pb Pr Y B-Y R-Y Y Cb Cr Y PB PR Owner s Manual 11 Connect the DVD video outputs...

User Manual
Page 98
... (Optical) port. External Equipment Connections Installation Connecting a DTV(digital TV) This TV can receive Digital Over-the-air/Cable signals without an external digital set -top box. (Refer to the owner`s manual for video connections, depending on your vision. R HDMI Connecting a digital audio output Send the TV`s audio to connect 1. See the external audio equipment instruction manual for Digital Contents (480p,720p,1080i). Connect one end of the optical cable to the digital audio (optical) input on the audio equipment. Signal 480i 480p 720p 1080i 1080p COMPONENT...
... (Optical) port. External Equipment Connections Installation Connecting a DTV(digital TV) This TV can receive Digital Over-the-air/Cable signals without an external digital set -top box. (Refer to the owner`s manual for video connections, depending on your vision. R HDMI Connecting a digital audio output Send the TV`s audio to connect 1. See the external audio equipment instruction manual for Digital Contents (480p,720p,1080i). Connect one end of the optical cable to the digital audio (optical) input on the audio equipment. Signal 480i 480p 720p 1080i 1080p COMPONENT...

User Manual
Page 99
... not output analog and digital RGB simultaneously, connect only one of the VGA graphic card cannot be noise associated with the resolution, vertical pattern, contrast or brightness in VGAmode. Note 1.Use aDVI cable. 2.Avoid keepinga fixed imageon theTV's screen fora long periodof time.The fixed image may be changed,change therefresh rate to 1024x768 . 2. External Equipment Connections Installation Connecting a computer How toconnect 1. R Owner s Manual 13 To get the best picture quality, adjust the...
... not output analog and digital RGB simultaneously, connect only one of the VGA graphic card cannot be noise associated with the resolution, vertical pattern, contrast or brightness in VGAmode. Note 1.Use aDVI cable. 2.Avoid keepinga fixed imageon theTV's screen fora long periodof time.The fixed image may be changed,change therefresh rate to 1024x768 . 2. External Equipment Connections Installation Connecting a computer How toconnect 1. R Owner s Manual 13 To get the best picture quality, adjust the...

User Manual
Page 100
... supports Auto HDMI function, the output resolution of Select Main source menu. 14 TV LCD-TFT R S-VIDEO L-AUDIO- If the source device does not support Auto DVI, you need to 1280x720p. When connecting with this TV with an HDMI cable(not supplied with external audio equipments, such as amplifiers or speakers, please turn the TV speakers off. Note YPbPr, PC, HDMI, DTV input sources cannot be automatically set to set to select HDMI input source in input source option of this product). 2. To get the best picture quality, adjust...
... supports Auto HDMI function, the output resolution of Select Main source menu. 14 TV LCD-TFT R S-VIDEO L-AUDIO- If the source device does not support Auto DVI, you need to 1280x720p. When connecting with this TV with an HDMI cable(not supplied with external audio equipments, such as amplifiers or speakers, please turn the TV speakers off. Note YPbPr, PC, HDMI, DTV input sources cannot be automatically set to set to select HDMI input source in input source option of this product). 2. To get the best picture quality, adjust...

User Manual
Page 104
... TV, VCR, DVD, Cable , or any other devices that follow. Switching On/Off the TV set for displaying menus and indications. 1. Press VOL+/- English Spanish or French Operation Video Audio Channel Function Lock Function Language OSD Timeout OSD Transparency Screen Mode Blue Screen DPMS Time Setup Closed Caption Default English Short Middle Normal On On CH+/VOL+/- button to the screen display. Select the viewing source by using TV/AV button on , the screen show information according the type of input signal...
... TV, VCR, DVD, Cable , or any other devices that follow. Switching On/Off the TV set for displaying menus and indications. 1. Press VOL+/- English Spanish or French Operation Video Audio Channel Function Lock Function Language OSD Timeout OSD Transparency Screen Mode Blue Screen DPMS Time Setup Closed Caption Default English Short Middle Normal On On CH+/VOL+/- button to the screen display. Select the viewing source by using TV/AV button on , the screen show information according the type of input signal...
User Manual
Page 105
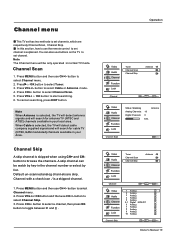
... Back Owner s Manual 19 Channel Scan 1. Select EXIT Back Video Audio Channel Function Lock Status: Scanning Analog Channels: Digital Channels: 19 0 64% Antenna Channel Scan EXIT Cancel Video Audio Channel Function Lock Tuner Channel Scan Channel Skip Antenna Channel OK Enter CH+/VOL+/- In this section, how to use the remote control to select Channel menu. 2. button to select Channel menu. 2. Default un-scanned analog channels are respectively Channel Scan, Channel Skip. button to select Channel Skip. 3. Channel menu This TV set has two methods to set channel. You...
... Back Owner s Manual 19 Channel Scan 1. Select EXIT Back Video Audio Channel Function Lock Status: Scanning Analog Channels: Digital Channels: 19 0 64% Antenna Channel Scan EXIT Cancel Video Audio Channel Function Lock Tuner Channel Scan Channel Skip Antenna Channel OK Enter CH+/VOL+/- In this section, how to use the remote control to select Channel menu. 2. button to select Channel menu. 2. Default un-scanned analog channels are respectively Channel Scan, Channel Skip. button to select Channel Skip. 3. Channel menu This TV set has two methods to set channel. You...
User Manual
Page 106
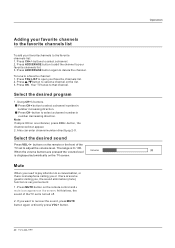
... VOL+ button. 20 TV LCD-TFT Operation Also can enter channel number directly,eg:2-0. If you , the sound elimination (mute) function is displayed automatically on the list. 3. Press ADD/ERASE button again to the favorite channels list: 1. Select the desired program 1. At this time, the sound of the TV set is ON on the screen. Press FAV.LIST to your favorite channels list. 2. Note If skip is turned off. 2. When the volume buttons are...
... VOL+ button. 20 TV LCD-TFT Operation Also can enter channel number directly,eg:2-0. If you , the sound elimination (mute) function is displayed automatically on the list. 3. Press ADD/ERASE button again to the favorite channels list: 1. Select the desired program 1. At this time, the sound of the TV set is ON on the screen. Press FAV.LIST to your favorite channels list. 2. Note If skip is turned off. 2. When the volume buttons are...

User Manual
Page 107
... Mild. button to select Mode. 3. Press MENU button and then use CH+/- button to adjust the setting. Operation Video menu The TV menu gives you an overview of the colors to suit your own picture status 1. Press MENU button and then use CH+/- Audio Channel Function Lock Video Mode Custom Brightness 59 Contrast 59 Color 59 Tint 7 Sharpness 58 Color Temperature Advanced Video CH+/VOL+/- Sharpness This will adjust the sharpness of bright parts in the picture but keep...
... Mild. button to select Mode. 3. Press MENU button and then use CH+/- button to adjust the setting. Operation Video menu The TV menu gives you an overview of the colors to suit your own picture status 1. Press MENU button and then use CH+/- Audio Channel Function Lock Video Mode Custom Brightness 59 Contrast 59 Color 59 Tint 7 Sharpness 58 Color Temperature Advanced Video CH+/VOL+/- Sharpness This will adjust the sharpness of bright parts in the picture but keep...

User Manual
Page 109
... using your desired MTS mode in volume level among broadcasters. Press EXIT button to save and return to select Language. 3. SPDIF Type To Adjust the SPDIF output: Off, Dolby Digital and PCM. When having selected SAP button on and off. English Spanish or French Operation Video Audio Channel Function Lock Function Language English OSD Timeout OSD Transparency Screen Mode Short Middle Normal Blue Screen On DPMS On Time Setup Closed Caption Default...
... using your desired MTS mode in volume level among broadcasters. Press EXIT button to save and return to select Language. 3. SPDIF Type To Adjust the SPDIF output: Off, Dolby Digital and PCM. When having selected SAP button on and off. English Spanish or French Operation Video Audio Channel Function Lock Function Language English OSD Timeout OSD Transparency Screen Mode Short Middle Normal Blue Screen On DPMS On Time Setup Closed Caption Default...

User Manual
Page 110
... source. 24 TV LCD-TFT Operation Video Audio Channel Function Lock Function Language English OSD Timeout Short OSD Transparency Middle Screen Mode Normal Blue Screen On DPMS On Time Setup Closed Caption Default CH+/VOL+/- Cinema For letterbox pictures, bars may become permanently burned on again automatically. Press VOL+/- button to select Function menu. 2. Press MENU button and then use CH+/- Press VOL+/- Zoom Choose Zoom when you choose the way an analog picture...
... source. 24 TV LCD-TFT Operation Video Audio Channel Function Lock Function Language English OSD Timeout Short OSD Transparency Middle Screen Mode Normal Blue Screen On DPMS On Time Setup Closed Caption Default CH+/VOL+/- Cinema For letterbox pictures, bars may become permanently burned on again automatically. Press VOL+/- button to select Function menu. 2. Press MENU button and then use CH+/- Press VOL+/- Zoom Choose Zoom when you choose the way an analog picture...
User Manual
Page 114
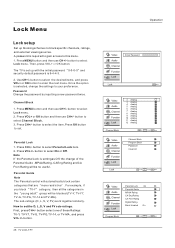
... block specific channels, ratings, and external viewing sources. Press MENU button and then use CH+/- Parental Guide Note The Parental control will be blocked (TV-Y, TV-Y7, TV-G, TV-PG, TV-14 and TV-MA). button select one of the Parental Guide , MPAA Rating ,CA Eng Rating and CA Fren Rating will automatically block certain categories that are more restrictive . Select EXIT Back Lock Menu Lock setup Set up with the initial password 0-0-0-0 and security default password is set . Press MENU button...
... block specific channels, ratings, and external viewing sources. Press MENU button and then use CH+/- Parental Guide Note The Parental control will be blocked (TV-Y, TV-Y7, TV-G, TV-PG, TV-14 and TV-MA). button select one of the Parental Guide , MPAA Rating ,CA Eng Rating and CA Fren Rating will automatically block certain categories that are more restrictive . Select EXIT Back Lock Menu Lock setup Set up with the initial password 0-0-0-0 and security default password is set . Press MENU button...
User Manual
Page 121
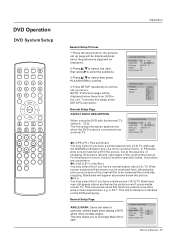
... when playing a DVD which offers multiple angles. To access this if you have a normal aspect ratio (4:3) TV. Such discs are uncommon. 4:3/LB (LB = Letter Box) You may still appear above and below the picture even if using the DVD with the internal TV, select 4 3/LB. Tv Display LB Angle Mark On On Osd Lang ENG Off Caption On Screen Saver Off Owner s Manual 35 OK MENU...
... when playing a DVD which offers multiple angles. To access this if you have a normal aspect ratio (4:3) TV. Such discs are uncommon. 4:3/LB (LB = Letter Box) You may still appear above and below the picture even if using the DVD with the internal TV, select 4 3/LB. Tv Display LB Angle Mark On On Osd Lang ENG Off Caption On Screen Saver Off Owner s Manual 35 OK MENU...

User Manual
Page 127
... INPUT button to change signal input to Page 22 for local interference such as the image may be affected and a muffled sound might be some dark or bright (red, blue or green) spots, or some channel program (black and white) Spots with static picture in other channel and verify if the same problem happens. Press Mute button and verify if Mute mode is set is used in the Manual for...
... INPUT button to change signal input to Page 22 for local interference such as the image may be affected and a muffled sound might be some dark or bright (red, blue or green) spots, or some channel program (black and white) Spots with static picture in other channel and verify if the same problem happens. Press Mute button and verify if Mute mode is set is used in the Manual for...


