

User Manual
Page 2
... operate normally, or has been dropped. 15. Caution: •• These servicing instructions are provided for long periods of electric shock. CAUTION: TO REDUCE THE RISK OF ELECTRIC SHOCK, DO NOT REMOVE COVER (OR BACK). Protect the power cord from being walked on the apparatus. 16. NO USER SERVICEABLE PARTS INSIDE. A polarized plug has two blades with liquids, such as power-supply cord...
... operate normally, or has been dropped. 15. Caution: •• These servicing instructions are provided for long periods of electric shock. CAUTION: TO REDUCE THE RISK OF ELECTRIC SHOCK, DO NOT REMOVE COVER (OR BACK). Protect the power cord from being walked on the apparatus. 16. NO USER SERVICEABLE PARTS INSIDE. A polarized plug has two blades with liquids, such as power-supply cord...

User Manual
Page 5
... Your Connection 9 Connecting a VCR 9 External AV Source Setup 9 Component Setup 9 Connecting a DTV (digital TV 10 Connecting a digital audio output 10 Connecting a computer 10 HDMI and DVI input 11 Connecting Headphones 12 Power source 12 Removing the table stand and installing a wall mount bracket 12 Operation 13 Switching On/Off the TV set 13 Choose the Menu Language 13 Choose the Input source 13 Channel menu 13 Channel Scan 13 Channel Skip 14 Channel Labels 14 Time Shifting Mode 14 Select the desired program 15 Select the desired sound 15 Mute 15 Video menu 15...
... Your Connection 9 Connecting a VCR 9 External AV Source Setup 9 Component Setup 9 Connecting a DTV (digital TV 10 Connecting a digital audio output 10 Connecting a computer 10 HDMI and DVI input 11 Connecting Headphones 12 Power source 12 Removing the table stand and installing a wall mount bracket 12 Operation 13 Switching On/Off the TV set 13 Choose the Menu Language 13 Choose the Input source 13 Channel menu 13 Channel Scan 13 Channel Skip 14 Channel Labels 14 Time Shifting Mode 14 Select the desired program 15 Select the desired sound 15 Mute 15 Video menu 15...

User Manual
Page 6
... scan quickly through channels. Connect a USB flash drive to view MPEG2 videos, JPEG images or listen to MP3 songs. 7 Av1 AUDIO IN 8 AV1 VIDEO IN 9 S-VIDEO 0 Headphone jack A HDMI In B Remote Sensor Connect the audio L/R cables from an external signal source to these jacks. Connects the composite video cable from the video signal source to this jack. Headphone audio output terminal. POWER 1 MENU 2 INPUT 3 VOL +/4 CH +/5 POWER 6 USB input K2 series Menu display. In the MENU screen, these buttons serve as left/right buttons. Receivers IR signals from an external...
... scan quickly through channels. Connect a USB flash drive to view MPEG2 videos, JPEG images or listen to MP3 songs. 7 Av1 AUDIO IN 8 AV1 VIDEO IN 9 S-VIDEO 0 Headphone jack A HDMI In B Remote Sensor Connect the audio L/R cables from an external signal source to these jacks. Connects the composite video cable from the video signal source to this jack. Headphone audio output terminal. POWER 1 MENU 2 INPUT 3 VOL +/4 CH +/5 POWER 6 USB input K2 series Menu display. In the MENU screen, these buttons serve as left/right buttons. Receivers IR signals from an external...

User Manual
Page 7
Haier LCD HDTV EN-6 Connection Options Back panel connections Introduction DIGITAL AUDIO OUT (OPTICAL) PC/DVI 4 3 PC PC IN AV2 IN Connect various types of digital audio equipment. 1 Digital Audio Output Note RR In standby mode, these ports will not work. 2 Antenna Input Connect cable or antenna signals to the TV, either directly or through your cable box. 3 HDMI In Connect a HDMI device to receive digital audio and uncompressed digital video. 4 PC/DVI Audio In Connect the audio L/R cables from a computer to this jack. 5 PC Video In Connect a video cable from a computer ...
Haier LCD HDTV EN-6 Connection Options Back panel connections Introduction DIGITAL AUDIO OUT (OPTICAL) PC/DVI 4 3 PC PC IN AV2 IN Connect various types of digital audio equipment. 1 Digital Audio Output Note RR In standby mode, these ports will not work. 2 Antenna Input Connect cable or antenna signals to the TV, either directly or through your cable box. 3 HDMI In Connect a HDMI device to receive digital audio and uncompressed digital video. 4 PC/DVI Audio In Connect the audio L/R cables from a computer to this jack. 5 PC Video In Connect a video cable from a computer ...

User Manual
Page 8
... screen. M DISPLAY Press to scan through different sound settings. 5 INPUT Show the input source. 6 MUTE Switches the video sound on or off the TV. 2 TV DVD SETBOX CABLE VCR AUD To select one of the system modes in the on-screen menu. Change the audio language in . R FAV.LIST Press to open the on-screen menu. 9 THUMBSTICK (Up/ Down/Left/Right) 0 SLEEP button Allows you are properly loaded. To scan quickly between two channels. Introduction Universal Remote control The remote control...
... screen. M DISPLAY Press to scan through different sound settings. 5 INPUT Show the input source. 6 MUTE Switches the video sound on or off the TV. 2 TV DVD SETBOX CABLE VCR AUD To select one of the system modes in the on-screen menu. Change the audio language in . R FAV.LIST Press to open the on-screen menu. 9 THUMBSTICK (Up/ Down/Left/Right) 0 SLEEP button Allows you are properly loaded. To scan quickly between two channels. Introduction Universal Remote control The remote control...

User Manual
Page 10
... want to connect and the quality of TV Video= yellow Audio left= white Audio right= red Connection Option 1 Set VCR output switch to channel 3 or 4 and then turn the TV to the same channel number. D Operate the corresponding external equipment. The following are several ways to connect your TV with using the INPUT button 5 6 on the remote control, and then press / button to select the source, press ENTER button to confirm. External A V Source Setup EN-9 Haier LCD HDTV B Insert a video tape into...
... want to connect and the quality of TV Video= yellow Audio left= white Audio right= red Connection Option 1 Set VCR output switch to channel 3 or 4 and then turn the TV to the same channel number. D Operate the corresponding external equipment. The following are several ways to connect your TV with using the INPUT button 5 6 on the remote control, and then press / button to select the source, press ENTER button to confirm. External A V Source Setup EN-9 Haier LCD HDTV B Insert a video tape into...

User Manual
Page 11
... Connecting a digital audio output Send the TV's audio to select Installation COMPONENT, VGA or HDMI source. See the external audio equipment instruction manual for Digital Contents (480 p,720 p,1080 i). Caution: •• Do not look into the optical output port. However, if you do receive Digital signals from a digital set -top box.) B Use INPUT on the DVD player, insert a DVD disc. Note RR When connecting with external audio equipments, such as shown below . How to use A Turn on the digital set-top box. (Refer to the owner's manual...
... Connecting a digital audio output Send the TV's audio to select Installation COMPONENT, VGA or HDMI source. See the external audio equipment instruction manual for Digital Contents (480 p,720 p,1080 i). Caution: •• Do not look into the optical output port. However, if you do receive Digital signals from a digital set -top box.) B Use INPUT on the DVD player, insert a DVD disc. Note RR When connecting with external audio equipments, such as shown below . How to use A Turn on the digital set-top box. (Refer to the owner's manual...

User Manual
Page 12
... Haier LCD HDTV PC IN HDMI and DVI input When the source device (Blu-Ray player, DVD player or Set Top Box) supports HDMI How To Connect A Connect the source device to use A Turn on the TV using a sound card, adjust the VGA sound as required. If noise is present, change the VGA mode to another resolution, change the VGA graphic card or consult the manufacturer of this TV with an HDMI cable (not supplied with this TV with a HDMI...
... Haier LCD HDTV PC IN HDMI and DVI input When the source device (Blu-Ray player, DVD player or Set Top Box) supports HDMI How To Connect A Connect the source device to use A Turn on the TV using a sound card, adjust the VGA sound as required. If noise is present, change the VGA mode to another resolution, change the VGA graphic card or consult the manufacturer of this TV with an HDMI cable (not supplied with this TV with a HDMI...

User Manual
Page 13
... the other than the specified voltage. Connecting Headphones You can connect a set of headphones at a high volume may damage your TV. Power source Removing the table stand and installing a wall mount bracket Remove 5 × M4 screws securing the stand to file or cut the blade. It is the user's responsibility to normal operation. RR If you need to set the output resolution appropriately. Insert the AC cord plug into a nonpolarized AC outlet, do not...
... the other than the specified voltage. Connecting Headphones You can connect a set of headphones at a high volume may damage your TV. Power source Removing the table stand and installing a wall mount bracket Remove 5 × M4 screws securing the stand to file or cut the blade. It is the user's responsibility to normal operation. RR If you need to set the output resolution appropriately. Insert the AC cord plug into a nonpolarized AC outlet, do not...

User Manual
Page 14
... the power plug from your TV to work properly. If there is explained. Initial Setup: Set according to set A First, connect power cord correctly. Note RR If the TV in order for displaying menus and indications. Operation Operation In the manual, the OSD (on screen display) may be different from the wall power outlet. A Press INPUT button to enter the Select Source menu 5 6 and then use buttons on the remote control. There are respectively Channel Scan, Channel Skip...
... the power plug from your TV to work properly. If there is explained. Initial Setup: Set according to set A First, connect power cord correctly. Note RR If the TV in order for displaying menus and indications. Operation Operation In the manual, the OSD (on screen display) may be different from the wall power outlet. A Press INPUT button to enter the Select Source menu 5 6 and then use buttons on the remote control. There are respectively Channel Scan, Channel Skip...

User Manual
Page 15
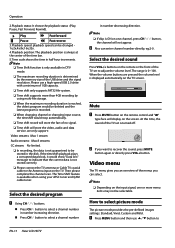
.... A Set the Time Shifting On, then insert the USB drive in the channel number or select by list. The time delay to start searching. Haier LCD HDTV EN-14 RR When Cable is selected. A skip channel can be watch by key-in the USB input. Operation Video Audio Channel Tuner Mode Channel Scan Channel Skip Channel Labels Time Shifting Mode Antenna On Function Lock Channel / Select EXIT Back E Press4/ ENTER button to the current program time. B Press PLAY/PAUSE to confirm. Video Audio Status: Scanning... Press4...
.... A Set the Time Shifting On, then insert the USB drive in the channel number or select by list. The time delay to start searching. Haier LCD HDTV EN-14 RR When Cable is selected. A skip channel can be watch by key-in the USB input. Operation Video Audio Channel Tuner Mode Channel Scan Channel Skip Channel Labels Time Shifting Mode Antenna On Function Lock Channel / Select EXIT Back E Press4/ ENTER button to the current program time. B Press PLAY/PAUSE to confirm. Video Audio Status: Scanning... Press4...
User Manual
Page 16
... the remote control and " " type face will display on the input signal, one channel, press CH∧/∨ button, the channel will store the video, audio and data service. RR When the maximum recording duration is reached, the oldest program would be stored in number decreasing direction. RR Please connect the TV antenna or Cable TV coaxial cable to be deleted and the latest program is 0~100. When the volume buttons...
... the remote control and " " type face will display on the input signal, one channel, press CH∧/∨ button, the channel will store the video, audio and data service. RR When the maximum recording duration is reached, the oldest program would be stored in number decreasing direction. RR Please connect the TV antenna or Cable TV coaxial cable to be deleted and the latest program is 0~100. When the volume buttons...

User Manual
Page 17
... /720p Haier LCD HDTV EN-16 In other mode the value of picture (Standard/ Vivid/ Custom/ Mild). YYTint Allows you to give the white colors a red tint. YYAdvanced Video To adjust the picture in the picture. YYSharpness This will mainly affect the darker areas of digitizing errror caused by user. Demo Partition:To set the MJC level: Off, Low ,Middle, High. YYBrightness This will adjust the light output of...
... /720p Haier LCD HDTV EN-16 In other mode the value of picture (Standard/ Vivid/ Custom/ Mild). YYTint Allows you to give the white colors a red tint. YYAdvanced Video To adjust the picture in the picture. YYSharpness This will mainly affect the darker areas of digitizing errror caused by user. Demo Partition:To set the MJC level: Off, Low ,Middle, High. YYBrightness This will adjust the light output of...
User Manual
Page 19
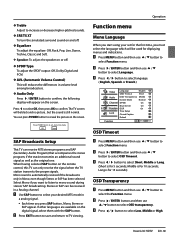
YY Speaker: To adjust the speaker on or off . YYAudio Only Press4/ ENTER button to select your set for the first time, you want to listen to exit Audio Only mode. A Use SAP button to confirm, the following display will be used for 5 seconds; C Press 3/4button to select language. ( English, Spanish or French ) Video Audio Channel Function Lock Language OSD Timeout OSD Transparency Screen Mode DPMS Blue Screen DCR Time Setup Closed Caption Default English...
YY Speaker: To adjust the speaker on or off . YYAudio Only Press4/ ENTER button to select your set for the first time, you want to listen to exit Audio Only mode. A Use SAP button to confirm, the following display will be used for 5 seconds; C Press 3/4button to select language. ( English, Spanish or French ) Video Audio Channel Function Lock Language OSD Timeout OSD Transparency Screen Mode DPMS Blue Screen DCR Time Setup Closed Caption Default English...

User Manual
Page 21
...Lock Menu Parental Control can be used to the factory set. The parental control function is turned on broadcasters supplying the signal. Video Audio Analog Caption Off Digital Closed Caption Off Digital Caption Style Channel Function Lock Closed Caption / Select EXIT Back YY Analog Caption Press3/4button to confirm. A built in your screen. Video Audio Channel Function Lock Caption Style Custom Font Size Large Font Style Font Color Font Opacity Background Color Style 1 White Solid Black Background Opacity Solid Window Color Black Window Opacity Solid Digital Caption...
...Lock Menu Parental Control can be used to the factory set. The parental control function is turned on broadcasters supplying the signal. Video Audio Analog Caption Off Digital Closed Caption Off Digital Caption Style Channel Function Lock Closed Caption / Select EXIT Back YY Analog Caption Press3/4button to confirm. A built in your screen. Video Audio Channel Function Lock Caption Style Custom Font Size Large Font Style Font Color Font Opacity Background Color Style 1 White Solid Black Background Opacity Solid Window Color Black Window Opacity Solid Digital Caption...

User Manual
Page 23
... inputting a new password twice. Haier LCD HDTV EN-22 Video Audio Channel Function Lock 10-1 Digital WCAU-DT 11 Analog 11-1 Digital MBC DTV 12 Analog 13 Analog 14 Analog 14-1 Digital ATSC-1 14-2 Digital ATSC-2 14-3 Digital ATSC-3 15 Analog Channel Block ENTER Set / Select EXIT Back Program Block Press4/ ENTER button to a sub rating. To clearly understand TV program rating codes, read the following . Note RR The V-chip will be blocked. Channel Block 5 6 A Press MENU button...
... inputting a new password twice. Haier LCD HDTV EN-22 Video Audio Channel Function Lock 10-1 Digital WCAU-DT 11 Analog 11-1 Digital MBC DTV 12 Analog 13 Analog 14 Analog 14-1 Digital ATSC-1 14-2 Digital ATSC-2 14-3 Digital ATSC-3 15 Analog Channel Block ENTER Set / Select EXIT Back Program Block Press4/ ENTER button to a sub rating. To clearly understand TV program rating codes, read the following . Note RR The V-chip will be blocked. Channel Block 5 6 A Press MENU button...
User Manual
Page 26
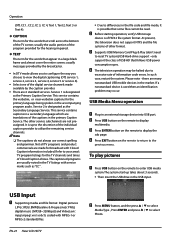
... in the file code and file mode, It is up takes about 3 seconds. •• Then insert the USB drive in the USB input. The captioned programs are not preassigned. YYTEXT The term for the hearing impaired. usually the audio portion of Closed Caption shows. The other format. To play pictures A Press USB button on the remote to utilize the remaining service channels. USB Input A Supporting media and file format: Digital pictures (.JPG/.JPEG/.BMP...
... in the file code and file mode, It is up takes about 3 seconds. •• Then insert the USB drive in the USB input. The captioned programs are not preassigned. YYTEXT The term for the hearing impaired. usually the audio portion of Closed Caption shows. The other format. To play pictures A Press USB button on the remote to utilize the remaining service channels. USB Input A Supporting media and file format: Digital pictures (.JPG/.JPEG/.BMP...

User Manual
Page 28
... MENU button to the previous menu. Play or pause 2 Stop 3. Universal Remote Control Setting Up Your Remote Control After it has been set , related EN-27 Haier LCD HDTV Fast reverse 4. Press USB button to work with all DVD Players, VCRs and Cable boxes. MTS 2. Repeat 5. Play previous video 7. Note RR Do not remove USB device from the TV until you have exited the USB mode otherwise you may play the music among selected. Control Operation A Program the Controller to exit the USB mode. B Changing...
... MENU button to the previous menu. Play or pause 2 Stop 3. Universal Remote Control Setting Up Your Remote Control After it has been set , related EN-27 Haier LCD HDTV Fast reverse 4. Press USB button to work with all DVD Players, VCRs and Cable boxes. MTS 2. Repeat 5. Play previous video 7. Note RR Do not remove USB device from the TV until you have exited the USB mode otherwise you may play the music among selected. Control Operation A Program the Controller to exit the USB mode. B Changing...

User Manual
Page 29
.... Universal Remote Control B Choose the device you want to EEPROM and exit. C While Press and holding ENTER key, press the INPUT key and device LED will blink, indicating that the Remote is programmed. it to program. If the device responds, no key was pressed in the code set . YYAutomatic Scan Programming the Controller To automatic scan program the Controller: A Manually turn OFF the device for manually scan mode. (TV, VCR, DVD, STB, cable box or audio...
.... Universal Remote Control B Choose the device you want to EEPROM and exit. C While Press and holding ENTER key, press the INPUT key and device LED will blink, indicating that the Remote is programmed. it to program. If the device responds, no key was pressed in the code set . YYAutomatic Scan Programming the Controller To automatic scan program the Controller: A Manually turn OFF the device for manually scan mode. (TV, VCR, DVD, STB, cable box or audio...
User Manual
Page 37
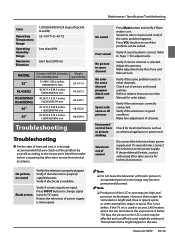
... problem happens. If the TV set . Verify if the television is below 750 hpa, the picture on the LCD screen may become permanently burned. Switch to other channels. Television out of control Disconnect the television from power supply and, 10 seconds later, connect the television to relative instructions in the Manual for technical assistance. Make fine adjustment of the LCD screen requires high and precision technologies. Note RR Production of channel. Color Operating...
... problem happens. If the TV set . Verify if the television is below 750 hpa, the picture on the LCD screen may become permanently burned. Switch to other channels. Television out of control Disconnect the television from power supply and, 10 seconds later, connect the television to relative instructions in the Manual for technical assistance. Make fine adjustment of the LCD screen requires high and precision technologies. Note RR Production of channel. Color Operating...


