User Manual
Page 3
... a wet basement, or near a swimming pool. 6. Power Source ---this unit on the AC cord power plug is securely connected. 10. If you and your new product Your product has been manufactured and tested with the unit. 7. To prevent electric shock, ensure the Grounding pin on an unstable cart, stand, tripod, bracket, or table. This will prevent damage to the...
... a wet basement, or near a swimming pool. 6. Power Source ---this unit on the AC cord power plug is securely connected. 10. If you and your new product Your product has been manufactured and tested with the unit. 7. To prevent electric shock, ensure the Grounding pin on an unstable cart, stand, tripod, bracket, or table. This will prevent damage to the...
User Manual
Page 4
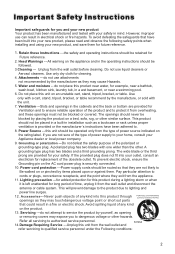
... CLAMPS POWER SERVICE GROUNDING ELECTRODE SYSTEM (NEC ART 250, PART H) If liquid has been spilled, or objects have been fallen into the unit. Outdoor antenna grounding---If an outside antenna or cable system is connected to the unit, be situated away heat source such as this indicates a need for the grounding electrode. c. b. Important Safety Instructions a. When the power supply cord or plug is grounded...
... CLAMPS POWER SERVICE GROUNDING ELECTRODE SYSTEM (NEC ART 250, PART H) If liquid has been spilled, or objects have been fallen into the unit. Outdoor antenna grounding---If an outside antenna or cable system is connected to the unit, be situated away heat source such as this indicates a need for the grounding electrode. c. b. Important Safety Instructions a. When the power supply cord or plug is grounded...
User Manual
Page 5
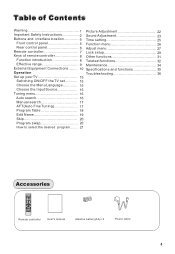
MENU VOL+ CH- Table of Contents Warning 1 Picture Adjustment 22 Important Safety Instructions 2 Sound Adjustment 23 Buttons and interface location 5 Time setting 25 Front control panel 5 Function menu 26 Rear control panel 6 Adjust menu 27 Remote controller 7 Lock setup 29 Keys of remote controller 8 Other functions 31 Function introduction 8 Teletext functions 32 Effective range 9 Maintenance 34 External Equipment Connections ........ 10 Specifications and functions 35 Operation Troubleshooting 36 Set up your TV 15 Switching ON/OFF the TV set........... 15...
MENU VOL+ CH- Table of Contents Warning 1 Picture Adjustment 22 Important Safety Instructions 2 Sound Adjustment 23 Buttons and interface location 5 Time setting 25 Front control panel 5 Function menu 26 Rear control panel 6 Adjust menu 27 Remote controller 7 Lock setup 29 Keys of remote controller 8 Other functions 31 Function introduction 8 Teletext functions 32 Effective range 9 Maintenance 34 External Equipment Connections ........ 10 Specifications and functions 35 Operation Troubleshooting 36 Set up your TV 15 Switching ON/OFF the TV set........... 15...
User Manual
Page 6
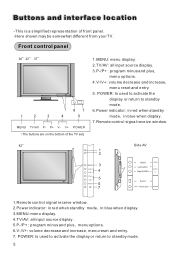
... mode. TV/AV 6 7 Side AV VIDEO Left AUDIO Right AUDEO VIDEO L AUDIO R Switch Power jack POWER 1.Remote control signal receive window. 2.Power indicator: in red when standby mode, in blue when display. 7.Remote control signal receive window. 1 2 MENU 3 VOL+ 4 VOL- Buttons and interface location -This is a simplified representation of the TV set) 1.MENU: menu display. 2.TV/AV: all input source display. 5.P-/P+ : program minus and plus , menu options. 4.V-/V+: volume decrease and increase, menu reset and entry. 5. P+ V- V+ POWER The buttons are on the bottom of front panel...
... mode. TV/AV 6 7 Side AV VIDEO Left AUDIO Right AUDEO VIDEO L AUDIO R Switch Power jack POWER 1.Remote control signal receive window. 2.Power indicator: in red when standby mode, in blue when display. 7.Remote control signal receive window. 1 2 MENU 3 VOL+ 4 VOL- Buttons and interface location -This is a simplified representation of the TV set) 1.MENU: menu display. 2.TV/AV: all input source display. 5.P-/P+ : program minus and plus , menu options. 4.V-/V+: volume decrease and increase, menu reset and entry. 5. P+ V- V+ POWER The buttons are on the bottom of front panel...
User Manual
Page 7
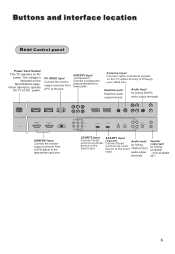
... Scart input. audio output terminals. SCART1 Input (Canal+) Audio input Connect Scart out from a DVD player to the TV, either directly or through your cable box. The voltage is indicated on DC power. SCART2 Input Connect Scart out from a PC to the jack DVD/DTV Input (Component ) Connect a component video/audiodevice to operate the TV on the Specifications page. Audio input for linking loudhailer only available 42 Buttons and interface location Rear Control panel Power Cord Socket This TV operates on AC power. PC VIDEO Input Connect the monitor output connector...
... Scart input. audio output terminals. SCART1 Input (Canal+) Audio input Connect Scart out from a DVD player to the TV, either directly or through your cable box. The voltage is indicated on DC power. SCART2 Input Connect Scart out from a PC to the jack DVD/DTV Input (Component ) Connect a component video/audiodevice to operate the TV on the Specifications page. Audio input for linking loudhailer only available 42 Buttons and interface location Rear Control panel Power Cord Socket This TV operates on AC power. PC VIDEO Input Connect the monitor output connector...
User Manual
Page 9
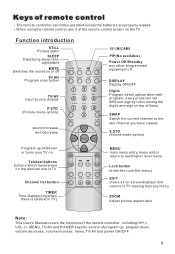
... Program scan button MUTE STILL SCAN SLEEP PIP DISPLAY ABC@ DEF TV/AV Input source display P.STD (Picture mode option) GHI$ JKL% MNO POR& STUV WXYZ TV/AV *#() SWAP P.STD S.STD sound increase and decrease CH+ VOL- Function introduction STILL Picture static SLEEP Displaying sleep time, adjustable MUTE Switches the sound on -screen displays and returns to next higher level menu. Channel list button CH- H.LOCK CH.LIST TIMER ZOOM EXIT TIMER Time display(only when there is teletext in TV. Teletext buttons buttons which have viewed. When using the remote...
... Program scan button MUTE STILL SCAN SLEEP PIP DISPLAY ABC@ DEF TV/AV Input source display P.STD (Picture mode option) GHI$ JKL% MNO POR& STUV WXYZ TV/AV *#() SWAP P.STD S.STD sound increase and decrease CH+ VOL- Function introduction STILL Picture static SLEEP Displaying sleep time, adjustable MUTE Switches the sound on -screen displays and returns to next higher level menu. Channel list button CH- H.LOCK CH.LIST TIMER ZOOM EXIT TIMER Time display(only when there is teletext in TV. Teletext buttons buttons which have viewed. When using the remote...
User Manual
Page 12
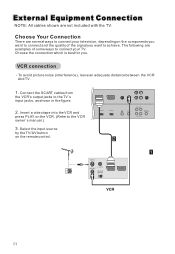
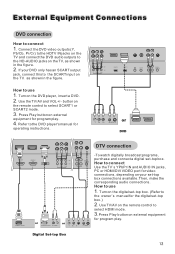
... the remote control. Choose the connection which is best for you want to achieve. VCR connection - Select the input source by the TV/AV button on the VCR. (Refer to connect and the quality of the signal you . Choose Your Connection There are examples of some ways to connect your television, depending on the components you want to the VCR owner`s manual.) 3. Connect the SCART cables from the VCR's output...
... the remote control. Choose the connection which is best for you want to achieve. VCR connection - Select the input source by the TV/AV button on the VCR. (Refer to connect and the quality of the signal you . Choose Your Connection There are examples of some ways to connect your television, depending on the components you want to the VCR owner`s manual.) 3. Connect the SCART cables from the VCR's output...
User Manual
Page 13
... digitally broadcast programs, purchase and connect a digital set -top box connections available. Turn on external equipment for program play . 4. Use TV/AV on the remote control to select HDMI mode. 3.Press Play button on the digital set -top box.) 2. How to the owner`s manual for video connections, depending on the TV, as shown in the figure. 2. buttonon the remote control to connect 1 . How to connect Use the TV`s YPbPr IN and AUDIO IN jacks, PC or HDMI/DVI VIDEO port for the digital set -top box. (Refer to use 1. Refer tothe DVD player...
... digitally broadcast programs, purchase and connect a digital set -top box connections available. Turn on external equipment for program play . 4. Use TV/AV on the remote control to select HDMI mode. 3.Press Play button on the digital set -top box.) 2. How to the owner`s manual for video connections, depending on the TV, as shown in the figure. 2. buttonon the remote control to connect 1 . How to connect Use the TV`s YPbPr IN and AUDIO IN jacks, PC or HDMI/DVI VIDEO port for the digital set -top box. (Refer to use 1. Refer tothe DVD player...

User Manual
Page 14
... cable. 2 Avoid keeping a fixed image on the screen. 3 The synchronization input form for video connections, depending on the menu until the picture is clear. There may become permanently imprinted on the TV's screen for a long period of the PC graphic card can not be noise associated with the resolution, vertical pattern, contrast or brightness in PC mode. Then, make the corresponding audio connection. External Equipment Connections PC connection...
... cable. 2 Avoid keeping a fixed image on the screen. 3 The synchronization input form for video connections, depending on the menu until the picture is clear. There may become permanently imprinted on the TV's screen for a long period of the PC graphic card can not be noise associated with the resolution, vertical pattern, contrast or brightness in PC mode. Then, make the corresponding audio connection. External Equipment Connections PC connection...

User Manual
Page 15
... is the user`s responsibility to normal operation. Power source Wider Hole and Blade AC Outlet TO USE AC POWER SOURCE Use the AC polarized line cord provided for operation on the rear panel of the set if you wish to watch a TV programme without disturbing the other than the specified voltage. Polarized AC Cord Plug NOTES: Never connect the AC line cord plug to other people in . Plug a set of headphones...
... is the user`s responsibility to normal operation. Power source Wider Hole and Blade AC Outlet TO USE AC POWER SOURCE Use the AC polarized line cord provided for operation on the rear panel of the set if you wish to watch a TV programme without disturbing the other than the specified voltage. Polarized AC Cord Plug NOTES: Never connect the AC line cord plug to other people in . Plug a set of headphones...
User Manual
Page 16
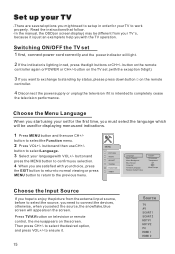
... screen display) may be used for your TV to the previous menu. to ensure it is intended to set for the first time, you select the source, the snowflake,blue screen will light . 2 If the indicator is lighting in order for displaying menus and indications. 1 Press MENU button and then use CH+/- button on the TV set 1 first, connect power cord correctly and the power indicator will appears on the remote controller. 4 Disconnect the power supply...
... screen display) may be used for your TV to the previous menu. to ensure it is intended to set for the first time, you select the source, the snowflake,blue screen will light . 2 If the indicator is lighting in order for displaying menus and indications. 1 Press MENU button and then use CH+/- button on the TV set 1 first, connect power cord correctly and the power indicator will appears on the remote controller. 4 Disconnect the power supply...
User Manual
Page 17
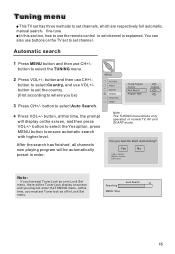
... Program Table England 4 Press VOL+/- After the search has finished, all channels now playing program will be automatically preset in Lock Set menu. there will display on in order. button to ensure automatic search with higher level. button to select the Yes option, press MENU button to select Auto Search. Note : The TUNING menu will be only operated in Lock Set menu. Automatic search 1 Press MENU button and then use the remote control to set Tuner lock...
... Program Table England 4 Press VOL+/- After the search has finished, all channels now playing program will be automatically preset in Lock Set menu. there will display on in order. button to ensure automatic search with higher level. button to select the Yes option, press MENU button to select Auto Search. Note : The TUNING menu will be only operated in Lock Set menu. Automatic search 1 Press MENU button and then use the remote control to set Tuner lock...

User Manual
Page 18
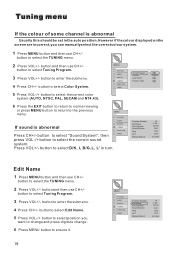
... Program Table England 4 Press CH+/- MENU PICTURE AUDIO ADJUST TUNING FUNCTION TIMER Program Number Edit Name Color System Sound System Skip AFT Manual Search 18 C 28 AUTO D/K OFF OFF 62.25MHz AFT(Auto Fine Tuning) If the picture and/or sound are familiar with the frequency value, press the desired digits direct. . Tuning menu Manual search If excessive channel signals of unwanted programs are received in local area, manual search function is recommended. 1 Press MENU button...
... Program Table England 4 Press CH+/- MENU PICTURE AUDIO ADJUST TUNING FUNCTION TIMER Program Number Edit Name Color System Sound System Skip AFT Manual Search 18 C 28 AUTO D/K OFF OFF 62.25MHz AFT(Auto Fine Tuning) If the picture and/or sound are familiar with the frequency value, press the desired digits direct. . Tuning menu Manual search If excessive channel signals of unwanted programs are received in local area, manual search function is recommended. 1 Press MENU button...
User Manual
Page 20
button and then use CH+/- Press VOL+/- Tuning Program Country Auto Search Program Table England Program Number Edit Name Color System Sound System Skip AFT Manual Search 18 C 28 AUTO D/K OFF OFF 62.25MHz Edit Name 1 Press MENU button and then use CH+/- MENU PICTURE AUDIO ADJUST TUNING FUNCTION TIMER Program Number Edit Name Color System Sound System Skip AFT Manual Search 18 C 28 AUTO D/K OFF OFF 62.25MHz button to select D/K, I, B/G, L, L' in turn. button to select Color System. button to enter...
button and then use CH+/- Press VOL+/- Tuning Program Country Auto Search Program Table England Program Number Edit Name Color System Sound System Skip AFT Manual Search 18 C 28 AUTO D/K OFF OFF 62.25MHz Edit Name 1 Press MENU button and then use CH+/- MENU PICTURE AUDIO ADJUST TUNING FUNCTION TIMER Program Number Edit Name Color System Sound System Skip AFT Manual Search 18 C 28 AUTO D/K OFF OFF 62.25MHz button to select D/K, I, B/G, L, L' in turn. button to select Color System. button to enter...

User Manual
Page 21
... select your favorite channels only. 1 Press MENU button and then use CH+/- MENU PICTURE AUDIO ADJUST TUNING FUNCTION TIMER MENU PICTURE AUDIO ADJUST TUNING FUNCTION TIMER Tuning Program Country Auto Search Program Table England Program Number Edit Name Color System Sound System Skip AFT Manual Search 18 C 28 AUTO D/K OFF OFF 62.25MHz Program swap Swap function enables quick swap to set Skip as On. 6 Press the EXIT button to return to normal viewing or press MENU button to return to...
... select your favorite channels only. 1 Press MENU button and then use CH+/- MENU PICTURE AUDIO ADJUST TUNING FUNCTION TIMER MENU PICTURE AUDIO ADJUST TUNING FUNCTION TIMER Tuning Program Country Auto Search Program Table England Program Number Edit Name Color System Sound System Skip AFT Manual Search 18 C 28 AUTO D/K OFF OFF 62.25MHz Program swap Swap function enables quick swap to set Skip as On. 6 Press the EXIT button to return to normal viewing or press MENU button to return to...

User Manual
Page 23
Note: Depending on the input signal, one or more menu items may not be selectable. button and then use CH+/- MENU PICTURE AUDIO ADJUST TUNING FUNCTION TIMER Video Mode Contrast Brightness Saturation Hue Sharpness Backlight Noise Reduction Personal 50 50 0 0 0 0 Auto Brightness This will adjust the light output of the complete picture, which will adjust the light of the display. button to obtain the desired effect. 4 When you are adjusted. Backlight This will...
Note: Depending on the input signal, one or more menu items may not be selectable. button and then use CH+/- MENU PICTURE AUDIO ADJUST TUNING FUNCTION TIMER Video Mode Contrast Brightness Saturation Hue Sharpness Backlight Noise Reduction Personal 50 50 0 0 0 0 Auto Brightness This will adjust the light output of the complete picture, which will adjust the light of the display. button to obtain the desired effect. 4 When you are adjusted. Backlight This will...

User Manual
Page 24
... volume every time the channel is a speaker that can be adjusted to personal tastes Standard: Normal sound with your listening position. button to obtain the best reproduction for sound reproduction dependent on the broadcast signals or signals from external inputs received. button to select the Music Standard Personal or Hall. button and then use CH+/- MENU PICTURE AUDIO ADJUST TUNING FUNCTION TIMER Volume Balance Audio Mode Treble Bass Auto Volume Woofer 0 0 Music 0 0 OFF 0 Balance This will adjust the sound output...
... volume every time the channel is a speaker that can be adjusted to personal tastes Standard: Normal sound with your listening position. button to obtain the best reproduction for sound reproduction dependent on the broadcast signals or signals from external inputs received. button to select the Music Standard Personal or Hall. button and then use CH+/- MENU PICTURE AUDIO ADJUST TUNING FUNCTION TIMER Volume Balance Audio Mode Treble Bass Auto Volume Woofer 0 0 Music 0 0 OFF 0 Balance This will adjust the sound output...
User Manual
Page 26
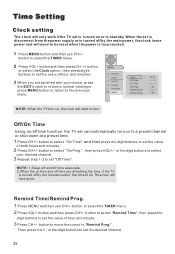
...+/- Remind Time Remind Prog. Time Setting Clock setting The clock will only work if the TV set the value of hour and minute. 3 Press CH+/- MENU PICTURE AUDIO ADJUST TUNING FUNCTION TIMER Clock Off Time On Time On Prog. button to select "On Time", and then press the digit buttons to set is turned on time and off by the remote control, the time of On Time item will hold good. or the digit buttons to select...
...+/- Remind Time Remind Prog. Time Setting Clock setting The clock will only work if the TV set the value of hour and minute. 3 Press CH+/- MENU PICTURE AUDIO ADJUST TUNING FUNCTION TIMER Clock Off Time On Time On Prog. button to select "On Time", and then press the digit buttons to set is turned on time and off by the remote control, the time of On Time item will hold good. or the digit buttons to select...

User Manual
Page 28
... used to reset the defecult setting parameters Display Mode Adjust RGB Default Auto Sync Color Temperature Black Stretch 4:3 9300K OFF It does not work on the TV mode. Auto Sync This is used for the adjustment of the numerical value of red, green and blue in PC mode. Display Mode This will increase or decrease 6500K (red) and 11000K (blue) colors to select the ADJUST menu. 2 Press VOL+/- Color temperature This will adjust the picture aspect ratio. Adjust menu The TV menu...
... used to reset the defecult setting parameters Display Mode Adjust RGB Default Auto Sync Color Temperature Black Stretch 4:3 9300K OFF It does not work on the TV mode. Auto Sync This is used for the adjustment of the numerical value of red, green and blue in PC mode. Display Mode This will increase or decrease 6500K (red) and 11000K (blue) colors to select the ADJUST menu. 2 Press VOL+/- Color temperature This will adjust the picture aspect ratio. Adjust menu The TV menu...
User Manual
Page 37
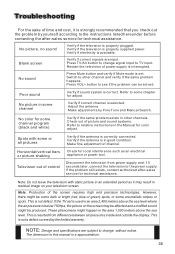
... change signal input to TV input. Poor sound Verify if sound system is correctly connected. Adjust the antenna. Check out of picture and sound systems. Refer to see if the problem can be solved. However, there might be some dark or bright (red, blue or green) spots, or some channel Verify if correct channel is not a defect covered by Fine Tune and Manual Search. NOTE: Design and specifications are input. Switch...
... change signal input to TV input. Poor sound Verify if sound system is correctly connected. Adjust the antenna. Check out of picture and sound systems. Refer to see if the problem can be solved. However, there might be some dark or bright (red, blue or green) spots, or some channel Verify if correct channel is not a defect covered by Fine Tune and Manual Search. NOTE: Design and specifications are input. Switch...


