User Manual
Page 3
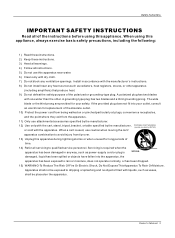
..., stand, tripod, bracket, or table specified by the manufacturer, PORTABLE CART WARNING (symbol provided by RETAC) or sold with the manufacturer`s instructions. 8) Do not install near water. 6) Clean only with liquids, such as vases, shall be exposed to dripping or splashing and no objects filled with dry cloth. 7) Do not block any heat sources such as power-supply cord...
..., stand, tripod, bracket, or table specified by the manufacturer, PORTABLE CART WARNING (symbol provided by RETAC) or sold with the manufacturer`s instructions. 8) Do not install near water. 6) Clean only with liquids, such as vases, shall be exposed to dripping or splashing and no objects filled with dry cloth. 7) Do not block any heat sources such as power-supply cord...

User Manual
Page 5
... Con tro ls Connection Options Universal Remote Controller Installation Acc ess ori es Antenna Connection VCR Connection External A/V Source Setup DVD Connection DTV Connection Digital Audio Output PC Connection Monitor Out Setup HDM I Cable Sample Connecting Headphones Pow er so urc e Operation Switching On/Off the TV set Choose the Menu Language Choose the input Source Channel Menu Automatic Scan Man ual S can Fine Tune Edi t Pro gra m Rename Select the desired program Select the desired sound Mute Video Menu How to select picture modes How to customize...
... Con tro ls Connection Options Universal Remote Controller Installation Acc ess ori es Antenna Connection VCR Connection External A/V Source Setup DVD Connection DTV Connection Digital Audio Output PC Connection Monitor Out Setup HDM I Cable Sample Connecting Headphones Pow er so urc e Operation Switching On/Off the TV set Choose the Menu Language Choose the input Source Channel Menu Automatic Scan Man ual S can Fine Tune Edi t Pro gra m Rename Select the desired program Select the desired sound Mute Video Menu How to select picture modes How to customize...

User Manual
Page 6
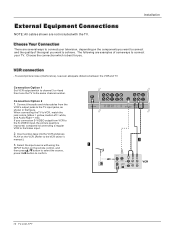
... the TV set) 6 TV LCD-TFT AUDIO2 Input connect to hear stereo sound from a video device. Never attempt to operate the TV on the Specifications page. VIDEO2 Input Connects the video signal from an external device. MENU 4 POWER 5 HL26S HL32S HL37S INPUT CH- Controls -This is indicated on DC power. (Only for HL42S ) R AUDIO L VIDEO AC IN 1.INPUT: all input source display and OK confirm. 2.CH-/+ Program minus and plus , menu options. 3.VOL-/+: volume decrease and increase, menu reset and entry. 4.MENU: menu display. 5. Front panel controls...
... the TV set) 6 TV LCD-TFT AUDIO2 Input connect to hear stereo sound from a video device. Never attempt to operate the TV on the Specifications page. VIDEO2 Input Connects the video signal from an external device. MENU 4 POWER 5 HL26S HL32S HL37S INPUT CH- Controls -This is indicated on DC power. (Only for HL42S ) R AUDIO L VIDEO AC IN 1.INPUT: all input source display and OK confirm. 2.CH-/+ Program minus and plus , menu options. 3.VOL-/+: volume decrease and increase, menu reset and entry. 4.MENU: menu display. 5. Front panel controls...
User Manual
Page 8
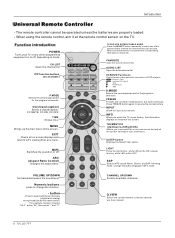
..., white LED will be operated unless the batteries are properly loaded. - PIP function buttons (no available) SELECT CH.LIST FAV.LIST AUDIOLIST PIP SWAP AUDIO SWAP POSITION P.MODE Selects the picture appropriate for the program's character. CH- TV DVD VCR SETBOX CABLE AUDIO Press the SELECT button repeatedly to select one of the screen. SLEEP button Displays the Sleep Timer option. button Press to resume the normal picture. CHANNEL UP/DOWN Selects available channels Q.VIEW Q.VIEW Switch the current channel to...
..., white LED will be operated unless the batteries are properly loaded. - PIP function buttons (no available) SELECT CH.LIST FAV.LIST AUDIOLIST PIP SWAP AUDIO SWAP POSITION P.MODE Selects the picture appropriate for the program's character. CH- TV DVD VCR SETBOX CABLE AUDIO Press the SELECT button repeatedly to select one of the screen. SLEEP button Displays the Sleep Timer option. button Press to resume the normal picture. CHANNEL UP/DOWN Selects available channels Q.VIEW Q.VIEW Switch the current channel to...

User Manual
Page 9
... the picture quality in the connections. CH- If the antenna needs to bend the bronze wire when connecting the antenna. Installation External Equipment Connections Accessories SELECT CH.LIST FAV.LIST AUDIOLIST PIP SWAP AUDIO SWAP POSITION P.MODE CC UIDE ENU S.MODE FREEZE NPUT INFO OK ARC SAP SLEEP EXIT VOL+ CH+ VOL- Remote controller Owner`s manual Alkaline battery(AAA) 2 Power cable Antenna Connection Generally speaking, to tighten. Q.VIEW TFT-LCD TV OWNER'S MANUAL MODEL:L40A8A Please READ this manual carefully before operating your...
... the picture quality in the connections. CH- If the antenna needs to bend the bronze wire when connecting the antenna. Installation External Equipment Connections Accessories SELECT CH.LIST FAV.LIST AUDIOLIST PIP SWAP AUDIO SWAP POSITION P.MODE CC UIDE ENU S.MODE FREEZE NPUT INFO OK ARC SAP SLEEP EXIT VOL+ CH+ VOL- Remote controller Owner`s manual Alkaline battery(AAA) 2 Power cable Antenna Connection Generally speaking, to tighten. Q.VIEW TFT-LCD TV OWNER'S MANUAL MODEL:L40A8A Please READ this manual carefully before operating your...
User Manual
Page 10
... jack colors (Video = yellow, Audio Left = white, and Audio Right = red). Select the input source with the TV. Installation External Equipment Connections NOTE: All cables shown are several ways to connect your TV. Choose Your Connection There are not included with using the INPUT button on the VCR. (Refer to the VCR owner`s manual.) 3. Insert a video tape into the VCR and press PLAY on the remote control, and then press / button to select the source, press the button...
... jack colors (Video = yellow, Audio Left = white, and Audio Right = red). Select the input source with the TV. Installation External Equipment Connections NOTE: All cables shown are several ways to connect your TV. Choose Your Connection There are not included with using the INPUT button on the VCR. (Refer to the VCR owner`s manual.) 3. Insert a video tape into the VCR and press PLAY on the remote control, and then press / button to select the source, press the button...

User Manual
Page 11
... component video output, use S-Video. How to the TV input jacks, as shown in the figure. 2. Select the input source with using the INPUT button on external equipment for operating instructions. Press Play button on the remote control. 2. Press the / button to external equipment, match the jack colors (Video = yellow, Audio Left = white, and Audio Right = red). NOTE: If your DVD only has an S-VIDEO output jack, connect this to select YPbPr mode. 3. External Equipment Connections Installation External A/V Source Setup How to connect Connect the audio and video cables...
... component video output, use S-Video. How to the TV input jacks, as shown in the figure. 2. Select the input source with using the INPUT button on external equipment for operating instructions. Press Play button on the remote control. 2. Press the / button to external equipment, match the jack colors (Video = yellow, Audio Left = white, and Audio Right = red). NOTE: If your DVD only has an S-VIDEO output jack, connect this to select YPbPr mode. 3. External Equipment Connections Installation External A/V Source Setup How to connect Connect the audio and video cables...

User Manual
Page 12
... optical cable to the TV Audio (Optical) Output port. 2. How to connect Use the TV`s (Y, PB, PR) , VGA or HDMI jack for the digital set -top box. (Refer to the owner`s manual for video connections, depending on the remote control to the digital audio (optical) input on the digital set -top box.) 2. Use INPUT on your vision. 12 TV LCD-TFT PC/DVI OPTICAL AUDIO IN AC IN How to use Y2 Pb2 Pr2 L R AV OUT L R PC Y1 Pb1 Pr1 L R S-VIDEO VIDEO L R HDMI1 1. See the external audio equipment instruction manual...
... optical cable to the TV Audio (Optical) Output port. 2. How to connect Use the TV`s (Y, PB, PR) , VGA or HDMI jack for the digital set -top box. (Refer to the owner`s manual for video connections, depending on the remote control to the digital audio (optical) input on the digital set -top box.) 2. Use INPUT on your vision. 12 TV LCD-TFT PC/DVI OPTICAL AUDIO IN AC IN How to use Y2 Pb2 Pr2 L R AV OUT L R PC Y1 Pb1 Pr1 L R S-VIDEO VIDEO L R HDMI1 1. See the external audio equipment instruction manual...
User Manual
Page 13
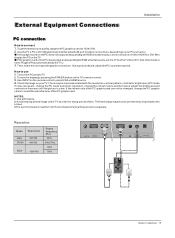
.../DVI OPTICAL AUDIO IN Owner s Manual 13 If the graphiccard on yourTV.There maybe noise associatedwith the resolution,vertical pattern, contrastor brightness inPC mode. Use theTV`s PCor DVI (DigitalVisual Interface)AudioIN port forvideo connections, dependingon your PCconnector. To get thebest picture quality, adjust thePC graphics card to another rate or adjust the brightness and contrast on the menu until the picture is separate. External Equipment Connections Installation PC connection...
.../DVI OPTICAL AUDIO IN Owner s Manual 13 If the graphiccard on yourTV.There maybe noise associatedwith the resolution,vertical pattern, contrastor brightness inPC mode. Use theTV`s PCor DVI (DigitalVisual Interface)AudioIN port forvideo connections, dependingon your PCconnector. To get thebest picture quality, adjust thePC graphics card to another rate or adjust the brightness and contrast on the menu until the picture is separate. External Equipment Connections Installation PC connection...
User Manual
Page 14
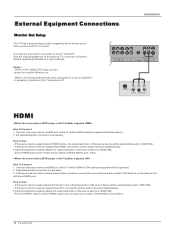
External Equipment Connections Installation Monitor Out Setup The TV has a special signal output capability which allows you need to set the output resolution appropriately. When connecting with this product). 2. Connect the source device to HDMI port of this TV with a HDMI-to HDMI port of this TV with an HDMI cable(not supplied with external audio equipments, such as amplifers or speakers, please turn the TV speakers off. No separated audio connection is necessary. 3. Connect the second TV or monitor to select HDMI input source in input source option of the second...
External Equipment Connections Installation Monitor Out Setup The TV has a special signal output capability which allows you need to set the output resolution appropriately. When connecting with this product). 2. Connect the source device to HDMI port of this TV with a HDMI-to HDMI port of this TV with an HDMI cable(not supplied with external audio equipments, such as amplifers or speakers, please turn the TV speakers off. No separated audio connection is necessary. 3. Connect the second TV or monitor to select HDMI input source in input source option of the second...
User Manual
Page 17
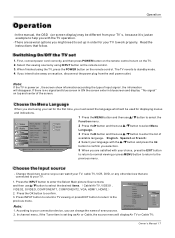
.... SVIDEO COMPONENT1 DVD 3. In channel menu, if the Tuner item is set up in power on top and center of every source. 2. When finished using INPUT button on the remote control. 3. Press the INPUT button to enter the Select Main picture Source menu and then use / button to work properly. Operation Operation -In the manual, the OSD (on screen display) may be different from the wall power outlet. Select the viewing source by using the TV, press the POWER button on the remote control. VIDEO1...
.... SVIDEO COMPONENT1 DVD 3. In channel menu, if the Tuner item is set up in power on top and center of every source. 2. When finished using INPUT button on the remote control. 3. Press the INPUT button to enter the Select Main picture Source menu and then use / button to work properly. Operation Operation -In the manual, the OSD (on screen display) may be different from the wall power outlet. Select the viewing source by using the TV, press the POWER button on the remote control. VIDEO1...

User Manual
Page 18
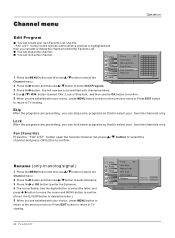
... Audio Auto Scan Cable Time A B C Channel Manual Scan Fine Tune Edit Program Function Rename Lock : Move cursor, /OK: Go to submenu, EXIT/ MENU: Exit main menu Video Audio Time A B C Channel Function Lock Tuner Air Auto Scan Manual Scan Fine Tune Edit Program Rename OK Cancel Air Tuner Number: 47 Found: 1 : Move cursor, OK: Enter, MENU: Return to set channel is required to gain access to start searching. 8 To cancel searching, press the OK button. When Cable is selected, the TV will detect antenna signals...
... Audio Auto Scan Cable Time A B C Channel Manual Scan Fine Tune Edit Program Function Rename Lock : Move cursor, /OK: Go to submenu, EXIT/ MENU: Exit main menu Video Audio Time A B C Channel Function Lock Tuner Air Auto Scan Manual Scan Fine Tune Edit Program Rename OK Cancel Air Tuner Number: 47 Found: 1 : Move cursor, OK: Enter, MENU: Return to set channel is required to gain access to start searching. 8 To cancel searching, press the OK button. When Cable is selected, the TV will detect antenna signals...
User Manual
Page 20
... Favorite List. Video Audio Time A B C Channel Function Lock Tuner Air Auto Scan Manual Scan Fine Tune Edit Program Rename Program No Program Name : Move cursor, /OK: Go to submenu, / ME NU: Return to select your favorite channels only. Use the FAV.LiST button on the remote control when a channel is highlighted and then you can skip some programs so that to upper menu, EXIT: Exit main menu 20 TV LCD-TFT You can lock some channel; Lock After the programs...
... Favorite List. Video Audio Time A B C Channel Function Lock Tuner Air Auto Scan Manual Scan Fine Tune Edit Program Rename Program No Program Name : Move cursor, /OK: Go to submenu, / ME NU: Return to select your favorite channels only. Use the FAV.LiST button on the remote control when a channel is highlighted and then you can skip some programs so that to upper menu, EXIT: Exit main menu 20 TV LCD-TFT You can lock some channel; Lock After the programs...
User Manual
Page 21
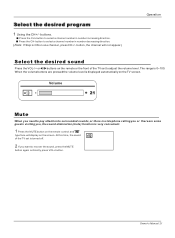
... MUTE button on the remote control and " " type face will not appear.) Operation Select the desired sound Press the VOL-/+ or / buttons on the remote or the front of the TV set to select a channel number in number decreasing direction. (Note: If Skip is 0~100. Press the CH+ button to adjust the volume level. The range is ON on the screen. Owner s Manual 21 button, the channel will display on one channel, press...
... MUTE button on the remote control and " " type face will not appear.) Operation Select the desired sound Press the VOL-/+ or / buttons on the remote or the front of the TV set to select a channel number in number decreasing direction. (Note: If Skip is 0~100. Press the CH+ button to adjust the volume level. The range is ON on the screen. Owner s Manual 21 button, the channel will display on one channel, press...
User Manual
Page 22
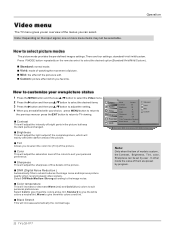
... EXIT button to return to select the color mix (Tint) of mode is soft. DNR (Digital Noise Reduction ) Automatically filters out and reduces the image noise and improves picture quality when receiving weak video signals. Operation How to give the white colors a red tint. Standard: normal mode. Color temperature This will adjust the saturation level of them are four settings: standard/ vivid /mild/custom. Video Audio Time A B C Channel Function Lock Mode Custom...
... EXIT button to return to select the color mix (Tint) of mode is soft. DNR (Digital Noise Reduction ) Automatically filters out and reduces the image noise and improves picture quality when receiving weak video signals. Operation How to give the white colors a red tint. Standard: normal mode. Color temperature This will adjust the saturation level of them are four settings: standard/ vivid /mild/custom. Video Audio Time A B C Channel Function Lock Mode Custom...
User Manual
Page 24
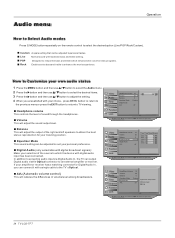
... audio input via the Optical connector to an external amplifier or receiver. AVL (Automatic volume control) This will adjust the output of the right and left speakers to personal tastes. Equalizer Mode This sound setting can output Digital audio via Digital Audio In, the TV can be adjusted to obtain the best stereo reproduction for your listening position. How to Customize your own audio status 1 Press the MENU button and then use / button to select the Audio menu...
... audio input via the Optical connector to an external amplifier or receiver. AVL (Automatic volume control) This will adjust the output of the right and left speakers to personal tastes. Equalizer Mode This sound setting can output Digital audio via Digital Audio In, the TV can be adjusted to obtain the best stereo reproduction for your listening position. How to Customize your own audio status 1 Press the MENU button and then use / button to select the Audio menu...

User Manual
Page 31
... programs to -video movies use this function, the following must be blocked by broadcasting stations. The default setting is to allow all programs) G (General audience) PG (Parental guidance suggested ) (Parents strongly cautioned) (Mature audience only) TV Rating Children: ALL (Age) FV (Fantasy Violence) (applies to TV-Y, TV-Y7) (applies to TV-PG, TV-14, TV-MA) Owner s Manual 31 Specify a password 3. adult language) S (Sex - Ratings for a time period. Lock Menu Operation Parental Control...
... programs to -video movies use this function, the following must be blocked by broadcasting stations. The default setting is to allow all programs) G (General audience) PG (Parental guidance suggested ) (Parents strongly cautioned) (Mature audience only) TV Rating Children: ALL (Age) FV (Fantasy Violence) (applies to TV-Y, TV-Y7) (applies to TV-PG, TV-14, TV-MA) Owner s Manual 31 Specify a password 3. adult language) S (Sex - Ratings for a time period. Lock Menu Operation Parental Control...

User Manual
Page 35
.... Operation Setting Up Your Remote Control After it has been set up to 600 code sets. Bulb key to find device codes automatically. The two programming methods are programmed successfully, device LED will be compatible with the new code, saving the code and exit. TV. Manually Programming the Controller 1. Manually scan mode With manually scan programming, the Controller tests all DVD Players, VCRs and Cable boxes. Press and release the CH+/CH- When device is in current mode.). Fast Programming Haier default TV code set . Press...
.... Operation Setting Up Your Remote Control After it has been set up to 600 code sets. Bulb key to find device codes automatically. The two programming methods are programmed successfully, device LED will be compatible with the new code, saving the code and exit. TV. Manually Programming the Controller 1. Manually scan mode With manually scan programming, the Controller tests all DVD Players, VCRs and Cable boxes. Press and release the CH+/CH- When device is in current mode.). Fast Programming Haier default TV code set . Press...

User Manual
Page 36
..., press AUTO key. Q.VIEW Automatic Scan Programming the Controller To automatic scan program the Controller: 1. The feature is in code set . Setting Up Your Remote Control Operation SELECT CH.LIST FAV.LIST AUDIOLIST PIP SWAP AUDIO SWAP POSITION P.MODE CC TIME ENU S.MODE FREEZE NPUT INFO OK ARC SAP SLEEP EXIT VOL+ CH+ VOL- Manually turn OFF the device you to control the volume and mute function of your DVD or VCR while the Controller operates in another device mode control certain...
..., press AUTO key. Q.VIEW Automatic Scan Programming the Controller To automatic scan program the Controller: 1. The feature is in code set . Setting Up Your Remote Control Operation SELECT CH.LIST FAV.LIST AUDIOLIST PIP SWAP AUDIO SWAP POSITION P.MODE CC TIME ENU S.MODE FREEZE NPUT INFO OK ARC SAP SLEEP EXIT VOL+ CH+ VOL- Manually turn OFF the device you to control the volume and mute function of your DVD or VCR while the Controller operates in another device mode control certain...
User Manual
Page 43
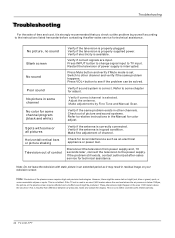
... Mute mode is set is used in an area 2,400 meters above the sea level. Press INPUT button to change signal input to the power supply. Make adjustments by the limited warranty. 44 TV LCD-TFT Disconnect the television from difference between air pressures inside and outside the display. No picture, no sound Blank screen No sound Verify if the television is selected. Verify if correct channel is properly plugged. Restart the television of channel...
... Mute mode is set is used in an area 2,400 meters above the sea level. Press INPUT button to change signal input to the power supply. Make adjustments by the limited warranty. 44 TV LCD-TFT Disconnect the television from difference between air pressures inside and outside the display. No picture, no sound Blank screen No sound Verify if the television is selected. Verify if correct channel is properly plugged. Restart the television of channel...


