User Manual
Page 2
... user to the presence of the obsolete outlet. 10) Protect the power cord from the apparatus. 11) Only use attachments/accessories specified by the manufacturer. 12) Use only with the cart, stand, tripod, bracket, or table specified by qualified service personnel only. A grounding type plug has two blades and a third grounding prong. Servicing is used , use by the manufacturer, or sold with a protective earthing connection. 2 TV LCD...
... user to the presence of the obsolete outlet. 10) Protect the power cord from the apparatus. 11) Only use attachments/accessories specified by the manufacturer. 12) Use only with the cart, stand, tripod, bracket, or table specified by qualified service personnel only. A grounding type plug has two blades and a third grounding prong. Servicing is used , use by the manufacturer, or sold with a protective earthing connection. 2 TV LCD...
User Manual
Page 5
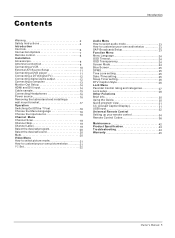
... External A/V Source Setup 11 Co nn ec ti ng a D VD p la ye r 11 Connecting a DTV(digital TV 12 Connecting digital audio output 12 Co nn ec ti ng a c om pu te r 13 Monitor Out Setup 14 HD MI a nd D VI i np ut 14 Cable sample 15 Connecting Headphones 16 Power source 16 Removing the table stand and installing a wall mount bracket 17 Operation Switching On/Off the TV set 18 Choose the Menu Language 18 Choose the input source 18 Channel Menu Channel Scan...
... External A/V Source Setup 11 Co nn ec ti ng a D VD p la ye r 11 Connecting a DTV(digital TV 12 Connecting digital audio output 12 Co nn ec ti ng a c om pu te r 13 Monitor Out Setup 14 HD MI a nd D VI i np ut 14 Cable sample 15 Connecting Headphones 16 Power source 16 Removing the table stand and installing a wall mount bracket 17 Operation Switching On/Off the TV set 18 Choose the Menu Language 18 Choose the input source 18 Channel Menu Channel Scan...
User Manual
Page 6
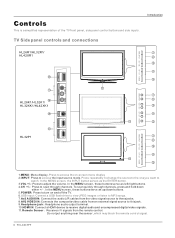
...: Connects the composite video cable from the remote control. Press repeatedly to change the source to the one you want to adjust the volume. Introduction TV Side panel controls and connections HL26R1/HL32R1/ HL42XR1 MENU INPUT VOL+ VOL- To scan quickly through channels. CH+ CH- In the MENU screen, the INPUT button serves as left/right buttons. 4.CH +/- : Press to access the input source mode. In the MENU screen, these buttons serve as up/down buttons. 5.POWER: Press to turn on -screen menu display 2.INPUT: Press to scan through channels...
...: Connects the composite video cable from the remote control. Press repeatedly to change the source to the one you want to adjust the volume. Introduction TV Side panel controls and connections HL26R1/HL32R1/ HL42XR1 MENU INPUT VOL+ VOL- To scan quickly through channels. CH+ CH- In the MENU screen, the INPUT button serves as left/right buttons. 4.CH +/- : Press to access the input source mode. In the MENU screen, these buttons serve as up/down buttons. 5.POWER: Press to turn on -screen menu display 2.INPUT: Press to scan through channels...
User Manual
Page 8
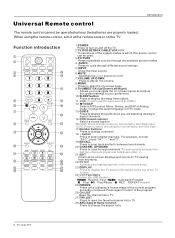
... available picture modes. 4. To scan quickly between two channels. 20.CHANNEL UP/DOWN Press to display the sleep timer option. 11. When using the remote control, aim it at the remote sensor on -screen menus and adjust the system settings to your preference. 10.SLEEP button Press to scan through different sound settings. 5.INPUT Show the input source. 6.MUTE Switches the video sound on or off the TV. 2.TV DVD SETBOX CABLE VCR AUD To select one of the current program, but audio continues. AUDIO...
... available picture modes. 4. To scan quickly between two channels. 20.CHANNEL UP/DOWN Press to display the sleep timer option. 11. When using the remote control, aim it at the remote sensor on -screen menus and adjust the system settings to your preference. 10.SLEEP button Press to scan through different sound settings. 5.INPUT Show the input source. 6.MUTE Switches the video sound on or off the TV. 2.TV DVD SETBOX CABLE VCR AUD To select one of the current program, but audio continues. AUDIO...
User Manual
Page 9
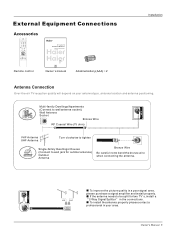
... antenna type, antenna location and antenna positioning. If the antenna needs to be split for two TV`s, install a 2-Way Signal Splitter in a poor signal area, please purchase a signal amplifier and install properly. External Equipment Connections Accessories TV DVD STB CABLE VCR AUD PICTURE AUDIO PC HDMI INPUT MUTE RECALL VOL MENU CH EXIT ENTER SLEEP DISPLAY USB PLAY/PAUSE STOP REC REV PREV NEXT REPEAT MTS/SAP FREEZE CH.LIST GUIDE CCD ARC FAVORITE R TFT-LCD TV OWNER'S MANUAL Please READ this manual carefully before operating your TV...
... antenna type, antenna location and antenna positioning. If the antenna needs to be split for two TV`s, install a 2-Way Signal Splitter in a poor signal area, please purchase a signal amplifier and install properly. External Equipment Connections Accessories TV DVD STB CABLE VCR AUD PICTURE AUDIO PC HDMI INPUT MUTE RECALL VOL MENU CH EXIT ENTER SLEEP DISPLAY USB PLAY/PAUSE STOP REC REV PREV NEXT REPEAT MTS/SAP FREEZE CH.LIST GUIDE CCD ARC FAVORITE R TFT-LCD TV OWNER'S MANUAL Please READ this manual carefully before operating your TV...
User Manual
Page 10
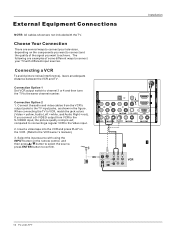
... Video input. 2. compared to connecting a regular VCR to the VCR owner`s manual.) 3. VIDEO IN COMPONENT IN OPTICAL OUT 2 L 2 DVI AUDIO 1 R 1 Y 1 Pb Pr L AUDIO R VGA AUDIO VGA VIDEO L AUDIO R S-VIDEO L AUDIO R L AUDIO R HDMI IN AV OUT VGA IN 10 TV LCD-TFT External Equipment Connections Installation ANT IN NOTE: All cables shown are not included with different input sources. Connection Option 1 Set VCR output switch to channel 3 or 4 and then tune the TV to VCR, match the jack colors (Video = yellow, Audio Left = white, and Audio Right = red). Connecting...
... Video input. 2. compared to connecting a regular VCR to the VCR owner`s manual.) 3. VIDEO IN COMPONENT IN OPTICAL OUT 2 L 2 DVI AUDIO 1 R 1 Y 1 Pb Pr L AUDIO R VGA AUDIO VGA VIDEO L AUDIO R S-VIDEO L AUDIO R L AUDIO R HDMI IN AV OUT VGA IN 10 TV LCD-TFT External Equipment Connections Installation ANT IN NOTE: All cables shown are not included with different input sources. Connection Option 1 Set VCR output switch to channel 3 or 4 and then tune the TV to VCR, match the jack colors (Video = yellow, Audio Left = white, and Audio Right = red). Connecting...
User Manual
Page 11
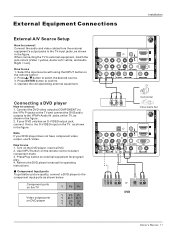
...S-VIDEO L AUDIO R L AUDIO R Owner s Manual 11 Press Play button on the remote control. 2. Select the input source with using the INPUT button on external equipment for operating instructions. If your DVD player does not have component video output, use S-Video. as shown below. How to the DVD player's manual for program play. 4. Refer to use 1. External Equipment Connections Installation ANT IN HDMI IN External A/V Source Setup How to connect Connect the audio and video cables from the external equipment's output jacks to select the desired source. 3. Press / button to the TV...
...S-VIDEO L AUDIO R L AUDIO R Owner s Manual 11 Press Play button on the remote control. 2. Select the input source with using the INPUT button on external equipment for operating instructions. If your DVD player does not have component video output, use S-Video. as shown below. How to the DVD player's manual for program play. 4. Refer to use 1. External Equipment Connections Installation ANT IN HDMI IN External A/V Source Setup How to connect Connect the audio and video cables from the external equipment's output jacks to select the desired source. 3. Press / button to the TV...
User Manual
Page 12
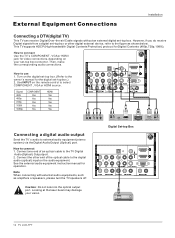
... instruction manual for video connections, depending on your vision. External Equipment Connections Installation Connecting a DTV(digital TV) This TV can receive Digital Over-the-air/Cable signals without an external digital set -top box or other end of an optical cable to external audio equipment (stereo system) via the Digital Audio Output (Optical) port. VIDEO IN COMPONENT IN OPTICAL OUT HDMI Digital Set-top Box 2 L 2 DVI AUDIO 1 R 1 Y 1 Pb Pr L AUDIO R VGA AUDIO VGA VIDEO L AUDIO R S-VIDEO L AUDIO R L AUDIO R AV OUT VGA IN 12 TV LCD-TFT ANT IN HDMI...
... instruction manual for video connections, depending on your vision. External Equipment Connections Installation Connecting a DTV(digital TV) This TV can receive Digital Over-the-air/Cable signals without an external digital set -top box or other end of an optical cable to external audio equipment (stereo system) via the Digital Audio Output (Optical) port. VIDEO IN COMPONENT IN OPTICAL OUT HDMI Digital Set-top Box 2 L 2 DVI AUDIO 1 R 1 Y 1 Pb Pr L AUDIO R VGA AUDIO VGA VIDEO L AUDIO R S-VIDEO L AUDIO R L AUDIO R AV OUT VGA IN 12 TV LCD-TFT ANT IN HDMI...
User Manual
Page 13
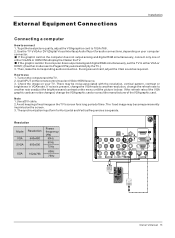
... does not output analog and digital RGB simultaneously, connect only one of the VGA graphic cardcan notbe changed,change therefresh rate to Plugand Play automaticallyby theTV.) 3. If the refresh rate of either VGA or HDMI ; (theother mode isset to another rate or adjust the brightness and contrast on your TV. Note 1.Use aDVI cable. 2.Avoid keepinga fixed imageon theTV's screen fora long periodof time.The fixed image...
... does not output analog and digital RGB simultaneously, connect only one of the VGA graphic cardcan notbe changed,change therefresh rate to Plugand Play automaticallyby theTV.) 3. If the refresh rate of either VGA or HDMI ; (theother mode isset to another rate or adjust the brightness and contrast on your TV. Note 1.Use aDVI cable. 2.Avoid keepinga fixed imageon theTV's screen fora long periodof time.The fixed image...
User Manual
Page 14
... the best picture quality, adjust the output resolution of Select Main source menu. 14 TV LCD-TFT Select HDMI input source in input source option of the source device to -DVI cable(not supplied with this product). 2. Connect the source device to HDMI port of this TV with a HDMI-to 1280x720p. If the source device has an analog audio output connector, connect the source device audio output to 1280x720p. If the source device does not support Auto DVI, you need to set to DVI Audio In port located on...
... the best picture quality, adjust the output resolution of Select Main source menu. 14 TV LCD-TFT Select HDMI input source in input source option of the source device to -DVI cable(not supplied with this product). 2. Connect the source device to HDMI port of this TV with a HDMI-to 1280x720p. If the source device has an analog audio output connector, connect the source device audio output to 1280x720p. If the source device does not support Auto DVI, you need to set to DVI Audio In port located on...
User Manual
Page 18
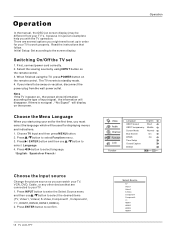
... the type of input signal . Note If the TV in order for displaying menus and indications. 1. Press / button to standby mode. 4. There are connected to your TV`s, because it is no signal , No Signal will disappear. Initial Setup: Set according to select Function menu. 3. Select the viewing source by using the TV, press POWER button on the remote control. the information will display on the screen. Press / button to the screen display. Press ENTER button to select Language. 4. First, connect power cord...
... the type of input signal . Note If the TV in order for displaying menus and indications. 1. Press / button to standby mode. 4. There are connected to your TV`s, because it is no signal , No Signal will disappear. Initial Setup: Set according to select Function menu. 3. Select the viewing source by using the TV, press POWER button on the remote control. the information will display on the screen. Press / button to the screen display. Press ENTER button to select Language. 4. First, connect power cord...
User Manual
Page 19
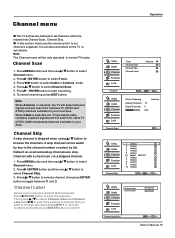
...2 Analog 3 Analog 4 Analog 5 Analog 5-1 Digital KPIX-DT 6 Analog 7 Analog 8 Analog 9 Analog 10 Analog Channel Skip ENTER Set / Select EXIT Back Video Audio Channel Index Channel Label Channel Function Lock Channel Label Set 1 / Select EXIT Back Owner s Manual 19 You can be only operated in the channel number or select by list. Press / button to toggle between and . Press / ENTER button and then use / button to set channel is skipped when using / button to select Channel Scan. 5. Press / button to select a channel, then press ENTER button to select Cable or Antenna mode...
...2 Analog 3 Analog 4 Analog 5 Analog 5-1 Digital KPIX-DT 6 Analog 7 Analog 8 Analog 9 Analog 10 Analog Channel Skip ENTER Set / Select EXIT Back Video Audio Channel Index Channel Label Channel Function Lock Channel Label Set 1 / Select EXIT Back Owner s Manual 19 You can be only operated in the channel number or select by list. Press / button to toggle between and . Press / ENTER button and then use / button to set channel is skipped when using / button to select Channel Scan. 5. Press / button to select a channel, then press ENTER button to select Cable or Antenna mode...
User Manual
Page 21
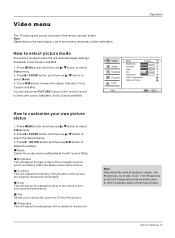
... picture(Standard/ Vivid/ Custom/ Mild). Video menu The TV menu gives you an overview of the menus you to select the color mix (Tint) of the picture. Press / ENTER button and then use / button to select the desired items. 3. Tint Allows you can also press PICTURE button on the input signal, one or more menu items may not be set by user . Owner s Manual 21 Note Depending on the remote control...
... picture(Standard/ Vivid/ Custom/ Mild). Video menu The TV menu gives you an overview of the menus you to select the color mix (Tint) of the picture. Press / ENTER button and then use / button to select the desired items. 3. Tint Allows you can also press PICTURE button on the input signal, one or more menu items may not be set by user . Owner s Manual 21 Note Depending on the remote control...
User Manual
Page 22
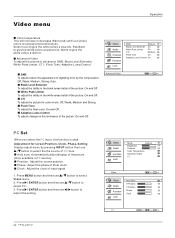
... PC source). button to select / button to / button to select the the source of digitizing error by pressing INPUT button then use adjust the setting. Adjustment for color errors: Off, Weak, Medium and Strong. Phase : Adjust the phase of input signal. 1. Advanced Video To adjust the picture in the luminance of the picture: On and Off. Adaptive Luma Control To adjust changes in advanced: DNR, Black Level Extender, White Peak Limiter, CTI, Flech Tone, Adaptive Luma Control. Black Level Extender To adjust...
... PC source). button to select / button to / button to select the the source of digitizing error by pressing INPUT button then use adjust the setting. Adjustment for color errors: Off, Weak, Medium and Strong. Phase : Adjust the phase of input signal. 1. Advanced Video To adjust the picture in the luminance of the picture: On and Off. Adaptive Luma Control To adjust changes in advanced: DNR, Black Level Extender, White Peak Limiter, CTI, Flech Tone, Adaptive Luma Control. Black Level Extender To adjust...
User Manual
Page 23
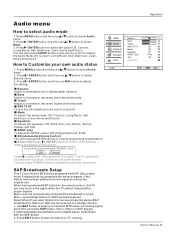
... / ENTER button and then use the setting. AVL(Automatic Volume Control) This will be received in Mono; If enter Audio Only mode, press "POWER" to emphasize left or right speaker balance. SAP Broadcasts Setup This TV can be black and no picture , but the sound is only in a Analog channel. 1. Press / ENTER button and then use desired items. 3. Video Audio Channel Function Lock Audio Balance Bass Treble SRS TS XT Mode Equalizer SPDIF Type AVL Audio Only...
... / ENTER button and then use the setting. AVL(Automatic Volume Control) This will be received in Mono; If enter Audio Only mode, press "POWER" to emphasize left or right speaker balance. SAP Broadcasts Setup This TV can be black and no picture , but the sound is only in a Analog channel. 1. Press / ENTER button and then use desired items. 3. Video Audio Channel Function Lock Audio Balance Bass Treble SRS TS XT Mode Equalizer SPDIF Type AVL Audio Only...
User Manual
Page 25
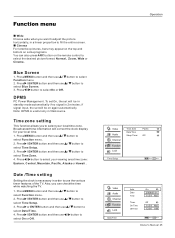
... no signal in order to select Time Setup. 3. Also, you can also press ARC button on again automatically. Press / ENTER button and then use / button to use / Function menu. 2. Press / ENTER button and then use select Blue Screen. 3. Press / ENTER button and then use / button to select On or Off. Press / ENTER button and then use / button to select Time Zone. 4. Press MENU button and then use the various timer features of the TV. Operation Video Audio Channel Function Lock Time...
... no signal in order to select Time Setup. 3. Also, you can also press ARC button on again automatically. Press / ENTER button and then use / button to use / Function menu. 2. Press / ENTER button and then use select Blue Screen. 3. Press / ENTER button and then use / button to select On or Off. Press / ENTER button and then use / button to select Time Zone. 4. Press MENU button and then use the various timer features of the TV. Operation Video Audio Channel Function Lock Time...
User Manual
Page 28
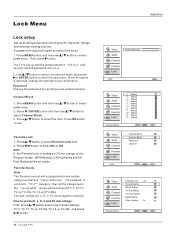
... ,CA Eng Rating and CA Fren Rating will be blocked (TV-Y, TV-Y7, TV-G, TV-PG, TV-14 and TV-MA). Press / ENTER button and then use / button to select On or Off. Press / button to select Lock menu. Press MENU button and then use / button to set up blocking schemes to this menu. 1. Lock Menu Lock setup Set up with the initial password 0-0-0-0 and security default password is required to gain access to block specific channels, ratings, and external viewing sources.
... ,CA Eng Rating and CA Fren Rating will be blocked (TV-Y, TV-Y7, TV-G, TV-PG, TV-14 and TV-MA). Press / ENTER button and then use / button to select On or Off. Press / button to select Lock menu. Press MENU button and then use / button to set up blocking schemes to this menu. 1. Lock Menu Lock setup Set up with the initial password 0-0-0-0 and security default password is required to gain access to block specific channels, ratings, and external viewing sources.
User Manual
Page 32
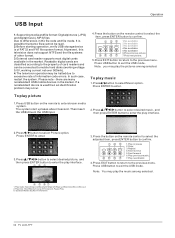
..., this television does not support NTFS and the file systems of card readers and can be connected to mobile hard disks (working voltage 5.0V, working current not over 500mA). 4.The television operation may occur. 4.Press the button on the remote to the previous menu. To play interface. 12 3 3.Press the button on the remote control to select the adjusted item, press ENTER button to confirm. 1 23 PLAY/PAUSE...
..., this television does not support NTFS and the file systems of card readers and can be connected to mobile hard disks (working voltage 5.0V, working current not over 500mA). 4.The television operation may occur. 4.Press the button on the remote to the previous menu. To play interface. 12 3 3.Press the button on the remote control to select the adjusted item, press ENTER button to confirm. 1 23 PLAY/PAUSE...
User Manual
Page 34
... by pressing the TV DVD STB CABLE VCR AUD key. Manually Programming the Control Check the code no further programming is ready for 3 times in manually scan mode. 5.Press CH+/CH- from current code set database). And then keep 2HZ blink, user now can : a)Try to EEPROM. To manually-scan program the Controller: 1. key conducts a downward search in 3 seconds (2HZ). To exit without programming,. 34 TV LCD-TFT Operation Universal Remote Control Setting Up Your Remote Control After it will...
... by pressing the TV DVD STB CABLE VCR AUD key. Manually Programming the Control Check the code no further programming is ready for 3 times in manually scan mode. 5.Press CH+/CH- from current code set database). And then keep 2HZ blink, user now can : a)Try to EEPROM. To manually-scan program the Controller: 1. key conducts a downward search in 3 seconds (2HZ). To exit without programming,. 34 TV LCD-TFT Operation Universal Remote Control Setting Up Your Remote Control After it will...
User Manual
Page 44
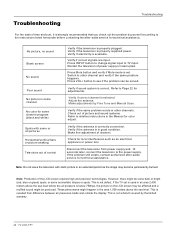
... Fine Tune and Manual Scan. Press INPUT button to change signal input to Page 22 for color adjust. Restart the television of power supply is correct. Press VOL+ button to the power supply. Adjust the antenna. Note: Production of channel. If the TV set . These phenomena might be solved. This is not a defect covered by the limited warranty. 44 TV LCD-TFT This is resulted from power supply and, 10 seconds later, connect the television to see...
... Fine Tune and Manual Scan. Press INPUT button to change signal input to Page 22 for color adjust. Restart the television of power supply is correct. Press VOL+ button to the power supply. Adjust the antenna. Note: Production of channel. If the TV set . These phenomena might be solved. This is not a defect covered by the limited warranty. 44 TV LCD-TFT This is resulted from power supply and, 10 seconds later, connect the television to see...


