
User Manual
Page 2
Contents Safety and warnings 2-4 Introduction 5 Installation 6-9 Remote Control 10 Operation...11-14 Trouble Shooting 15 Warranty...16 -1-
Contents Safety and warnings 2-4 Introduction 5 Installation 6-9 Remote Control 10 Operation...11-14 Trouble Shooting 15 Warranty...16 -1-
User Manual
Page 3
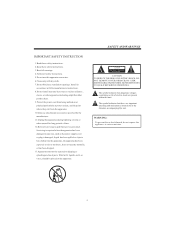
....Only use attachments/accessories specified by the manufacturer. 11.Unplug this apparatus during lightning storms or when unused for long periods of electric shock are important operating and maintenance instructions in accordance with the manufacturers instructions. 8.Do not install near water. 6.Clean only with dry cloth. 7.Do not block any way, such as the power-supply cord or plug...
....Only use attachments/accessories specified by the manufacturer. 11.Unplug this apparatus during lightning storms or when unused for long periods of electric shock are important operating and maintenance instructions in accordance with the manufacturers instructions. 8.Do not install near water. 6.Clean only with dry cloth. 7.Do not block any way, such as the power-supply cord or plug...

User Manual
Page 4
... service life of your television on an unstable cart, stand, shelf or table. Serious injury to an individual , and damage to the television, may result if it falls. When the television receiver is not used in the back cover. Do not place naked flame sources, such as lighted candles on , or suddenly push the television or its stand. Do not place the power supply cord...
... service life of your television on an unstable cart, stand, shelf or table. Serious injury to an individual , and damage to the television, may result if it falls. When the television receiver is not used in the back cover. Do not place naked flame sources, such as lighted candles on , or suddenly push the television or its stand. Do not place the power supply cord...
User Manual
Page 5
.... Reorient or relocate the receiving antenna. - This symbol indicates that to which can be performed by turning the equipment off and on the picture screen can be connected to MAINS socket outlet with the Class B FCC limits. Do not cover the ventilation openings when using the TV. During thunder and lighting, unplug the power cord and antenna cord to prevent damage to...
.... Reorient or relocate the receiving antenna. - This symbol indicates that to which can be performed by turning the equipment off and on the picture screen can be connected to MAINS socket outlet with the Class B FCC limits. Do not cover the ventilation openings when using the TV. During thunder and lighting, unplug the power cord and antenna cord to prevent damage to...
User Manual
Page 6
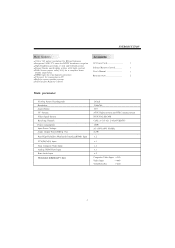
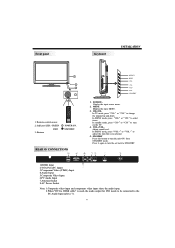
... ■ Deeper blacks and brighter whites with high contrast Infrared Remote Control........... 1 ■ Wide Screen aspect ratio (16:9) for a complete home theater experience User's Manual 1 ■ HDMI input for true digital connection ■ VGA port for connection to PC Battery(AAA 2 ■ Built-in stereo speaker system ■ Full-function Remote Control Main parameter Viewing Picture Size(diagonal) Resolution: Aspect Ratio: TV System: Video Signal System: Receiving Channel: Power consumption: Input Power Voltage: Audio Output Power(THD 7%): Rear High-Definition...
... ■ Deeper blacks and brighter whites with high contrast Infrared Remote Control........... 1 ■ Wide Screen aspect ratio (16:9) for a complete home theater experience User's Manual 1 ■ HDMI input for true digital connection ■ VGA port for connection to PC Battery(AAA 2 ■ Built-in stereo speaker system ■ Full-function Remote Control Main parameter Viewing Picture Size(diagonal) Resolution: Aspect Ratio: TV System: Video Signal System: Receiving Channel: Power consumption: Input Power Voltage: Audio Output Power(THD 7%): Rear High-Definition...
User Manual
Page 7
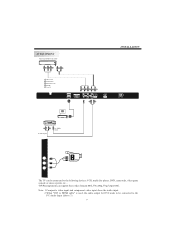
... component video input share the audio input. 2.When "DVI to HDMI cable" is used, the audio output for DVI needs to be connected to turn on the TV. 4.VOL+/VOLAdjust sound level. Front panel Keyboard INSTALLATION SOURCE 3 MENU CH+ 1 CH- 2 VOL+ VOL- STANDBY. 1.SOURCE: Display the input source menu. 2.MENU: Display the main MENU. 3.CH+/CHIn TV mode, press"CH+"or"CH-"to turn the unit ON from STANDBY mode. STANDBY 30 30 1 2 3 4 5 6 7 8 9 0 + + VOL CH _ _ 1: Remote control sensor. 2: Indicator LED: GREEN RED 3: Buttons POWER...
... component video input share the audio input. 2.When "DVI to HDMI cable" is used, the audio output for DVI needs to be connected to turn on the TV. 4.VOL+/VOLAdjust sound level. Front panel Keyboard INSTALLATION SOURCE 3 MENU CH+ 1 CH- 2 VOL+ VOL- STANDBY. 1.SOURCE: Display the input source menu. 2.MENU: Display the main MENU. 3.CH+/CHIn TV mode, press"CH+"or"CH-"to turn the unit ON from STANDBY mode. STANDBY 30 30 1 2 3 4 5 6 7 8 9 0 + + VOL CH _ _ 1: Remote control sensor. 2: Indicator LED: GREEN RED 3: Buttons POWER...
User Manual
Page 8
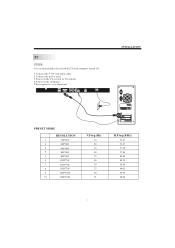
PC STEPS: It is very important. This sequence is recommended to have both the TV and computer turned off. 1.Connect the VGA and audio cable. 2.Connect the power cord. 3.Power on the TV, switch to VGA mode. 4.Power on the computer. HDMI2 INPUT HDMI1 INPUT Pr Pb AV1 Y L PC AUDIO INPUT R RF INPUT INSTALLATION PRESET MODE RESOLUTION 1 720*400 2 640*480 3 640*480 4 800*600 5 800*600 6 1024*768 7 1024*768 8 1024*768 9 1280*1024 10 1280*1024 V.Freq.(Hz) 70 60 75 60 75 60 70 75 60 75 H.Freq.(KHz) 31.47 31.47 37.50 37.88 46.88 48.36 56.48 60.02 63.98 80.00 -7-
PC STEPS: It is very important. This sequence is recommended to have both the TV and computer turned off. 1.Connect the VGA and audio cable. 2.Connect the power cord. 3.Power on the TV, switch to VGA mode. 4.Power on the computer. HDMI2 INPUT HDMI1 INPUT Pr Pb AV1 Y L PC AUDIO INPUT R RF INPUT INSTALLATION PRESET MODE RESOLUTION 1 720*400 2 640*480 3 640*480 4 800*600 5 800*600 6 1024*768 7 1024*768 8 1024*768 9 1280*1024 10 1280*1024 V.Freq.(Hz) 70 60 75 60 75 60 70 75 60 75 H.Freq.(KHz) 31.47 31.47 37.50 37.88 46.88 48.36 56.48 60.02 63.98 80.00 -7-
User Manual
Page 9
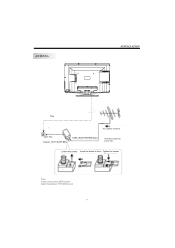
ANTENNA INSTALLATION Note: Aerial connections:IEC(female). Input impendance:75 unbalanced. -8-
ANTENNA INSTALLATION Note: Aerial connections:IEC(female). Input impendance:75 unbalanced. -8-
User Manual
Page 10
... needs to be connected to the PC Audio Input (above 7). -9- AV EQUIPMENT VIDEO EQUIPMENT with YPbPr GBR WR Y Yellow (video) W White(audio L) R Red(audio R or Pr) B Blue(Pb) G Green(Y) HDMI2 INPUT HDMI1 INPUT HDMI VIDEO EQUIPMENT W R TO VIDEO output To audio outputs G B R W R Pr AV1 Pb L PC AUDIO INPUT Y R W R RF INPUT INSTALLATION AV2 VIDEO L R The TV can support these video formats:480i,576i,480p,576p,720p,1080i. YPbPr(component) can be connected to the following devices: VCR, multi disc player, DVD, camcorder, video game...
... needs to be connected to the PC Audio Input (above 7). -9- AV EQUIPMENT VIDEO EQUIPMENT with YPbPr GBR WR Y Yellow (video) W White(audio L) R Red(audio R or Pr) B Blue(Pb) G Green(Y) HDMI2 INPUT HDMI1 INPUT HDMI VIDEO EQUIPMENT W R TO VIDEO output To audio outputs G B R W R Pr AV1 Pb L PC AUDIO INPUT Y R W R RF INPUT INSTALLATION AV2 VIDEO L R The TV can support these video formats:480i,576i,480p,576p,720p,1080i. YPbPr(component) can be connected to the following devices: VCR, multi disc player, DVD, camcorder, video game...
User Manual
Page 11
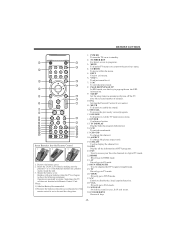
.... 9: SLEEP Set the sleep timer to automatically turn off the TV after the selected number of minutes. 10: P.G Setting the Parental Control level control. 11: MUTE To disable or enable the sound. 12: RECALL To access the previously viewed program. 13: SOURCE To display or exit the TV input source menu. 14: ENTER Confirms selection. 15: TV DISPLAY Display/hide the program Information 16: S.M To switch sound mode. 17: CH+/CHTo change the channel. 18: ASPECT To change the picture aspect...
.... 9: SLEEP Set the sleep timer to automatically turn off the TV after the selected number of minutes. 10: P.G Setting the Parental Control level control. 11: MUTE To disable or enable the sound. 12: RECALL To access the previously viewed program. 13: SOURCE To display or exit the TV input source menu. 14: ENTER Confirms selection. 15: TV DISPLAY Display/hide the program Information 16: S.M To switch sound mode. 17: CH+/CHTo change the channel. 18: ASPECT To change the picture aspect...
User Manual
Page 12
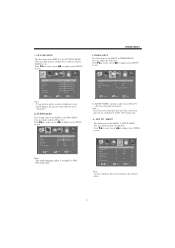
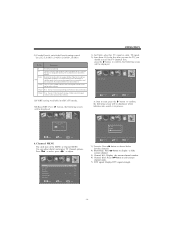
.... Picture Audio Picture mode Contrast Brightness Color Tint Sharpness Color Temp. Press to select, press to adjust, press MENU to the default value. -11- Picture Audio Timer Setup V-CHIP Sleep timer Time zone Daylight Saving Time Clock Off Pacific Off 1999/12/31 04:03PM Channel Select Adjust Menu Exit 1).SLEEP TIMER: automatically shuts off the TV after the selected time period. You can adjust the time here. Picture Audio Menu language Transparency Aspect Noise Reduction Advanced Closed caption XVS...
.... Picture Audio Picture mode Contrast Brightness Color Tint Sharpness Color Temp. Press to select, press to adjust, press MENU to the default value. -11- Picture Audio Timer Setup V-CHIP Sleep timer Time zone Daylight Saving Time Clock Off Pacific Off 1999/12/31 04:03PM Channel Select Adjust Menu Exit 1).SLEEP TIMER: automatically shuts off the TV after the selected time period. You can adjust the time here. Picture Audio Menu language Transparency Aspect Noise Reduction Advanced Closed caption XVS...
User Manual
Page 13
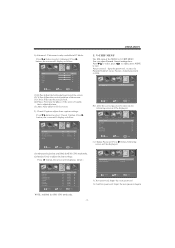
...You can adjust Parental Control settings here. Parent control: input the password, to exit. Channel Picture Audio Mode Font style Font size Font Edge style Font Edge color FG color BG color FG opacity BG opacity Select Timer Setup V-CHIP Custom Default Default Default Default Default Default Default Default Channel Adjust Menu Exit NOTE: available in PC Mode. Closed Caption: adjust close caption settings. Press button to select Advanced ,Press button, the screen will be displayed. Press button to select Closed Caption ,Press button, the screen will be displayed...
...You can adjust Parental Control settings here. Parent control: input the password, to exit. Channel Picture Audio Mode Font style Font size Font Edge style Font Edge color FG color BG color FG opacity BG opacity Select Timer Setup V-CHIP Custom Default Default Default Default Default Default Default Default Channel Adjust Menu Exit NOTE: available in PC Mode. Closed Caption: adjust close caption settings. Press button to select Advanced ,Press button, the screen will be displayed. Press button to select Closed Caption ,Press button, the screen will be displayed...
User Manual
Page 14
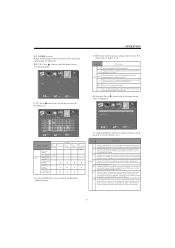
...-MA Block Press ENTER to lock or unlock Channel Select Adjust Menu Exit 5.4 Canada: Press button, the following screen will be displayed Picture Audio Canada English Canada French Timer Setup P.G Channel 14+ E Select Adjust Menu Exit 1): Canada English: switch the english rating control level:E,C,C8+,G,PG,14+,18+. Rating Description E Exempt: Includes news, sports, documents and other information programming: talk shows, music videos, and variety programming. X X is an order rating...
...-MA Block Press ENTER to lock or unlock Channel Select Adjust Menu Exit 5.4 Canada: Press button, the following screen will be displayed Picture Audio Canada English Canada French Timer Setup P.G Channel 14+ E Select Adjust Menu Exit 1): Canada English: switch the english rating control level:E,C,C8+,G,PG,14+,18+. Rating Description E Exempt: Includes news, sports, documents and other information programming: talk shows, music videos, and variety programming. X X is an order rating...
User Manual
Page 15
... ATSC (TV) mode. 5.6 Reset RRT: Press button, the following screen will be displayed, which indicates auto search is Channel MENU. Channel NO.: Display the current channel number. 6). Auto Scan: If it's the first time you use the TV, you sure? Picture Audio Timer Air/cable Auto Scan Favorite Show/Hide Channel NO. Favorite: Press button to adjust. NO YES Picture Audio Timer Setup V-CHIP Channel RF CH: 4 FOUND: 0 Select Adjust Menu Exit 6. DTV signal : Setup V-CHIP Channel Cable 2-1 Select Adjust Menu Exit Select Adjust Menu Exit...
... ATSC (TV) mode. 5.6 Reset RRT: Press button, the following screen will be displayed, which indicates auto search is Channel MENU. Channel NO.: Display the current channel number. 6). Auto Scan: If it's the first time you use the TV, you sure? Picture Audio Timer Air/cable Auto Scan Favorite Show/Hide Channel NO. Favorite: Press button to adjust. NO YES Picture Audio Timer Setup V-CHIP Channel RF CH: 4 FOUND: 0 Select Adjust Menu Exit 6. DTV signal : Setup V-CHIP Channel Cable 2-1 Select Adjust Menu Exit Select Adjust Menu Exit...
User Manual
Page 16
... non-active pixels may appear on the remote control for inspecting Normal audio Colour control Picture breaking up Normal audio or weak retune channel No colour Noise TVsystem The LCDTV panel is not opened Contrast and brightness/volume setup Press standby key on the screen as a fixed point of the product. -15- Please note this does not affect the performance of red, green, blue, black or white.
... non-active pixels may appear on the remote control for inspecting Normal audio Colour control Picture breaking up Normal audio or weak retune channel No colour Noise TVsystem The LCDTV panel is not opened Contrast and brightness/volume setup Press standby key on the screen as a fixed point of the product. -15- Please note this does not affect the performance of red, green, blue, black or white.


