

User Manual
Page 1
R LED TV OWNER'S MANUAL Please READ this manual carefully before operating your TV, and retain it for future reference. MODELS: HL22XLT 2 HL22XWLWT W2
R LED TV OWNER'S MANUAL Please READ this manual carefully before operating your TV, and retain it for future reference. MODELS: HL22XLT 2 HL22XWLWT W2

User Manual
Page 5
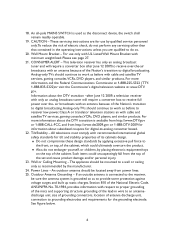
...3. However, there is no guarantee that to operate the equipment. 2. Shielded interface cables and AC power cord, if any radio or TV interference caused by one or more of the FCC Rules.These limits are designed to provide reasonable protection against harmful interference in order to ...to try to correct the interference by unauthorized modification to this apparatus to rain or moisture 3 Consult the dealer or an experienced radio/TV technician for future reference. It is the responsibilities of fire or electric shock, do not expose this equipment. If this manual thoroughly....
...3. However, there is no guarantee that to operate the equipment. 2. Shielded interface cables and AC power cord, if any radio or TV interference caused by one or more of the FCC Rules.These limits are designed to provide reasonable protection against harmful interference in order to ...to try to correct the interference by unauthorized modification to this apparatus to rain or moisture 3 Consult the dealer or an experienced radio/TV technician for future reference. It is the responsibilities of fire or electric shock, do not expose this equipment. If this manual thoroughly....

User Manual
Page 6
... to unplug the confined spaces or in a box unit when not in use liquid cleaners or aerosol cleaners to clean the internal part of the TV once a year. Do not use for Remote Controller Avoid Dropping Avoid Liquids 3 2 1 6 5 4 9 8 7 0 3 2 1 6 5 4 9 8 7 0 4 Avoid Aerosol Cleaners 3 2 1 6 5 4 8 9 ...ventilation may shorten the life of time (days). Unplug immediately if there is a malfunction like metals or other foreign materials are put inside the TV box like no picture, no video/audio, smoke and bad odor from the AC outlet before cleaning. Don't throw any vents and openings. ...
... to unplug the confined spaces or in a box unit when not in use liquid cleaners or aerosol cleaners to clean the internal part of the TV once a year. Do not use for Remote Controller Avoid Dropping Avoid Liquids 3 2 1 6 5 4 9 8 7 0 3 2 1 6 5 4 9 8 7 0 4 Avoid Aerosol Cleaners 3 2 1 6 5 4 8 9 ...ventilation may shorten the life of time (days). Unplug immediately if there is a malfunction like metals or other foreign materials are put inside the TV box like no picture, no video/audio, smoke and bad odor from the AC outlet before cleaning. Don't throw any vents and openings. ...

User Manual
Page 7
... is damaged, liquid has been spilled or objects have fallen into your outlet, consult an electrician for your dealer or local power company. 16. The TV should be connected to rain or moisture, does not operate normally, or has been dropped. 15. Keep these instructions. 2. Heed all instructions. 5. Follow all warnings...
... is damaged, liquid has been spilled or objects have fallen into your outlet, consult an electrician for your dealer or local power company. 16. The TV should be connected to rain or moisture, does not operate normally, or has been dropped. 15. Keep these instructions. 2. Heed all instructions. 5. Follow all warnings...
User Manual
Page 8
...or translator television stations an with recommended international global safety standards for the grounding electrode. All televisions must comply with cable and satellite TV services, gaming consoles,VCRs, DVD players, and similar products. Section 810 of the National Electric Code, ANSI/NFPA No. 70...Wall or Ceiling Mounting - These servicing instructions are for use only with UL Listed Wall Mount Bracket with cable and satellite TV services, gaming consoles,VCRs, DVD players, and similar products, For more information about subsidized coupons for information about the DTV ...
...or translator television stations an with recommended international global safety standards for the grounding electrode. All televisions must comply with cable and satellite TV services, gaming consoles,VCRs, DVD players, and similar products. Section 810 of the National Electric Code, ANSI/NFPA No. 70...Wall or Ceiling Mounting - These servicing instructions are for use only with UL Listed Wall Mount Bracket with cable and satellite TV services, gaming consoles,VCRs, DVD players, and similar products, For more information about subsidized coupons for information about the DTV ...

User Manual
Page 9
... to a mains socket outlet with a protective earthing connection. 28. Please, make sure to connect the power plug to the wall outlet socket after connecting the TV to dripping or splashing and no objects filled with liquids, such as the disconnect device, the location on the apparatus and the function of the...
... to a mains socket outlet with a protective earthing connection. 28. Please, make sure to connect the power plug to the wall outlet socket after connecting the TV to dripping or splashing and no objects filled with liquids, such as the disconnect device, the location on the apparatus and the function of the...

User Manual
Page 12
... a soft and flat surface (blanket, foam, cloth, etc.) to prevent any damage to the HDTV. 2. Remove the stand base from your TV at least 2.36 inches (60 mm) from the wall to remove the base. ATTACHING THE BASE IMPORTANT: The Base of the display. Carefully align and ... the Base to usage. 1. PREPARING YOUR LCD HDTV FOR WALL MOUNTING We suggest that you need to prevent cable interference. Remove the screws holding your TV using four M4 screws, as indicated in the illustration. 100 mm 100 mm NOTE f The wall mount bracket and the screws are not included. 10...
... a soft and flat surface (blanket, foam, cloth, etc.) to prevent any damage to the HDTV. 2. Remove the stand base from your TV at least 2.36 inches (60 mm) from the wall to remove the base. ATTACHING THE BASE IMPORTANT: The Base of the display. Carefully align and ... the Base to usage. 1. PREPARING YOUR LCD HDTV FOR WALL MOUNTING We suggest that you need to prevent cable interference. Remove the screws holding your TV using four M4 screws, as indicated in the illustration. 100 mm 100 mm NOTE f The wall mount bracket and the screws are not included. 10...

User Manual
Page 13
Power: Insert the power cord in a position to allow free flow of the battery compartment. Turn the TV on: Press the Power key on the remote control or the side panel control knobs.The TV will be turned on a solid surface. 3. Remote control: Remove the cover of air. Min 1 m HTR-D09 HTR-D09... Ensure that the TV is placed in the wall socket with display on the screen. Connect the antenna cable or CATV cable to the power cord! 1. Power Key 11 ...
Power: Insert the power cord in a position to allow free flow of the battery compartment. Turn the TV on: Press the Power key on the remote control or the side panel control knobs.The TV will be turned on a solid surface. 3. Remote control: Remove the cover of air. Min 1 m HTR-D09 HTR-D09... Ensure that the TV is placed in the wall socket with display on the screen. Connect the antenna cable or CATV cable to the power cord! 1. Power Key 11 ...

User Manual
Page 15
... video devices such as a DVD Player or set top box through this SPDIF connection to your equipment is inserted to page 22~24 for Digital TV. 6. English 1. Connect the primary source for digital video such as a VCR or video game.
... video devices such as a DVD Player or set top box through this SPDIF connection to your equipment is inserted to page 22~24 for Digital TV. 6. English 1. Connect the primary source for digital video such as a VCR or video game.

User Manual
Page 16
Press to turn on -screen display) menu. CH Ÿ 5. MENU 7. INPUT Press to decrease the volume. Press to decrease the channel number. VOL 4. Press to increase the volume. OPERATING INSTRUCTIONS TO USE THE BACK PANEL CONTROL 1 2 VOL 3 4 CH 5 6 MENU 7 INPUT 1. VOL + 3. Press to select the input source. 14 POWER 2. Press to open or exit the OSD (on / off (standby) the TV set. Press to increase the channel number. CH ź 6.
Press to turn on -screen display) menu. CH Ÿ 5. MENU 7. INPUT Press to decrease the volume. Press to decrease the channel number. VOL 4. Press to increase the volume. OPERATING INSTRUCTIONS TO USE THE BACK PANEL CONTROL 1 2 VOL 3 4 CH 5 6 MENU 7 INPUT 1. VOL + 3. Press to select the input source. 14 POWER 2. Press to open or exit the OSD (on / off (standby) the TV set. Press to increase the channel number. CH ź 6.

User Manual
Page 17
... Channel List. v Menu not displayed: Press CH+ or CH- CH.LIST Press to choose the sub-channel). MTS/SAP Press to activate the NTSC TV sounds. (Switch Stereo, SAP or Mono tone for ATV / switch audio languages for DTV.) SLEEP Press to set the preset time to switch the...video modes switching. INPUT Press "INPUT" to open or exit menu. ARC Press to navigate right or left. GUIDE Press to power ON/OFF (standby) TV. v Menu not displayed: Press VOL+ or VOLto adjust volume. English TO USE THE REMOTE CONTROL Power Press to display the Electronic Program Guide. DISPLAY ...
... Channel List. v Menu not displayed: Press CH+ or CH- CH.LIST Press to choose the sub-channel). MTS/SAP Press to activate the NTSC TV sounds. (Switch Stereo, SAP or Mono tone for ATV / switch audio languages for DTV.) SLEEP Press to set the preset time to switch the...video modes switching. INPUT Press "INPUT" to open or exit menu. ARC Press to navigate right or left. GUIDE Press to power ON/OFF (standby) TV. v Menu not displayed: Press VOL+ or VOLto adjust volume. English TO USE THE REMOTE CONTROL Power Press to display the Electronic Program Guide. DISPLAY ...
User Manual
Page 19
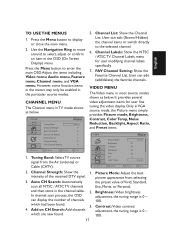
...Channel menu in most source modes shows as below . FAV Channel Setting: Show the Favorite Channel List. VIDEO MENU The Video menu in TV mode shows as below . It provides several video adjustment items for user modifying channel labels specifically. 7. Brightness: Video brightness adjustment, the... range is 0 ~ 100. 3. However, some function items in the menus may only be enabled in the channel table. Tuning Band: Select TV source signal from selecting 3. Adjust the items including Video menu, Audio menu, Feature menu, Channel menu, and VGA menu. Channel Labels: Show ...
...Channel menu in most source modes shows as below . FAV Channel Setting: Show the Favorite Channel List. VIDEO MENU The Video menu in TV mode shows as below . It provides several video adjustment items for user modifying channel labels specifically. 7. Brightness: Video brightness adjustment, the... range is 0 ~ 100. 3. However, some function items in the menus may only be enabled in the channel table. Tuning Band: Select TV source signal from selecting 3. Adjust the items including Video menu, Audio menu, Feature menu, Channel menu, and VGA menu. Channel Labels: Show ...

User Manual
Page 20
...: Normal / Zoom1 / Wide / Zoom2 / HDMI PC mode (for user to modify the audio setting. Audio language setting is only available with ATSC TV source, the option is R50 ~ G50. 7. Noise Reduction: Gives four NR effect degrees, such as below. Preset: Restore the default video settings. Audio...number of the screen. 11. Adaptive Contrast: Choose On or Off to auto adjust the backlight of the supported audio languages depends on the ATSC TV programs. (English / Spanish / French) 7. DCR: Choose On or Off to adjust the gamma after analyzing the input signal automatically. 10. Treble...
...: Normal / Zoom1 / Wide / Zoom2 / HDMI PC mode (for user to modify the audio setting. Audio language setting is only available with ATSC TV source, the option is R50 ~ G50. 7. Noise Reduction: Gives four NR effect degrees, such as below. Preset: Restore the default video settings. Audio...number of the screen. 11. Adaptive Contrast: Choose On or Off to auto adjust the backlight of the supported audio languages depends on the ATSC TV programs. (English / Spanish / French) 7. DCR: Choose On or Off to adjust the gamma after analyzing the input signal automatically. 10. Treble...

User Manual
Page 21
...Select the menu display language. (English / Français / Español) 2. This menu contains options to turn on the current mode (TV, HDMI, etc.), some options may not be available. Enter Old Password Enter New Password Confirm New Password 19 The default setting is shown below.... The Feature menu is On. 9. Speaker: Choose to set the Year, Month, Date, and,Time manually. Depending on / off the TV internal speaker.The digital audio output signals and earphone output signals will not be consistent across programs and channels automatically. 10. Time: Set current...
...Select the menu display language. (English / Français / Español) 2. This menu contains options to turn on the current mode (TV, HDMI, etc.), some options may not be available. Enter Old Password Enter New Password Confirm New Password 19 The default setting is shown below.... The Feature menu is On. 9. Speaker: Choose to set the Year, Month, Date, and,Time manually. Depending on / off the TV internal speaker.The digital audio output signals and earphone output signals will not be consistent across programs and channels automatically. 10. Time: Set current...

User Manual
Page 22
...the Parental Lock item, then the user can modify the detail styles described below.The setting result will be locked and the TV can be updated by MPAA or TV Rating. [Canadian Parental Locks] - Set the parental control level by program with RRT5 rating information. 6. Before entering the ...Move ENTER Select Menu Return Exit Exit [Button Lock] - Open V-Chip is selected, user can modify the restricted table about MPAA or TV Rating respectively. If Custom mode is an advanced V-Chip rating system for setting the digital closed caption options. (Off / On / With Mute) 7.
...the Parental Lock item, then the user can modify the detail styles described below.The setting result will be locked and the TV can be updated by MPAA or TV Rating. [Canadian Parental Locks] - Set the parental control level by program with RRT5 rating information. 6. Before entering the ...Move ENTER Select Menu Return Exit Exit [Button Lock] - Open V-Chip is selected, user can modify the restricted table about MPAA or TV Rating respectively. If Custom mode is an advanced V-Chip rating system for setting the digital closed caption options. (Off / On / With Mute) 7.

User Manual
Page 23
... Menu: This option shows the photos in JPEG formats, plays the music in MP3 formats or plays Time Shift feature in digital TV that stored in Feature Menu to display Multimedia List menu for component input, which can edit the input labels. 11. Automatic /... Solid / Flashing / Transparent / Translucent. [Background Color] - User can be chosen as followed: HL22XLT2 / HL22XLTW2: 15360x8640 There are three ways to 31. [Preset] - MP3 MusicBox Exit v Select MultiMedia Menu in a USB storage device. Automatic / White / ...
... Menu: This option shows the photos in JPEG formats, plays the music in MP3 formats or plays Time Shift feature in digital TV that stored in Feature Menu to display Multimedia List menu for component input, which can edit the input labels. 11. Automatic /... Solid / Flashing / Transparent / Translucent. [Background Color] - User can be chosen as followed: HL22XLT2 / HL22XLTW2: 15360x8640 There are three ways to 31. [Preset] - MP3 MusicBox Exit v Select MultiMedia Menu in a USB storage device. Automatic / White / ...
User Manual
Page 26
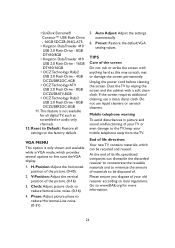
...not rub or strike the screen with a soft, clean cloth. H-Position: Adjust the horizontal position of the picture. (0-16) 3. Dust the TV by wiping the screen and the cabinet with anything hard as scrambled or audio only channels. 13. TIPS Care of . If the screen requires ... which provides several options to fine tune the VGA display. 1. Clock: Adjust picture clock to the factory default. Reset to Default: Restore all digital TV, such as this may scratch, mar, or damage the screen permanently. V-Position: Adjust the vertical position of the picture. (0-40) 2. Phase: Adjust...
...not rub or strike the screen with a soft, clean cloth. H-Position: Adjust the horizontal position of the picture. (0-16) 3. Dust the TV by wiping the screen and the cabinet with anything hard as scrambled or audio only channels. 13. TIPS Care of . If the screen requires ... which provides several options to fine tune the VGA display. 1. Clock: Adjust picture clock to the factory default. Reset to Default: Restore all digital TV, such as this may scratch, mar, or damage the screen permanently. V-Position: Adjust the vertical position of the picture. (0-40) 2. Phase: Adjust...

User Manual
Page 27
... generates, uses, and can be made to this device that interference will not occur in a particular installation. v Increase the separation between the equipment and the TV. Federal Communications Commission Notice This equipment has been tested and found to comply with the instructions, may void the user's authority to operate the equipment...
... generates, uses, and can be made to this device that interference will not occur in a particular installation. v Increase the separation between the equipment and the TV. Federal Communications Commission Notice This equipment has been tested and found to comply with the instructions, may void the user's authority to operate the equipment...
User Manual
Page 28
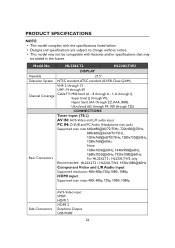
... not be added in the future. Note: Rear Connectors 1280x1024@60Hz, 1440x900@60Hz, 1680x1050@60Hz, 1920x1080@60Hz: For HL22XLT2 / HL22XLTW2 only. HL22XLT2 HL22XLTW2 DISPLAY Viewable 21.5" Television System NTSC standard,ATSC standard (8-VSB, Clear-QAM) VHF: 2 through 13 UHF: ...14 through 69 Channel Coverage Cable TV: Mild band (A - 8 through A - 1, A through I), Super band (J through W), Hyper band (AA through ZZ, AAA, BBB), Ultra...
... not be added in the future. Note: Rear Connectors 1280x1024@60Hz, 1440x900@60Hz, 1680x1050@60Hz, 1920x1080@60Hz: For HL22XLT2 / HL22XLTW2 only. HL22XLT2 HL22XLTW2 DISPLAY Viewable 21.5" Television System NTSC standard,ATSC standard (8-VSB, Clear-QAM) VHF: 2 through 13 UHF: ...14 through 69 Channel Coverage Cable TV: Mild band (A - 8 through A - 1, A through I), Super band (J through W), Hyper band (AA through ZZ, AAA, BBB), Ultra...

User Manual
Page 29
HL22XLT2 HL22XLTW2 WEIGHT & DIMENSIOIN Dimensions with Stand 21.11x15.4x6.3 (W x H x D)(inch) Dimensions without Stand 21.11x13.84x1.62 (W x H x D)(inch) Weight with Stand 8.82(lbs) Weight without Stand and Base 8.27(lbs) WALL MOUNTING VESA-compatible wall bracket 100 x 100 mm (W x H) Screw type Metric 4 x 10 mm POWER Power Consumption 50W Standby English Model No.
HL22XLT2 HL22XLTW2 WEIGHT & DIMENSIOIN Dimensions with Stand 21.11x15.4x6.3 (W x H x D)(inch) Dimensions without Stand 21.11x13.84x1.62 (W x H x D)(inch) Weight with Stand 8.82(lbs) Weight without Stand and Base 8.27(lbs) WALL MOUNTING VESA-compatible wall bracket 100 x 100 mm (W x H) Screw type Metric 4 x 10 mm POWER Power Consumption 50W Standby English Model No.


