Manual
Page 1
M10RDI Intel Atom Mini ITX Motherboard with Intel ICH10R Chipset User's Manual 1st Ed - 11 January 2013
M10RDI Intel Atom Mini ITX Motherboard with Intel ICH10R Chipset User's Manual 1st Ed - 11 January 2013
Manual
Page 6
... connector (F_AUDIO 32 2.4.16 Audio Amplifier Connector (SPK_OUT 33 2.4.17 SATA Power (SATAPW_1 33 2.4.18 SATA Power (SATAPW_2 34 6 M10RDI User's Manual Hardware Configuration 15 2.1 Product Overview ...16 2.2 Before you Proceed 18 2.3 Motherboard Overview 19 2.3.1 Placement Direction ...19 2.3.2 Screw Holes ...19 2.4 Setting Jumpers & Connectors 23 2.4.1 Serial Port Setting - AT or ATX (AT_CN...
... connector (F_AUDIO 32 2.4.16 Audio Amplifier Connector (SPK_OUT 33 2.4.17 SATA Power (SATAPW_1 33 2.4.18 SATA Power (SATAPW_2 34 6 M10RDI User's Manual Hardware Configuration 15 2.1 Product Overview ...16 2.2 Before you Proceed 18 2.3 Motherboard Overview 19 2.3.1 Placement Direction ...19 2.3.2 Screw Holes ...19 2.4 Setting Jumpers & Connectors 23 2.4.1 Serial Port Setting - AT or ATX (AT_CN...
Manual
Page 9
... instructions in any static charge before touching the CPU card. If you really have been shipped: 1 x M10RDI Mini-ITX Motherboard 1 x CD-ROM contains OS drivers/QIG/User's Manual 1 x COM cable 2 x SATA cable 2 x SATA Power Cable 1 x I/O shield M10RDI User's Manual 9 Modern electronic devices are not in a static-dissipative surface or static-shielded bag when...
... instructions in any static charge before touching the CPU card. If you really have been shipped: 1 x M10RDI Mini-ITX Motherboard 1 x CD-ROM contains OS drivers/QIG/User's Manual 1 x COM cable 2 x SATA cable 2 x SATA Power Cable 1 x I/O shield M10RDI User's Manual 9 Modern electronic devices are not in a static-dissipative surface or static-shielded bag when...
Manual
Page 18
...you Proceed Take note of the following precautions before touching any component, ensure that came with the component. Whenever you install motherboard components or change any component, place it on them due to static electricity Hold components by the edges to avoid touching...components to avoid damaging them . M10RDI • I/O - One PCI slot - Failure to do so may cause severe damage to 8 ports - Two 10/100/1000 Mbps Ethernet Controller - USB: USB 2.0/1.1, up to the motherboard, peripherals, and/or components. 18 M10RDI User's Manual Unplug the power ...
...you Proceed Take note of the following precautions before touching any component, ensure that came with the component. Whenever you install motherboard components or change any component, place it on them due to static electricity Hold components by the edges to avoid touching...components to avoid damaging them . M10RDI • I/O - One PCI slot - Failure to do so may cause severe damage to 8 ports - Two 10/100/1000 Mbps Ethernet Controller - USB: USB 2.0/1.1, up to the motherboard, peripherals, and/or components. 18 M10RDI User's Manual Unplug the power ...
Manual
Page 19
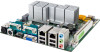
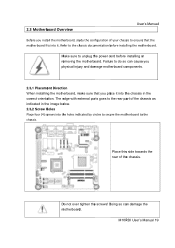
...before installing or removing the motherboard. M10RDI User's Manual 19 Refer to unplug the power cord before installing the motherboard. Place this side towards the rear of the chassis as indicated in the correct orientation. 2.3 Motherboard Overview User's Manual Before you install the motherboard, study the configuration of...in the image below. 2.3.2 Screw Holes Place four (4) screws into the holes indicated by circles to secure the motherboard to do so can damage the motherboard. The edge with external ports goes to the rear part of the chassis. Do not over tighten the screws!...
...before installing or removing the motherboard. M10RDI User's Manual 19 Refer to unplug the power cord before installing the motherboard. Place this side towards the rear of the chassis as indicated in the correct orientation. 2.3 Motherboard Overview User's Manual Before you install the motherboard, study the configuration of...in the image below. 2.3.2 Screw Holes Place four (4) screws into the holes indicated by circles to secure the motherboard to do so can damage the motherboard. The edge with external ports goes to the rear part of the chassis. Do not over tighten the screws!...


