User Manual
Page 1
GC-WB300D GC-WB150 User's Manual 12WE6-WIFIBT-30AR
GC-WB300D GC-WB150 User's Manual 12WE6-WIFIBT-30AR

User Manual
Page 2
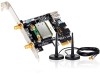
Step 2: Connect the other end of the USB cable to the F_USB connector on the Wi-Fi/ Bluetooth card. Connect one end of the USB cable to the USB connector on the motherboard. - 2 - English Chapter 1 Installing the Wi-Fi/Bluetooth Card Wi-Fi/Bluetooth Card Antenna Connector USB Connector Antenna Antenna Connector USB Cable Step 1: Install the Wi-Fi/Bluetooth card in a PCI Express x1 slot.
Step 2: Connect the other end of the USB cable to the F_USB connector on the Wi-Fi/ Bluetooth card. Connect one end of the USB cable to the USB connector on the motherboard. - 2 - English Chapter 1 Installing the Wi-Fi/Bluetooth Card Wi-Fi/Bluetooth Card Antenna Connector USB Connector Antenna Antenna Connector USB Cable Step 1: Install the Wi-Fi/Bluetooth card in a PCI Express x1 slot.
User Manual
Page 3
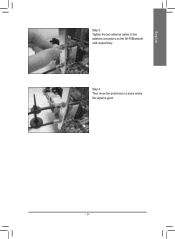
Step 4: Then move the antennas to the antenna connectors on the Wi-Fi/Bluetooth card respectively. English Step 3: Tighten the two antenna cables to a place where the signal is good. - 3 -
Step 4: Then move the antennas to the antenna connectors on the Wi-Fi/Bluetooth card respectively. English Step 3: Tighten the two antenna cables to a place where the signal is good. - 3 -

User Manual
Page 4
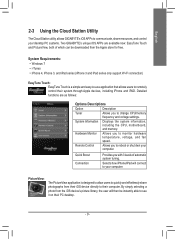
...-screen instructions to install the drivers and utilities in sequence. 2-2 Using the Wi-Fi Share Utility The Wi-Fi Share utility allows you to configure how your computer into a virtual wireless access point (Virtual Router Mode), which mode to the directory where shared files are listed. After the installation, the Wi-Fi Share icon will act. Option Descriptions Option Manage Wi-Fi Share Local Share Directory Mode Choice Setting Reset Router Live Update Help...
...-screen instructions to install the drivers and utilities in sequence. 2-2 Using the Wi-Fi Share Utility The Wi-Fi Share utility allows you to configure how your computer into a virtual wireless access point (Virtual Router Mode), which mode to the directory where shared files are listed. After the installation, the Wi-Fi Share icon will act. Option Descriptions Option Manage Wi-Fi Share Local Share Directory Mode Choice Setting Reset Router Live Update Help...
User Manual
Page 5
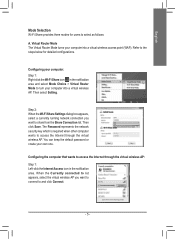
... wants to access the Internet through the virtual wireless AP. You can keep the default password or create your computer into a virtual wireless AP. When the Currently connected to list appears, select the virtual wireless AP you want to connect to select as follows: A. English Mode Selection Wi-Fi Share provides three modes for detailed configurations. Configuring your computer into a virtual wireless access point (WAP). Refer to turn your...
... wants to access the Internet through the virtual wireless AP. You can keep the default password or create your computer into a virtual wireless AP. When the Currently connected to list appears, select the virtual wireless AP you want to connect to select as follows: A. English Mode Selection Wi-Fi Share provides three modes for detailed configurations. Configuring your computer into a virtual wireless access point (WAP). Refer to turn your...

User Manual
Page 6
... computers with the Wi-Fi Share utility and have Wi-Fi Share Mode enabled. Then select Manage Wi-Fi Share to each other. Note: Be sure to turn off the firewall on both computers before using the network connection shared by the virtual wireless AP. English Step 2: When the Connect to a Network dialog box appears, enter the security key of the source computer, right-click...
... computers with the Wi-Fi Share utility and have Wi-Fi Share Mode enabled. Then select Manage Wi-Fi Share to each other. Note: Be sure to turn off the firewall on both computers before using the network connection shared by the virtual wireless AP. English Step 2: When the Connect to a Network dialog box appears, enter the security key of the source computer, right-click...

User Manual
Page 7
English Step 2: The Wi-Fi Share Manager will be on the Wi-Fi Share Manager. Drag the file/folder to the target computer, click Yes. The TX light will display the other computer with Wi-Fi Share Mode enabled (the target computer). Step 4: When asked whether to send the file/folder to the target computer displayed on when the file/data is located. Step 3: Go the directory where the file/folder that you want to share is being sent. - 7 -
English Step 2: The Wi-Fi Share Manager will be on the Wi-Fi Share Manager. Drag the file/folder to the target computer, click Yes. The TX light will display the other computer with Wi-Fi Share Mode enabled (the target computer). Step 4: When asked whether to send the file/folder to the target computer displayed on when the file/data is located. Step 3: Go the directory where the file/folder that you want to share is being sent. - 7 -
User Manual
Page 8
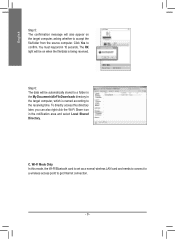
The RX light will be automatically stored to a folder in the My Documents\AirFileDownloads directory in the target computer, which is named according to accept the file/folder from the source computer....time. C. To directly access this mode, the Wi-Fi/Bluetooth card is set as a normal wireless LAN card and needs to connect to a wireless access point to confirm. Wi-Fi Mode Only In this directory later, you can also right-click the Wi-Fi Share icon in 15 seconds. Click Yes to get Internet connection. - 8 - English Step 5: The confirmation message will also appear on when the file...
The RX light will be automatically stored to a folder in the My Documents\AirFileDownloads directory in the target computer, which is named according to accept the file/folder from the source computer....time. C. To directly access this mode, the Wi-Fi/Bluetooth card is set as a normal wireless LAN card and needs to connect to a wireless access point to confirm. Wi-Fi Mode Only In this directory later, you can also right-click the Wi-Fi Share icon in 15 seconds. Click Yes to get Internet connection. - 8 - English Step 5: The confirmation message will also appear on when the file...
User Manual
Page 9
... a photo from the iOS device's picture library, the user will connect to your computer. Remote Control Allows you to monitor hardware temperature, voltage, and fan speed. Quick Boost Connection Provides you with 3 levels of which can be instantly able to see it on their PC desktop. - 9 - English 2-3 Using the Cloud Station Utility The Cloud Station utility allows GIGABYTE's iOS APPs to communicate, share...
... a photo from the iOS device's picture library, the user will connect to your computer. Remote Control Allows you to monitor hardware temperature, voltage, and fan speed. Quick Boost Connection Provides you with 3 levels of which can be instantly able to see it on their PC desktop. - 9 - English 2-3 Using the Cloud Station Utility The Cloud Station utility allows GIGABYTE's iOS APPs to communicate, share...
User Manual
Page 10
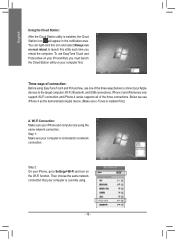
... demonstration Apple device. (Make sure i-Tunes is installed, the Cloud Station icon will appear in the notification area. Three ways of connection: Before using the same network connection. Wi-Fi Connection: Make sure your iPhone, go to the target computer: Wi-Fi, Bluetooth, and USB connections. Below we use one of the three connections. Step 1: Make sure your Apple devices to Settings>Wi-Fi and turn on...
... demonstration Apple device. (Make sure i-Tunes is installed, the Cloud Station icon will appear in the notification area. Three ways of connection: Before using the same network connection. Wi-Fi Connection: Make sure your iPhone, go to the target computer: Wi-Fi, Bluetooth, and USB connections. Below we use one of the three connections. Step 1: Make sure your Apple devices to Settings>Wi-Fi and turn on...

User Manual
Page 11
... begin to search for the computer using the same network connection. Now you are able to use the EasyTune Touch functions to the main menu of the EasyTune Touch application. When the computer is displayed, select it . Then return to remotely control the target computer via the iPhone or check hardware information. Using PictureView Step 1: Go to photo gallery...
... begin to search for the computer using the same network connection. Now you are able to use the EasyTune Touch functions to the main menu of the EasyTune Touch application. When the computer is displayed, select it . Then return to remotely control the target computer via the iPhone or check hardware information. Using PictureView Step 1: Go to photo gallery...
User Manual
Page 12
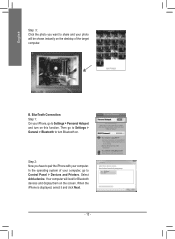
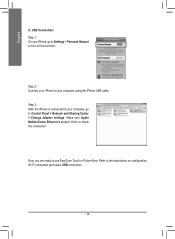
..., select it and click Next. - 12 - English Step 3: Click the photo you have to Control Panel > Devices and Printers. Step 2: Now you want to share and your iPhone, go to Settings > General > Bluetooth to Settings > Personal Hotspot and turn Bluetooth on this function. Select Add a device. Your computer will be shown instantly on the screen. Then go to...
..., select it and click Next. - 12 - English Step 3: Click the photo you have to Control Panel > Devices and Printers. Step 2: Now you want to share and your iPhone, go to Settings > General > Bluetooth to Settings > Personal Hotspot and turn Bluetooth on this function. Select Add a device. Your computer will be shown instantly on the screen. Then go to...
User Manual
Page 13
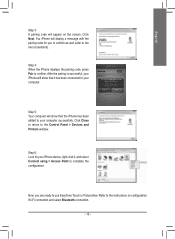
... to use EasyTune Touch or PictureView. After the pairing is successful, your computer successfully. Now, you to confirm as well (refer to the next screenshot). Refer to the instructions on the screen. You iPhone will appear on configuration Wi-Fi connection and select Bluetooth connection. - 13 - Click Close to return to the Control Panel > Devices and Printers window. English...
... to use EasyTune Touch or PictureView. After the pairing is successful, your computer successfully. Now, you to confirm as well (refer to the next screenshot). Refer to the instructions on the screen. You iPhone will appear on configuration Wi-Fi connection and select Bluetooth connection. - 13 - Click Close to return to the Control Panel > Devices and Printers window. English...
User Manual
Page 14
If not, re-check the connection. Now, you are ready to your computer using the iPhone USB cable. Step 3: After the iPhone is present. Step 2: Connect your iPhone to your computer, go to Settings > Personal Hotspot to turn on configuration Wi-Fi connection and select USB connection. - 14 - English C. Refer to Control Panel > Network and Sharing Center > Change adapter settings. USB Connection: Step 1: On your iPhone, go to the instructions on this function. Make sure Apple Mobile Device Ethernet is connected to use EasyTune Touch or PictureView.
If not, re-check the connection. Now, you are ready to your computer using the iPhone USB cable. Step 3: After the iPhone is present. Step 2: Connect your iPhone to your computer, go to Settings > Personal Hotspot to turn on configuration Wi-Fi connection and select USB connection. - 14 - English C. Refer to Control Panel > Network and Sharing Center > Change adapter settings. USB Connection: Step 1: On your iPhone, go to the instructions on this function. Make sure Apple Mobile Device Ethernet is connected to use EasyTune Touch or PictureView.


