Manual
Page 3
...on/from the Support\Motherboard\Technology Guide page on your motherboard revision before updating motherboard BIOS, drivers, or when looking for technical information. All rights reserved. GIGABYTE UNITED INC. No part of the product, read the Quick Installation Guide included with the product.... „ For detailed product information, carefully read the User's Manual. „ For instructions on how to GIGABYTE UNITED INC. Documentation Classifications In order to their respective owners. Check your motherboard looks like this manual are legally registered to ...
...on/from the Support\Motherboard\Technology Guide page on your motherboard revision before updating motherboard BIOS, drivers, or when looking for technical information. All rights reserved. GIGABYTE UNITED INC. No part of the product, read the Quick Installation Guide included with the product.... „ For detailed product information, carefully read the User's Manual. „ For instructions on how to GIGABYTE UNITED INC. Documentation Classifications In order to their respective owners. Check your motherboard looks like this manual are legally registered to ...
Manual
Page 5
... 61 3-1 Installing Chipset Drivers 61 3-2 SoftwareApplications 62 3-3 Driver CD Information 62 3-4 Hardware Information 63 3-5 Contact Us ...63 Chapter 4 Unique Features 65 4-1 Xpress Recovery2 65 4-2 BIOS Update ......77 5-1 Configuring SATA Hard Drive(s 77 5-1-1 Configuring Intel® ICH9R SATA Controllers 77 5-1-2 Configuring GIGABYTE SATA2 SATA Controller 83 5-1-3 Making a SATA RAID/AHCI Driver Diskette 89 5-1-4 Installing the SATA RAID/AHCI Driver and Operating System 90 5-2 Configuring Audio Input and Output 98 5-2-1 Configuring 2/4/5.1/7.1-Channel Audio 98 5-2-2 Installing...
... 61 3-1 Installing Chipset Drivers 61 3-2 SoftwareApplications 62 3-3 Driver CD Information 62 3-4 Hardware Information 63 3-5 Contact Us ...63 Chapter 4 Unique Features 65 4-1 Xpress Recovery2 65 4-2 BIOS Update ......77 5-1 Configuring SATA Hard Drive(s 77 5-1-1 Configuring Intel® ICH9R SATA Controllers 77 5-1-2 Configuring GIGABYTE SATA2 SATA Controller 83 5-1-3 Making a SATA RAID/AHCI Driver Diskette 89 5-1-4 Installing the SATA RAID/AHCI Driver and Operating System 90 5-2 Configuring Audio Input and Output 98 5-2-1 Configuring 2/4/5.1/7.1-Channel Audio 98 5-2-2 Installing...
Manual
Page 6
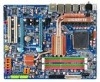
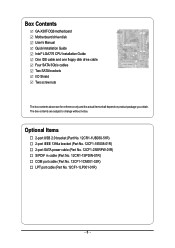
... No. 12CF1-1LP001-01R) - 6 - The box contents are for reference only and the actual items shall depend on product package you obtain. Box Contents GA-X38T-DQ6 motherboard Motherboard driver disk User's Manual Quick Installation Guide Intel® LGA775 CPU Installation Guide One IDE cable and one floppy disk drive cable Four SATA 3Gb...
... No. 12CF1-1LP001-01R) - 6 - The box contents are for reference only and the actual items shall depend on product package you obtain. Box Contents GA-X38T-DQ6 motherboard Motherboard driver disk User's Manual Quick Installation Guide Intel® LGA775 CPU Installation Guide One IDE cable and one floppy disk drive cable Four SATA 3Gb...
Manual
Page 12
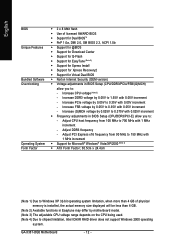
... 0.025V to 0.375V with 0.05V increment - GA-X38T-DQ6 Motherboard - 12 - Increase PCIe voltage by 0.05V to 1.55V with 0.025V increment Š Frequency adjustments in BIOS Setup (CPU/DDR3/PCI-E) allow you to: - Adjust DDR3 frequency - Increase FSB voltage by 0.05V to chipset limitation, Intel ICH9R RAID driver does not support Windows 2000 operating...
... 0.025V to 0.375V with 0.05V increment - GA-X38T-DQ6 Motherboard - 12 - Increase PCIe voltage by 0.05V to 1.55V with 0.025V increment Š Frequency adjustments in BIOS Setup (CPU/DDR3/PCI-E) allow you to: - Adjust DDR3 frequency - Increase FSB voltage by 0.05V to chipset limitation, Intel ICH9R RAID driver does not support Windows 2000 operating...
Manual
Page 19
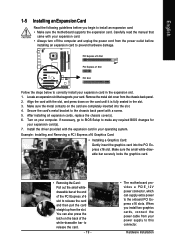
... your expansion card in the slot. 3. Make sure the metal contacts on the card until it is fully seated in the expansion slot. 1. Install the driver provided with the slot, and press down on the card are completely inserted into the PCI Express x16 slot. Hardware Installation Carefully read the manual...
... your expansion card in the slot. 3. Make sure the metal contacts on the card until it is fully seated in the expansion slot. 1. Install the driver provided with the slot, and press down on the card are completely inserted into the PCI Express x16 slot. Hardware Installation Carefully read the manual...

Manual
Page 38
... boot from the device configured in Boot Menu is effective for one time only. In Boot Menu, use the up hard drive data using the driver disk, the key can access Boot Menu again to change the first boot device setting as needed. : Q-Flash Press the key to accept. Motherboard ... screen at system startup, refer to the instructions on the Full Screen LOGO Show item on BIOS Setup settings. Note: The setting in Boot Menu. GA-X38T-DQ6 Motherboard - 38 - The POST Screen Award Modular BIOS v6.00PG, An Energy Star Ally Copyright (C) 1984-2007, Award Software, Inc. A. To exit Boot Menu, ...
... boot from the device configured in Boot Menu is effective for one time only. In Boot Menu, use the up hard drive data using the driver disk, the key can access Boot Menu again to change the first boot device setting as needed. : Q-Flash Press the key to accept. Motherboard ... screen at system startup, refer to the instructions on the Full Screen LOGO Show item on BIOS Setup settings. Note: The setting in Boot Menu. GA-X38T-DQ6 Motherboard - 38 - The POST Screen Award Modular BIOS v6.00PG, An Energy Star Ally Copyright (C) 1984-2007, Award Software, Inc. A. To exit Boot Menu, ...

Manual
Page 45
... controllers to PATA mode. (Default) RAID Enables RAID for the SATA controllers. Advanced Host Controller Interface (AHCI) is an interface specification that allows the storage driver to AHCI mode. English 2-5 Integrated Peripherals CMOS Setup Utility-Copyright (C) 1984-2007 Award Software Integrated Peripherals SATA RAID/AHCI Mode SATA Port0~3 Native Mode USB...
... controllers to PATA mode. (Default) RAID Enables RAID for the SATA controllers. Advanced Host Controller Interface (AHCI) is an interface specification that allows the storage driver to AHCI mode. English 2-5 Integrated Peripherals CMOS Setup Utility-Copyright (C) 1984-2007 Award Software Integrated Peripherals SATA RAID/AHCI Mode SATA Port0~3 Native Mode USB...
Manual
Page 48
GA-X38T-DQ6 Motherboard - 48 - Options are : Auto, 3F8/IRQ4 (default), 2F8/IRQ3, 3E8/IRQ4,... parallel (LPT) port. Parallel Port Mode Selects an operating mode for the SATA controller integrated in the GIGABYTE SATA 2 chip or configures the SATA controller to enable advanced Serial ATA features such as Native Command Queuing... and hot plug. Advanced Host Controller Interface (AHCI) is an interface specification that allows the storage driver to AHCI mode. Options are: SPP (Standard Parallel Port)(default), EPP (Enhanced Parallel Port), ECP (Extended ...
GA-X38T-DQ6 Motherboard - 48 - Options are : Auto, 3F8/IRQ4 (default), 2F8/IRQ3, 3E8/IRQ4,... parallel (LPT) port. Parallel Port Mode Selects an operating mode for the SATA controller integrated in the GIGABYTE SATA 2 chip or configures the SATA controller to enable advanced Serial ATA features such as Native Command Queuing... and hot plug. Advanced Host Controller Interface (AHCI) is an interface specification that allows the storage driver to AHCI mode. Options are: SPP (Standard Parallel Port)(default), EPP (Enhanced Parallel Port), ECP (Extended ...
Manual
Page 61
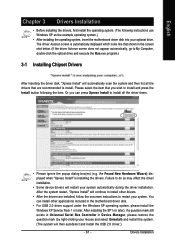
... select the item that are installed, follow the onscreen instructions to install. You can press Xpress Install to install all the drivers that you can install other drivers. • After the drivers are recommended to restart your mouse and select Uninstall) and restart the system. (The system will automatically scan the system and...
... select the item that are installed, follow the onscreen instructions to install. You can press Xpress Install to install all the drivers that you can install other drivers. • After the drivers are recommended to restart your mouse and select Uninstall) and restart the system. (The system will automatically scan the system and...
Manual
Page 62
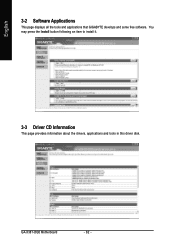
GA-X38T-DQ6 Motherboard - 62 - You may press the Install button following an item to install it. 3-3 Driver CD Information This page provides information about the drivers, applications and tools in this driver disk. English 3-2 Software Applications This page displays all the tools and applications that GIGABYTE develops and some free software.
GA-X38T-DQ6 Motherboard - 62 - You may press the Install button following an item to install it. 3-3 Driver CD Information This page provides information about the drivers, applications and tools in this driver disk. English 3-2 Software Applications This page displays all the tools and applications that GIGABYTE develops and some free software.
Manual
Page 63
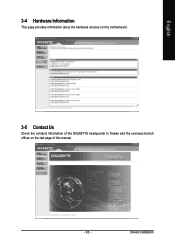
Drivers Installation English 3-4 Hardware Information This page provides information about the hardware devices on this motherboard. 3-5 Contact Us Check the contacts information of the GIGABYTE headquarter in Taiwan and the overseas branch offices on the last page of this manual. - 63 -
Drivers Installation English 3-4 Hardware Information This page provides information about the hardware devices on this motherboard. 3-5 Contact Us Check the contacts information of the GIGABYTE headquarter in Taiwan and the overseas branch offices on the last page of this manual. - 63 -
Manual
Page 65
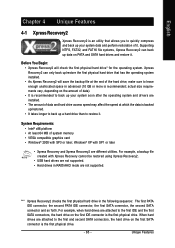
... SATA connectors, the hard drive on the amount of data). • It is recommended to back up your system soon after the operating system and drivers are installed. • The amount of data and hard drive access speed may affect the speed at the end of the hard drive, make sure...
... SATA connectors, the hard drive on the amount of data). • It is recommended to back up your system soon after the operating system and drivers are installed. • The amount of data and hard drive access speed may affect the speed at the end of the hard drive, make sure...
Manual
Page 68
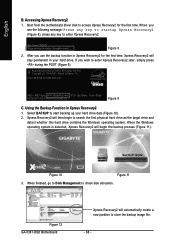
... in Xpress Recovery2 1. When finished, go to Disk Management to enter Xpress Recovery2 later, simply press during the POST (Figure 9). Boot from the motherboard driver disk to enter Xpress Recovery2. . . Using the Backup Function in your hard drive data (Figure 10). 2. English B. When the Windows operating system is...the first physical hard drive as the target drive and detect whether this hard drive contains the Windows operating system. Figure 12 GA-X38T-DQ6 Motherboard Xpress Recovery2 will begin to store the backup image file. - 68 - Accessing Xpress Recovery2 1.
... in Xpress Recovery2 1. When finished, go to Disk Management to enter Xpress Recovery2 later, simply press during the POST (Figure 9). Boot from the motherboard driver disk to enter Xpress Recovery2. . . Using the Backup Function in your hard drive data (Figure 10). 2. English B. When the Windows operating system is...the first physical hard drive as the target drive and detect whether this hard drive contains the Windows operating system. Figure 12 GA-X38T-DQ6 Motherboard Xpress Recovery2 will begin to store the backup image file. - 68 - Accessing Xpress Recovery2 1.
Manual
Page 73
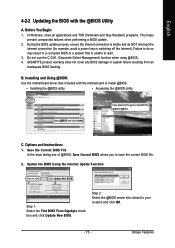
... BIOS. Select @BIOS and click Install. Unique Features Do not use the C.O.M. (Corporate Online Management) function when using @BIOS. 4. GIGABYTE product warranty does not cover any BIOS damage or system failure resulting from an inadequate BIOS flashing. In Windows, close all applications and TSR...to install @BIOS. • Installing the @BIOS utility. • Accessing the @BIOS utility. Installing and Using @BIOS: Use the motherboard driver disk included with the @BIOS Utility A. Save the Current BIOS File In the main dialog box of @BIOS, Save Current BIOS allows you ...
... BIOS. Select @BIOS and click Install. Unique Features Do not use the C.O.M. (Corporate Online Management) function when using @BIOS. 4. GIGABYTE product warranty does not cover any BIOS damage or system failure resulting from an inadequate BIOS flashing. In Windows, close all applications and TSR...to install @BIOS. • Installing the @BIOS utility. • Accessing the @BIOS utility. Installing and Using @BIOS: Use the motherboard driver disk included with the @BIOS Utility A. Save the Current BIOS File In the main dialog box of @BIOS, Save Current BIOS allows you ...
Manual
Page 77
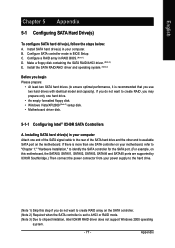
...(Note 3) Due to create RAID, you use two hard drives with identical model and capacity). Make a floppy disk containing the SATA RAID/AHCI driver. (Note 2) E. If there is more than one end of the SATA signal cable to the rear of the SATA hard drive and the ... you may prepare only one hard drive. • An empty formatted floppy disk. • Windows Vista/XP/2000 (Note 3) setup disk. • Motherboard driver disk. 5-1-1 Configuring Intel® ICH9R SATA Controllers A. Configure a RAID array in your computer Attach one SATA controller on your motherboard, refer to "Chapter 1," ...
...(Note 3) Due to create RAID, you use two hard drives with identical model and capacity). Make a floppy disk containing the SATA RAID/AHCI driver. (Note 2) E. If there is more than one end of the SATA signal cable to the rear of the SATA hard drive and the ... you may prepare only one hard drive. • An empty formatted floppy disk. • Windows Vista/XP/2000 (Note 3) setup disk. • Motherboard driver disk. 5-1-1 Configuring Intel® ICH9R SATA Controllers A. Configure a RAID array in your computer Attach one SATA controller on your motherboard, refer to "Chapter 1," ...

Manual
Page 81
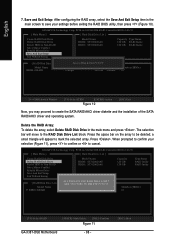
Finally press on the Create Volume item to create the SATA RAID/AHCI driver diskette and the installation of the SATA RAID/ACHI driver and operating system. - 81 - Are you sure you want to create this volume, press to confirm or to cancel (Figure 6). Create RAID Volume 2. Exit RAID ...
Finally press on the Create Volume item to create the SATA RAID/AHCI driver diskette and the installation of the SATA RAID/ACHI driver and operating system. - 81 - Are you sure you want to create this volume, press to confirm or to cancel (Figure 6). Create RAID Volume 2. Exit RAID ...
Manual
Page 88
... (Y/N)? GIGABYTE Technology Corp. N RAID Level Capacity Status 0-Stripe 240 GB Normal Members(HDDx) 01 [KL]-Select RAID [SPACE]-Mark Delete [DEL]-Confirm Figure 11 GA-X38T-DQ6 Motherboard - 88 - [ESC]-Abort Press the space bar on the array to create the SATA RAID/AHCI driver diskette and... the installation of the SATA RAID/AHCI driver and operating system. PCIE-to-SATAII/IDE RAID Controller...
... (Y/N)? GIGABYTE Technology Corp. N RAID Level Capacity Status 0-Stripe 240 GB Normal Members(HDDx) 01 [KL]-Select RAID [SPACE]-Mark Delete [DEL]-Confirm Figure 11 GA-X38T-DQ6 Motherboard - 88 - [ESC]-Abort Press the space bar on the array to create the SATA RAID/AHCI driver diskette and... the installation of the SATA RAID/AHCI driver and operating system. PCIE-to-SATAII/IDE RAID Controller...
Manual
Page 89
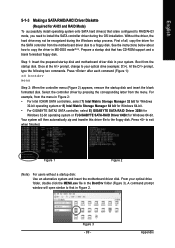
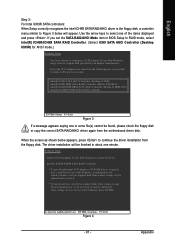
...menu Step 2: When the controller menu (Figure 2) appears, remove the startup disk and insert the blank formatted disk. Select the controller driver by pressing the corresponding letter from the startup disk. For example, from the menu in Figure 2: • For Intel ICH9R SATA ...Windows 64-bit. • For GIGABYTE SATA2 SATA controller, select E) GIGABYTE SATA-RAID Driver 32Bit for Windows 32-bit operating system or F) GIGABYTE SATA-RAID Driver 64Bit for the SATA controller from the motherboard driver disk to install the SATA controller driver during the Windows setup process. Once ...
...menu Step 2: When the controller menu (Figure 2) appears, remove the startup disk and insert the blank formatted disk. Select the controller driver by pressing the corresponding letter from the startup disk. For example, from the menu in Figure 2: • For Intel ICH9R SATA ...Windows 64-bit. • For GIGABYTE SATA2 SATA controller, select E) GIGABYTE SATA-RAID Driver 32Bit for Windows 32-bit operating system or F) GIGABYTE SATA-RAID Driver 64Bit for the SATA controller from the motherboard driver disk to install the SATA controller driver during the Windows setup process. Once ...
Manual
Page 90
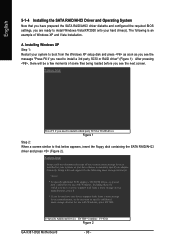
S=Specify Additional Device ENTER=Continue F3=Exit Figure 2 GA-X38T-DQ6 Motherboard - 90 - Installing Windows XP Step 1: Restart your hard drive(s). After pressing , there will load support for use with Windows, including those for which you ... device manufacturer, press S. * If you have chosen to boot from a mass storage device manufacturer, or do not want to install a third party SCSI or RAID driver. The following mass storage devices(s) * To specify additional SCSI adapters, CD-ROM drives, or special disk controllers for use with Windows, press ENTER. Currently, Setup...
S=Specify Additional Device ENTER=Continue F3=Exit Figure 2 GA-X38T-DQ6 Motherboard - 90 - Installing Windows XP Step 1: Restart your hard drive(s). After pressing , there will load support for use with Windows, including those for which you ... device manufacturer, press S. * If you have chosen to boot from a mass storage device manufacturer, or do not want to install a third party SCSI or RAID driver. The following mass storage devices(s) * To specify additional SCSI adapters, CD-ROM drives, or special disk controllers for use with Windows, press ENTER. Currently, Setup...
Manual
Page 91
...Adapter for use with Windows, press ENTER. English Step 3: For Intel ICH9R SATA controllers: When Setup correctly recognizes the Intel ICH9R SATA RAID/AHCI driver in about one minute. S=Specify Additional Device ENTER=Continue F3=Exit Figure 4 - 91 - Windows Setup Setup will appear. Select the SCSI ... use with Windows, using a device support disk provided by an adapter manufacturer. Use the arrow keys to continue the driver installation from the motherboard driver disk. When the screen as shown below will load support for the following list, or press ESC to return to...
...Adapter for use with Windows, press ENTER. English Step 3: For Intel ICH9R SATA controllers: When Setup correctly recognizes the Intel ICH9R SATA RAID/AHCI driver in about one minute. S=Specify Additional Device ENTER=Continue F3=Exit Figure 4 - 91 - Windows Setup Setup will appear. Select the SCSI ... use with Windows, using a device support disk provided by an adapter manufacturer. Use the arrow keys to continue the driver installation from the motherboard driver disk. When the screen as shown below will load support for the following list, or press ESC to return to...


