Manual
Page 1
GA-VM900MC Intel® CoreTM 2 Duo / Intel® Pentium® D / Intel® Pentium® 4 / Celeron® D LGA775 Processor Motherboard User's Manual Rev. 1002 12ME-VM900MC-1002R * The WEEE marking on the product indicates this product must not be disposed of with user's other household waste and must be handed over to a designated collection point for the recycling of waste electrical and electronic equipment!! * The WEEE marking applies only in European Union's member states.
GA-VM900MC Intel® CoreTM 2 Duo / Intel® Pentium® D / Intel® Pentium® 4 / Celeron® D LGA775 Processor Motherboard User's Manual Rev. 1002 12ME-VM900MC-1002R * The WEEE marking on the product indicates this product must not be disposed of with user's other household waste and must be handed over to a designated collection point for the recycling of waste electrical and electronic equipment!! * The WEEE marking applies only in European Union's member states.

Manual
Page 3
... without prior notice. For product-related information, check on our website at: http://www.gigabyte.com.tw Identifying Your Motherboard Revision The revision number on our website. Check your motherboard looks like this manual are legally registered to GIGABYTE UNITED INC. Copyright © 2007 GIGA-BYTE TECHNOLOGY CO., LTD. All rights reserved. Example...
... without prior notice. For product-related information, check on our website at: http://www.gigabyte.com.tw Identifying Your Motherboard Revision The revision number on our website. Check your motherboard looks like this manual are legally registered to GIGABYTE UNITED INC. Copyright © 2007 GIGA-BYTE TECHNOLOGY CO., LTD. All rights reserved. Example...
Manual
Page 6
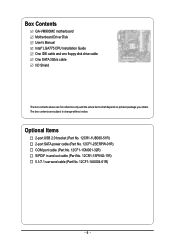
.... 12CF1-1CM001-32R) S/PDIF in and out cable (Part No. 12CR1-1SPINO-11R) 5.1/7.1 surround cable (Part No. 12CF1-1AU004-01R) - 6 - Box Contents GA-VM900MC motherboard Motherboard Driver Disk User's Manual Intel® LGA775 CPU Installation Guide One IDE cable and one floppy disk drive cable One SATA 3Gb/s cable I/O Shield The box contents...
.... 12CF1-1CM001-32R) S/PDIF in and out cable (Part No. 12CR1-1SPINO-11R) 5.1/7.1 surround cable (Part No. 12CF1-1AU004-01R) - 6 - Box Contents GA-VM900MC motherboard Motherboard Driver Disk User's Manual Intel® LGA775 CPU Installation Guide One IDE cable and one floppy disk drive cable One SATA 3Gb/s cable I/O Shield The box contents...

Manual
Page 9
... to wear an electrostatic discharge (ESD) wrist strap when handling electronic components such as a motherboard, CPU or memory. Prior to installation, carefully read the user's manual and follow these procedures: • Prior to installation, do not have an ESD wrist strap, keep your hands dry and first touch a metal object to...
... to wear an electrostatic discharge (ESD) wrist strap when handling electronic components such as a motherboard, CPU or memory. Prior to installation, carefully read the user's manual and follow these procedures: • Prior to installation, do not have an ESD wrist strap, keep your hands dry and first touch a metal object to...
Manual
Page 15
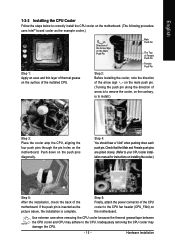
Check that the Male and Female push pins are joined closely. (Refer to your CPU cooler installation manual for instructions on installing the cooler.) Step 5: After the installation, check the back of the CPU cooler to the CPU fan header (CPU_FAN) on the ...
Check that the Male and Female push pins are joined closely. (Refer to your CPU cooler installation manual for instructions on installing the cooler.) Step 5: After the installation, check the back of the CPU cooler to the CPU fan header (CPU_FAN) on the ...
Manual
Page 17
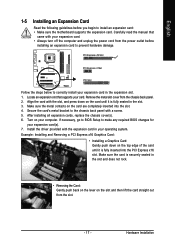
Carefully read the manual that supports your card. Align the card with a screw. 5. Hardware Installation Example: Installing and Removing a PCI Express x16 Graphics Card: • Installing a Graphics Card: Gently ...
Carefully read the manual that supports your card. Align the card with a screw. 5. Hardware Installation Example: Installing and Removing a PCI Express x16 Graphics Card: • Installing a Graphics Card: Gently ...
Manual
Page 28
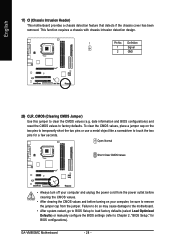
... to the motherboard. • After system restart, go to BIOS Setup to load factory defaults (select Load Optimized Defaults) or manually configure the BIOS settings (refer to clear the CMOS values (e.g. GA-VM900MC Motherboard - 28 - Definition 1 Signal 2 GND 20) CLR_CMOS (Clearing CMOS Jumper) Use this jumper to Chapter 2, "BIOS Setup," for a few seconds...
... to the motherboard. • After system restart, go to BIOS Setup to load factory defaults (select Load Optimized Defaults) or manually configure the BIOS settings (refer to clear the CMOS values (e.g. GA-VM900MC Motherboard - 28 - Definition 1 Signal 2 GND 20) CLR_CMOS (Clearing CMOS Jumper) Use this jumper to Chapter 2, "BIOS Setup," for a few seconds...
Manual
Page 33
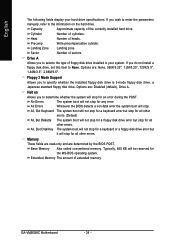
..., set this item to None so the system will skip the detection of the device during the POST for faster system startup. • Manual Allows you to manually enter the specifications of the hard drive when the hard drive access mode is set this item to None so the system will skip...
..., set this item to None so the system will skip the detection of the device during the POST for faster system startup. • Manual Allows you to manually enter the specifications of the hard drive when the hard drive access mode is set this item to None so the system will skip...
Manual
Page 34
Capacity Approximate capacity of heads. Precomp Write precompensation cylinder. Drive A Allows you wish to enter the parameters manually, refer to specify whether the installed floppy disk drive is 3-mode floppy disk drive, a Japanese standard floppy disk drive. Halt on ... system boot will be reserved for any error. Base Memory Also called conventional memory. If you to determine whether the system will not stop . GA-VM900MC Motherboard - 34 - Floppy 3 Mode Support Allows you to the information on Allows you do not install a floppy disk drive, set this item...
Capacity Approximate capacity of heads. Precomp Write precompensation cylinder. Drive A Allows you wish to enter the parameters manually, refer to specify whether the installed floppy disk drive is 3-mode floppy disk drive, a Japanese standard floppy disk drive. Halt on ... system boot will be reserved for any error. Base Memory Also called conventional memory. If you to determine whether the system will not stop . GA-VM900MC Motherboard - 34 - Floppy 3 Mode Support Allows you to the information on Allows you do not install a floppy disk drive, set this item...
Manual
Page 49
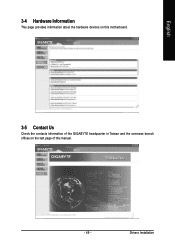
English 3-4 Hardware Information This page provides information about the hardware devices on this motherboard. 3-5 Contact Us Check the contacts information of the GIGABYTE headquarter in Taiwan and the overseas branch offices on the last page of this manual. - 49 - Drivers Installation
English 3-4 Hardware Information This page provides information about the hardware devices on this motherboard. 3-5 Contact Us Check the contacts information of the GIGABYTE headquarter in Taiwan and the overseas branch offices on the last page of this manual. - 49 - Drivers Installation
Manual
Page 60
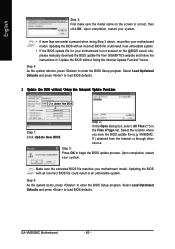
... and press to enter the BIOS Setup program. Step 2: In the Open dialog box, select All Files (*.*) in an unbootable system. f1) obtained from GIGABYTE's website and follow the instructions in "Update the BIOS without Using the Internet Update Function Click Update New BIOS Step 1: Click Update New BIOS. Make...program. Select Load Optimized Defaults and press to load BIOS defaults. English Step 3: First make sure the model name on the @BIOS server site, please manually download the BIOS update file from the Internet or through other source. GA-VM900MC Motherboard - 60 -
... and press to enter the BIOS Setup program. Step 2: In the Open dialog box, select All Files (*.*) in an unbootable system. f1) obtained from GIGABYTE's website and follow the instructions in "Update the BIOS without Using the Internet Update Function Click Update New BIOS Step 1: Click Update New BIOS. Make...program. Select Load Optimized Defaults and press to load BIOS defaults. English Step 3: First make sure the model name on the @BIOS server site, please manually download the BIOS update file from the Internet or through other source. GA-VM900MC Motherboard - 60 -
Manual
Page 67
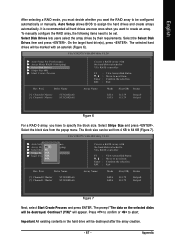
...in the hard drive will be set from the popup menu. Select the Select Disk Drives item and press . Posi. Appendix To manually configure the RAID array, the following items need to be marked with an asterisk (Figure 6). Select Disk Drives lets users select ... X Array Mode4RKAID 0 (Striping) X Select Disk D8rKives X Stripe Size 6416KK X Start Create32PKrocess 64K Dev. Continue? (Y/N)" will be configured automatically or manually. It is recommended all hard drives are new ones when you want to create an array. On the target hard drive(s), press . Press to confirm...
...in the hard drive will be set from the popup menu. Select the Select Disk Drives item and press . Posi. Appendix To manually configure the RAID array, the following items need to be marked with an asterisk (Figure 6). Select Disk Drives lets users select ... X Array Mode4RKAID 0 (Striping) X Select Disk D8rKives X Stripe Size 6416KK X Start Create32PKrocess 64K Dev. Continue? (Y/N)" will be configured automatically or manually. It is recommended all hard drives are new ones when you want to create an array. On the target hard drive(s), press . Press to confirm...
Manual
Page 71
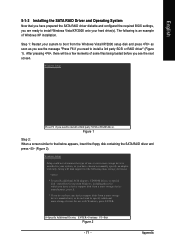
... an example of one or more mass storage devices installed in your system to boot from a mass storage device manufacturer, or do not want to manually specify an adapter. After pressing , there will load support for use with Windows, press ENTER.
... an example of one or more mass storage devices installed in your system to boot from a mass storage device manufacturer, or do not want to manually specify an adapter. After pressing , there will load support for use with Windows, press ENTER.
Manual
Page 75
... following instructions use Windows XP as the example operating system.) Step 1: After installing the audio driver, the Audio Manager icon will appear in jack and manually configure the jack for microphone functionality. • If your front panel audio supports Intel HD Audio standard, you can have an Internet chat, make sure...
... following instructions use Windows XP as the example operating system.) Step 1: After installing the audio driver, the Audio Manager icon will appear in jack and manually configure the jack for microphone functionality. • If your front panel audio supports Intel HD Audio standard, you can have an Internet chat, make sure...


