
Manual
Page 3
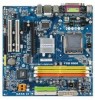
... of the motherboard is the property of this manual are legally registered to use GIGABYTE's unique features, read or download the information on/from the Support\Motherboard\Technology Guide page on your motherboard revision before updating motherboard BIOS, drivers, or when looking for technical information. For example, "REV: 1.0" means the revision of...
... of the motherboard is the property of this manual are legally registered to use GIGABYTE's unique features, read or download the information on/from the Support\Motherboard\Technology Guide page on your motherboard revision before updating motherboard BIOS, drivers, or when looking for technical information. For example, "REV: 1.0" means the revision of...
Manual
Page 5
... 47 3-1 Installing Chipset Drivers 47 3-2 SoftwareApplications 48 3-3 Driver CD Information 48 3-4 Hardware Information 49 3-5 Contact Us ...49 Chapter 4 Unique Features 51 4-1 Xpress Recovery2 51 4-2 BIOS Update Utilities...ReadyBoost 62 Chapter 5 Appendix ...63 5-1 Configuring SATA Hard Drive(s 63 5-1-1 Configuring VIA VT8237S SATA Controllers 63 5-1-2 Making a SATA RAID Driver Diskette 70 5-1-3 Installing the SATA RAID Driver and Operating System 71 5-2 Configuring Audio Input and Output 74 5-2-1 Configuring 2/4/5.1/7.1-Channel Audio 74 5-2-2 Installing the S/PDIF In and Out ...
... 47 3-1 Installing Chipset Drivers 47 3-2 SoftwareApplications 48 3-3 Driver CD Information 48 3-4 Hardware Information 49 3-5 Contact Us ...49 Chapter 4 Unique Features 51 4-1 Xpress Recovery2 51 4-2 BIOS Update Utilities...ReadyBoost 62 Chapter 5 Appendix ...63 5-1 Configuring SATA Hard Drive(s 63 5-1-1 Configuring VIA VT8237S SATA Controllers 63 5-1-2 Making a SATA RAID Driver Diskette 70 5-1-3 Installing the SATA RAID Driver and Operating System 71 5-2 Configuring Audio Input and Output 74 5-2-1 Configuring 2/4/5.1/7.1-Channel Audio 74 5-2-2 Installing the S/PDIF In and Out ...
Manual
Page 6
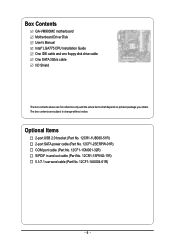
... (Part No. 12CF1-1CM001-32R) S/PDIF in and out cable (Part No. 12CR1-1SPINO-11R) 5.1/7.1 surround cable (Part No. 12CF1-1AU004-01R) - 6 - Box Contents GA-VM900MC motherboard Motherboard Driver Disk User's Manual Intel® LGA775 CPU Installation Guide One IDE cable and one floppy disk drive cable One SATA 3Gb/s cable I/O Shield The...
... (Part No. 12CF1-1CM001-32R) S/PDIF in and out cable (Part No. 12CR1-1SPINO-11R) 5.1/7.1 surround cable (Part No. 12CF1-1AU004-01R) - 6 - Box Contents GA-VM900MC motherboard Motherboard Driver Disk User's Manual Intel® LGA775 CPU Installation Guide One IDE cable and one floppy disk drive cable One SATA 3Gb/s cable I/O Shield The...
Manual
Page 17
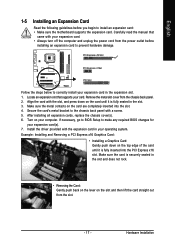
... card to install an expansion card: • Make sure the motherboard supports the expansion card. Carefully read the manual that supports your computer. Install the driver provided with your expansion card(s). 7. Hardware Installation Align the card with a screw. 5. Make sure the card is securely seated in the expansion slot. 1. Remove the...
... card to install an expansion card: • Make sure the motherboard supports the expansion card. Carefully read the manual that supports your computer. Install the driver provided with your expansion card(s). 7. Hardware Installation Align the card with a screw. 5. Make sure the card is securely seated in the expansion slot. 1. Remove the...

Manual
Page 19
... and your devices are compliant with the connectors you need to install a 5.1/7.1 surround cable (optional) and enable the multi-channel audio feature through the audio driver. Hardware Installation Refer to the instructions on the motherboard. - 19 - English Mic In Jack (Pink) The default Mic in Chapter 5, "Configuring 2/4/5.1/7.1Channel Audio." 1-7 Internal Connectors...
... and your devices are compliant with the connectors you need to install a 5.1/7.1 surround cable (optional) and enable the multi-channel audio feature through the audio driver. Hardware Installation Refer to the instructions on the motherboard. - 19 - English Mic In Jack (Pink) The default Mic in Chapter 5, "Configuring 2/4/5.1/7.1Channel Audio." 1-7 Internal Connectors...
Manual
Page 30
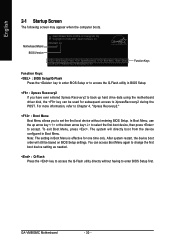
...key < > or the down arrow key< > to select the first boot device, then press to enter BIOS Setup first. To exit Boot Menu, press . GA-VM900MC Motherboard - 30 - VM900MC E3 . . . . : BIOS Setup/Q-Flash : XpressRecovery2 : Boot Menu : Qflash 05/29/2007-P4M900-8237S-6A7L8G11C-00 Function Keys Function Keys: : BIOS... access to access the Q-Flash utility directly without entering BIOS Setup. In Boot Menu, use the up hard drive data using the motherboard driver disk, the key can access Boot Menu again to change the first boot device setting as needed. : Q-Flash Press the key to ...
...key < > or the down arrow key< > to select the first boot device, then press to enter BIOS Setup first. To exit Boot Menu, press . GA-VM900MC Motherboard - 30 - VM900MC E3 . . . . : BIOS Setup/Q-Flash : XpressRecovery2 : Boot Menu : Qflash 05/29/2007-P4M900-8237S-6A7L8G11C-00 Function Keys Function Keys: : BIOS... access to access the Q-Flash utility directly without entering BIOS Setup. In Boot Menu, use the up hard drive data using the motherboard driver disk, the key can access Boot Menu again to change the first boot device setting as needed. : Q-Flash Press the key to ...

Manual
Page 47
...) and restart the system. (The system will continue to install other applications included in the screen shot below. (If the driver Autorun screen does not appear automatically, go to install. After installing the SP1 (or later), if a question mark still exists... Controller in Device Manager, please remove the question mark (by right-clicking your system automatically during the driver installation. English Chapter 3 Drivers Installation • Before installing the drivers, first install the operating system. (The following the item. You can press Xpress Install to restart...
...) and restart the system. (The system will continue to install other applications included in the screen shot below. (If the driver Autorun screen does not appear automatically, go to install. After installing the SP1 (or later), if a question mark still exists... Controller in Device Manager, please remove the question mark (by right-clicking your system automatically during the driver installation. English Chapter 3 Drivers Installation • Before installing the drivers, first install the operating system. (The following the item. You can press Xpress Install to restart...
Manual
Page 48
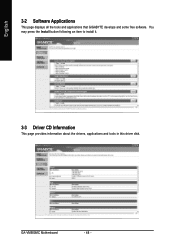
You may press the Install button following an item to install it. 3-3 Driver CD Information This page provides information about the drivers, applications and tools in this driver disk. GA-VM900MC Motherboard - 48 - English 3-2 Software Applications This page displays all the tools and applications that GIGABYTE develops and some free software.
You may press the Install button following an item to install it. 3-3 Driver CD Information This page provides information about the drivers, applications and tools in this driver disk. GA-VM900MC Motherboard - 48 - English 3-2 Software Applications This page displays all the tools and applications that GIGABYTE develops and some free software.
Manual
Page 49
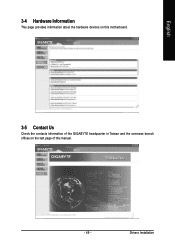
English 3-4 Hardware Information This page provides information about the hardware devices on this motherboard. 3-5 Contact Us Check the contacts information of the GIGABYTE headquarter in Taiwan and the overseas branch offices on the last page of this manual. - 49 - Drivers Installation
English 3-4 Hardware Information This page provides information about the hardware devices on this motherboard. 3-5 Contact Us Check the contacts information of the GIGABYTE headquarter in Taiwan and the overseas branch offices on the last page of this manual. - 49 - Drivers Installation
Manual
Page 51
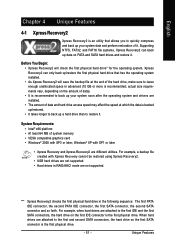
... drive on the first SATA connector is the first physical drive. - 51 - Xpress Recovery2 can back up your system soon after the operating system and drivers are attached to the first and second SATA connectors, the hard drive on the first IDE connector is the first physical drive. For example, when...
... drive on the first SATA connector is the first physical drive. - 51 - Xpress Recovery2 can back up your system soon after the operating system and drivers are attached to the first and second SATA connectors, the hard drive on the first IDE connector is the first physical drive. For example, when...

Manual
Page 54
Boot from the motherboard driver disk to access Xpress Recovery2 for the first time, Xpress Recovery2 will automatically create a new partition to search the first physical hard drive as the target drive and detect whether this hard drive contains the Windows operating system. VM900MC E3 . . . . : BIOS...10 Figure 11 3. Award Modular BIOS v6.00PG, An Energy Star Ally Copyright (C) 1984-2007, Award Software, Inc. Figure 12 GA-VM900MC Motherboard Xpress Recovery2 will stay permanent in your hard drive data (Figure 10). 2. After you use the backup function in Xpress Recovery2...
Boot from the motherboard driver disk to access Xpress Recovery2 for the first time, Xpress Recovery2 will automatically create a new partition to search the first physical hard drive as the target drive and detect whether this hard drive contains the Windows operating system. VM900MC E3 . . . . : BIOS...10 Figure 11 3. Award Modular BIOS v6.00PG, An Energy Star Ally Copyright (C) 1984-2007, Award Software, Inc. Figure 12 GA-VM900MC Motherboard Xpress Recovery2 will stay permanent in your hard drive data (Figure 10). 2. After you use the backup function in Xpress Recovery2...
Manual
Page 59
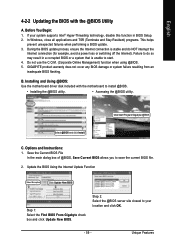
...switching off the Internet). Do not use the C.O.M. (Corporate Online Management) function when using @BIOS. 5. Installing and Using @BIOS: Use the motherboard driver disk included with the @BIOS Utility A. Save the Current BIOS File In the main dialog box of @BIOS, Save Current BIOS allows you to ...your system supports Intel® Hyper-Threading technology, disable this option Click Update New BIOS Step 1: Select the Find BIOS From Gigabyte check box and click Update New BIOS. Update the BIOS Using the Internet Update Function Select this function in a corrupted BIOS or a ...
...switching off the Internet). Do not use the C.O.M. (Corporate Online Management) function when using @BIOS. 5. Installing and Using @BIOS: Use the motherboard driver disk included with the @BIOS Utility A. Save the Current BIOS File In the main dialog box of @BIOS, Save Current BIOS allows you to ...your system supports Intel® Hyper-Threading technology, disable this option Click Update New BIOS Step 1: Select the Find BIOS From Gigabyte check box and click Update New BIOS. Update the BIOS Using the Internet Update Function Select this function in a corrupted BIOS or a ...

Manual
Page 63
...RAID, you use two hard drives with identical model and capacity). Configure a RAID array in BIOS Setup. C . Make a floppy disk containing the SATA RAID driver. (Note 2) E. Then connect the power connector from your power supply to the hard drive. (Note 1) Skip this step if you do not want to ...RAID mode. - 63 - Install the SATA RAID driver and operating system. (Note 2) Before you begin Please prepare: • Two SATA hard drives (to ensure optimal performance, it is recommended that you may...
...RAID, you use two hard drives with identical model and capacity). Configure a RAID array in BIOS Setup. C . Make a floppy disk containing the SATA RAID driver. (Note 2) E. Then connect the power connector from your power supply to the hard drive. (Note 1) Skip this step if you do not want to ...RAID mode. - 63 - Install the SATA RAID driver and operating system. (Note 2) Before you begin Please prepare: • Two SATA hard drives (to ensure optimal performance, it is recommended that you may...
Manual
Page 70
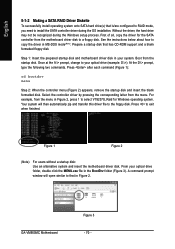
Prepare a startup disk that in Figure 2. Press to copy the driver in your optical drive (example: D:\>). Select the controller driver by pressing the corresponding letter from the startup disk. GA-VM900MC Motherboard Figure 3 - 70 - Once at the A:\> prompt, change to your system. Figure 1 Figure 2 (Note) For users without a startup disk: Use an alternative system and...
Prepare a startup disk that in Figure 2. Press to copy the driver in your optical drive (example: D:\>). Select the controller driver by pressing the corresponding letter from the startup disk. GA-VM900MC Motherboard Figure 3 - 70 - Once at the A:\> prompt, change to your system. Figure 1 Figure 2 (Note) For users without a startup disk: Use an alternative system and...
Manual
Page 71
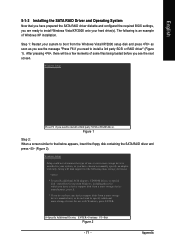
... is an example of some files being loaded before you see the message "Press F6 if you need to install a 3rd party SCSI or RAID driver" (Figure 1). After pressing , there will load support for use with Windows, press ENTER. Windows Setup Press F6 if you need to install a... third party SCSI or RAID driver. English 5-1-3 Installing the SATA RAID Driver and Operating System Now that you have prepared the SATA RAID driver diskette and configured the required BIOS settings, you are ready to that below appears, insert the...
... is an example of some files being loaded before you see the message "Press F6 if you need to install a 3rd party SCSI or RAID driver" (Figure 1). After pressing , there will load support for use with Windows, press ENTER. Windows Setup Press F6 if you need to install a... third party SCSI or RAID driver. English 5-1-3 Installing the SATA RAID Driver and Operating System Now that you have prepared the SATA RAID driver diskette and configured the required BIOS settings, you are ready to that below appears, insert the...
Manual
Page 72
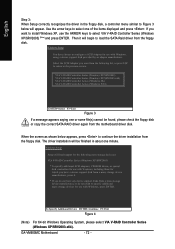
...XP, use with Windows, using a device support disk provided by an adapter manufacturer. English Step 3: When Setup correctly recognizes the driver in about one minute. If you do not want to specify additional mass storage devices for use with Windows, press ENTER. ... XP/SRV2003) (Note) and press ENTER. GA-VM900MC Motherboard - 72 - S=Specify Additional Device ENTER=Continue F3=Exit Figure 4 (Note) For 64-bit Windows Operating System, please select VIA V-RAID Controller Series (Windows XP/SRV2003-x64). The driver installation will begin to the previous screen. Then...
...XP, use with Windows, using a device support disk provided by an adapter manufacturer. English Step 3: When Setup correctly recognizes the driver in about one minute. If you do not want to specify additional mass storage devices for use with Windows, press ENTER. ... XP/SRV2003) (Note) and press ENTER. GA-VM900MC Motherboard - 72 - S=Specify Additional Device ENTER=Continue F3=Exit Figure 4 (Note) For 64-bit Windows Operating System, please select VIA V-RAID Controller Series (Windows XP/SRV2003-x64). The driver installation will begin to the previous screen. Then...
Manual
Page 73
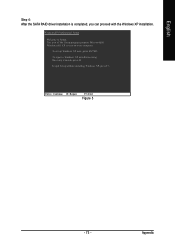
WindowsXP Professional Setup Welcome to run on your computer. Enter= Continue R=Repair F3=Exit Figure 5 - 73 - Appendix To set up Windows XP now, press ENTER. This port of the Setup program prepares Microsoft(R) Windows (R) XP to Setup. To quit Setup without installing Windows XP, press F3. To repair a Windows XP installation using Recovery Console, press R. English Step 4: After the SATA RAID driver installation is completed, you can proceed with the Windows XP installation.
WindowsXP Professional Setup Welcome to run on your computer. Enter= Continue R=Repair F3=Exit Figure 5 - 73 - Appendix To set up Windows XP now, press ENTER. This port of the Setup program prepares Microsoft(R) Windows (R) XP to Setup. To quit Setup without installing Windows XP, press F3. To repair a Windows XP installation using Recovery Console, press R. English Step 4: After the SATA RAID driver installation is completed, you can proceed with the Windows XP installation.
Manual
Page 74
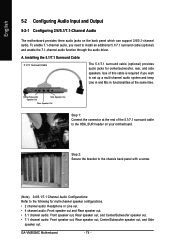
To enable 7.1-channel audio, you wish to install an additional 5.1/7.1 surround cable (optional) and enable the 7.1-channel audio function through the audio driver. Step 2: Secure the bracket to the chassis back panel with a screw. (Note) 2/4/5.1/7.1 Channel Audio Configurations: Refer to the HDA_SUR header on the back panel which .../Subwoofer speaker out, and Side speaker out. Center/Subwoofer Speaker Out Side Speaker Out Rear Speaker Out Step 1: Connect the connector at the same time. GA-VM900MC Motherboard - 74 -
To enable 7.1-channel audio, you wish to install an additional 5.1/7.1 surround cable (optional) and enable the 7.1-channel audio function through the audio driver. Step 2: Secure the bracket to the chassis back panel with a screw. (Note) 2/4/5.1/7.1 Channel Audio Configurations: Refer to the HDA_SUR header on the back panel which .../Subwoofer speaker out, and Side speaker out. Center/Subwoofer Speaker Out Side Speaker Out Rear Speaker Out Step 1: Connect the connector at the same time. GA-VM900MC Motherboard - 74 -
Manual
Page 75
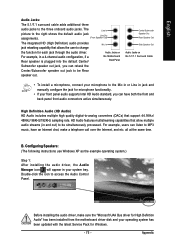
...that allow multiple audio streams (in jack and manually configure the jack for High Defintion Audio" has been installed from the motherboard driver disk and your system tray. The Line In picture to the right shows the default audio jack Line Out assignments. (Front Speaker...a microphone, connect your microphone to MP3 music, have both the front and back panel front audio connectors active simultaneously. Before installing the audio driver, make a telephone call over the Internet, and etc. Center/Subwoofer Speaker Out Rear Speaker Out Side Speaker Out Audio Jacks on For example...
...that allow multiple audio streams (in jack and manually configure the jack for High Defintion Audio" has been installed from the motherboard driver disk and your system tray. The Line In picture to the right shows the default audio jack Line Out assignments. (Front Speaker...a microphone, connect your microphone to MP3 music, have both the front and back panel front audio connectors active simultaneously. Before installing the audio driver, make a telephone call over the Internet, and etc. Center/Subwoofer Speaker Out Rear Speaker Out Side Speaker Out Audio Jacks on For example...
Manual
Page 79
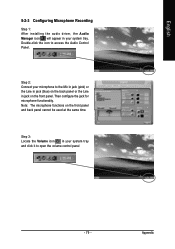
... functionality. Note: The microphone functions on the back panel or the Line in your system tray. English 5-2-3 Configuring Microphone Recording Step 1: After installing the audio driver, the Audio Manager icon will appear in your system tray and click it to open the volume control panel - 79 - Step 3: Locate the Volume icon...
... functionality. Note: The microphone functions on the back panel or the Line in your system tray. English 5-2-3 Configuring Microphone Recording Step 1: After installing the audio driver, the Audio Manager icon will appear in your system tray and click it to open the volume control panel - 79 - Step 3: Locate the Volume icon...


