Manual
Page 5
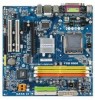
... 47 3-1 Installing Chipset Drivers 47 3-2 SoftwareApplications 48 3-3 Driver CD Information 48 3-4 Hardware Information 49 3-5 Contact Us ...49 Chapter 4 Unique Features 51 4-1 Xpress Recovery2 51 4-2 BIOS ...Configuring SATA Hard Drive(s 63 5-1-1 Configuring VIA VT8237S SATA Controllers 63 5-1-2 Making a SATA RAID Driver Diskette 70 5-1-3 Installing the SATA RAID Driver and Operating System 71 5-2 Configuring Audio Input and Output 74 5-2-1 Configuring 2/4/5.1/7.1-Channel Audio 74 5-2-2 Installing the S/PDIF In and Out Cable (Optional 77 5-2-3 Configuring Microphone Recording 79...
... 47 3-1 Installing Chipset Drivers 47 3-2 SoftwareApplications 48 3-3 Driver CD Information 48 3-4 Hardware Information 49 3-5 Contact Us ...49 Chapter 4 Unique Features 51 4-1 Xpress Recovery2 51 4-2 BIOS ...Configuring SATA Hard Drive(s 63 5-1-1 Configuring VIA VT8237S SATA Controllers 63 5-1-2 Making a SATA RAID Driver Diskette 70 5-1-3 Installing the SATA RAID Driver and Operating System 71 5-2 Configuring Audio Input and Output 74 5-2-1 Configuring 2/4/5.1/7.1-Channel Audio 74 5-2-2 Installing the S/PDIF In and Out Cable (Optional 77 5-2-3 Configuring Microphone Recording 79...

Manual
Page 19
.... Refer to the instructions on the motherboard. - 19 - Microphones must be sure to the connector on setting up a 2/4/5.1/7.1-channel audio configuration in jack. Hardware Installation Unplug the power cord from the power outlet to prevent damage to the devices. • After installing... and your devices are compliant with the connectors you need to this jack. To configure 7.1-channel audio, you wish to connect. • Before installing the devices, be connected to install a 5.1/7.1 surround cable (optional) and enable the multi-channel audio feature through the audio driver.
.... Refer to the instructions on the motherboard. - 19 - Microphones must be sure to the connector on setting up a 2/4/5.1/7.1-channel audio configuration in jack. Hardware Installation Unplug the power cord from the power outlet to prevent damage to the devices. • After installing... and your devices are compliant with the connectors you need to this jack. To configure 7.1-channel audio, you wish to connect. • Before installing the devices, be connected to install a 5.1/7.1 surround cable (optional) and enable the multi-channel audio feature through the audio driver.
Manual
Page 74
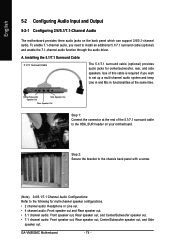
... of this cable is required if you need to install an additional 5.1/7.1 surround cable (optional) and enable the 7.1-channel audio function through the audio driver. Use of the 5.1/7.1 surround cable to the following for center/subwoofer, rear, and side speakers. GA-VM900MC Motherboard - 74 - Installing the 5.1/7.1 Surround Cable: 5.1/7.1 Surround Cable The 5.1/7.1 surround cable (optional) provides...
... of this cable is required if you need to install an additional 5.1/7.1 surround cable (optional) and enable the 7.1-channel audio function through the audio driver. Use of the 5.1/7.1 surround cable to the following for center/subwoofer, rear, and side speakers. GA-VM900MC Motherboard - 74 - Installing the 5.1/7.1 Surround Cable: 5.1/7.1 Surround Cable The 5.1/7.1 surround cable (optional) provides...
Manual
Page 75
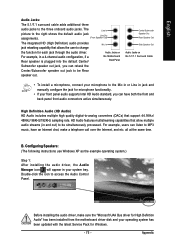
...functionality. • If your operating system has been updated with the latest Service Pack for each jack through the audio driver. Audio Jacks on the 5.1/7.1 Surround Cable • To install a microphone, connect your system tray. B. Center/Subwoofer Speaker Out ...Speakers: (The following instructions use Windows XP as the example operating system.) Step 1: After installing the audio driver, the Audio Manager icon will appear in a 4-channel audio configuration, if a Rear speaker is plugged into the default Center/ the Motherboard Back Panel Subwoofer speaker out...
...functionality. • If your operating system has been updated with the latest Service Pack for each jack through the audio driver. Audio Jacks on the 5.1/7.1 Surround Cable • To install a microphone, connect your system tray. B. Center/Subwoofer Speaker Out ...Speakers: (The following instructions use Windows XP as the example operating system.) Step 1: After installing the audio driver, the Audio Manager icon will appear in a 4-channel audio configuration, if a Rear speaker is plugged into the default Center/ the Motherboard Back Panel Subwoofer speaker out...
Manual
Page 79
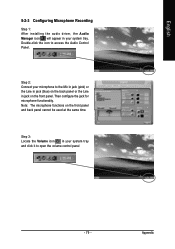
Step 3: Locate the Volume icon in your system tray. Appendix Then configure the jack for microphone functionality. English 5-2-3 Configuring Microphone Recording Step 1: After installing the audio driver, the Audio Manager icon will appear in your system tray and click it to open the volume control panel - 79 - Note: The microphone functions on the front... the Line in jack on the front panel and back panel cannot be used at the same time. Step 2: Connect your microphone to access the Audio Control Panel.
Step 3: Locate the Volume icon in your system tray. Appendix Then configure the jack for microphone functionality. English 5-2-3 Configuring Microphone Recording Step 1: After installing the audio driver, the Audio Manager icon will appear in your system tray and click it to open the volume control panel - 79 - Note: The microphone functions on the front... the Line in jack on the front panel and back panel cannot be used at the same time. Step 2: Connect your microphone to access the Audio Control Panel.


