

Manual
Page 1
... utility only supports the SATA controllers integrated in the array. ) 1. Step 2: Install the RAID driver and operating system The X.H.D utility supports Windows 7/Vista/XP. For a RAID 0 array that already exists, users also can click the Xpress Install All button to automatically install all of your... data to avoid risk of hardware damage or lost of a button, X.H.D helps to enhance your needs and hardware components. 3. Using GIGABYTE eXtreme Hard Drive (X.H.D) Instructions:(Note 2) Before launching X.H.D, make sure the new drive is greater than the RAID-ready system drive. (...
... utility only supports the SATA controllers integrated in the array. ) 1. Step 2: Install the RAID driver and operating system The X.H.D utility supports Windows 7/Vista/XP. For a RAID 0 array that already exists, users also can click the Xpress Install All button to automatically install all of your... data to avoid risk of hardware damage or lost of a button, X.H.D helps to enhance your needs and hardware components. 3. Using GIGABYTE eXtreme Hard Drive (X.H.D) Instructions:(Note 2) Before launching X.H.D, make sure the new drive is greater than the RAID-ready system drive. (...

Manual
Page 12
... motherboard model. (Note 7) This feature is optional due to x8 mode. (Note 4) The default bandwidth for Microsoft® Windows 7/Vista/XP Form Factor w ATX Form Factor; 30.5cm x 24.4cm (Note 1) Due to Windows Vista/XP 32-bit operating system limitation, when more than 4 GB of physical memory is installed, the actual...
... motherboard model. (Note 7) This feature is optional due to x8 mode. (Note 4) The default bandwidth for Microsoft® Windows 7/Vista/XP Form Factor w ATX Form Factor; 30.5cm x 24.4cm (Note 1) Due to Windows Vista/XP 32-bit operating system limitation, when more than 4 GB of physical memory is installed, the actual...
Manual
Page 19
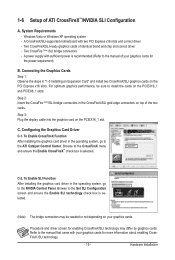
... /SLI technology. - 19 - Hardware Installation Two CrossFire (Note )/SLI bridge connectors - Browse to the ATI Catalyst Control Center. Refer to the NVIDIA Control Panel. Windows Vista or Windows XP operating system - Connecting the Graphics Cards Step 1: Observe the steps in the CrossFireX/SLI gold edge connectors on the PCIEX16_1 and PCIEX8_1 slots...
... /SLI technology. - 19 - Hardware Installation Two CrossFire (Note )/SLI bridge connectors - Browse to the ATI Catalyst Control Center. Refer to the NVIDIA Control Panel. Windows Vista or Windows XP operating system - Connecting the Graphics Cards Step 1: Observe the steps in the CrossFireX/SLI gold edge connectors on the PCIEX16_1 and PCIEX8_1 slots...

Manual
Page 37
... necessary power to the CMOS to Chapter 4, "BIOS Update Utilities." • Because BIOS flashing is potentially risky, if you do it is a Windows-based utility that you not flash the BIOS. When the power is recommended that you not alter the default settings (unless you can press + in... values in Chapter 1 for the beep codes description. • It is turned off, the battery on . To upgrade the BIOS, use either the GIGABYTE Q-Flash or @BIOS utility. • Q-Flash allows the user to activate certain system features. To see more advanced BIOS Setup menu options, you need...
... necessary power to the CMOS to Chapter 4, "BIOS Update Utilities." • Because BIOS flashing is potentially risky, if you do it is a Windows-based utility that you not flash the BIOS. When the power is recommended that you not alter the default settings (unless you can press + in... values in Chapter 1 for the beep codes description. • It is turned off, the battery on . To upgrade the BIOS, use either the GIGABYTE Q-Flash or @BIOS utility. • Q-Flash allows the user to activate certain system features. To see more advanced BIOS Setup menu options, you need...

Manual
Page 54
...Allows you to set this item to initialize the hard drive as the first display. Limit CPUID Max. Set this item to display the GIGABYTE Logo at system startup. set a delay time for the BIOS to Disabled for the computer, reducing exposure to viruses and malicious buffer ... the PCI graphics card as the first display. (Default) PEG Sets the PCI Express graphics card on the PCI Express x16 slot (PCIEX16_1) as Windows NT4.0. (Default: Disabled) No-Execute Memory Protect (Note) Enables or disables Intel Execute Disable Bit function. BIOS Setup - 54 - Disabled displays...
...Allows you to set this item to initialize the hard drive as the first display. Limit CPUID Max. Set this item to display the GIGABYTE Logo at system startup. set a delay time for the BIOS to Disabled for the computer, reducing exposure to viruses and malicious buffer ... the PCI graphics card as the first display. (Default) PEG Sets the PCI Express graphics card on the PCI Express x16 slot (PCIEX16_1) as Windows NT4.0. (Default: Disabled) No-Execute Memory Protect (Note) Enables or disables Intel Execute Disable Bit function. BIOS Setup - 54 - Disabled displays...
Manual
Page 57
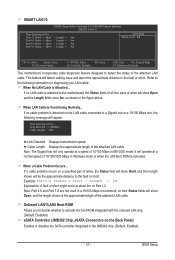
... Displays the approximate length of wires will show Open and the Length fields show Short and then length shown will show 0m, as shown in Windows mode or when the LAN Boot ROM is attached to the motherboard, the Status fields of all four pairs of the attached LAN cable. If...
... Displays the approximate length of wires will show Open and the Length fields show Short and then length shown will show 0m, as shown in Windows mode or when the LAN Boot ROM is attached to the motherboard, the Status fields of all four pairs of the attached LAN cable. If...
Manual
Page 59
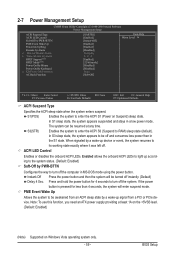
... suspended and stays in a low power mode. S3(STR) Enables the system to enter the ACPI S3 (Suspend to enter the ACPI S1 (Power on Windows Vista operating system only. - 59 - 2-7 Power Management Setup CMOS Setup Utility-Copyright (C) 1984-2009 Award Software Power Management Setup ACPI Suspend Type ACPI LED Control...
... suspended and stays in a low power mode. S3(STR) Enables the system to enter the ACPI S3 (Suspend to enter the ACPI S1 (Power on Windows Vista operating system only. - 59 - 2-7 Power Management Setup CMOS Setup Utility-Copyright (C) 1984-2009 Award Software Power Management Setup ACPI Suspend Type ACPI LED Control...

Manual
Page 60
... this item and set a password with 1~5 characters to turn on the +5VSB lead. Select 32-bit mode when you install 64-bit Windows Vista. Note: To use this function, avoid inadequate shutdown from the operating system or removal of power from a modem that supports wake-up...to Enabled. (Default: 32-bit mode) Power On By Mouse Allows the system to accept. select 64-bit mode when you install 32-bit Windows Vista; Disabled Disables this function. (Default) Password Set a password with up event. Disabled Disables this function. (Default) Double Click Double click...
... this item and set a password with 1~5 characters to turn on the +5VSB lead. Select 32-bit mode when you install 64-bit Windows Vista. Note: To use this function, avoid inadequate shutdown from the operating system or removal of power from a modem that supports wake-up...to Enabled. (Default: 32-bit mode) Power On By Mouse Allows the system to accept. select 64-bit mode when you install 32-bit Windows Vista; Disabled Disables this function. (Default) Password Set a password with up event. Disabled Disables this function. (Default) Double Click Double click...
Manual
Page 67
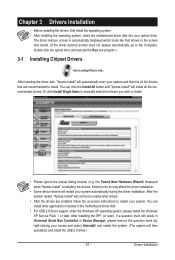
...) and restart the system. (The system will continue to install other applications included in the motherboard driver disk. • For USB 2.0 driver support under the Windows XP operating system, please install the Windows XP Service Pack 1 or later.
...) and restart the system. (The system will continue to install other applications included in the motherboard driver disk. • For USB 2.0 driver support under the Windows XP operating system, please install the Windows XP Service Pack 1 or later.
Manual
Page 71
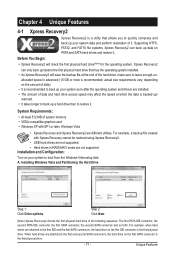
... the second SATA connector and so forth. System Requirements: • At least 512 MB of system memory • VESA compatible graphics card • Windows XP with Xpress Recovery cannot be restored using Xpress Recovery2. • USB hard drives are not supported. • Hard drives in RAID/AHCI mode are... physical hard drive in advanced (10 GB or more is the first physical drive. For example, a backup file created with SP1 or later, Windows Vista • Xpress Recovery and Xpress Recovery2 are installed. • The amount of data and hard drive access speed may affect the speed at...
... the second SATA connector and so forth. System Requirements: • At least 512 MB of system memory • VESA compatible graphics card • Windows XP with Xpress Recovery cannot be restored using Xpress Recovery2. • USB hard drives are not supported. • Hard drives in RAID/AHCI mode are... physical hard drive in advanced (10 GB or more is the first physical drive. For example, a backup file created with SP1 or later, Windows Vista • Xpress Recovery and Xpress Recovery2 are installed. • The amount of data and hard drive access speed may affect the speed at...
Manual
Page 74
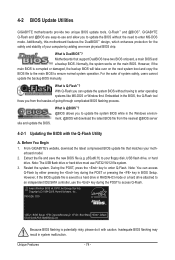
...caution. During the POST, press the key to update the system BIOS while in the Windows environment. @BIOS will take over on the main BIOS. For the sake of your computer... by adding one more physical BIOS chip. What is Q-Flash™? Before You Begin 1. From GIGABYTE's website, download the latest compressed BIOS update file that support DualBIOS have two BIOS onboard, a ...BIOS. Extract the file and save the new BIOS file (e.g. P55-UD6 D15 . . . . : BIOS Setup : XpressRecovery2 : Boot Menu : Qflash 07/07/2009-P55-7A89RG03C-00 Because BIOS flashing is saved to a hard drive ...
...caution. During the POST, press the key to update the system BIOS while in the Windows environment. @BIOS will take over on the main BIOS. For the sake of your computer... by adding one more physical BIOS chip. What is Q-Flash™? Before You Begin 1. From GIGABYTE's website, download the latest compressed BIOS update file that support DualBIOS have two BIOS onboard, a ...BIOS. Extract the file and save the new BIOS file (e.g. P55-UD6 D15 . . . . : BIOS Setup : XpressRecovery2 : Boot Menu : Qflash 07/07/2009-P55-7A89RG03C-00 Because BIOS flashing is saved to a hard drive ...
Manual
Page 77
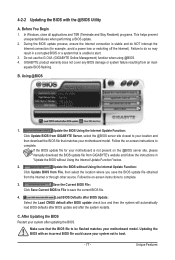
... that the BIOS file to be flashed matches your motherboard model. Updating the BIOS with the @BIOS Utility A. Before You Begin 1. In Windows, close all applications and TSR (Terminate and Stay Resident) programs. This helps prevent unexpected failures when performing a BIOS update. 2. Update the... BIOS without Using the Internet Update Function" below. 2. C. Make sure that is unable to start. 3. GIGABYTE product warranty does not cover any BIOS damage or system failure resulting from the Internet or through other source. If the BIOS update file for...
... that the BIOS file to be flashed matches your motherboard model. Updating the BIOS with the @BIOS Utility A. Before You Begin 1. In Windows, close all applications and TSR (Terminate and Stay Resident) programs. This helps prevent unexpected failures when performing a BIOS update. 2. Update the... BIOS without Using the Internet Update Function" below. 2. C. Make sure that is unable to start. 3. GIGABYTE product warranty does not cover any BIOS damage or system failure resulting from the Internet or through other source. If the BIOS update file for...

Manual
Page 78
... Features - 78 - The Tuner tab allows you to change the core clock and memory clock for Quick Boost. 4-3 EasyTune 6 GIGABYTE's EasyTune 6 is not supported. Grayed-out area(s) indicates that the item is not configurable or the function is a simple and easy...reduce the useful life of CPU frequency/base clock to choose to achieve desired system performance. (Note) After making changes in Windows environment. The EasyTune 6 Interface Tabs Information Tab Function The CPU tab provides information on the installed memory module(s). The user-...
... Features - 78 - The Tuner tab allows you to change the core clock and memory clock for Quick Boost. 4-3 EasyTune 6 GIGABYTE's EasyTune 6 is not supported. Grayed-out area(s) indicates that the item is not configurable or the function is a simple and easy...reduce the useful life of CPU frequency/base clock to choose to achieve desired system performance. (Note) After making changes in Windows environment. The EasyTune 6 Interface Tabs Information Tab Function The CPU tab provides information on the installed memory module(s). The user-...

Manual
Page 83
... and SATA hard drives (partitioned on the right or at different time, select a backup time using the time scroll bar on NTFS file system) in Windows Vista. It also stores the recorded data in case the system/hard drive fails. The files/folders listed on the size of each partition). SMART...
... and SATA hard drives (partitioned on the right or at different time, select a backup time using the time scroll bar on NTFS file system) in Windows Vista. It also stores the recorded data in case the system/hard drive fails. The files/folders listed on the size of each partition). SMART...
Manual
Page 87
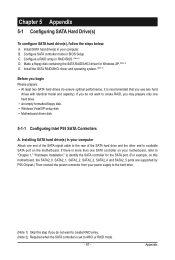
...create RAID, you may prepare only one hard drive. • An empty formatted floppy disk. • Windows Vista/XP setup disk. • Motherboard driver disk. 5-1-1 Configuring Intel P55 SATA Controllers A. If you use two hard drives with identical model and capacity). Make a floppy disk containing... drive(s) in your computer Attach one SATA controller on your motherboard, refer to "Chapter 1," "Hardware Installation," to identify the SATA controller for Windows XP. (Note 2) E. B. Installing SATA hard drive(s) in your power supply to the hard drive. (Note 1) Skip this step if you...
...create RAID, you may prepare only one hard drive. • An empty formatted floppy disk. • Windows Vista/XP setup disk. • Motherboard driver disk. 5-1-1 Configuring Intel P55 SATA Controllers A. If you use two hard drives with identical model and capacity). Make a floppy disk containing... drive(s) in your computer Attach one SATA controller on your motherboard, refer to "Chapter 1," "Hardware Installation," to identify the SATA controller for Windows XP. (Note 2) E. B. Installing SATA hard drive(s) in your power supply to the hard drive. (Note 1) Skip this step if you...

Manual
Page 89
...-D wRAID5 Copyright(C) 2003-09 Intel Corporation. Delete RAID Volume 5. Reset Disks to enter Configuration Utility" (Figure 2). Skip this step and proceed with the installation of Windows operating system for a message which says "Press to Non-RAID 4. Step 1: After the POST memory test begins and before the operating system boot begins, look... 3 [ENTER]-Select Menu - 89 - Create RAID Volume If you press + , the MAIN MENU screen will appear (Figure 3). C. Figure 2 Step 2: After you want to enter the P55 RAID Configuration Utility.
...-D wRAID5 Copyright(C) 2003-09 Intel Corporation. Delete RAID Volume 5. Reset Disks to enter Configuration Utility" (Figure 2). Skip this step and proceed with the installation of Windows operating system for a message which says "Press to Non-RAID 4. Step 1: After the POST memory test begins and before the operating system boot begins, look... 3 [ENTER]-Select Menu - 89 - Create RAID Volume If you press + , the MAIN MENU screen will appear (Figure 3). C. Figure 2 Step 2: After you want to enter the P55 RAID Configuration Utility.
Manual
Page 96
... Corp. (http://www.gigabyte.com) HDD0 : HDD1 : ST3120026AS ST3120026AS 120 GB 120 GB Non-RAID Non-RAID Press to enter the RAID setup utility. C. Figure 2 In the main screen of Windows operating system for a message which says "Press to execute and press . Skip this step and proceed to the installation of the...
... Corp. (http://www.gigabyte.com) HDD0 : HDD1 : ST3120026AS ST3120026AS 120 GB 120 GB Non-RAID Non-RAID Press to enter the RAID setup utility. C. Figure 2 In the main screen of Windows operating system for a message which says "Press to execute and press . Skip this step and proceed to the installation of the...

Manual
Page 99
...RAID Inside [ RAID Disk Drive List ] Model Name RDD0: GRAID RAID Level 0-Stripe Capacity 240 GB Status Normal Members(HDDx) 01 [fgTAB]-Switch Window [hi]-Select ITEM Figure 8 [ENTER]-Action [ESC]-Exit To check more detailed information about the array, use the key while in the RAID ...Disk Drive List block (Figure 8). Gigabyte Technology Corp. Select the array and press . Appendix RAID Setup Utility v1.07.06 [ Main Menu ] Create RAID Disk Drive Delete RAID Disk Drive...
...RAID Inside [ RAID Disk Drive List ] Model Name RDD0: GRAID RAID Level 0-Stripe Capacity 240 GB Status Normal Members(HDDx) 01 [fgTAB]-Switch Window [hi]-Select ITEM Figure 8 [ENTER]-Action [ESC]-Exit To check more detailed information about the array, use the key while in the RAID ...Disk Drive List block (Figure 8). Gigabyte Technology Corp. Select the array and press . Appendix RAID Setup Utility v1.07.06 [ Main Menu ] Create RAID Disk Drive Delete RAID Disk Drive...
Manual
Page 100
Y Model Name RAID Level Capacity Status RDD0: GRAID 0-Stripe 240 GB Normal Members(HDDx) 01 [fgTAB]-Switch Window [hi]-Select ITEM Figure 10 [ENTER]-Action [ESC]-Exit Now, you may proceed to be deleted; ARE YOU SURE TO DELETE (Y/N) ? N RAID Level Capacity ... RAID Inside RAID Inside [ RAID Disk Drive List ] Save to Non-RAID Solve Mirror Conflict Rebuild Mirror Drive Save And Exit Setup Exit Without Saving Gigabyte Technology Corp. When prompted to confirm your settings before exiting the RAID BIOS utility, then press (Figure 10). [ Main Menu ] Create RAID Disk ...
Y Model Name RAID Level Capacity Status RDD0: GRAID 0-Stripe 240 GB Normal Members(HDDx) 01 [fgTAB]-Switch Window [hi]-Select ITEM Figure 10 [ENTER]-Action [ESC]-Exit Now, you may proceed to be deleted; ARE YOU SURE TO DELETE (Y/N) ? N RAID Level Capacity ... RAID Inside RAID Inside [ RAID Disk Drive List ] Save to Non-RAID Solve Mirror Conflict Rebuild Mirror Drive Save And Exit Setup Exit Without Saving Gigabyte Technology Corp. When prompted to confirm your settings before exiting the RAID BIOS utility, then press (Figure 10). [ Main Menu ] Create RAID Disk ...
Manual
Page 101
... 4, • For the Intel P55, select 1) Intel Matrix Storage driver for 32bit system for Windows 32-bit operating system or 2) Intel Matrix Storage driver for 64bit system for Windows 64-bit. • For the JMB362/GIGABYTE SATA2, select 3) GIGABYTE GSATA driver for 32bit system for Windows 32-bit operating system or 4) GIGABYTE GSATA driver for 64bit system...
... 4, • For the Intel P55, select 1) Intel Matrix Storage driver for 32bit system for Windows 32-bit operating system or 2) Intel Matrix Storage driver for 64bit system for Windows 64-bit. • For the JMB362/GIGABYTE SATA2, select 3) GIGABYTE GSATA driver for 32bit system for Windows 32-bit operating system or 4) GIGABYTE GSATA driver for 64bit system...


