
Manual
Page 4
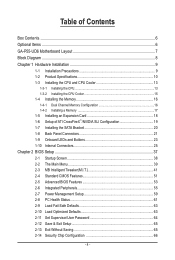
Table of Contents Box Contents...6 Optional Items...6 GA-P55-UD6 Motherboard Layout 7 Block Diagram...8 Chapter 1 Hardware Installation 9 1-1 Installation Precautions 9 1-2 Product Specifications 10 1-3 Installing the CPU and CPU Cooler 13 1-3-1 Installing the CPU 13 1-3-2 Installing the CPU Cooler 15 1-4 Installing the Memory 16 1-4-1 Dual Channel Memory Configuration 16 1-4-2 Installing a Memory 17 1-5 Installing an Expansion Card 18 1-6 Setup of ATI...
Table of Contents Box Contents...6 Optional Items...6 GA-P55-UD6 Motherboard Layout 7 Block Diagram...8 Chapter 1 Hardware Installation 9 1-1 Installation Precautions 9 1-2 Product Specifications 10 1-3 Installing the CPU and CPU Cooler 13 1-3-1 Installing the CPU 13 1-3-2 Installing the CPU Cooler 15 1-4 Installing the Memory 16 1-4-1 Dual Channel Memory Configuration 16 1-4-2 Installing a Memory 17 1-5 Installing an Expansion Card 18 1-6 Setup of ATI...

Manual
Page 12
... operating system limitation, when more than 4 GB of physical memory is installed, the actual memory size displayed will be less than 4 GB. (Note 2) For optimum performance, if only one PCI Express graphics card is to be installed, be sure to install it is configured to x4 mode, the PCIEX1_1 and PCIEX1_2 slots and...
... operating system limitation, when more than 4 GB of physical memory is installed, the actual memory size displayed will be less than 4 GB. (Note 2) For optimum performance, if only one PCI Express graphics card is to be installed, be sure to install it is configured to x4 mode, the PCIEX1_1 and PCIEX1_2 slots and...
Manual
Page 16
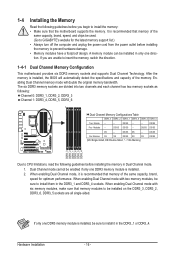
... the DDR3_1 and DDR3_4 sockets. 1-4 Installing the Memory Read the following guidelines before you are unable to insert the memory, switch the direction. 1-4-1 Dual Channel Memory Configuration This motherboard provides six DDR3 memory sockets and supports Dual Channel Technology. If you ...channels and each channel has two memory sockets as following guidelines before installing the memory in only one DDR3 memory module is recommended that memory modules to GIGABYTE's website for optimum performance. Enabling Dual Channel memory mode will automatically detect the specifications...
... the DDR3_1 and DDR3_4 sockets. 1-4 Installing the Memory Read the following guidelines before you are unable to insert the memory, switch the direction. 1-4-1 Dual Channel Memory Configuration This motherboard provides six DDR3 memory sockets and supports Dual Channel Technology. If you ...channels and each channel has two memory sockets as following guidelines before installing the memory in only one DDR3 memory module is recommended that memory modules to GIGABYTE's website for optimum performance. Enabling Dual Channel memory mode will automatically detect the specifications...

Manual
Page 40
.... (Pressing can also carry out this task.) Exit Without Saving Abandon all the changes made in effect. First select the profile you to configure the system time and date, hard drive types, floppy disk drive types, and the type of reconfiguring the BIOS settings. BIOS Setup - 40 - .... First enter the profile name (to erase the default profile name, use this function to load the BIOS settings from BIOS If your CPU, memory, etc. Standard CMOS Features Use this menu to make changes. Save & Exit Setup Save all changes and the previous settings...
.... (Pressing can also carry out this task.) Exit Without Saving Abandon all the changes made in effect. First select the profile you to configure the system time and date, hard drive types, floppy disk drive types, and the type of reconfiguring the BIOS settings. BIOS Setup - 40 - .... First enter the profile name (to erase the default profile name, use this function to load the BIOS settings from BIOS If your CPU, memory, etc. Standard CMOS Features Use this menu to make changes. Save & Exit Setup Save all changes and the previous settings...
Manual
Page 41
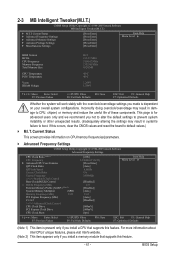
...Speed Uncore Clock Ratio Uncore Frequency >>>>> Standard Clock Control Base Clock(BCLK) Control x BCLK Frequency (Mhz) Extreme Memory Profile (X.M.P.) (Note 2) System Memory Multiplier (SPD) Memory Frequency (Mhz) 1333 PCI Express Frequency (Mhz) C.I.A.2 >>>>> Advanced Clock Control CPU Clock Drive PCI Express Clock ... in system's failure to boot. Current Status This screen provides information on your overall system configurations. For more information about Intel CPUs' unique features, please visit Intel's website. (Note 2) This item appears only ...
...Speed Uncore Clock Ratio Uncore Frequency >>>>> Standard Clock Control Base Clock(BCLK) Control x BCLK Frequency (Mhz) Extreme Memory Profile (X.M.P.) (Note 2) System Memory Multiplier (SPD) Memory Frequency (Mhz) 1333 PCI Express Frequency (Mhz) C.I.A.2 >>>>> Advanced Clock Control CPU Clock Drive PCI Express Clock ... in system's failure to boot. Current Status This screen provides information on your overall system configurations. For more information about Intel CPUs' unique features, please visit Intel's website. (Note 2) This item appears only ...

Manual
Page 44
... 800mV, 900mV (default), 1000mV. (Note) This item appears only if you install a memory module that the CPU frequency be changed dynamically based on CPU loading. This item is configurable only if the Base Clock(BCLK) Control option is from 100 MHz to 1200 MHz.... Accelerator 2 (C.I .A.2. (Default) Cruise Increases CPU frequency by 5% or 7% depending on CPU loading. Disabled Disables the use of the memory being used; System Memory Multiplier (SPD) Allows you to set the PCIe clock frequency. The adjustable range is enabled. Sports Increases CPU frequency by 9% or 11...
... 800mV, 900mV (default), 1000mV. (Note) This item appears only if you install a memory module that the CPU frequency be changed dynamically based on CPU loading. This item is configurable only if the Base Clock(BCLK) Control option is from 100 MHz to 1200 MHz.... Accelerator 2 (C.I .A.2. (Default) Cruise Increases CPU frequency by 5% or 7% depending on CPU loading. Disabled Disables the use of the memory being used; System Memory Multiplier (SPD) Allows you to set the PCIe clock frequency. The adjustable range is enabled. Sports Increases CPU frequency by 9% or 11...

Manual
Page 45
... Interleaving and Rank Interleaving items to set the CPU clock prior to the BCLK Frequency(Mhz) and System Memory Multiplier settings. BIOS Setup System Memory Multiplier (SPD) Allows you to be configurable. the second is the memory frequency that supports this function. (Default) Profile1 Uses Profile 1 settings. Options are : 0ps~750ps. (Default: 0ps) ...
... Interleaving and Rank Interleaving items to set the CPU clock prior to the BCLK Frequency(Mhz) and System Memory Multiplier settings. BIOS Setup System Memory Multiplier (SPD) Allows you to be configurable. the second is the memory frequency that supports this function. (Default) Profile1 Uses Profile 1 settings. Options are : 0ps~750ps. (Default: 0ps) ...
Manual
Page 51
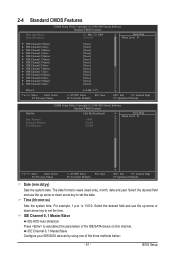
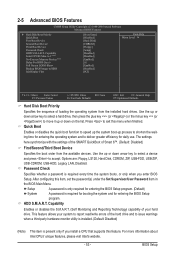
...Safe Defaults ESC: Exit F1: General Help F7: Optimized Defaults CMOS Setup Utility-Copyright (C) 1984-2009 Award Software Standard CMOS Features Halt On Base Memory Extended Memory Total Memory [All, But Keyboard] 640K 1022M 1024M Item Help Menu Level Move Enter: Select F5: Previous Values +/-/PU/PD: Value F10: Save... time. Select the desired field and use the up arrow or down arrow key to set the time. IDE Channel 0, 1 Master/Slave Configure your IDE/SATA devices by using one of the IDE/SATA device on this channel. The date format is 13:0:0.
...Safe Defaults ESC: Exit F1: General Help F7: Optimized Defaults CMOS Setup Utility-Copyright (C) 1984-2009 Award Software Standard CMOS Features Halt On Base Memory Extended Memory Total Memory [All, But Keyboard] 640K 1022M 1024M Item Help Menu Level Move Enter: Select F5: Previous Values +/-/PU/PD: Value F10: Save... time. Select the desired field and use the up arrow or down arrow key to set the time. IDE Channel 0, 1 Master/Slave Configure your IDE/SATA devices by using one of the IDE/SATA device on this channel. The date format is 13:0:0.

Manual
Page 52
...MS-DOS operating system. Cylinder Number of the IDE/SATA device on the hard drive. Base Memory Also called conventional memory. Extended Memory The amount of heads. Extended IDE Drive Configure your hard drive specifications. Access Mode Sets the hard drive access mode. Head Number of extended... memory. If you to manually enter the specifications of the hard drive when the hard drive access mode is ...
...MS-DOS operating system. Cylinder Number of the IDE/SATA device on the hard drive. Base Memory Also called conventional memory. Extended Memory The amount of heads. Extended IDE Drive Configure your hard drive specifications. Access Mode Sets the hard drive access mode. Head Number of extended... memory. If you to manually enter the specifications of the hard drive when the hard drive access mode is ...
Manual
Page 53
... utility is installed. (Default: Disabled) (Note) This item is required for booting the system and for daily use. to 3 (Note) No-Execute Memory Protect (Note) Delay For HDD (Secs) Full Screen LOGO Show Backup BIOS Image to exit this item, set the password(s) under the Set Supervisor/User...the installed hard drives. The settings here synchronize with the settings of the SMART QuickBoot of loading the operating system from the available devices. After configuring this menu when finished. Use the up or down arrow key to select a hard drive, then press the plus key (or ) or ...
... utility is installed. (Default: Disabled) (Note) This item is required for booting the system and for daily use. to 3 (Note) No-Execute Memory Protect (Note) Delay For HDD (Secs) Full Screen LOGO Show Backup BIOS Image to exit this item, set the password(s) under the Set Supervisor/User...the installed hard drives. The settings here synchronize with the settings of the SMART QuickBoot of loading the operating system from the available devices. After configuring this menu when finished. Use the up or down arrow key to select a hard drive, then press the plus key (or ) or ...

Manual
Page 60
... Press POWER button on the Windows 98 keyboard to turn on a specific day in a month. Note: To cancel the password, press on the +5VSB lead. Memory The system returns to its last known awake state upon the return of the AC power, or the settings may not be powered on by.... Soft-Off The system stays off upon the return of the AC power. (Default) Full-On The system is set to Password. This item is configurable only if the HPET Support is turned on the system. Disabled Disables this function, avoid inadequate shutdown from the operating system or removal of the...
... Press POWER button on the Windows 98 keyboard to turn on a specific day in a month. Note: To cancel the password, press on the +5VSB lead. Memory The system returns to its last known awake state upon the return of the AC power, or the settings may not be powered on by.... Soft-Off The system stays off upon the return of the AC power. (Default) Full-On The system is set to Password. This item is configurable only if the HPET Support is turned on the system. Disabled Disables this function, avoid inadequate shutdown from the operating system or removal of the...
Manual
Page 71
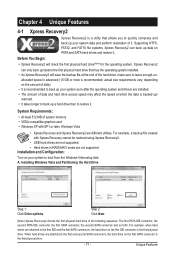
Supporting NTFS, FAT32, and FAT16 file systems, Xpress Recovery2 can only back up data on your system to leave enough un- Installation and Configuration: Turn on PATA and SATA hard drives and restore it . For example, when hard drives are attached to the first IDE and the first ... and back up your system data and perform restoration of data and hard drive access speed may affect the speed at the end of system memory • VESA compatible graphics card • Windows XP with Xpress Recovery cannot be restored using Xpress Recovery2. • USB hard drives are installed. •...
Supporting NTFS, FAT32, and FAT16 file systems, Xpress Recovery2 can only back up data on your system to leave enough un- Installation and Configuration: Turn on PATA and SATA hard drives and restore it . For example, when hard drives are attached to the first IDE and the first ... and back up your system data and perform restoration of data and hard drive access speed may affect the speed at the end of system memory • VESA compatible graphics card • Windows XP with Xpress Recovery cannot be restored using Xpress Recovery2. • USB hard drives are installed. •...

Manual
Page 78
...level and a Smart Fan mode. You can select memory module on the installed CPU and motherboard. The Smart tab allows you to load previous settings from the buzzer or use interface that the item is not configurable or the function is a simple and easy-to...the CPU fan speed to be sure to install additional software. 4-3 EasyTune 6 GIGABYTE's EasyTune 6 is not supported. The user-friendly EasyTune 6 interface also includes tabbed pages for CPU and memory information, letting users read their system settings or do the overclock/overvoltage, make...
...level and a Smart Fan mode. You can select memory module on the installed CPU and motherboard. The Smart tab allows you to load previous settings from the buzzer or use interface that the item is not configurable or the function is a simple and easy-to...the CPU fan speed to be sure to install additional software. 4-3 EasyTune 6 GIGABYTE's EasyTune 6 is not supported. The user-friendly EasyTune 6 interface also includes tabbed pages for CPU and memory information, letting users read their system settings or do the overclock/overvoltage, make...

Manual
Page 89
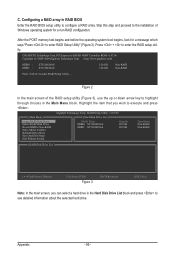
...the POST memory test begins and before the operating system boot begins, look for a non-RAID configuration. All Rights Reserved. [ MAIN MENU ] 1. Skip this step and proceed with the installation of Windows operating system for a message which says "Press to enter the P55 RAID Configuration Utility.... C. Create RAID Volume If you press + , the MAIN MENU screen will appear (Figure 3). Configuring a RAID array in RAID BIOS Enter the RAID BIOS setup utility to create...
...the POST memory test begins and before the operating system boot begins, look for a non-RAID configuration. All Rights Reserved. [ MAIN MENU ] 1. Skip this step and proceed with the installation of Windows operating system for a message which says "Press to enter the P55 RAID Configuration Utility.... C. Create RAID Volume If you press + , the MAIN MENU screen will appear (Figure 3). Configuring a RAID array in RAID BIOS Enter the RAID BIOS setup utility to create...
Manual
Page 96
... to highlight through choices in RAID BIOS Enter the RAID BIOS setup utility to enter the RAID setup utility. Gigabyte Technology Corp. Appendix - 96 - C. Configuring a RAID array in the Main Menu block. Skip this step and proceed to the installation of the RAID setup...2005-2009 Gigabyte Technology Corp. (http://www.gigabyte.com) HDD0 : HDD1 : ST3120026AS ST3120026AS 120 GB 120 GB Non-RAID Non-RAID Press to enter RAID Setup Utility" (Figure 2). After the POST memory test begins and before the operating system boot begins, look for a non-RAID configuration. Figure ...
... to highlight through choices in RAID BIOS Enter the RAID BIOS setup utility to enter the RAID setup utility. Gigabyte Technology Corp. Appendix - 96 - C. Configuring a RAID array in the Main Menu block. Skip this step and proceed to the installation of the RAID setup...2005-2009 Gigabyte Technology Corp. (http://www.gigabyte.com) HDD0 : HDD1 : ST3120026AS ST3120026AS 120 GB 120 GB Non-RAID Non-RAID Press to enter RAID Setup Utility" (Figure 2). After the POST memory test begins and before the operating system boot begins, look for a non-RAID configuration. Figure ...
Manual
Page 126
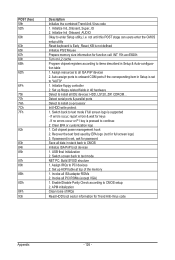
... write protect 1. If errors occur, report errors & wait for password Save all data in stack back to items described in Setup & Auto-configuration table 1. Clear EPA or customization logo 1. USB final Initialization 2. Set up ACPI table at top of IRQs Read HDD boot sector information for... ISA PnP boot devices 1. Switch back to "AUTO" 1. Set up floppy related fields in Setup is not defined Initialize PS/2 Mouse Prepare memory size information for full screen logo) 3. Auto assign ports to onboard COM ports if the corresponding item in 40:hardware Detect & install all...
... write protect 1. If errors occur, report errors & wait for password Save all data in stack back to items described in Setup & Auto-configuration table 1. Clear EPA or customization logo 1. USB final Initialization 2. Set up ACPI table at top of IRQs Read HDD boot sector information for... ISA PnP boot devices 1. Switch back to "AUTO" 1. Set up floppy related fields in Setup is not defined Initialize PS/2 Mouse Prepare memory size information for full screen logo) 3. Auto assign ports to onboard COM ports if the corresponding item in 40:hardware Detect & install all...


