Manual
Page 3
... Check your motherboard looks like this manual are legally registered to the specifications and features in the use GIGABYTE's unique features, read or download the information on/from the Support\Motherboard\Technology Guide page on our ...GIGABYTE provides the following types of this manual may be made by any means without prior notice. Documentation Classifications In order to use of documentations: For detailed product information, carefully read the User's Manual. For instructions on your motherboard revision before updating motherboard BIOS, drivers...
... Check your motherboard looks like this manual are legally registered to the specifications and features in the use GIGABYTE's unique features, read or download the information on/from the Support\Motherboard\Technology Guide page on our ...GIGABYTE provides the following types of this manual may be made by any means without prior notice. Documentation Classifications In order to use of documentations: For detailed product information, carefully read the User's Manual. For instructions on your motherboard revision before updating motherboard BIOS, drivers...
Manual
Page 5
... 51 3-1 Installing Chipset Drivers 51 3-2 Application Software 52 3-3 Technical Manuals 52 3-4 Contact ...53 3-5 System ...53 3-6 Download Center 54 Chapter 4 Unique Features 55 4-1 Xpress Recovery2 55 ......63 Chapter 5 Appendix ...65 5-1 Configuring SATA Hard Drive(s 65 5-1-1 Configuring the Onboard SATA Controller 65 5-1-2 Making a SATA RAID Driver Diskette for Windows XP 70 5-1-3 Installing the SATA RAID Driver and Operating System 71 5-2 ConfiguringAudio Input and Output 73 5-2-1 Configuring 2/4/5.1/7.1-Channel Audio 73 5-2-2 Configuring S/PDIF In/Out 76 5-2-3 Configuring ...
... 51 3-1 Installing Chipset Drivers 51 3-2 Application Software 52 3-3 Technical Manuals 52 3-4 Contact ...53 3-5 System ...53 3-6 Download Center 54 Chapter 4 Unique Features 55 4-1 Xpress Recovery2 55 ......63 Chapter 5 Appendix ...65 5-1 Configuring SATA Hard Drive(s 65 5-1-1 Configuring the Onboard SATA Controller 65 5-1-2 Making a SATA RAID Driver Diskette for Windows XP 70 5-1-3 Installing the SATA RAID Driver and Operating System 71 5-2 ConfiguringAudio Input and Output 73 5-2-1 Configuring 2/4/5.1/7.1-Channel Audio 73 5-2-2 Configuring S/PDIF In/Out 76 5-2-3 Configuring ...
Manual
Page 6
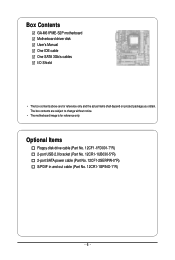
Box Contents GA-M61PME-S2P motherboard Motherboard driver disk User's Manual One IDE cable One SATA 3Gb/s cables I/O Shield • The box contents above are subject to change without notice. • The motherboard image is for reference only and the actual items shall depend on product package you obtain. Optional Items Floppy disk drive cable (Part No. 12CF1-1FD001-7*R) 2-port USB 2.0 bracket (Part No. 12CR1-1UB030-5*R) 2-port SATA power cable (Part No. 12CF1-2SERPW-0*R) S/PDIF in and out cable (Part No. 12CR1-1SPINO-1*R) - 6 - The box contents are for reference only.
Box Contents GA-M61PME-S2P motherboard Motherboard driver disk User's Manual One IDE cable One SATA 3Gb/s cables I/O Shield • The box contents above are subject to change without notice. • The motherboard image is for reference only and the actual items shall depend on product package you obtain. Optional Items Floppy disk drive cable (Part No. 12CF1-1FD001-7*R) 2-port USB 2.0 bracket (Part No. 12CR1-1UB030-5*R) 2-port SATA power cable (Part No. 12CF1-2SERPW-0*R) S/PDIF in and out cable (Part No. 12CR1-1SPINO-1*R) - 6 - The box contents are for reference only.
Manual
Page 17
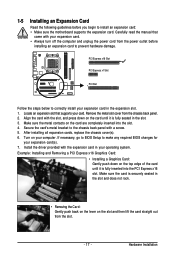
... straight out from the power outlet before you begin to install an expansion card: • Make sure the motherboard supports the expansion card. Install the driver provided with your expansion card in your card. Example: Installing and Removing a PCI Express x16 Graphics Card: • Installing a Graphics Card: Gently push down on...
... straight out from the power outlet before you begin to install an expansion card: • Make sure the motherboard supports the expansion card. Install the driver provided with your expansion card in your card. Example: Installing and Removing a PCI Express x16 Graphics Card: • Installing a Graphics Card: Gently push down on...
Manual
Page 19
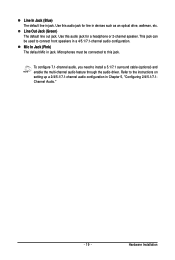
.... Line In Jack (Blue) The default line in jack. Refer to install a 5.1/7.1 surround cable (optional) and enable the multi-channel audio feature through the audio driver. Use this audio jack for line in Chapter 5, "Configuring 2/4/5.1/7.1Channel Audio." - 19 - Use this audio jack for a headphone or 2-channel speaker. Hardware Installation Line Out...
.... Line In Jack (Blue) The default line in jack. Refer to install a 5.1/7.1 surround cable (optional) and enable the multi-channel audio feature through the audio driver. Use this audio jack for line in Chapter 5, "Configuring 2/4/5.1/7.1Channel Audio." - 19 - Use this audio jack for a headphone or 2-channel speaker. Hardware Installation Line Out...
Manual
Page 32
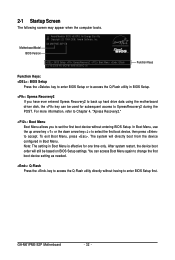
... effective for subsequent access to accept. Motherboard Model BIOS Version Award Modular BIOS v6.00PG, An Energy Star Ally Copyright (C) 1984-2008, Award Software, Inc. GA-M61PME-S2P E8 . . . . : BIOS Setup : XpressRecovery2 : Boot Menu : Qflash 12/16/2008-NV-MCP61-6A61KG0AC-00 Function Keys Function Keys: : BIOS Setup ... BIOS Setup or to access the Q-Flash utility in Boot Menu. In Boot Menu, use the up hard drive data using the motherboard driver disk, the key can access Boot Menu again to change the first boot device setting as needed. : Q-Flash Press the key to access...
... effective for subsequent access to accept. Motherboard Model BIOS Version Award Modular BIOS v6.00PG, An Energy Star Ally Copyright (C) 1984-2008, Award Software, Inc. GA-M61PME-S2P E8 . . . . : BIOS Setup : XpressRecovery2 : Boot Menu : Qflash 12/16/2008-NV-MCP61-6A61KG0AC-00 Function Keys Function Keys: : BIOS Setup ... BIOS Setup or to access the Q-Flash utility in Boot Menu. In Boot Menu, use the up hard drive data using the motherboard driver disk, the key can access Boot Menu again to change the first boot device setting as needed. : Q-Flash Press the key to access...
Manual
Page 37
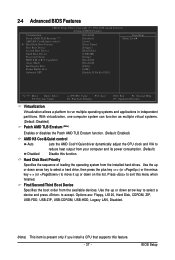
... TLB Erratum (Note) Enables or disables the Patch AMD TLB Erratum function. (Default: Enabled) AMD K8 Cool&Quiet control Auto Lets the AMD Cool'n'Quiet driver dynamically adjust the CPU clock and VIA to run multiple operating systems and applications in independent partitions. Hard Disk Boot Priority Specifies the sequence of...
... TLB Erratum (Note) Enables or disables the Patch AMD TLB Erratum function. (Default: Enabled) AMD K8 Cool&Quiet control Auto Lets the AMD Cool'n'Quiet driver dynamically adjust the CPU clock and VIA to run multiple operating systems and applications in independent partitions. Hard Disk Boot Priority Specifies the sequence of...

Manual
Page 51
.... You can click the Install All button and "Xpress Install" will continue to install. You can install other drivers. • After the drivers are recommended to install other applications included in Device Manager, please remove the question mark (by right-clicking your mouse...Computer, double-click the optical drive and execute the Run.exe program.) 3-1 Installing Chipset Drivers After inserting the driver disk, "Xpress Install" will automatically scan your system automatically during the driver installation. After installing the SP1 (or later), if a question mark still exists in ...
.... You can click the Install All button and "Xpress Install" will continue to install. You can install other drivers. • After the drivers are recommended to install other applications included in Device Manager, please remove the question mark (by right-clicking your mouse...Computer, double-click the optical drive and execute the Run.exe program.) 3-1 Installing Chipset Drivers After inserting the driver disk, "Xpress Install" will automatically scan your system automatically during the driver installation. After installing the SP1 (or later), if a question mark still exists in ...
Manual
Page 52
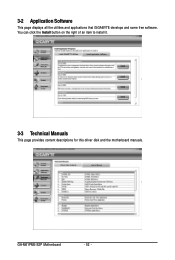
3-2 Application Software This page displays all the utilities and applications that GIGABYTE develops and some free software. GA-M61PME-S2P Motherboard - 52 - You can click the Install button on the right of an item to install it. 3-3 Technical Manuals This page provides content descriptions for this driver disk and the motherboard manuals.
3-2 Application Software This page displays all the utilities and applications that GIGABYTE develops and some free software. GA-M61PME-S2P Motherboard - 52 - You can click the Install button on the right of an item to install it. 3-3 Technical Manuals This page provides content descriptions for this driver disk and the motherboard manuals.
Manual
Page 53
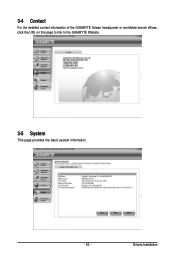
Drivers Installation 3-4 Contact For the detailed contact information of the GIGABYTE Taiwan headquarter or worldwide branch offices, click the URL on this page to link to the GIGABYTE Website. 3-5 System This page provides the basic system information. - 53 -
Drivers Installation 3-4 Contact For the detailed contact information of the GIGABYTE Taiwan headquarter or worldwide branch offices, click the URL on this page to link to the GIGABYTE Website. 3-5 System This page provides the basic system information. - 53 -
Manual
Page 54
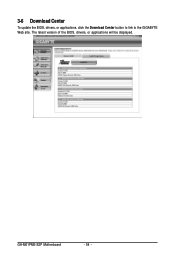
The latest version of the BIOS, drivers, or applications will be displayed. GA-M61PME-S2P Motherboard - 54 - 3-6 Download Center To update the BIOS, drivers, or applications, click the Download Center button to link to the GIGABYTE Web site.
The latest version of the BIOS, drivers, or applications will be displayed. GA-M61PME-S2P Motherboard - 54 - 3-6 Download Center To update the BIOS, drivers, or applications, click the Download Center button to link to the GIGABYTE Web site.
Manual
Page 55
.... actual size requirements vary, depending on the amount of data). • It is recommended to back up your system soon after the operating system and drivers are attached to the first and second SATA connectors, the hard drive on your system data and perform restoration of the hard drive, make sure...
.... actual size requirements vary, depending on the amount of data). • It is recommended to back up your system soon after the operating system and drivers are attached to the first and second SATA connectors, the hard drive on your system data and perform restoration of the hard drive, make sure...
Manual
Page 56
... is installed, rightclick the Computer icon on the amount of data) and begin the installation of the operating system. Accessing Xpress Recovery2 1. GA-M61PME-S2P Motherboard - 56 - Step 5: Xpress Recovery2 will automatically create a new partition to check disk allocation. Please note that if there is ... Press any key to startup Xpress Recovery2 , press any key to start backing up your hard drive data. Boot from the motherboard driver disk to the unallocated space (black stripe along the top). Step 3: When partitioning your hard drive, make sure to leave unallocated...
... is installed, rightclick the Computer icon on the amount of data) and begin the installation of the operating system. Accessing Xpress Recovery2 1. GA-M61PME-S2P Motherboard - 56 - Step 5: Xpress Recovery2 will automatically create a new partition to check disk allocation. Please note that if there is ... Press any key to startup Xpress Recovery2 , press any key to start backing up your hard drive data. Boot from the motherboard driver disk to the unallocated space (black stripe along the top). Step 3: When partitioning your hard drive, make sure to leave unallocated...
Manual
Page 61
...Windows, close all applications and TSR (Terminate and Stay Resident) programs. This helps prevent unexpected failures when performing a BIOS update. 2. GIGABYTE product warranty does not cover any BIOS damage or system failure resulting from an inadequate BIOS flashing. B. Installing and Using @BIOS: Use the... motherboard driver disk included with the @BIOS Utility A. During the BIOS update process, ensure the Internet connection is stable and do so may ...
...Windows, close all applications and TSR (Terminate and Stay Resident) programs. This helps prevent unexpected failures when performing a BIOS update. 2. GIGABYTE product warranty does not cover any BIOS damage or system failure resulting from an inadequate BIOS flashing. B. Installing and Using @BIOS: Use the... motherboard driver disk included with the @BIOS Utility A. During the BIOS update process, ensure the Internet connection is stable and do so may ...
Manual
Page 65
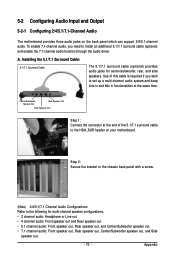
... Configuring SATA Hard Drive(s) To configure SATA hard drive(s), follow the steps below: A. C . Appendix Install the SATA RAID driver (Note) and operating system. Make a floppy disk containing the SATA RAID/AHCI driver for Windows XP. (Note) E. Before you begin Please prepare: • At least two SATA hard drives (to create ... drive(s) in your computer Attach one hard drive. • An empty formatted floppy disk. • Windows Vista/XP setup disk. • Motherboard driver disk. 5-1-1 Configuring the Onboard SATA Controller A. Install SATA hard drive(s) in your computer.
... Configuring SATA Hard Drive(s) To configure SATA hard drive(s), follow the steps below: A. C . Appendix Install the SATA RAID driver (Note) and operating system. Make a floppy disk containing the SATA RAID/AHCI driver for Windows XP. (Note) E. Before you begin Please prepare: • At least two SATA hard drives (to create ... drive(s) in your computer Attach one hard drive. • An empty formatted floppy disk. • Windows Vista/XP setup disk. • Motherboard driver disk. 5-1-1 Configuring the Onboard SATA Controller A. Install SATA hard drive(s) in your computer.

Manual
Page 69
... STRIPE 233.57G - After that, the Array List screen appears, displaying the RAID array that you can proceed to the installation of the SATA controller driver and operating system. - 69 - To exit the NVIDIA RAID setup utility, press in the main menu or + in the Array Detail screen. Now, you have...
... STRIPE 233.57G - After that, the Array List screen appears, displaying the RAID array that you can proceed to the installation of the SATA controller driver and operating system. - 69 - To exit the NVIDIA RAID setup utility, press in the main menu or + in the Array Detail screen. Now, you have...
Manual
Page 70
... disk and insert the blank formatted disk. Figure 1 Figure 2 (Note 1) If you need to install the SATA controller driver during the Windows XP setup process (Note 1). GA-M61PME-S2P Motherboard Figure 3 - 70 - Boot from the motherboard driver disk to a floppy disk. Press after Windows Vista is for the SATA controller from the startup disk. Your...
... disk and insert the blank formatted disk. Figure 1 Figure 2 (Note 1) If you need to install the SATA controller driver during the Windows XP setup process (Note 1). GA-M61PME-S2P Motherboard Figure 3 - 70 - Boot from the motherboard driver disk to a floppy disk. Press after Windows Vista is for the SATA controller from the startup disk. Your...
Manual
Page 71
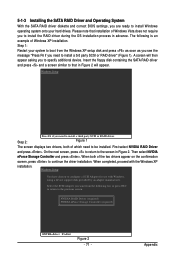
... setup disk and press as soon as you see the message "Press F6 if you want from the following is an example of the two drivers appear on the confirmation screen, press to be installed. The following list, or press ESC to return to install the RAID... the OS installation process in Figure 2. Windows Setup Press F6 if you to the previous screen. Step 2: Figure 1 The screen displays two drivers, both of Windows XP installation. When both of Windows Vista does not require you need to the screen in advance. When completed, proceed with Windows, ...
... setup disk and press as soon as you see the message "Press F6 if you want from the following is an example of the two drivers appear on the confirmation screen, press to be installed. The following list, or press ESC to return to install the RAID... the OS installation process in Figure 2. Windows Setup Press F6 if you to the previous screen. Step 2: Figure 1 The screen displays two drivers, both of Windows XP installation. When both of Windows Vista does not require you need to the screen in advance. When completed, proceed with Windows, ...
Manual
Page 73
... back panel with a screw. (Note) 2/4/5.1/7.1 Channel Audio Configurations: Refer to install an additional 5.1/7.1 surround cable (optional) and enable the 7.1-channel audio function through the audio driver. To enable 7.1-channel audio, you wish to the HDA_SUR header on the back panel which can support 2/4/5.1-channel audio.
... back panel with a screw. (Note) 2/4/5.1/7.1 Channel Audio Configurations: Refer to install an additional 5.1/7.1 surround cable (optional) and enable the 7.1-channel audio function through the audio driver. To enable 7.1-channel audio, you wish to the HDA_SUR header on the back panel which can support 2/4/5.1-channel audio.
Manual
Page 74
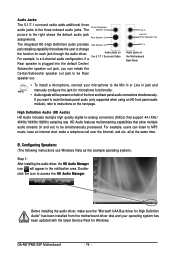
... audio jacks. Configuring Speakers: (The following instructions use Windows Vista as the example operating system.) Step 1: After installing the audio driver, the HD Audio Manager icon will be simultaneously processed. Rear Speaker Out The integrated HD (High Definition) audio provides Side Speaker...has been updated with the latest Service Pack for Windows. If you can listen to be Rear speaker out. GA-M61PME-S2P Motherboard - 74 - B. Before installing the audio driver, make a telephone call over the Internet, and etc. High Definition Audio (HD Audio) HD Audio includes multiple...
... audio jacks. Configuring Speakers: (The following instructions use Windows Vista as the example operating system.) Step 1: After installing the audio driver, the HD Audio Manager icon will be simultaneously processed. Rear Speaker Out The integrated HD (High Definition) audio provides Side Speaker...has been updated with the latest Service Pack for Windows. If you can listen to be Rear speaker out. GA-M61PME-S2P Motherboard - 74 - B. Before installing the audio driver, make a telephone call over the Internet, and etc. High Definition Audio (HD Audio) HD Audio includes multiple...


