Manual
Page 5
... 51 3-1 Installing Chipset Drivers 51 3-2 Application Software 52 3-3 Technical Manuals 52 3-4 Contact ...53 3-5 System ...53 3-6 Download Center 54 Chapter 4 Unique Features 55 4-1 Xpress Recovery2 55 4-2 ... SATA Hard Drive(s 65 5-1-1 Configuring the Onboard SATA Controller 65 5-1-2 Making a SATA RAID Driver Diskette for Windows XP 70 5-1-3 Installing the SATA RAID Driver and Operating System 71 5-2 ConfiguringAudio Input and Output 73 5-2-1 Configuring 2/4/5.1/7.1-Channel Audio 73 5-2-2 Configuring S/PDIF In/Out 76 5-2-3 Configuring Microphone Recording 78 5-2-4 Using the Sound ...
... 51 3-1 Installing Chipset Drivers 51 3-2 Application Software 52 3-3 Technical Manuals 52 3-4 Contact ...53 3-5 System ...53 3-6 Download Center 54 Chapter 4 Unique Features 55 4-1 Xpress Recovery2 55 4-2 ... SATA Hard Drive(s 65 5-1-1 Configuring the Onboard SATA Controller 65 5-1-2 Making a SATA RAID Driver Diskette for Windows XP 70 5-1-3 Installing the SATA RAID Driver and Operating System 71 5-2 ConfiguringAudio Input and Output 73 5-2-1 Configuring 2/4/5.1/7.1-Channel Audio 73 5-2-2 Configuring S/PDIF In/Out 76 5-2-3 Configuring Microphone Recording 78 5-2-4 Using the Sound ...
Manual
Page 19
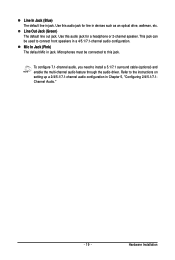
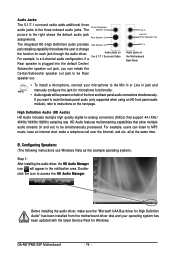
...Mic in jack. Hardware Installation To configure 7.1-channel audio, you need to the instructions on setting up a 2/4/5.1/7.1-channel audio configuration in Chapter 5, "Configuring 2/4/5.1/7.1Channel Audio." - 19 - Use this audio jack for line in a 4/5.1/7.1-channel audio configuration. This jack can be connected to connect ...as an optical drive, walkman, etc. Refer to install a 5.1/7.1 surround cable (optional) and enable the multi-channel audio feature through the audio driver. Microphones must be used to this jack. Line Out Jack (Green) The default line out jack. Line In ...
...Mic in jack. Hardware Installation To configure 7.1-channel audio, you need to the instructions on setting up a 2/4/5.1/7.1-channel audio configuration in Chapter 5, "Configuring 2/4/5.1/7.1Channel Audio." - 19 - Use this audio jack for line in a 4/5.1/7.1-channel audio configuration. This jack can be connected to connect ...as an optical drive, walkman, etc. Refer to install a 5.1/7.1 surround cable (optional) and enable the multi-channel audio feature through the audio driver. Microphones must be used to this jack. Line Out Jack (Green) The default line out jack. Line In ...
Manual
Page 73
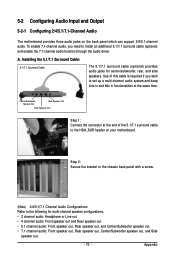
... in functionalities at the end of this cable is required if you need to install an additional 5.1/7.1 surround cable (optional) and enable the 7.1-channel audio function through the audio driver. Use of the 5.1/7.1 surround cable to the following for center/subwoofer, rear, and side speakers. Appendix Installing the 5.1/7.1 Surround Cable: 5.1/7.1 Surround Cable The...
... in functionalities at the end of this cable is required if you need to install an additional 5.1/7.1 surround cable (optional) and enable the 7.1-channel audio function through the audio driver. Use of the 5.1/7.1 surround cable to the following for center/subwoofer, rear, and side speakers. Appendix Installing the 5.1/7.1 Surround Cable: 5.1/7.1 Surround Cable The...
Manual
Page 74
... the example operating system.) Step 1: After installing the audio driver, the HD Audio Manager icon will be present on the next page. GA-M61PME-S2P Motherboard - 74 - High Definition Audio (HD Audio) HD Audio includes multiple high quality digital-to change the function for each jack through the audio driver. Before installing the audio driver, make a telephone call over the Internet, and etc...
... the example operating system.) Step 1: After installing the audio driver, the HD Audio Manager icon will be present on the next page. GA-M61PME-S2P Motherboard - 74 - High Definition Audio (HD Audio) HD Audio includes multiple high quality digital-to change the function for each jack through the audio driver. Before installing the audio driver, make a telephone call over the Internet, and etc...
Manual
Page 78
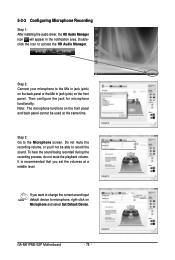
Then configure the jack for microphone functionality. It is recommended that you set the volumes at the same time. GA-M61PME-S2P Motherboard - 78 - Step 2: Connect your microphone to access the HD Audio Manager. Note: The microphone functions on the front panel and back panel cannot be able to record the sound... or you want to change the current sound input default device to the Microphone screen. 5-2-3 Configuring Microphone Recording Step 1: After installing the audio driver, the HD Audio Manager icon will appear in jack (pink) on Microphone and select Set Default Device.
Then configure the jack for microphone functionality. It is recommended that you set the volumes at the same time. GA-M61PME-S2P Motherboard - 78 - Step 2: Connect your microphone to access the HD Audio Manager. Note: The microphone functions on the front panel and back panel cannot be able to record the sound... or you want to change the current sound input default device to the Microphone screen. 5-2-3 Configuring Microphone Recording Step 1: After installing the audio driver, the HD Audio Manager icon will appear in jack (pink) on Microphone and select Set Default Device.


