
User Manual
Page 17
... card from the operating system. Read the related expansion card's instruction document before install the expansion card into expansion slot in the slot. 5. Install related driver from BIOS. 8. Power on the slot. When an AGP 2X (3.3V) card is installed the 2X_DET will light up normally due to install / uninstall the... small white-drawable bar. Replace the screw to secure the slot bracket of the AGP slot when you try to AGP 2X (3.3V) is inserted. GA-K8NSNXP Motherboard - 17 - Remove your computer's chassis cover, screws and slot bracket from the computer. 3.
... card from the operating system. Read the related expansion card's instruction document before install the expansion card into expansion slot in the slot. 5. Install related driver from BIOS. 8. Power on the slot. When an AGP 2X (3.3V) card is installed the 2X_DET will light up normally due to install / uninstall the... small white-drawable bar. Replace the screw to secure the slot bracket of the AGP slot when you try to AGP 2X (3.3V) is inserted. GA-K8NSNXP Motherboard - 17 - Remove your computer's chassis cover, screws and slot bracket from the computer. 3.
User Manual
Page 19
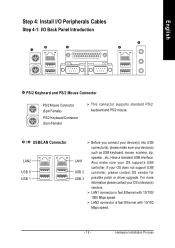
... Ethernet with 10/100/ 1000 Mbps speed. Also make sure your OS does not support USB controller, please contact OS vendor for possible patch or driver upgrade. English Step 4: Install I/O Peripherals Cables Step 4-1: I/O Back Panel Introduction PS/2 Keyboard and PS/2 Mouse Connector PS/2 Mouse Connector (6 pin Female) PS/2 Keyboard Connector (6 pin...
... Ethernet with 10/100/ 1000 Mbps speed. Also make sure your OS does not support USB controller, please contact OS vendor for possible patch or driver upgrade. English Step 4: Install I/O Peripherals Cables Step 4-1: I/O Back Panel Introduction PS/2 Keyboard and PS/2 Mouse Connector PS/2 Mouse Connector (6 pin Female) PS/2 Keyboard Connector (6 pin...
User Manual
Page 20
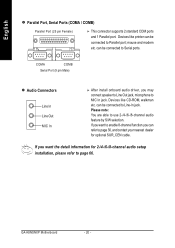
... Line In Line Out MIC In After install onboard audio driver, you want the detail information for optional SUR_CEN cable. English Parallel Port, Serial Ports (COMA / COMB) Parallel Port (25 pin Female) This connector supports 2 standard COM ports and 1 Parallel port. GA-K8NSNXP Motherboard - 20 - Devices like printer can refer to page 30...
... Line In Line Out MIC In After install onboard audio driver, you want the detail information for optional SUR_CEN cable. English Parallel Port, Serial Ports (COMA / COMB) Parallel Port (25 pin Female) This connector supports 2 standard COM ports and 1 Parallel port. GA-K8NSNXP Motherboard - 20 - Devices like printer can refer to page 30...
User Manual
Page 26
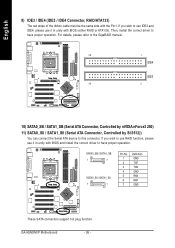
... support hot plug function. If you wish to use IDE3 and IDE4, please use it in unity with BIOS and install the correct driver to use RAID function, please use it in unity with the Pin1. If you wish to have proper operation. Then, install the correct... driver to this connector. English 9) IDE3 / IDE4 (IDE3 / IDE4 Connector, RAID/ATA133) The red stripe of the ribbon cable must be the same side with BIOS (either RAID or ATA133). GA-K8NSNXP Motherboard - 26 -
... support hot plug function. If you wish to use IDE3 and IDE4, please use it in unity with BIOS and install the correct driver to use RAID function, please use it in unity with the Pin1. If you wish to have proper operation. Then, install the correct... driver to this connector. English 9) IDE3 / IDE4 (IDE3 / IDE4 Connector, RAID/ATA133) The red stripe of the ribbon cable must be the same side with BIOS (either RAID or ATA133). GA-K8NSNXP Motherboard - 26 -
User Manual
Page 57
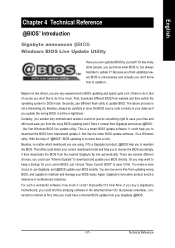
... - Because you think updating newest BIOS is unnecessary and actually you to choose the BIOS accordingly. Again, Gigabyte's innovative product erects a milestone in the attached driver CD. First, download different BIOS from the nearest Gigabyte ftp site automatically. Here it . There are now worry free from updating wrong BIOS, and capable to maintain...
... - Because you think updating newest BIOS is unnecessary and actually you to choose the BIOS accordingly. Again, Gigabyte's innovative product erects a milestone in the attached driver CD. First, download different BIOS from the nearest Gigabyte ftp site automatically. Here it . There are now worry free from updating wrong BIOS, and capable to maintain...
User Manual
Page 66
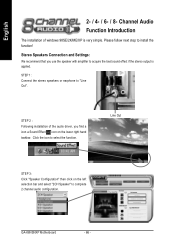
... speakers or earphone to acquire the best sound effect if the stereo output is very simple. English 2- / 4- / 6- / 8- Please follow next step to install the function! GA-K8NSNXP Motherboard - 66 - Channel Audio Function Introduction The installation of the audio driver, you use the speaker with amplifier to "Line Out".
... speakers or earphone to acquire the best sound effect if the stereo output is very simple. English 2- / 4- / 6- / 8- Please follow next step to install the function! GA-K8NSNXP Motherboard - 66 - Channel Audio Function Introduction The installation of the audio driver, you use the speaker with amplifier to "Line Out".
User Manual
Page 67
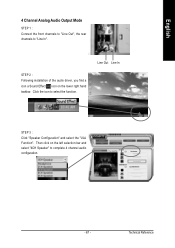
Click the icon to complete 4 channel audio configuration. - 67 - STEP 2 : Following installation of the audio driver, you find a icon a Sound Effect icon on the left selection bar and select "4CH Speaker" to select the function. Then click on the lower right hand taskbar. Line Out Line In STEP 3 : Click "Speaker Configuration" and select the "UAJ Function". Technical Reference English 4 Channel Analog Audio Output Mode STEP 1 : Connect the front channels to "Line Out", the rear channels to "Line In".
Click the icon to complete 4 channel audio configuration. - 67 - STEP 2 : Following installation of the audio driver, you find a icon a Sound Effect icon on the left selection bar and select "4CH Speaker" to select the function. Then click on the lower right hand taskbar. Line Out Line In STEP 3 : Click "Speaker Configuration" and select the "UAJ Function". Technical Reference English 4 Channel Analog Audio Output Mode STEP 1 : Connect the front channels to "Line Out", the rear channels to "Line In".
User Manual
Page 68
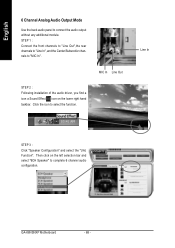
STEP 1 : Connect the front channels to "Line Out",the rear channels to "Line In", and the Center/Subwoofer channels to select the function. GA-K8NSNXP Motherboard - 68 - Click the icon to "MIC In". Line In STEP 3 : Click "Speaker Configuration" and select the "UAJ Function". Then click... Output Mode Use the back audio panel to complete 6 channel audio configuration. MIC In Line Out STEP 2 : Following installation of the audio driver, you find a icon a Sound Effect icon on the left selection bar and select "6CH Speaker" to connect the audio output without any additional module...
STEP 1 : Connect the front channels to "Line Out",the rear channels to "Line In", and the Center/Subwoofer channels to select the function. GA-K8NSNXP Motherboard - 68 - Click the icon to "MIC In". Line In STEP 3 : Click "Speaker Configuration" and select the "UAJ Function". Then click... Output Mode Use the back audio panel to complete 6 channel audio configuration. MIC In Line Out STEP 2 : Following installation of the audio driver, you find a icon a Sound Effect icon on the left selection bar and select "6CH Speaker" to connect the audio output without any additional module...
User Manual
Page 70
... "LINE IN" port. Connect the center/subwoofer channels to the "MIC IN" port located on the audio panel and the R/L channels to select the function. GA-K8NSNXP Motherboard - 70 - Sound Effect Configuration: At the sound effect menu, users can adjust sound option settings as desired. Click the icon to the Surround-Kit... "SUR BACK" port. (This method requires UAJ function) STEP 4 : Following installation of the audio driver, you find a icon a Sound Effect icon on the lower right hand taskbar.
... "LINE IN" port. Connect the center/subwoofer channels to the "MIC IN" port located on the audio panel and the R/L channels to select the function. GA-K8NSNXP Motherboard - 70 - Sound Effect Configuration: At the sound effect menu, users can adjust sound option settings as desired. Click the icon to the Surround-Kit... "SUR BACK" port. (This method requires UAJ function) STEP 4 : Following installation of the audio driver, you find a icon a Sound Effect icon on the lower right hand taskbar.
User Manual
Page 74
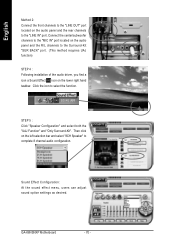
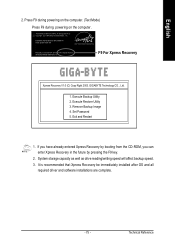
...Recovery. Exit and Restart Build 2011 GA-K8NSNXP Motherboard - 74 - Allows installation of the screen. When the boot partition is not working properly, the user can also function by pressing the F9 key during computer power on. . . Insert the provided driver CD into your CD drive, then... save and exit the BIOS menu. Verifying DMI Pool Data Boot from CD: Boot from CD-ROM. Set Password 5. Xpress Recovery is Xpress Recovery ? GIGABYTE Technology CO. , Ltd. 1. Remove Backup Image 4....
...Recovery. Exit and Restart Build 2011 GA-K8NSNXP Motherboard - 74 - Allows installation of the screen. When the boot partition is not working properly, the user can also function by pressing the F9 key during computer power on. . . Insert the provided driver CD into your CD drive, then... save and exit the BIOS menu. Verifying DMI Pool Data Boot from CD: Boot from CD-ROM. Set Password 5. Xpress Recovery is Xpress Recovery ? GIGABYTE Technology CO. , Ltd. 1. Remove Backup Image 4....
User Manual
Page 75
... in the future by pressing the F9 key. 2. Technical Reference English 2. Intel 865PE AGPSet BIOS for 8IPE1000MT F1 Check System Health OK . . . Execute Restore Utility 3. GIGABYTE Technology CO. , Ltd. 1. Press F9 during powering on the computer. (Text Mode) Press F9 during powering on the computer. It is recommended that Xpress Recovery...
... in the future by pressing the F9 key. 2. Technical Reference English 2. Intel 865PE AGPSet BIOS for 8IPE1000MT F1 Check System Health OK . . . Execute Restore Utility 3. GIGABYTE Technology CO. , Ltd. 1. Press F9 during powering on the computer. (Text Mode) Press F9 during powering on the computer. It is recommended that Xpress Recovery...
User Manual
Page 78
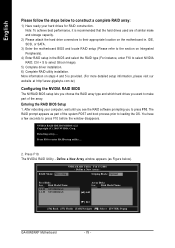
...driver installation. 6) Complete RAID utility installation. NVDIA RAID Utility Feb 13 2004 - Define a New Array - RAID Mode: Mirroring Striping Block: Optimal Free Disks Loc Disk Model Name 1.0.M ST3120026AS 1.1.M ST3120026AS Array Disks Loc Disk Model Name [J] Add [I ] Del [F6] Back [F7] Finish [TAB] Navigate [KL] Select [ENTER] Popup GA-K8NSNXP... Motherboard - 78 - Note: To achieve best performance, it is provided. (For more detailed setup information, please visit our website at http:\\www.gigabyte.com.tw) Configuring the NVIDIA RAID BIOS...
...driver installation. 6) Complete RAID utility installation. NVDIA RAID Utility Feb 13 2004 - Define a New Array - RAID Mode: Mirroring Striping Block: Optimal Free Disks Loc Disk Model Name 1.0.M ST3120026AS 1.1.M ST3120026AS Array Disks Loc Disk Model Name [J] Add [I ] Del [F6] Back [F7] Finish [TAB] Navigate [KL] Select [ENTER] Popup GA-K8NSNXP... Motherboard - 78 - Note: To achieve best performance, it is provided. (For more detailed setup information, please visit our website at http:\\www.gigabyte.com.tw) Configuring the NVIDIA RAID BIOS...
User Manual
Page 80
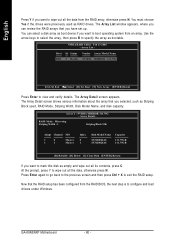
...press B to specify the array as RAID drives. The Array Detail screen shows various information about the array that you want to configure and load drivers under Windows. Now that you have set up. English Press Y if you selected, such as Striping Block used as bootable. The Array Detail... out all its contents, press C. Press Enter again to go back to the previous screen and then press Ctrl + X to view and verify details. GA-K8NSNXP Motherboard - 80 - Array List - The Array List window appears, where you can select a disk array as empty and wipe out all the data, ...
...press B to specify the array as RAID drives. The Array Detail screen shows various information about the array that you want to configure and load drivers under Windows. Now that you have set up. English Press Y if you selected, such as Striping Block used as bootable. The Array Detail... out all its contents, press C. Press Enter again to go back to the previous screen and then press Ctrl + X to view and verify details. GA-K8NSNXP Motherboard - 80 - Array List - The Array List window appears, where you can select a disk array as empty and wipe out all the data, ...
User Manual
Page 81
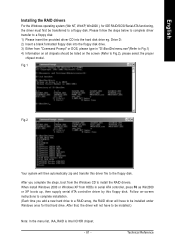
... Win2000 or XP boots up, then supply serial ATA controller driver by this driver file to install the RAID drivers. English Installing the RAID drivers For the Windows operating system (Win NT, WinXP, Win2000 ), for that , the driver will then automatically zip and transfer this floppy disk. Technical ... Note: In the menu list, IAA_RAID is Intel ICH5R chipset. - 81 - Please follow the steps below to complete driver transfer to a floppy disk: 1) Please insert the provided driver CD into the floppy disk drive. 3) Either from the Windows CD to the floppy disk. Drive D: 2) Insert a...
... Win2000 or XP boots up, then supply serial ATA controller driver by this driver file to install the RAID drivers. English Installing the RAID drivers For the Windows operating system (Win NT, WinXP, Win2000 ), for that , the driver will then automatically zip and transfer this floppy disk. Technical ... Note: In the menu list, IAA_RAID is Intel ICH5R chipset. - 81 - Please follow the steps below to complete driver transfer to a floppy disk: 1) Please insert the provided driver CD into the floppy disk drive. 3) Either from the Windows CD to the floppy disk. Drive D: 2) Insert a...
User Manual
Page 83
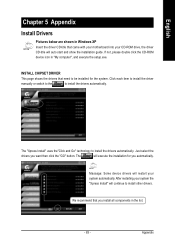
If not, please double click the CD-ROM device icon in the list. - 83 - INSTALL CHIPSET DRIVER This page shows the drivers that need to install the drivers automatically. The "Xpress Install" uses the"Click and Go" technology to be installed for you automatically. The will ... Click each item to install the driver manually or switch to the to install other drivers. After restarting your system the "Xpress Install" will continue to install the drivers automatically. Massage: Some device drivers will restart your CD-ROM drive, the driver CD-title will execute the installation ...
If not, please double click the CD-ROM device icon in the list. - 83 - INSTALL CHIPSET DRIVER This page shows the drivers that need to install the drivers automatically. The "Xpress Install" uses the"Click and Go" technology to be installed for you automatically. The will ... Click each item to install the driver manually or switch to the to install other drivers. After restarting your system the "Xpress Install" will continue to install the drivers automatically. Massage: Some device drivers will restart your CD-ROM drive, the driver CD-title will execute the installation ...
User Manual
Page 84
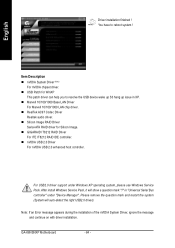
... mark and restart the system (System will show a question mark "?" Item Description „ nVIDIA System Driver (Note) For nVIDIA chipset driver. „ USB Patch for WinXP This patch driver can help you to reboot system ! GA-K8NSNXP Motherboard - 84 - English Driver installation finished ! You have to resolve the USB device wake up S3 hang up issue...
... mark and restart the system (System will show a question mark "?" Item Description „ nVIDIA System Driver (Note) For nVIDIA chipset driver. „ USB Patch for WinXP This patch driver can help you to reboot system ! GA-K8NSNXP Motherboard - 84 - English Driver installation finished ! You have to resolve the USB device wake up S3 hang up issue...
User Manual
Page 86
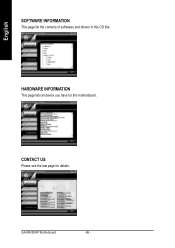
GA-K8NSNXP Motherboard - 86 - English SOFTWARE INFORMATION This page list the contects of softwares and drivers in this motherboard. HARDWARE INFORMATION This page lists all device you have for details. CONTACT US Please see the last page for this CD title.
GA-K8NSNXP Motherboard - 86 - English SOFTWARE INFORMATION This page list the contects of softwares and drivers in this motherboard. HARDWARE INFORMATION This page lists all device you have for details. CONTACT US Please see the last page for this CD title.


