
Manual
Page 10
Line Out ; MIC ; Back Surround Speaker Out ; GA-8I915G Pro Motherboard - 10 - Center/Subwoofer Speaker Out ; Surround Speaker Out connection w Supports SPDIF In/Out connection w CD In (Note 1) Due to 4GB memory)(Note 1) w ... w 1 parallel port supporting Normal/EPP/ECP mode w 1 VGA port, onboard COMA connection w 8 USB 2.0/1.1 ports (rear x 4, front x 4 via cable) w 3 IEEE1394 ports (requires cable) w 1 front audio connector w 1 IR connector w 1 PS/2 keyboard port w 1 PS/2 mouse port w Onboard Marvell 8001 chip (10/100/1000 Mbit) w 1 RJ 45 port w C-Media 9880 CODEC (UAJ) w Supports...
Line Out ; MIC ; Back Surround Speaker Out ; GA-8I915G Pro Motherboard - 10 - Center/Subwoofer Speaker Out ; Surround Speaker Out connection w Supports SPDIF In/Out connection w CD In (Note 1) Due to 4GB memory)(Note 1) w ... w 1 parallel port supporting Normal/EPP/ECP mode w 1 VGA port, onboard COMA connection w 8 USB 2.0/1.1 ports (rear x 4, front x 4 via cable) w 3 IEEE1394 ports (requires cable) w 1 front audio connector w 1 IR connector w 1 PS/2 keyboard port w 1 PS/2 mouse port w Onboard Marvell 8001 chip (10/100/1000 Mbit) w 1 RJ 45 port w C-Media 9880 CODEC (UAJ) w Supports...

Manual
Page 17
... like CD-ROM, walkman etc. VGA Port M onitor can be connected to Line In jack. LAN Port The provided Internetconnection is capable of providing digital audio to external speakers or compressed AC3 data to VGA port. have a standard USB interface. can be connected to this connector. English 1-6 I/O Back Panel Introduction PS...
... like CD-ROM, walkman etc. VGA Port M onitor can be connected to Line In jack. LAN Port The provided Internetconnection is capable of providing digital audio to external speakers or compressed AC3 data to VGA port. have a standard USB interface. can be connected to this connector. English 1-6 I/O Back Panel Introduction PS...

Manual
Page 18
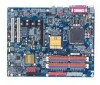
English You can use audio software to configure 2-/4-/5.1-/7.1-channel audio functioning. 1-7 Connectors Introduction 13 5 2 6 8 13 12 9 7 19 18 4 17 16 15 14 10 11 1) ATX_12V 2) ATX (Power Connector) 3) CPU_FAN 4) SYS_FAN 5) PWR_FAN 6) NB_FAN 7) FDD 8) IDE 9) S_ATA1/S_ATA2/S_ATA3/S_ATA4 10) PWR_LED 11) F_PANEL 12) AZALIA_FP 13) CD_IN 14) F_USB1 / F_USB2 15) F1_1394 / F2_1394 16) IR 17) COMA 18) CLR_CMOS 19) BAT GA-8I915G Pro Motherboard - 18 -
English You can use audio software to configure 2-/4-/5.1-/7.1-channel audio functioning. 1-7 Connectors Introduction 13 5 2 6 8 13 12 9 7 19 18 4 17 16 15 14 10 11 1) ATX_12V 2) ATX (Power Connector) 3) CPU_FAN 4) SYS_FAN 5) PWR_FAN 6) NB_FAN 7) FDD 8) IDE 9) S_ATA1/S_ATA2/S_ATA3/S_ATA4 10) PWR_LED 11) F_PANEL 12) AZALIA_FP 13) CD_IN 14) F_USB1 / F_USB2 15) F1_1394 / F2_1394 16) IR 17) COMA 18) CLR_CMOS 19) BAT GA-8I915G Pro Motherboard - 18 -
Manual
Page 24
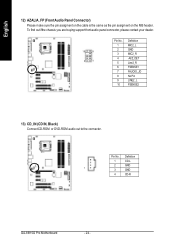
Definition 1 CD-L 2 GND 1 3 GND 4 CD-R GA-8I915G Pro Motherboard - 24 - To find out ifthe chassis you are buying support front audio panel connector, please contact your dealer. 10 9 2 1 Pin No. 1 2 3 4 5 6 7 8 9 10 Definition MIC2_L GND MIC2_R -ACZ_DET Line2_R FSENSE1 FAUOIO_JD No Pin LINE2_L FSENSE2 13) CD_IN (CD IN, Black) Connect CD-ROM or DVD-ROM audio out to the connector. English 12) AZALIA_FP (FrontAudio Panel Connector) Please m ake sure the pin assigm ent on the cable is the sam e as the pin assigm ent on the M B header. Pin No.
Definition 1 CD-L 2 GND 1 3 GND 4 CD-R GA-8I915G Pro Motherboard - 24 - To find out ifthe chassis you are buying support front audio panel connector, please contact your dealer. 10 9 2 1 Pin No. 1 2 3 4 5 6 7 8 9 10 Definition MIC2_L GND MIC2_R -ACZ_DET Line2_R FSENSE1 FAUOIO_JD No Pin LINE2_L FSENSE2 13) CD_IN (CD IN, Black) Connect CD-ROM or DVD-ROM audio out to the connector. English 12) AZALIA_FP (FrontAudio Panel Connector) Please m ake sure the pin assigm ent on the cable is the sam e as the pin assigm ent on the M B header. Pin No.

Manual
Page 37
...-Com bined, SATA w ill be simulated to Ch. 0 Master/Slav e. Disable USB M ouse Support. (Default v alue) Azalia Codec Auto Auto detect Azalia audio function. (Default v alue) Disa bled Disable Azalia audio func tion. If PATA IDE w ere set to Combined, y ou can use . BIOS w ill auto detect. (Default v alue) Combined Set On...
...-Com bined, SATA w ill be simulated to Ch. 0 Master/Slav e. Disable USB M ouse Support. (Default v alue) Azalia Codec Auto Auto detect Azalia audio function. (Default v alue) Disa bled Disable Azalia audio func tion. If PATA IDE w ere set to Combined, y ou can use . BIOS w ill auto detect. (Default v alue) Combined Set On...

Manual
Page 68
... in the system tray" is configured on the system. 2 Channel Output Mode -- Make sure "Show the audio configuration icon in the front: back surround speakers, center/ subwoofer speakers, surround speakers, front speakers and earphone....7.1 Channel Output Mode. Front speakers are configured on the system. 4 Channel Output Mode -- There are 5 kinds of the audio driver, you'll find an icon in 7.1 channel output mode no matter what other output devices are configured, then the system ...select the function. if back surround speakers are configured.) GA-8I915G Pro Motherboard - 68 -
... in the system tray" is configured on the system. 2 Channel Output Mode -- Make sure "Show the audio configuration icon in the front: back surround speakers, center/ subwoofer speakers, surround speakers, front speakers and earphone....7.1 Channel Output Mode. Front speakers are configured on the system. 4 Channel Output Mode -- There are 5 kinds of the audio driver, you'll find an icon in 7.1 channel output mode no matter what other output devices are configured, then the system ...select the function. if back surround speakers are configured.) GA-8I915G Pro Motherboard - 68 -

Manual
Page 69
... is applied. Appendix Line Out STEP 2: After installation of the audio driver, you'll find an icon in "Audio System Status". Double click the icon to manually modify speaker settings. STEP 3: Click "C-Media 3D Audio Configuration" and then select "Main Setting". English 2 Channel Audio Setup: We recommend that you use speakers with amplifier to...
... is applied. Appendix Line Out STEP 2: After installation of the audio driver, you'll find an icon in "Audio System Status". Double click the icon to manually modify speaker settings. STEP 3: Click "C-Media 3D Audio Configuration" and then select "Main Setting". English 2 Channel Audio Setup: We recommend that you use speakers with amplifier to...

Manual
Page 70
... The function to select the function. STEP 2: After installation of the audio driver, you the functions to manually modify speaker setting. Double click the icon to adjust speaker volume. English 4 Channel Audio Setup STEP 1 : Connect the front speaker to "Front Speaker Out"... and the surround speaker to "Surround speaker out". Front Speaker Out Surround speaker out STEP 3: Click "C-Media 3D Audio Configuration" and then select "Main Setting". GA-8I915G Pro Motherboard - 70 - The current audio mode is...
... The function to select the function. STEP 2: After installation of the audio driver, you the functions to manually modify speaker setting. Double click the icon to adjust speaker volume. English 4 Channel Audio Setup STEP 1 : Connect the front speaker to "Front Speaker Out"... and the surround speaker to "Surround speaker out". Front Speaker Out Surround speaker out STEP 3: Click "C-Media 3D Audio Configuration" and then select "Main Setting". GA-8I915G Pro Motherboard - 70 - The current audio mode is...

Manual
Page 71
...Speaker Out Center/Subwoofer Speaker Out Surround speaker out STEP 3: Click "C-Media 3D Audio Configuration" and then select "Main Setting". Double click the icon to "Center/Subwoofer Speaker Out". Appendix English 5.1 Channel Audio Setup STEP 1 : Connect the front speaker to "Front Speaker Out", the... and the center/subwoofer speaker to select the function. The current audio mode is display in the system area. The function to manually modify speaker the settings. STEP 2: After installation of the audio driver, you the functions to manually modify speaker setting. "Smart Jack...
...Speaker Out Center/Subwoofer Speaker Out Surround speaker out STEP 3: Click "C-Media 3D Audio Configuration" and then select "Main Setting". Double click the icon to "Center/Subwoofer Speaker Out". Appendix English 5.1 Channel Audio Setup STEP 1 : Connect the front speaker to "Front Speaker Out", the... and the center/subwoofer speaker to select the function. The current audio mode is display in the system area. The function to manually modify speaker the settings. STEP 2: After installation of the audio driver, you the functions to manually modify speaker setting. "Smart Jack...

Manual
Page 72
..." and then select "Main Setting". Double click the icon to "Back surround speaker out". The current audio mode is display in the system area. English 7.1 Channel Audio Setup STEP 1 : Connect the front speaker to "Front Speaker Out", the surround speaker to "Surround speaker out", ...speaker to select the function. The function to manually modify speaker setting. STEP 2: After installation of the audio driver, you the functions to manually modify speaker the settings. GA-8I915G Pro Motherboard - 72 - "Smart Jack" would auto-detect the speaker type you connect and gives you find...
..." and then select "Main Setting". Double click the icon to "Back surround speaker out". The current audio mode is display in the system area. English 7.1 Channel Audio Setup STEP 1 : Connect the front speaker to "Front Speaker Out", the surround speaker to "Surround speaker out", ...speaker to select the function. The function to manually modify speaker setting. STEP 2: After installation of the audio driver, you the functions to manually modify speaker the settings. GA-8I915G Pro Motherboard - 72 - "Smart Jack" would auto-detect the speaker type you connect and gives you find...

Manual
Page 73
...shown here. Device Setting Check "Enable Multiple Streaming" and restart the system to enable support for you to use the multiple audio output function. Note:The function can control Environment emulation, Environment size, and parameters of recording source is shown here. (2) ...For Dolby Digital Live! After you connect the audio device to control volume / panning / recording / monitoring. Defaults: The defaults for both "Sound Playback "and"Sound Recording " are "C-Media...
...shown here. Device Setting Check "Enable Multiple Streaming" and restart the system to enable support for you to use the multiple audio output function. Note:The function can control Environment emulation, Environment size, and parameters of recording source is shown here. (2) ...For Dolby Digital Live! After you connect the audio device to control volume / panning / recording / monitoring. Defaults: The defaults for both "Sound Playback "and"Sound Recording " are "C-Media...


