Manual
Page 1
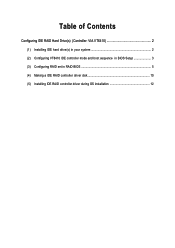
Table of Contents Configuring IDE RAID Hard Drive(s) (Controller: VIA VT6410 2 (1) Installing IDE hard drive(s) in your system 2 (2) Configuring VT6410 IDE controller mode and boot sequence in BIOS Setup 3 (3) Configuring RAID set in RAID BIOS 5 (4) Making a IDE RAID controller driver disk 10 (5) Installing IDE RAID controller driver during OS installation 12
Table of Contents Configuring IDE RAID Hard Drive(s) (Controller: VIA VT6410 2 (1) Installing IDE hard drive(s) in your system 2 (2) Configuring VT6410 IDE controller mode and boot sequence in BIOS Setup 3 (3) Configuring RAID set in RAID BIOS 5 (4) Making a IDE RAID controller driver disk 10 (5) Installing IDE RAID controller driver during OS installation 12
Manual
Page 2
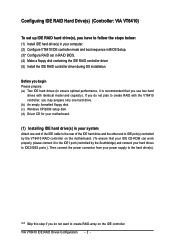
.... (b) An empty formatted floppy disk. (c) Windows XP/2000 setup disk. (d) Driver CD for your motherboard. (1) Installing IDE hard drive(s) in RAID BIOS. (4) Make a floppy disk containing the IDE RAID controller driver (5) Install the IDE RAID controller driver during OS installation. Ác Configuring IDE RAID Hard Drive(s) (Controller: VIA VT6410...the hard drive(s). Then connect the power connector from your computer. (2) Configure VT6410 IDE controller mode and boot sequence in BIOS Setup. (3)* Configure RAID set up IDE RAID hard drive(s), you have to IDE2/IDE3 ports ).
.... (b) An empty formatted floppy disk. (c) Windows XP/2000 setup disk. (d) Driver CD for your motherboard. (1) Installing IDE hard drive(s) in RAID BIOS. (4) Make a floppy disk containing the IDE RAID controller driver (5) Install the IDE RAID controller driver during OS installation. Ác Configuring IDE RAID Hard Drive(s) (Controller: VIA VT6410...the hard drive(s). Then connect the power connector from your computer. (2) Configure VT6410 IDE controller mode and boot sequence in BIOS Setup. (3)* Configure RAID set up IDE RAID hard drive(s), you have to IDE2/IDE3 ports ).

Manual
Page 12
... controller on your system, or you need to install a 3rd party SCSI or RAID driver." Figure 18 Step 2: When a screen similar to that you have prepared a floppy disk with the IDE RAID driver and adjusted BIOS settings, you can begin to specify additional mass storage devices for use with Windows, including... disks from the Windows 2000/XP Setup disk and press F6 as soon as you see the next screen for use with the IDE RAID driver. After pressing the F6 key, there will load support for the following mass storage device(s) * To specify additional SCSI adapters, CD-ROM drives,...
... controller on your system, or you need to install a 3rd party SCSI or RAID driver." Figure 18 Step 2: When a screen similar to that you have prepared a floppy disk with the IDE RAID driver and adjusted BIOS settings, you can begin to specify additional mass storage devices for use with Windows, including... disks from the Windows 2000/XP Setup disk and press F6 as soon as you see the next screen for use with the IDE RAID driver. After pressing the F6 key, there will load support for the following mass storage device(s) * To specify additional SCSI adapters, CD-ROM drives,...
Manual
Page 5
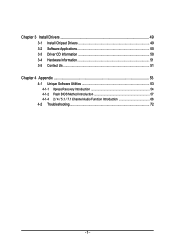
Chapter 3 Install Drivers 49 3-1 Install Chipset Drivers 49 3-2 Software Applications 50 3-3 Driver CD Information 50 3-4 Hardware Information 51 3-5 Contact Us ...51 Chapter 4 Appendix 53 4-1 Unique Software Utilities 53 4-1-1 Xpress Recovery Introduction 54 4-1-2 Flash BIOS Method Introduction 57 4-1-4 2 / 4 / 5.1 / 7.1 Channel Audio Function Introduction 66 4-2 Troubleshooting 72 - 5 -
Chapter 3 Install Drivers 49 3-1 Install Chipset Drivers 49 3-2 Software Applications 50 3-3 Driver CD Information 50 3-4 Hardware Information 51 3-5 Contact Us ...51 Chapter 4 Appendix 53 4-1 Unique Software Utilities 53 4-1-1 Xpress Recovery Introduction 54 4-1-2 Flash BIOS Method Introduction 57 4-1-4 2 / 4 / 5.1 / 7.1 Channel Audio Function Introduction 66 4-2 Troubleshooting 72 - 5 -
Manual
Page 16
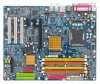
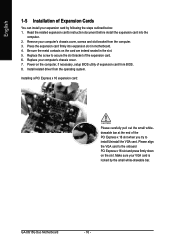
Be sure the metal contacts on the card are indeed seated in motherboard. 4. GA-8I915G Duo Motherboard - 16 - Install related driver from the computer. 3. Power on the slot .Make sure your VGA card is locked by following the steps outlined below: 1. Please align the VGA ... Express x 16 slot when you try to the onboard PCI Express x 16 slot and press firmly down on the computer, if necessary, setup BIOS utility of expansion card from BIOS. 8. Installing a PCI Express x 16 expansion card: Please carefully pull out the small whitedrawable bar at the end of the expansion card. 6....
Be sure the metal contacts on the card are indeed seated in motherboard. 4. GA-8I915G Duo Motherboard - 16 - Install related driver from the computer. 3. Power on the slot .Make sure your VGA card is locked by following the steps outlined below: 1. Please align the VGA ... Express x 16 slot when you try to the onboard PCI Express x 16 slot and press firmly down on the computer, if necessary, setup BIOS utility of expansion card from BIOS. 8. Installing a PCI Express x 16 expansion card: Please carefully pull out the small whitedrawable bar at the end of the expansion card. 6....

Manual
Page 22
Pin No. It will blink when the system enters suspend mode. Definition 1 1 MPD+ 2 MPD- 3 MPD- Please refer to the BIOS setting for the Serial ATA and install the proper driver in order to indicate whether the system is on/off. English 10) S_ATA0/S_ATA1/S_ATA2/S_ATA3 (Serial ATA Connector) Serial ATA can provide 150MB/s transfer rate. Pin No. Definition 1 GND 7 1 2 TXP 3 TXN 4 GND 5 RXN 6 RXP 7 GND 11) PWR_LED PWR_LED is connect with the system power indicator to work properly. GA-8I915G Duo Motherboard - 22 -
Pin No. It will blink when the system enters suspend mode. Definition 1 1 MPD+ 2 MPD- 3 MPD- Please refer to the BIOS setting for the Serial ATA and install the proper driver in order to indicate whether the system is on/off. English 10) S_ATA0/S_ATA1/S_ATA2/S_ATA3 (Serial ATA Connector) Serial ATA can provide 150MB/s transfer rate. Pin No. Definition 1 GND 7 1 2 TXP 3 TXN 4 GND 5 RXN 6 RXP 7 GND 11) PWR_LED PWR_LED is connect with the system power indicator to work properly. GA-8I915G Duo Motherboard - 22 -
Manual
Page 53
... for download. These characteristics make it the ideal companion with the option for users. Through GIGABYTE M.I .A. 2) is no longer need to -date drivers and BIOS. - 53 - Download Center Download Center allows users to quickly download and update their BIOS as well as CPU, memory, graphics card, etc. C.O.M. (Corporate Online Management) A web-based system management...
... for download. These characteristics make it the ideal companion with the option for users. Through GIGABYTE M.I .A. 2) is no longer need to -date drivers and BIOS. - 53 - Download Center Download Center allows users to quickly download and update their BIOS as well as CPU, memory, graphics card, etc. C.O.M. (Corporate Online Management) A web-based system management...
Manual
Page 54
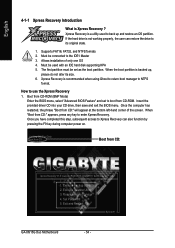
... Boot from CD:" appears, press any key to the IDE1 Master 3. Insert the provided driver CD into your CD drive, then save and exit the BIOS menu. Exit and Restart Build 2011 GA-8I915G Duo Motherboard - 54 - If the hard drive is Xpress Recovery ? Once the computer has restarted..., the phrase "Boot from CD: Xpress Recovery V1.0 (C) Copy Right 2003. Verifying DMI Pool Data Boot from CD: Boot from CD:" will appear at the bottom left-hand corner of only one OS 4. GIGABYTE...
... Boot from CD:" appears, press any key to the IDE1 Master 3. Insert the provided driver CD into your CD drive, then save and exit the BIOS menu. Exit and Restart Build 2011 GA-8I915G Duo Motherboard - 54 - If the hard drive is Xpress Recovery ? Once the computer has restarted..., the phrase "Boot from CD: Xpress Recovery V1.0 (C) Copy Right 2003. Verifying DMI Pool Data Boot from CD: Boot from CD:" will appear at the bottom left-hand corner of only one OS 4. GIGABYTE...
Manual
Page 55
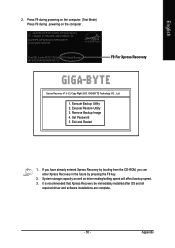
.... 2. It is recommended that Xpress Recovery be immediately installed after OS and all required driver and software installations are complete. - 55 - Award Modular BIOS v6.00PG, An Energy Star Al ly Copyright (C) 1984-2004, Award Software, Inc.... Remove Backup Image 4. Execute Restore Utility 3. Press F9 during powering on the computer. (Text Mode) Press F9 during powering on the computer . System storage capacity as well as drive reading/writing speed will affect backup speed. 3. English 2. GIGABYTE...
.... 2. It is recommended that Xpress Recovery be immediately installed after OS and all required driver and software installations are complete. - 55 - Award Modular BIOS v6.00PG, An Energy Star Al ly Copyright (C) 1984-2004, Award Software, Inc.... Remove Backup Image 4. Execute Restore Utility 3. Press F9 during powering on the computer. (Text Mode) Press F9 during powering on the computer . System storage capacity as well as drive reading/writing speed will affect backup speed. 3. English 2. GIGABYTE...


