Manual
Page 5
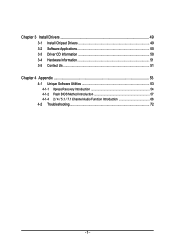
Chapter 3 Install Drivers 49 3-1 Install Chipset Drivers 49 3-2 Software Applications 50 3-3 Driver CD Information 50 3-4 Hardware Information 51 3-5 Contact Us ...51 Chapter 4 Appendix 53 4-1 Unique Software Utilities 53 4-1-1 Xpress Recovery Introduction 54 4-1-2 Flash BIOS Method Introduction 57 4-1-4 2 / 4 / 5.1 / 7.1 Channel Audio Function Introduction 66 4-2 Troubleshooting 72 - 5 -
Chapter 3 Install Drivers 49 3-1 Install Chipset Drivers 49 3-2 Software Applications 50 3-3 Driver CD Information 50 3-4 Hardware Information 51 3-5 Contact Us ...51 Chapter 4 Appendix 53 4-1 Unique Software Utilities 53 4-1-1 Xpress Recovery Introduction 54 4-1-2 Flash BIOS Method Introduction 57 4-1-4 2 / 4 / 5.1 / 7.1 Channel Audio Function Introduction 66 4-2 Troubleshooting 72 - 5 -
Manual
Page 10
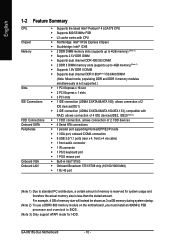
... port, onboard COMA connection Š 8 USB 2.0/1.1 ports (rear x 4, front x 4 via cable) Š 1 front audio connector Š 1 IR connector Š 1 PS/2 keyboard port Š 1 PS/2 mouse port Š Built-in BIOS. (Note 3) Only support ATAPI mode for HDD. GA-8I915G Duo Motherboard - 10 - For example, 4 GB of memory size will instead be shown as 3.xxGB...
... port, onboard COMA connection Š 8 USB 2.0/1.1 ports (rear x 4, front x 4 via cable) Š 1 front audio connector Š 1 IR connector Š 1 PS/2 keyboard port Š 1 PS/2 mouse port Š Built-in BIOS. (Note 3) Only support ATAPI mode for HDD. GA-8I915G Duo Motherboard - 10 - For example, 4 GB of memory size will instead be shown as 3.xxGB...
Manual
Page 11
... RAID (IDE2, IDE3) I/O Control Hardware Monitor BIOS Additional Features Overclocking Form Factor Š C-Media 9880 CODEC (UAJ) Š Supports Jack Sensing function Š Supports 2 / 4 / 5.1 / 7.1 channel audio Š Supports Line In ; Surround Speaker Out connection Š Supports SPDIF In/Out connection Š CD In Š Built-in VT6410 chipset Š Supports disk...
... RAID (IDE2, IDE3) I/O Control Hardware Monitor BIOS Additional Features Overclocking Form Factor Š C-Media 9880 CODEC (UAJ) Š Supports Jack Sensing function Š Supports 2 / 4 / 5.1 / 7.1 channel audio Š Supports Line In ; Surround Speaker Out connection Š Supports SPDIF In/Out connection Š CD In Š Built-in VT6410 chipset Š Supports disk...
Manual
Page 17
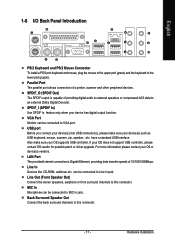
.... LAN Port The provided Internet connection is capable of a printer, scanner and other peripheral devices. Parallel Port The parallel port allows connection of providing digital audio to external speakers or compressed AC3 data to an external Dolby Digital Decoder. Line In Devices like CD-ROM, walkman etc. have a standard USB interface...
.... LAN Port The provided Internet connection is capable of a printer, scanner and other peripheral devices. Parallel Port The parallel port allows connection of providing digital audio to external speakers or compressed AC3 data to an external Dolby Digital Decoder. Line In Devices like CD-ROM, walkman etc. have a standard USB interface...
Manual
Page 18
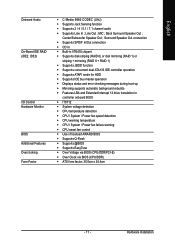
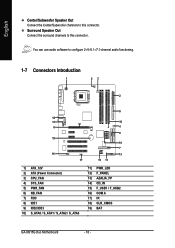
Surround Speaker Out Connect the surround channels to this connector. You can use audio software to configure 2-/4-/5.1-/7.1-channel audio functioning. 1-7 Connectors Introduction 1 53 2 8 14 13 18 6 4 9 19 10 ...7 16 12 17 15 11 1) ATX_12V 2) ATX (Power Connector) 3) CPU_FAN 4) SYS_FAN 5) PWR_FAN 6) NB_FAN 7) FDD 8) IDE1 9) IDE2/IDE3 10) S_ATA0 / S_ATA1 / S_ATA2 / S_ATA3 11) PWR_LED 12) F_PANEL 13) AZALIA_FP 14) CD_IN 15) F_USB1 / F_USB2 16) COM A 17) IR 18) CLR_CMOS 19) BAT GA-8I915G Duo...
Surround Speaker Out Connect the surround channels to this connector. You can use audio software to configure 2-/4-/5.1-/7.1-channel audio functioning. 1-7 Connectors Introduction 1 53 2 8 14 13 18 6 4 9 19 10 ...7 16 12 17 15 11 1) ATX_12V 2) ATX (Power Connector) 3) CPU_FAN 4) SYS_FAN 5) PWR_FAN 6) NB_FAN 7) FDD 8) IDE1 9) IDE2/IDE3 10) S_ATA0 / S_ATA1 / S_ATA2 / S_ATA3 11) PWR_LED 12) F_PANEL 13) AZALIA_FP 14) CD_IN 15) F_USB1 / F_USB2 16) COM A 17) IR 18) CLR_CMOS 19) BAT GA-8I915G Duo...

Manual
Page 24
...CD IN) Connect CD-ROM or DVD-ROM audio out to work or even damage it. Definition 1 1 CD-L 2 GND 3 GND 4 CD-R GA-8I915G Duo Motherboard - 24 - Check the pin assignment carefully while you connect the audio panel cable, incorrect connection between the cable and ...connector will make the device unable to the connector. For optional audio panel cable, please contact your local dealer. 10...
...CD IN) Connect CD-ROM or DVD-ROM audio out to work or even damage it. Definition 1 1 CD-L 2 GND 3 GND 4 CD-R GA-8I915G Duo Motherboard - 24 - Check the pin assignment carefully while you connect the audio panel cable, incorrect connection between the cable and ...connector will make the device unable to the connector. For optional audio panel cable, please contact your local dealer. 10...

Manual
Page 36
GA-8I915G Duo Motherboard - 36 - English 2-3 Integrated Peripherals CMOS Setup Utility-Copyright (C) 1984-2004 Award Software Integrated Peripherals On-Chip Primary PCI IDE On-Chip SATA Mode x PATA ... Mode Select UR2 Duplex Mode Onboard Parallel Port [Enabled] [Auto] Ch.0 Master/Slave Ch.2 Master/Slave Ch.3 Master/Slave [Enabled] [Enabled] [Disabled] [Disabled] [Auto] [HD Audio] [Enabled] [Enabled] [Disabled] [3F8/IRQ4] [2F8/IRQ] [IrDA] [Half] [378/IRQ7] Item Help Menu Level` KLJI: Move Enter: Select F5: Previous Values +/-/PU/PD: Value...
GA-8I915G Duo Motherboard - 36 - English 2-3 Integrated Peripherals CMOS Setup Utility-Copyright (C) 1984-2004 Award Software Integrated Peripherals On-Chip Primary PCI IDE On-Chip SATA Mode x PATA ... Mode Select UR2 Duplex Mode Onboard Parallel Port [Enabled] [Auto] Ch.0 Master/Slave Ch.2 Master/Slave Ch.3 Master/Slave [Enabled] [Enabled] [Disabled] [Disabled] [Auto] [HD Audio] [Enabled] [Enabled] [Disabled] [3F8/IRQ4] [2F8/IRQ] [IrDA] [Half] [378/IRQ7] Item Help Menu Level` KLJI: Move Enter: Select F5: Previous Values +/-/PU/PD: Value...

Manual
Page 37
... 0/2 Set to This value will auto make by the setting "On-Chip SATA Mode" and "PATA IDE Set to". Set front audio panel type to HD Audio. (Default value) Onboard H/W RAID Enabled Enable Onboard H/W RAID function. (Default value) Disabled Disable this function will auto set to Ch.../Slave, this function. English On-Chip SATA Mode Disabled Disable this function will auto set to Ch. 1 Master/Slave. AC97 HD Audio Set front audio panel type to AC97. Front Panel Type If you are not using onboard USB 2.0 feature. USB Controller Enabled Enable USB Controller. (...
... 0/2 Set to This value will auto make by the setting "On-Chip SATA Mode" and "PATA IDE Set to". Set front audio panel type to HD Audio. (Default value) Onboard H/W RAID Enabled Enable Onboard H/W RAID function. (Default value) Disabled Disable this function will auto set to Ch.../Slave, this function. English On-Chip SATA Mode Disabled Disable this function will auto set to Ch. 1 Master/Slave. AC97 HD Audio Set front audio panel type to AC97. Front Panel Type If you are not using onboard USB 2.0 feature. USB Controller Enabled Enable USB Controller. (...
Manual
Page 66
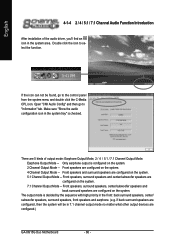
.../subwoofer speakers and back surround speakers are configured on the system. if back surround speakers are configured.) GA-8I915G Duo Motherboard - 66 - If the icon can not be in the system area. There are 5 kinds of the audio driver, you'll find an icon in 7.1 channel output mode no matter what other output devices...
.../subwoofer speakers and back surround speakers are configured on the system. if back surround speakers are configured.) GA-8I915G Duo Motherboard - 66 - If the icon can not be in the system area. There are 5 kinds of the audio driver, you'll find an icon in 7.1 channel output mode no matter what other output devices...
Manual
Page 67
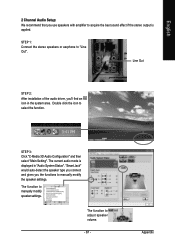
... Out STEP 2: After installation of the audio driver, you'll find an icon in "Audio System Status". The function to adjust speaker volume. - 67 - The function to manually modify speaker settings. The current audio mode is applied. STEP 3: Click "C-Media 3D Audio Configuration" and then select "Main Setting".... STEP 1: Connect the stereo speakers or earphone to select the function. Appendix English 2 Channel Audio Setup: We recommend that you the functions to manually modify the speaker settings. Double click the icon to "Line Out". ...
... Out STEP 2: After installation of the audio driver, you'll find an icon in "Audio System Status". The function to adjust speaker volume. - 67 - The function to manually modify speaker settings. The current audio mode is applied. STEP 3: Click "C-Media 3D Audio Configuration" and then select "Main Setting".... STEP 1: Connect the stereo speakers or earphone to select the function. Appendix English 2 Channel Audio Setup: We recommend that you the functions to manually modify the speaker settings. Double click the icon to "Line Out". ...
Manual
Page 68
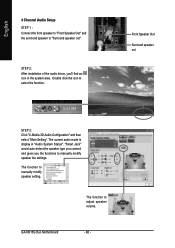
... in the system area. "Smart Jack" would auto-detect the speaker type you connect and gives you 'll find an icon in "Audio System Status". GA-8I915G Duo Motherboard - 68 - English 4 Channel Audio Setup STEP 1 : Connect the front speaker to "Front Speaker Out" and the surround speaker to manually modify speaker the settings. Double click...
... in the system area. "Smart Jack" would auto-detect the speaker type you connect and gives you 'll find an icon in "Audio System Status". GA-8I915G Duo Motherboard - 68 - English 4 Channel Audio Setup STEP 1 : Connect the front speaker to "Front Speaker Out" and the surround speaker to manually modify speaker the settings. Double click...
Manual
Page 69
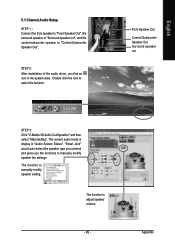
...Front Speaker Out Center/Subwoofer Speaker Out Surround speaker out STEP 3: Click "C-Media 3D Audio Configuration" and then select "Main Setting". The function to manually modify speaker setting. The current audio mode is display in the system area. The function to adjust speaker volume. - ... would auto-detect the speaker type you connect and gives you find an icon in "Audio System Status". Appendix Double click the icon to manually modify speaker the settings. English 5.1 Channel Audio Setup STEP 1 : Connect the front speaker to "Front Speaker Out", the surround speaker ...
...Front Speaker Out Center/Subwoofer Speaker Out Surround speaker out STEP 3: Click "C-Media 3D Audio Configuration" and then select "Main Setting". The function to manually modify speaker setting. The current audio mode is display in the system area. The function to adjust speaker volume. - ... would auto-detect the speaker type you connect and gives you find an icon in "Audio System Status". Appendix Double click the icon to manually modify speaker the settings. English 5.1 Channel Audio Setup STEP 1 : Connect the front speaker to "Front Speaker Out", the surround speaker ...
Manual
Page 70
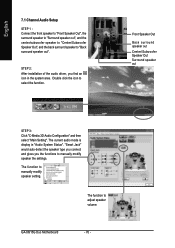
... Center/Subwoofer Speaker Out Surround speaker out STEP 3: Click "C-Media 3D Audio Configuration" and then select "Main Setting". The current audio mode is display in the system area. GA-8I915G Duo Motherboard - 70 - Double click the icon to "Back surround speaker out". English 7.1 Channel Audio Setup STEP 1 : Connect the front speaker to "Front Speaker Out", the...
... Center/Subwoofer Speaker Out Surround speaker out STEP 3: Click "C-Media 3D Audio Configuration" and then select "Main Setting". The current audio mode is display in the system area. GA-8I915G Duo Motherboard - 70 - Double click the icon to "Back surround speaker out". English 7.1 Channel Audio Setup STEP 1 : Connect the front speaker to "Front Speaker Out", the...

Manual
Page 71
... Note:The function can enable Monitoring and the recording source item as the recording device, you can be used only when you connect the audio device to control volume and monitor sound recording. Digital I/O Status: Digital Output Status-(1) For stereo PCM output: sampling rate is shown here.... Mixer The build-in real time. Device Setting Check "Enable Multiple Streaming" and restart the system to use the multiple audio output function. For example, with a microphone as shown in the right figure if you to enable support for both "Sound Playback "and"Sound ...
... Note:The function can enable Monitoring and the recording source item as the recording device, you can be used only when you connect the audio device to control volume and monitor sound recording. Digital I/O Status: Digital Output Status-(1) For stereo PCM output: sampling rate is shown here.... Mixer The build-in real time. Device Setting Check "Enable Multiple Streaming" and restart the system to use the multiple audio output function. For example, with a microphone as shown in the right figure if you to enable support for both "Sound Playback "and"Sound ...


