Manual
Page 4
... GA-8GNXP-D Motherboard Layout 6 Block Diagram ...7 Chapter 1 Hardware Installation 9 1-1 Considerations Prior to Installation 9 1-2 Feature Summary 10 1-3 Installation of the CPU and Heatsink 12 1-3-1 Installation of the CPU 12 1-3-2 Installation of the Heatsink 13 1-4 Installing/Removing Cool-Plus (Northbridge Cooling Fan 14 1-5 Installation of Memory 14 1-6 Installation of Expansion Cards 16 1-7 I/O Back Panel Introduction 17 1-8 Connectors Introduction 18 Chapter 2 BIOS Setup 29 The Main Menu (For example: BIOS Ver. : F1 30 2-1 Standard CMOS Features 32 2-2 Advanced BIOS...
... GA-8GNXP-D Motherboard Layout 6 Block Diagram ...7 Chapter 1 Hardware Installation 9 1-1 Considerations Prior to Installation 9 1-2 Feature Summary 10 1-3 Installation of the CPU and Heatsink 12 1-3-1 Installation of the CPU 12 1-3-2 Installation of the Heatsink 13 1-4 Installing/Removing Cool-Plus (Northbridge Cooling Fan 14 1-5 Installation of Memory 14 1-6 Installation of Expansion Cards 16 1-7 I/O Back Panel Introduction 17 1-8 Connectors Introduction 18 Chapter 2 BIOS Setup 29 The Main Menu (For example: BIOS Ver. : F1 30 2-1 Standard CMOS Features 32 2-2 Advanced BIOS...
Manual
Page 11
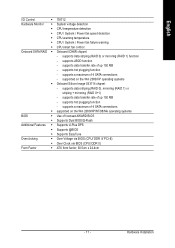
...Š CPU temperature detection Š CPU / System / Power fan speed detection Š CPU warning temperature Š CPU / System / Power fan failure warning Š CPU smart fan control Onboard SATA RAID Š Onboard ICH6R chipset - Hardware Installation supports a maximum of 4 SATA connections Š supported on the Win 2000/XP operating systems Š Onboard Silicon Image SiI3114 chipset - supported on the Win 2000/XP/NT/98/Me operating systems BIOS Š Use of up 150 MB - supports data transfer rate of licensed AWARD BIOS Š Supports Dual BIOS/Q-Flash...
...Š CPU temperature detection Š CPU / System / Power fan speed detection Š CPU warning temperature Š CPU / System / Power fan failure warning Š CPU smart fan control Onboard SATA RAID Š Onboard ICH6R chipset - Hardware Installation supports a maximum of 4 SATA connections Š supported on the Win 2000/XP operating systems Š Onboard Silicon Image SiI3114 chipset - supported on the Win 2000/XP/NT/98/Me operating systems BIOS Š Use of up 150 MB - supports data transfer rate of licensed AWARD BIOS Š Supports Dual BIOS/Q-Flash...
Manual
Page 20
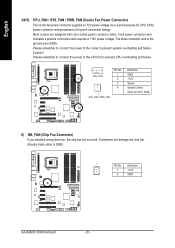
... not work. English 3/4/5) CPU_FAN / SYS_FAN / PWR_FAN (Cooler Fan Power Connector) The cooler fan power connector supplies a +12V power voltage via a 3-pin/4-pin(only for CPU_FAN) 6) NB_FAN (Chip Fan Connector) If you installed wrong direction, the chip fan will damage the chip fan. (Usually black cable is the ground wire (GND). Caution! Definition 1 +12V 2 GND GA-8GNXP-D Motherboard - 20 - The black connector wire is GND) 1 Pin No. Please remember to connect the power to the CPU fan to prevent system overheating and failure. Please...
... not work. English 3/4/5) CPU_FAN / SYS_FAN / PWR_FAN (Cooler Fan Power Connector) The cooler fan power connector supplies a +12V power voltage via a 3-pin/4-pin(only for CPU_FAN) 6) NB_FAN (Chip Fan Connector) If you installed wrong direction, the chip fan will damage the chip fan. (Usually black cable is the ground wire (GND). Caution! Definition 1 +12V 2 GND GA-8GNXP-D Motherboard - 20 - The black connector wire is GND) 1 Pin No. Please remember to connect the power to the CPU fan to prevent system overheating and failure. Please...
Manual
Page 21
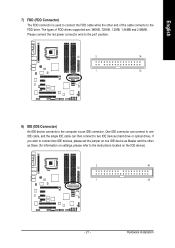
If you wish to connect two IDE devices, please set the jumper on one IDE cable, and the single IDE cable can then connect to two IDE devices (hard drive or optical drive). The types of the cable connects to the FDD drive. Please connect the red power connector wire to the pin1 position. 2 34 1 33 8) IDE (IDE Connector) An IDE device connects to the instructions located on the IDE device). 2 40 1 39 - 21 - One IDE connector can connect to one IDE device as Master and the other end...
If you wish to connect two IDE devices, please set the jumper on one IDE cable, and the single IDE cable can then connect to two IDE devices (hard drive or optical drive). The types of the cable connects to the FDD drive. Please connect the red power connector wire to the pin1 position. 2 34 1 33 8) IDE (IDE Connector) An IDE device connects to the instructions located on the IDE device). 2 40 1 39 - 21 - One IDE connector can connect to one IDE device as Master and the other end...
Manual
Page 22
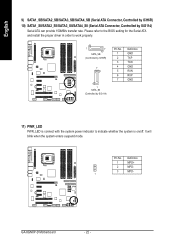
Definition 1 MPD+ 2 MPD- 3 MPD- 1 GA-8GNXP-D Motherboard - 22 - Please refer to the BIOS setting for the Serial ATA and install the proper driver in order to work properly. 1 7 SATA_SB (Controlled by ICH6R) 7 1 SATA_SII (Controlled by SiI3114) Serial ATA can provide 150MB/s transfer rate. English 9) SATA1_SB/SATA2_SB/SATA3_SB/SATA4_SB (Serial ATA Connector, Controlled by ICH6R) 10) SATA1_SII/SATA2_SII/SATA3_SII/SATA4_SII (Serial ATA Connector, Controlled by SiI3114) Pin No. 1 2 3 4 5 6 7 Definition GND TXP...
Definition 1 MPD+ 2 MPD- 3 MPD- 1 GA-8GNXP-D Motherboard - 22 - Please refer to the BIOS setting for the Serial ATA and install the proper driver in order to work properly. 1 7 SATA_SB (Controlled by ICH6R) 7 1 SATA_SII (Controlled by SiI3114) Serial ATA can provide 150MB/s transfer rate. English 9) SATA1_SB/SATA2_SB/SATA3_SB/SATA4_SB (Serial ATA Connector, Controlled by ICH6R) 10) SATA1_SII/SATA2_SII/SATA3_SII/SATA4_SII (Serial ATA Connector, Controlled by SiI3114) Pin No. 1 2 3 4 5 6 7 Definition GND TXP...
Manual
Page 32
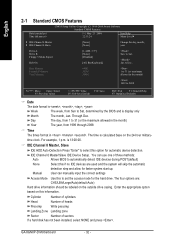
... Drive A Drive B Floppy 3 Mode Suport Holt On [1.44M, 3.5"] [None] [Disabled] [All, But Keyboard] Sun. The four options are used and the system will skip the automatic detection step and allow for automatic device detection. Manual User can use one of sectors If a hard disk has not been installed, select NONE and press . The time is , , , . You can manually input the correct settings Access Mode Use this option for faster system start up. GA-8GNXP-D Motherboard...
... Drive A Drive B Floppy 3 Mode Suport Holt On [1.44M, 3.5"] [None] [Disabled] [All, But Keyboard] Sun. The four options are used and the system will skip the automatic detection step and allow for automatic device detection. Manual User can use one of sectors If a hard disk has not been installed, select NONE and press . The time is , , , . You can manually input the correct settings Access Mode Use this option for faster system start up. GA-8GNXP-D Motherboard...
Manual
Page 42
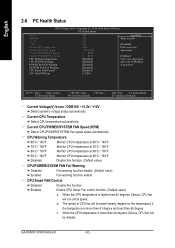
...Detect system's voltage status automatically. English 2-6 PC Health Status CMOS Setup Utility-Copyright (C) 1984-2004 Award Software PC Health Status Vcore DDR18V +3.3V +12V Current CPU Temperature Current CPU FAN Speed Current POWER FAN Speed Current SYSTEM FAN Speed CPU Warning Temperature CPU FAN Fail Warning POWER FAN Fail Warning SYSTEM FAN Fail Warning CPU Smart FAN Control CPU FAN PIN Type OK OK OK OK 50oC 3308 RPM 0 RPM 0 RPM [Disabled] [Disabled] [Disabled] [Disabled] [Enabled] [3 PIN] Item Help Menu Level` [Disabled] Don't reset case open status [Enabled] Clear case open status...
...Detect system's voltage status automatically. English 2-6 PC Health Status CMOS Setup Utility-Copyright (C) 1984-2004 Award Software PC Health Status Vcore DDR18V +3.3V +12V Current CPU Temperature Current CPU FAN Speed Current POWER FAN Speed Current SYSTEM FAN Speed CPU Warning Temperature CPU FAN Fail Warning POWER FAN Fail Warning SYSTEM FAN Fail Warning CPU Smart FAN Control CPU FAN PIN Type OK OK OK OK 50oC 3308 RPM 0 RPM 0 RPM [Disabled] [Disabled] [Disabled] [Disabled] [Enabled] [3 PIN] Item Help Menu Level` [Disabled] Don't reset case open status [Enabled] Clear case open status...
Manual
Page 47
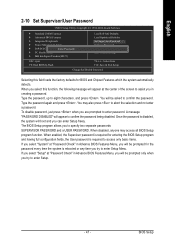
... enter a password. Type the password, up to confirm the password. English 2-10 Set Supervisor/User Password CMOS Setup Utility-Copyright (C) 1984-2004 Award Software ` Standard CMOS Features ` Advanced BIOS Features ` Integrated Peripherals ` Power Management Setup ` PnP/PCI ConfigurationEsnter Password: ` PC Health Status ` MB Intelligent Tweaker(M.I.T.) Load Fail-Safe Defaults Load Optimized Defaults Set Supervisor Password Set User Password Save & Exit Setup Exit Without Saving ESC: Quit F8: Dual BIOS/Q-Flash KLJI: Select Item F10: Save & Exit Setup Change/Set/Disable Password...
... enter a password. Type the password, up to confirm the password. English 2-10 Set Supervisor/User Password CMOS Setup Utility-Copyright (C) 1984-2004 Award Software ` Standard CMOS Features ` Advanced BIOS Features ` Integrated Peripherals ` Power Management Setup ` PnP/PCI ConfigurationEsnter Password: ` PC Health Status ` MB Intelligent Tweaker(M.I.T.) Load Fail-Safe Defaults Load Optimized Defaults Set Supervisor Password Set User Password Save & Exit Setup Exit Without Saving ESC: Quit F8: Dual BIOS/Q-Flash KLJI: Select Item F10: Save & Exit Setup Change/Set/Disable Password...
Manual
Page 53
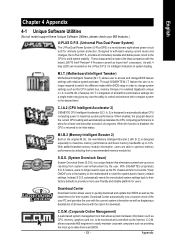
... reliable platform for users. C.I.A.2 (CPU Intelligent Accelerator 2) GIGABYTE CPU Intelligent Accelerator 2(C.I .B. 2) is designed to automatically adjust CPU computing power to maximize system performance. Download Center Download Center allows users to quickly download and update their BIOS as well as CPU, memory, graphics card, etc. English Chapter 4 Appendix 4-1 Unique Software Utilities (Not all model support these Unique Software Utilities, please check your MB features.) U-PLUS D.P.S. (Universal Plus Dual Power System) The U-Plus Dual Power System (U-Plus DPS...
... reliable platform for users. C.I.A.2 (CPU Intelligent Accelerator 2) GIGABYTE CPU Intelligent Accelerator 2(C.I .B. 2) is designed to automatically adjust CPU computing power to maximize system performance. Download Center Download Center allows users to quickly download and update their BIOS as well as CPU, memory, graphics card, etc. English Chapter 4 Appendix 4-1 Unique Software Utilities (Not all model support these Unique Software Utilities, please check your MB features.) U-PLUS D.P.S. (Universal Plus Dual Power System) The U-Plus Dual Power System (U-Plus DPS...

Manual
Page 54
Allows installation of the screen. Xpress Recovery is recommended when using Ghost to return boot manager to boot from CD-ROM. Boot from CD:" appears, press any key to Xpress Recovery can restore the drive to the IDE1 Master 3. When "Boot from CD-ROM (BMP Mode) Enter the BIOS menu, select "Advanced BIOS Feature" and set as the boot partition. Remove Backup Image 4. Exit and Restart Build 2011 GA-8GNXP-D Motherboard - 54 - Once you have...
Allows installation of the screen. Xpress Recovery is recommended when using Ghost to return boot manager to boot from CD-ROM. Boot from CD:" appears, press any key to Xpress Recovery can restore the drive to the IDE1 Master 3. When "Boot from CD-ROM (BMP Mode) Enter the BIOS menu, select "Advanced BIOS Feature" and set as the boot partition. Remove Backup Image 4. Exit and Restart Build 2011 GA-8GNXP-D Motherboard - 54 - Once you have...
Manual
Page 57
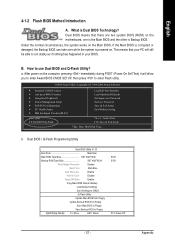
...other is Dual BIOS Technology? CMOS Setup Utility-Copyright (C) 1984-2004 Award Software Standard CMOS Features Advanced BIOS Features Integrated Peripherals Power Management Setup PnP/PCI Configurations PC Health Status MB Intelligent Tweaker(M.I.T.) ESC: Quit F8: Dual BIOS/Q-Flash Load Fail-Safe Defaults Load Optimized Defaults Set Supervisor Password Set User Password Save & Exit Setup Exit Without Saving : Select Item F10: Save & Exit Setup Time, Date, Hard Disk Type... Dual BIOS / Q-Flash Programming Utility Dual BIOS Utility V1.33 Boot From Main Bios Main ROM Type/Size SST...
...other is Dual BIOS Technology? CMOS Setup Utility-Copyright (C) 1984-2004 Award Software Standard CMOS Features Advanced BIOS Features Integrated Peripherals Power Management Setup PnP/PCI Configurations PC Health Status MB Intelligent Tweaker(M.I.T.) ESC: Quit F8: Dual BIOS/Q-Flash Load Fail-Safe Defaults Load Optimized Defaults Set Supervisor Password Set User Password Save & Exit Setup Exit Without Saving : Select Item F10: Save & Exit Setup Time, Date, Hard Disk Type... Dual BIOS / Q-Flash Programming Utility Dual BIOS Utility V1.33 Boot From Main Bios Main ROM Type/Size SST...

Manual
Page 58
... system after the power is set to Suspend to RAM, the Auto Recovery will show messages on , and that the Main BIOS works normally and could automatically recover the Main BIOS. (This auto recovery utility is set to Enable, the PC will be replaced by user. If Auto Recovery :Disable, it will show Keep DMI Data : Enable(Default), Disable Enable: The DMI data won't be replaced by user.) Load Default Settings Load dual BIOS default value. Update ESCD failure, checksum error or reset? Copy Main ROM Data to Backup...
... system after the power is set to Suspend to RAM, the Auto Recovery will show messages on , and that the Main BIOS works normally and could automatically recover the Main BIOS. (This auto recovery utility is set to Enable, the PC will be replaced by user. If Auto Recovery :Disable, it will show Keep DMI Data : Enable(Default), Disable Enable: The DMI data won't be replaced by user.) Load Default Settings Load dual BIOS default value. Update ESCD failure, checksum error or reset? Copy Main ROM Data to Backup...
Manual
Page 60
... ROM type. GA-8GNXP-D Motherboard - 60 - CMOS Setup Utility-Copyright (C) 1984-2004 Award Software Standard CMOS Features Advanced BIOS Features Integrated Peripherals Power Management Setup PnP/PCI Configurations PC Health Status MB Intelligent Tweaker(M.I.T.) ESC: Quit F8: Dual BIOS/Q-Flash Select Language Load Fail-Safe Defaults Load Optimized Defaults Set Supervisor Password Set User Password Save & Exit Setup Exit Without Saving F3: Change Language F10: Save & Exit Setup Time, Date, Hard Disk Type... Pressing the buttons mentioned on your keyboards to operate the Q-Flash/Dual...
... ROM type. GA-8GNXP-D Motherboard - 60 - CMOS Setup Utility-Copyright (C) 1984-2004 Award Software Standard CMOS Features Advanced BIOS Features Integrated Peripherals Power Management Setup PnP/PCI Configurations PC Health Status MB Intelligent Tweaker(M.I.T.) ESC: Quit F8: Dual BIOS/Q-Flash Select Language Load Fail-Safe Defaults Load Optimized Defaults Set Supervisor Password Set User Password Save & Exit Setup Exit Without Saving F3: Change Language F10: Save & Exit Setup Time, Date, Hard Disk Type... Pressing the buttons mentioned on your keyboards to operate the Q-Flash/Dual...
Manual
Page 62
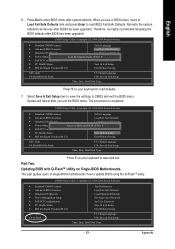
... ? The BIOS file becomes Fab after you flashed. Press Y button on your keyboard after you are sure to enter SETUP / Dual BIOS / Q-Flash / F9 For Xpress Recovery 09/23/2003-i875P-6A79BG03C-00 GA-8GNXP-D Motherboard - 62 - Press Esc and then Y button to the Q-Flash menu when the BIOS updating procedure is completed. Load Default Settings Save Settings to CMOS Q-Flash Utility Load Main BIOS from Floppy Load Backup BIOS from Floppy Save Main BIOS to Floppy Save Backup BIOS to Floppy Enter : Run KL:Move ESC:Reset F10:Power Off...
... ? The BIOS file becomes Fab after you flashed. Press Y button on your keyboard after you are sure to enter SETUP / Dual BIOS / Q-Flash / F9 For Xpress Recovery 09/23/2003-i875P-6A79BG03C-00 GA-8GNXP-D Motherboard - 62 - Press Esc and then Y button to the Q-Flash menu when the BIOS updating procedure is completed. Load Default Settings Save Settings to CMOS Q-Flash Utility Load Main BIOS from Floppy Load Backup BIOS from Floppy Save Main BIOS to Floppy Save Backup BIOS to Floppy Enter : Run KL:Move ESC:Reset F10:Power Off...
Manual
Page 63
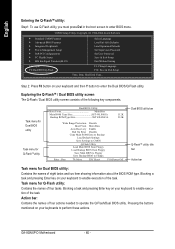
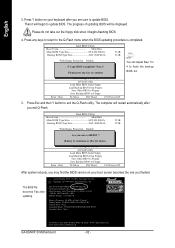
...: Dual BIOS/Q-Flash F3: Change Language F10: Save & Exit Setup Time, Date, Hard Disk Type... Press Y on Single-BIOS Motherboards. System will reboot after system reboots. The procedure is completed. Press Y on your keyboard to update BIOS using the Q-FlashTM utility. Part Two: Updating BIOS with Q-FlashTM Utility on your keyboard to save the settings to load BIOS Fail-Safe Defaults. When you exit the BIOS menu. Therefore, we highly recommend reloading the BIOS defaults after BIOS has been upgraded. English 6. This part guides users...
...: Dual BIOS/Q-Flash F3: Change Language F10: Save & Exit Setup Time, Date, Hard Disk Type... Press Y on Single-BIOS Motherboards. System will reboot after system reboots. The procedure is completed. Press Y on your keyboard to update BIOS using the Q-FlashTM utility. Part Two: Updating BIOS with Q-FlashTM Utility on your keyboard to save the settings to load BIOS Fail-Safe Defaults. When you exit the BIOS menu. Therefore, we highly recommend reloading the BIOS defaults after BIOS has been upgraded. English 6. This part guides users...
Manual
Page 66
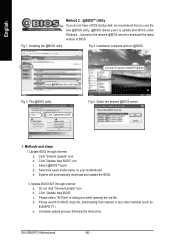
The @BIOS utility Click " " Click "Update New BIOS" Fig 4. Update BIOS through Internet: a. Do not click "Internet Update" icon b. GA-8GNXP-D Motherboard - 66 - System will automatically download and update the BIOS. Select the desired @BIOS server 1. Select @BIOSTM sever d. Select the exact model name on your motherboard e. d. Complete update process following the instruction. Installation complete and run @BIOS Click Sart/ Programs/ GIGABYTE/@BIOS Select @BIOS item than click Install Fig 3. II. Please select "All Files" in...
The @BIOS utility Click " " Click "Update New BIOS" Fig 4. Update BIOS through Internet: a. Do not click "Internet Update" icon b. GA-8GNXP-D Motherboard - 66 - System will automatically download and update the BIOS. Select the desired @BIOS server 1. Select @BIOSTM sever d. Select the exact model name on your motherboard e. d. Complete update process following the instruction. Installation complete and run @BIOS Click Sart/ Programs/ GIGABYTE/@BIOS Select @BIOS item than click Install Fig 3. II. Please select "All Files" in...
Manual
Page 69
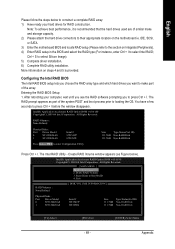
... RAID software prompting you want to make and storage capacity. 2) Please attach the hard drive connectors to loading the OS. RAID Volumes : None Defined. Create RAID Volume 2. Delete RAID Volume 3. Reset Disks to select Silicon Image). 5) Complete driver installation. 6) Complete RAID utility installation. More information on Integrated Peripherals). 4) Enter RAID setup in the BIOS and select the RAID type (For instance, enter Ctrl + I . The Intel RAID Utility - Note: To achieve best performance, it is provided. Entering the RAID BIOS Setup...
... RAID software prompting you want to make and storage capacity. 2) Please attach the hard drive connectors to loading the OS. RAID Volumes : None Defined. Create RAID Volume 2. Delete RAID Volume 3. Reset Disks to select Silicon Image). 5) Complete driver installation. 6) Complete RAID utility installation. More information on Integrated Peripherals). 4) Enter RAID setup in the BIOS and select the RAID type (For instance, enter Ctrl + I . The Intel RAID Utility - Note: To achieve best performance, it is provided. Entering the RAID BIOS Setup...
Manual
Page 74
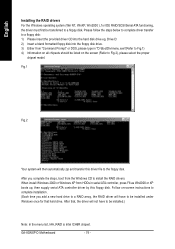
... driver file to the floppy disk. GA-8GNXP-D Motherboard - 74 - Drive D: 2) Insert a blank formatted floppy disk into the hard disk drive eg. When install Windows 2000 or Windows XP from the Windows CD to install the RAID drivers. After that hard drive. Fig.1 Fig.2 (Note) Your system will have to be installed under Windows once for IDE RAID/SCSI/Serial ATA functioning, the driver must first be listed on the screen (Refer to Fig.2), please select the proper chipset model. Follow on-screen instructions...
... driver file to the floppy disk. GA-8GNXP-D Motherboard - 74 - Drive D: 2) Insert a blank formatted floppy disk into the hard disk drive eg. When install Windows 2000 or Windows XP from the Windows CD to install the RAID drivers. After that hard drive. Fig.1 Fig.2 (Note) Your system will have to be installed under Windows once for IDE RAID/SCSI/Serial ATA functioning, the driver must first be listed on the screen (Refer to Fig.2), please select the proper chipset model. Follow on-screen instructions...
Manual
Page 80
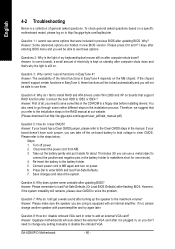
... a floppy disk before installing drivers. Answer: The availability of the listed functions in EasyTune 4 depends on power. 6. Answer: Please remember to load Fail-Safe Defaults (Or Load BIOS Defaults) after updating BIOS? However, if the system instability still remains, please clear CMOS to the battery holder. 5. Answer: Gigabyte motherboards will auto-detect the external VGA card after it at our website. (Please download it is equipped with power/amplifier and try again later. English 4-2 Troubleshooting...
... a floppy disk before installing drivers. Answer: The availability of the listed functions in EasyTune 4 depends on power. 6. Answer: Please remember to load Fail-Safe Defaults (Or Load BIOS Defaults) after updating BIOS? However, if the system instability still remains, please clear CMOS to the battery holder. 5. Answer: Gigabyte motherboards will auto-detect the external VGA card after it at our website. (Please download it is equipped with power/amplifier and try again later. English 4-2 Troubleshooting...
Manual
Page 81
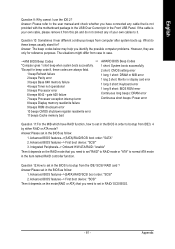
... error 11 beeps Cache memory bad AWARD BIOS Beep Codes 1 short: System boots successfully 2 short: CMOS setting error 1 long 1 short: DRAM or M/B error 1 long 2 short: Monitor or display card error 1 long 3 short: Keyboard error 1 long 9 short: BIOS ROM error Continuous long beeps: DRAM error Continuous short beeps: Power error Question 11:For the M/B which have connected any of your own cable, please remove it from case to it. Advanced BIOS features--> First boot device: "SCSI" 3. Answer: The beep codes below may help you have RAID function, how to set in the BIOS to the USB...
... error 11 beeps Cache memory bad AWARD BIOS Beep Codes 1 short: System boots successfully 2 short: CMOS setting error 1 long 1 short: DRAM or M/B error 1 long 2 short: Monitor or display card error 1 long 3 short: Keyboard error 1 long 9 short: BIOS ROM error Continuous long beeps: DRAM error Continuous short beeps: Power error Question 11:For the M/B which have connected any of your own cable, please remove it from case to it. Advanced BIOS features--> First boot device: "SCSI" 3. Answer: The beep codes below may help you have RAID function, how to set in the BIOS to the USB...


