
Manual
Page 16
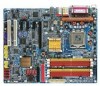
Replace your VGA card is locked by following the steps outlined below: 1. Please align the VGA card to install/uninstall the VGA card. Install related driver from the computer. 3. GA-8GNXP-D Motherboard - 16 - English 1-6 Installation of Expansion Cards You can install your expansion card by the small white-drawable bar. Read the related expansion...
Replace your VGA card is locked by following the steps outlined below: 1. Please align the VGA card to install/uninstall the VGA card. Install related driver from the computer. 3. GA-8GNXP-D Motherboard - 16 - English 1-6 Installation of Expansion Cards You can install your expansion card by the small white-drawable bar. Read the related expansion...
Manual
Page 22
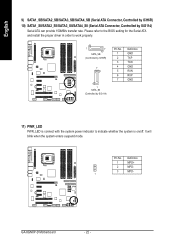
Definition 1 MPD+ 2 MPD- 3 MPD- 1 GA-8GNXP-D Motherboard - 22 - It will blink when the system enters suspend mode. Pin No. Please refer to the BIOS setting for the Serial ATA and install the proper driver in order to indicate whether the system is on/off. English 9) SATA1_SB/SATA2_SB/SATA3_SB/SATA4_SB (Serial ATA Connector, Controlled by...
Definition 1 MPD+ 2 MPD- 3 MPD- 1 GA-8GNXP-D Motherboard - 22 - It will blink when the system enters suspend mode. Pin No. Please refer to the BIOS setting for the Serial ATA and install the proper driver in order to indicate whether the system is on/off. English 9) SATA1_SB/SATA2_SB/SATA3_SB/SATA4_SB (Serial ATA Connector, Controlled by...
Manual
Page 50
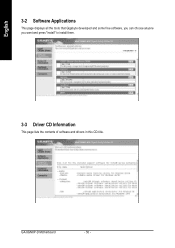
English 3-2 Software Applications This page displays all the tools that Gigabyte developed and some free software, you can choose anyone you want and press "install" to install them. 3-3 Driver CD Information This page lists the contents of software and drivers in this CD-title. GA-8GNXP-D Motherboard - 50 -
English 3-2 Software Applications This page displays all the tools that Gigabyte developed and some free software, you can choose anyone you want and press "install" to install them. 3-3 Driver CD Information This page lists the contents of software and drivers in this CD-title. GA-8GNXP-D Motherboard - 50 -

Manual
Page 54
...restarted, the phrase "Boot from CD: Xpress Recovery V1.0 (C) Copy Right 2003. Exit and Restart Build 2011 GA-8GNXP-D Motherboard - 54 - Supports FAT16, FAT32, and NTFS formats 2. Insert the provided driver CD into your CD drive, then save and exit the BIOS menu. When "Boot from CD-ROM (BMP ...Mode) Enter the BIOS menu, select "Advanced BIOS Feature" and set as the boot partition. GIGABYTE Technology CO. , Ltd. 1. Must be set ...
...restarted, the phrase "Boot from CD: Xpress Recovery V1.0 (C) Copy Right 2003. Exit and Restart Build 2011 GA-8GNXP-D Motherboard - 54 - Supports FAT16, FAT32, and NTFS formats 2. Insert the provided driver CD into your CD drive, then save and exit the BIOS menu. When "Boot from CD-ROM (BMP ...Mode) Enter the BIOS menu, select "Advanced BIOS Feature" and set as the boot partition. GIGABYTE Technology CO. , Ltd. 1. Must be set ...
Manual
Page 74
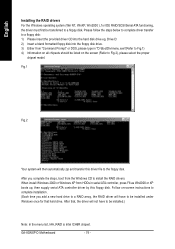
... the floppy disk drive. 3) Either from the Windows CD to be installed under Windows once for IDE RAID/SCSI/Serial ATA functioning, the driver must first be installed.) Note: In the menu list, IAA_RAID is Intel ICH6R chipset. Follow on the screen (Refer to the floppy disk.... After that hard drive. GA-8GNXP-D Motherboard - 74 - Please follow the steps below to complete driver transfer to a floppy disk. When install Windows 2000 or Windows XP from HDDs in "D:\BootDrv\menu.exe"(Refer to...
... the floppy disk drive. 3) Either from the Windows CD to be installed under Windows once for IDE RAID/SCSI/Serial ATA functioning, the driver must first be installed.) Note: In the menu list, IAA_RAID is Intel ICH6R chipset. Follow on the screen (Refer to the floppy disk.... After that hard drive. GA-8GNXP-D Motherboard - 74 - Please follow the steps below to complete driver transfer to a floppy disk. When install Windows 2000 or Windows XP from HDDs in "D:\BootDrv\menu.exe"(Refer to...
Manual
Page 76
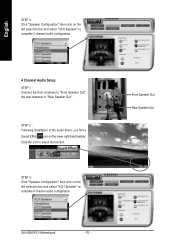
STEP 2 : Following installation of the audio driver, you find a Sound Effect icon on the lower right hand taskbar. Click the icon to complete 4 channel audio configuration. STEP 3: Click "Speaker Configuration" then click ... channels to "Rear Speaker Out". English STEP 3: Click "Speaker Configuration" then click on the left selection bar and select "4CH Speaker" to select the function. GA-8GNXP-D Motherboard - 76 - Front Speaker Out Rear Speaker Out
STEP 2 : Following installation of the audio driver, you find a Sound Effect icon on the lower right hand taskbar. Click the icon to complete 4 channel audio configuration. STEP 3: Click "Speaker Configuration" then click ... channels to "Rear Speaker Out". English STEP 3: Click "Speaker Configuration" then click on the left selection bar and select "4CH Speaker" to select the function. GA-8GNXP-D Motherboard - 76 - Front Speaker Out Rear Speaker Out

Manual
Page 78
... Speaker Out", the Center/ Subwoofer channels to "Center/Subwoofer Speaker Out", and the side channels to select the function. STEP 2 : Following installation of the audio driver, you find a Sound Effect icon on the left selection bar and select "8CH Speaker" to complete 8 channel audio configuration. Front Speaker Out Rear Speaker Out...
... Speaker Out", the Center/ Subwoofer channels to "Center/Subwoofer Speaker Out", and the side channels to select the function. STEP 2 : Following installation of the audio driver, you find a Sound Effect icon on the left selection bar and select "8CH Speaker" to complete 8 channel audio configuration. Front Speaker Out Rear Speaker Out...
Manual
Page 80
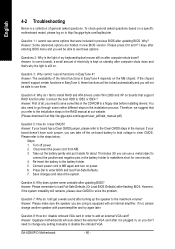
... for about 10 minutes (Or you need to change another speaker with an internal amplifier. Disconnect the power cord from MB. 3. Answer: Gigabyte motherboards will be able to the maximum volume? Answer: If your board doesn't have such jumper, you can use all , you can ...If not, please change any setting manually to see some files in the installation process. GA-8GNXP-D Motherboard - 80 - Question 7: Why do I still get a weak sound after I fail to install RAID and ATA drivers under Win 2000 and XP on -board battery to leak voltage to add an external VGA...
... for about 10 minutes (Or you need to change another speaker with an internal amplifier. Disconnect the power cord from MB. 3. Answer: Gigabyte motherboards will be able to the maximum volume? Answer: If your board doesn't have such jumper, you can use all , you can ...If not, please change any setting manually to see some files in the installation process. GA-8GNXP-D Motherboard - 80 - Question 7: Why do I still get a weak sound after I fail to install RAID and ATA drivers under Win 2000 and XP on -board battery to leak voltage to add an external VGA...


