Manual
Page 10
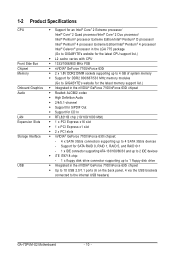
... Extreme Edition/Intel® Pentium® 4 processor/ Intel® Celeron® processor in the LGA 775 package (Go to GIGABYTE's website for the latest CPU support list.) Š L2 cache varies with CPU Š 1333/1066/800 MHz FSB Š... sockets supporting up to 4 GB of system memory Š Support for DDR2 800/667/533 MHz memory modules (Go to GIGABYTE's website for the latest memory support list.) Š Integrated in the nVIDIA® GeForce 7100/nForce 630i chipset Š ...: - 1 x floppy disk drive connector supporting up to the internal USB headers) GA-73PVM-S2 Motherboard - 10 -
... Extreme Edition/Intel® Pentium® 4 processor/ Intel® Celeron® processor in the LGA 775 package (Go to GIGABYTE's website for the latest CPU support list.) Š L2 cache varies with CPU Š 1333/1066/800 MHz FSB Š... sockets supporting up to 4 GB of system memory Š Support for DDR2 800/667/533 MHz memory modules (Go to GIGABYTE's website for the latest memory support list.) Š Integrated in the nVIDIA® GeForce 7100/nForce 630i chipset Š ...: - 1 x floppy disk drive connector supporting up to the internal USB headers) GA-73PVM-S2 Motherboard - 10 -
Manual
Page 16
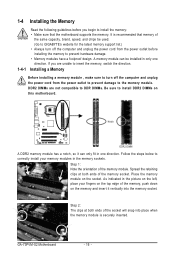
...DIMMs are unable to the memory module. Place the memory module on the memory and insert it can be used. (Go to GIGABYTE's website for the latest memory support list.) • Always turn off the computer and unplug the power cord from the power ...begin to install the memory: • Make sure that memory of the same capacity, brand, speed, and chips be installed in the memory sockets. GA-73PVM-S2 Motherboard - 16 - 1-4 Installing the Memory 1-4-1 Read the following guidelines before installing the memory to prevent hardware damage. • Memory modules have a...
...DIMMs are unable to the memory module. Place the memory module on the memory and insert it can be used. (Go to GIGABYTE's website for the latest memory support list.) • Always turn off the computer and unplug the power cord from the power ...begin to install the memory: • Make sure that memory of the same capacity, brand, speed, and chips be installed in the memory sockets. GA-73PVM-S2 Motherboard - 16 - 1-4 Installing the Memory 1-4-1 Read the following guidelines before installing the memory to prevent hardware damage. • Memory modules have a...

Manual
Page 56
You may press the Install button following an item to install it. 3-3 Driver CD Information This page provides information about the drivers, applications and tools in this driver disk. GA-73PVM-S2 Motherboard - 56 - 3-2 Software Applications This page displays all the tools and applications that GIGABYTE develops and some free software.
You may press the Install button following an item to install it. 3-3 Driver CD Information This page provides information about the drivers, applications and tools in this driver disk. GA-73PVM-S2 Motherboard - 56 - 3-2 Software Applications This page displays all the tools and applications that GIGABYTE develops and some free software.
Manual
Page 64
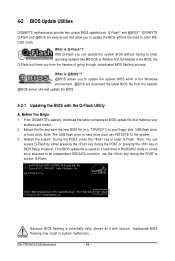
....00PG, An Energy Star Ally Copyright (C) 1984-2007, Award Software, Inc. Restart the system. Embedded in system malfunction. GIGABYTE Q-Flash and @BIOS are easy-to-use FAT32/16/12 file system. 3. What is @BIOSTM? @BIOS allows you to update the BIOS without having to access Q-Flash. What is Q-Flash ? GA-73PVM-S2 Motherboard - 64 -
....00PG, An Energy Star Ally Copyright (C) 1984-2007, Award Software, Inc. Restart the system. Embedded in system malfunction. GIGABYTE Q-Flash and @BIOS are easy-to-use FAT32/16/12 file system. 3. What is @BIOSTM? @BIOS allows you to update the BIOS without having to access Q-Flash. What is Q-Flash ? GA-73PVM-S2 Motherboard - 64 -
Manual
Page 68
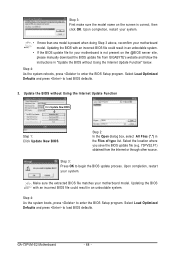
Step 3: Press OK to enter the BIOS Setup program. Step 4: As the system boots, press to begin the BIOS update process. GA-73PVM-S2 Motherboard - 68 - Upon completion, restart your motherboard model. Select Load Optimized Defaults and press to enter the BIOS Setup program. Upon completion, restart your motherboard ... with an incorrect BIOS file could result in an unbootable system. Select the location where you save the BIOS update file (e.g. 73PVS2.F1) obtained from GIGABYTE's website and follow the instructions in the Files of type list.
Step 3: Press OK to enter the BIOS Setup program. Step 4: As the system boots, press to begin the BIOS update process. GA-73PVM-S2 Motherboard - 68 - Upon completion, restart your motherboard model. Select Load Optimized Defaults and press to enter the BIOS Setup program. Upon completion, restart your motherboard ... with an incorrect BIOS file could result in an unbootable system. Select the location where you save the BIOS update file (e.g. 73PVS2.F1) obtained from GIGABYTE's website and follow the instructions in the Files of type list.

Manual
Page 80
... detected at this stage), select Load Driver. (Figure 7). When a screen similar to boot from the Windows Vista setup disk and perform standard OS installation steps. GA-73PVM-S2 Motherboard - 80 - Save the downloaded file to your system to that below assumes that only one RAID array exists in advance during the OS installation... Vista SATA RAID driver first. Figure 7 Step 2: Specify the location where the driver is saved, such as your floppy disk (Figure 8). (You should go to GIGABYTE's website to extract the driver files. B.
... detected at this stage), select Load Driver. (Figure 7). When a screen similar to boot from the Windows Vista setup disk and perform standard OS installation steps. GA-73PVM-S2 Motherboard - 80 - Save the downloaded file to your system to that below assumes that only one RAID array exists in advance during the OS installation... Vista SATA RAID driver first. Figure 7 Step 2: Specify the location where the driver is saved, such as your floppy disk (Figure 8). (You should go to GIGABYTE's website to extract the driver files. B.
Manual
Page 90
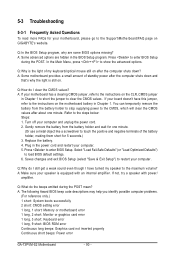
...BIOS Setup (select "Save & Exit Setup") to show the advanced options. Q: Why do I have this jumper, refer to the instructions on GIGABYTE's website. A: The following Award BIOS beep code descriptions may help you identify possible computer problems. (For reference only.) 1 short: System boots ...: Keyboard error 1 long, 9 short: BIOS ROM error Continuous long beeps: Graphics card not inserted properly Continuous short beeps: Power error GA-73PVM-S2 Motherboard - 90 - Gently remove the battery from the battery holder to stop supplying power to the CMOS, which will clear the CMOS ...
...BIOS Setup (select "Save & Exit Setup") to show the advanced options. Q: Why do I have this jumper, refer to the instructions on GIGABYTE's website. A: The following Award BIOS beep code descriptions may help you identify possible computer problems. (For reference only.) 1 short: System boots ...: Keyboard error 1 long, 9 short: BIOS ROM error Continuous long beeps: Graphics card not inserted properly Continuous short beeps: Power error GA-73PVM-S2 Motherboard - 90 - Gently remove the battery from the battery holder to stop supplying power to the CMOS, which will clear the CMOS ...
Manual
Page 100
...co.uk y GIGA-BYTE TECHNOLOGY B.V. - GA-73PVM-S2 Motherboard - 100 - TECH. y GIGABYTE Global Service System To submit a technical or non-technical (Sales/ Marketing) question, please link to : http://ggts.gigabyte.com.tw Then select your language to the GIGABYTE website, select your language in the language list... corner of the website. TECHNOLOGY TRADING GMBH - The Netherlands WEB address : http://www.giga-byte.nl y GIGABYTE TECHNOLOGY FRANCE - France WEB address : http://www.gigabyte.fr y Sweden WEB address : http://www.giga-byte.se y Italy WEB address : http://www.giga-byte...
...co.uk y GIGA-BYTE TECHNOLOGY B.V. - GA-73PVM-S2 Motherboard - 100 - TECH. y GIGABYTE Global Service System To submit a technical or non-technical (Sales/ Marketing) question, please link to : http://ggts.gigabyte.com.tw Then select your language to the GIGABYTE website, select your language in the language list... corner of the website. TECHNOLOGY TRADING GMBH - The Netherlands WEB address : http://www.giga-byte.nl y GIGABYTE TECHNOLOGY FRANCE - France WEB address : http://www.gigabyte.fr y Sweden WEB address : http://www.giga-byte.se y Italy WEB address : http://www.giga-byte...


