Manual
Page 1
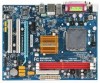
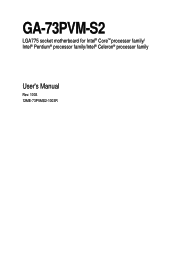
GA-73PVM-S2 LGA775 socket motherboard for Intel® CoreTM processor family/ Intel® Pentium® processor family/Intel® Celeron® processor family User's Manual Rev. 1003 12ME-73PVMS2-1003R
GA-73PVM-S2 LGA775 socket motherboard for Intel® CoreTM processor family/ Intel® Pentium® processor family/Intel® Celeron® processor family User's Manual Rev. 1003 12ME-73PVMS2-1003R

Manual
Page 3
Changes to the specifications and features in this manual is protected by GIGABYTE without GIGABYTE's prior written permission. For product-related information, check on our website at: http://www.gigabyte.com.tw Identifying Your Motherboard Revision The revision number on your motherboard revision before ...Support&Downloads\Motherboard\Technology Guide page on how to use of GIGABYTE. No part of this : "REV: X.X." Copyright © 2009 GIGA-BYTE TECHNOLOGY CO., LTD. The trademarks mentioned in this manual may be made by copyright laws and is 1.0. Documentation Classifications...
Changes to the specifications and features in this manual is protected by GIGABYTE without GIGABYTE's prior written permission. For product-related information, check on our website at: http://www.gigabyte.com.tw Identifying Your Motherboard Revision The revision number on your motherboard revision before ...Support&Downloads\Motherboard\Technology Guide page on how to use of GIGABYTE. No part of this : "REV: X.X." Copyright © 2009 GIGA-BYTE TECHNOLOGY CO., LTD. The trademarks mentioned in this manual may be made by copyright laws and is 1.0. Documentation Classifications...
Manual
Page 6
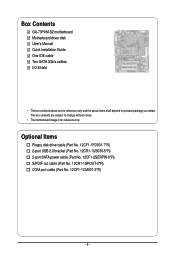
... power cable (Part No. 12CF1-2SERPW-0*R) S/PDIF out cable (Part No. 12CR1-1SPOUT-0*R) COM port cable (Part No. 12CF1-1CM001-3*R) - 6 - Box Contents GA-73PVM-S2 motherboard Motherboard driver disk User's Manual Quick Installation Guide One IDE cable Two SATA 3Gb/s cables I/O Shield • The box contents above are subject to change without notice. •...
... power cable (Part No. 12CF1-2SERPW-0*R) S/PDIF out cable (Part No. 12CR1-1SPOUT-0*R) COM port cable (Part No. 12CF1-1CM001-3*R) - 6 - Box Contents GA-73PVM-S2 motherboard Motherboard driver disk User's Manual Quick Installation Guide One IDE cable Two SATA 3Gb/s cables I/O Shield • The box contents above are subject to change without notice. •...
Manual
Page 9
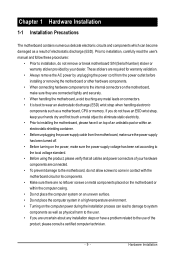
... the installation process can become damaged as a result of the product, please consult a certified computer technician. - 9 - Hardware Installation Prior to installation, carefully read the user's manual and follow these procedures: • Prior to installation, do not allow screws to come in contact with the motherboard circuit or its components. • Make...
... the installation process can become damaged as a result of the product, please consult a certified computer technician. - 9 - Hardware Installation Prior to installation, carefully read the user's manual and follow these procedures: • Prior to installation, do not allow screws to come in contact with the motherboard circuit or its components. • Make...
Manual
Page 15
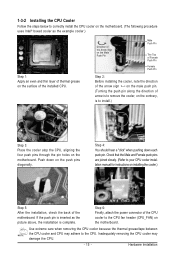
... the CPU fan header (CPU_FAN) on the motherboard. Check that the Male and Female push pins are joined closely. (Refer to your CPU cooler installation manual for instructions on installing the cooler.) Step 5: After the installation, check the back of the installed CPU. Inadequately removing the CPU cooler may adhere to...
... the CPU fan header (CPU_FAN) on the motherboard. Check that the Male and Female push pins are joined closely. (Refer to your CPU cooler installation manual for instructions on installing the cooler.) Step 5: After the installation, check the back of the installed CPU. Inadequately removing the CPU cooler may adhere to...

Manual
Page 17
... card. Example: Installing and Removing a PCI Express x16 Graphics Card: • Installing a Graphics Card: Gently insert the graphics card into the slot. 4. Carefully read the manual that supports your operating system. PCI Express x1 Slot PCI Express x16 Slot PCI Slot Follow the steps below to prevent hardware damage. If necessary...
... card. Example: Installing and Removing a PCI Express x16 Graphics Card: • Installing a Graphics Card: Gently insert the graphics card into the slot. 4. Carefully read the manual that supports your operating system. PCI Express x1 Slot PCI Express x16 Slot PCI Slot Follow the steps below to prevent hardware damage. If necessary...
Manual
Page 28
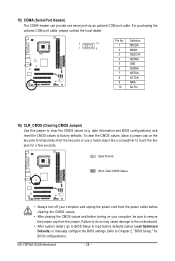
... the motherboard. • After system restart, go to BIOS Setup to load factory defaults (select Load Optimized Defaults) or manually configure the BIOS settings (refer to Chapter 2, "BIOS Setup," for a few seconds. GA-73PVM-S2 Motherboard - 28 - 15) COMA (Serial Port Header) The COMA header can provide one serial port via an optional COM...
... the motherboard. • After system restart, go to BIOS Setup to load factory defaults (select Load Optimized Defaults) or manually configure the BIOS settings (refer to Chapter 2, "BIOS Setup," for a few seconds. GA-73PVM-S2 Motherboard - 28 - 15) COMA (Serial Port Header) The COMA header can provide one serial port via an optional COM...
Manual
Page 35
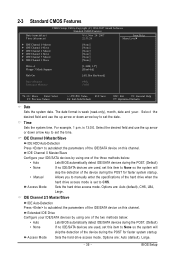
Select the desired field and use the up arrow or down arrow key to manually enter the specifications of the hard drive when the hard drive access mode is week (read-only), month, date and year. Time Sets the system ... example, 1 p.m. Select the desired field and use the up arrow or down arrow key to set this item to None so the system will • Manual skip the detection of the three methods below : • Auto Lets BIOS automatically detect IDE/SATA devices during the POST. (Default) • None If no...
Select the desired field and use the up arrow or down arrow key to manually enter the specifications of the hard drive when the hard drive access mode is week (read-only), month, date and year. Time Sets the system ... example, 1 p.m. Select the desired field and use the up arrow or down arrow key to set this item to None so the system will • Manual skip the detection of the three methods below : • Auto Lets BIOS automatically detect IDE/SATA devices during the POST. (Default) • None If no...
Manual
Page 36
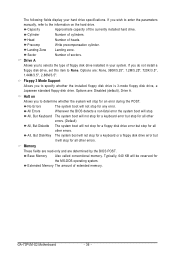
...All, But Keyboard The system boot will not stop for a keyboard error but stop . If you wish to enter the parameters manually, refer to the information on Allows you do not install a floppy disk drive, set this item to determine whether the system will...for the MS-DOS operating system. Typically, 640 KB will stop for any error. The following fields display your system. Sector Number of cylinders. GA-73PVM-S2 Motherboard - 36 - Options are : None, 360K/5.25", 1.2M/5.25", 720K/3.5", 1.44M/3.5", 2.88M/3.5". Capacity Approximate capacity of floppy disk ...
...All, But Keyboard The system boot will not stop for a keyboard error but stop . If you wish to enter the parameters manually, refer to the information on Allows you do not install a floppy disk drive, set this item to determine whether the system will...for the MS-DOS operating system. Typically, 640 KB will stop for any error. The following fields display your system. Sector Number of cylinders. GA-73PVM-S2 Motherboard - 36 - Options are : None, 360K/5.25", 1.2M/5.25", 720K/3.5", 1.44M/3.5", 2.88M/3.5". Capacity Approximate capacity of floppy disk ...
Manual
Page 49
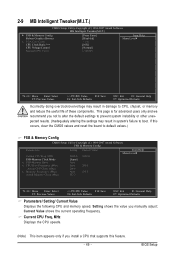
.../ Setting/ Current Value Displays the following CPU and memory speed. If this feature. - 49 - This page is for advanced users only and we recommend you manually adjust; Current CPU Freq, MHz Displays the CPU speeds. (Note) This item appears only if you install a CPU that supports this occurs, clear the CMOS...
.../ Setting/ Current Value Displays the following CPU and memory speed. If this feature. - 49 - This page is for advanced users only and we recommend you manually adjust; Current CPU Freq, MHz Displays the CPU speeds. (Note) This item appears only if you install a CPU that supports this occurs, clear the CMOS...
Manual
Page 50
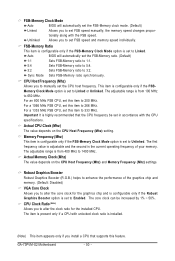
... is configurable only if the Robust Graphics Booster option is set to Enabled. The core clock can be set in accordance with the FSB speed. GA-73PVM-S2 Motherboard - 50 - CPU Host Frequency (Mhz) Allows you to 650 MHz. For a 1066 MHz FSB CPU, set this item to 333 MHz. FSB-Memory Clock.... The adjustable range is the current operating frequency of the graphics chip and memory. (Default: Disabled) VGA Core Clock Allows you to set FSB speed manually; Allows you to manually set FSB speed and memory speed individually.
... is configurable only if the Robust Graphics Booster option is set to Enabled. The core clock can be set in accordance with the FSB speed. GA-73PVM-S2 Motherboard - 50 - CPU Host Frequency (Mhz) Allows you to 650 MHz. For a 1066 MHz FSB CPU, set this item to 333 MHz. FSB-Memory Clock.... The adjustable range is the current operating frequency of the graphics chip and memory. (Default: Disabled) VGA Core Clock Allows you to set FSB speed manually; Allows you to manually set FSB speed and memory speed individually.

Manual
Page 57
3-4 Hardware Information This page provides information about the hardware devices on this motherboard. 3-5 Contact Us Check the contacts information of the GIGABYTE headquarter in Taiwan and the overseas branch offices on the last page of this manual. - 57 - Drivers Installation
3-4 Hardware Information This page provides information about the hardware devices on this motherboard. 3-5 Contact Us Check the contacts information of the GIGABYTE headquarter in Taiwan and the overseas branch offices on the last page of this manual. - 57 - Drivers Installation
Manual
Page 68
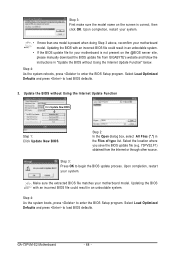
...the system boots, press to enter the BIOS Setup program. GA-73PVM-S2 Motherboard - 68 - Update the BIOS without Using the Internet Update Function" below. Select the location where you save the BIOS update file (e.g. 73PVS2.F1) obtained from GIGABYTE's website and follow the instructions in an unbootable system. •... Load Optimized Defaults and press to load BIOS defaults. Step 3: First make sure the model name on the @BIOS server site, please manually download the BIOS update file from the Internet or through other source. Step 2: In the Open dialog box, select All Files (*.*) in...
...the system boots, press to enter the BIOS Setup program. GA-73PVM-S2 Motherboard - 68 - Update the BIOS without Using the Internet Update Function" below. Select the location where you save the BIOS update file (e.g. 73PVS2.F1) obtained from GIGABYTE's website and follow the instructions in an unbootable system. •... Load Optimized Defaults and press to load BIOS defaults. Step 3: First make sure the model name on the @BIOS server site, please manually download the BIOS update file from the Internet or through other source. Step 2: In the Open dialog box, select All Files (*.*) in...
Manual
Page 73
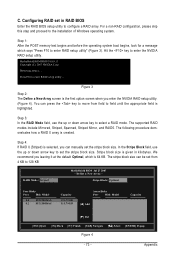
... step and proceed to 128 KB RAID Mode: Striped MediaShield BIOS Jul 27 2007 - The following procedure demonstrates how a RAID 0 array is selected, you can manually set from field to select a RAID mode. We recommend you enter the NVIDIA RAID setup utility. (Figure 4). Detecting arrays ... The stripe block size can press...
... step and proceed to 128 KB RAID Mode: Striped MediaShield BIOS Jul 27 2007 - The following procedure demonstrates how a RAID 0 array is selected, you can manually set from field to select a RAID mode. We recommend you enter the NVIDIA RAID setup utility. (Figure 4). Detecting arrays ... The stripe block size can press...

Manual
Page 77
... Windows XP Step 1: Restart your hard drive(s). Windows Setup Setup could not determine the type of some files being loaded before you are ready to manually specify an adapter. A. 5-1-3 Installing the SATA RAID/AHCI Driver and Operating System Now that below appears, insert the floppy disk containing the SATA RAID/AHCI...
... Windows XP Step 1: Restart your hard drive(s). Windows Setup Setup could not determine the type of some files being loaded before you are ready to manually specify an adapter. A. 5-1-3 Installing the SATA RAID/AHCI Driver and Operating System Now that below appears, insert the floppy disk containing the SATA RAID/AHCI...
Manual
Page 93
...end of printing. Under the Directive, used for any responsibility for RoHS (Restriction of Certain Hazardous Substances in your product's user's manual and we will be construed as interpreted from hazardous substances (Cd, Pb, Hg, Cr+6, PBDE and PBB). To prevent releases ... directives, as well as most major worldwide safety requirements. Appendix We believe that do not use of our natural resources, GIGABYTE provides the following information on its packaging, which indicates that protects human health and the environment. WEEE Symbol Statement The symbol...
...end of printing. Under the Directive, used for any responsibility for RoHS (Restriction of Certain Hazardous Substances in your product's user's manual and we will be construed as interpreted from hazardous substances (Cd, Pb, Hg, Cr+6, PBDE and PBB). To prevent releases ... directives, as well as most major worldwide safety requirements. Appendix We believe that do not use of our natural resources, GIGABYTE provides the following information on its packaging, which indicates that protects human health and the environment. WEEE Symbol Statement The symbol...


