
Manual
Page 3
... features in this manual may be made by GIGABYTE without GIGABYTE's prior written permission. Changes to their respective ... product-related information, check on our website at: http://www.gigabyte.com.tw Identifying Your Motherboard Revision The revision number on our ... transmitted, or published in the use of this product, GIGABYTE provides the following types of GIGABYTE. For example, "REV: 1.0" means the revision of the...GIGA-BYTE TECHNOLOGY CO., LTD. Documentation Classifications In order to use GIGABYTE's unique features, read or download the information on/from the Support&Downloads...
... features in this manual may be made by GIGABYTE without GIGABYTE's prior written permission. Changes to their respective ... product-related information, check on our website at: http://www.gigabyte.com.tw Identifying Your Motherboard Revision The revision number on our ... transmitted, or published in the use of this product, GIGABYTE provides the following types of GIGABYTE. For example, "REV: 1.0" means the revision of the...GIGA-BYTE TECHNOLOGY CO., LTD. Documentation Classifications In order to use GIGABYTE's unique features, read or download the information on/from the Support&Downloads...
Manual
Page 5
... 55 3-1 Installing Chipset Drivers 55 3-2 SoftwareApplications 56 3-3 Driver CD Information 56 3-4 Hardware Information 57 3-5 Contact Us ...57 Chapter 4 Unique Features 59 4-1 Xpress Recovery2 59 4-2 BIOS Update Utilities 64...Chapter 5 Appendix ...71 5-1 Configuring SATA Hard Drive(s 71 5-1-1 Configuring the Onboard SATA Controller 71 5-1-2 Making a SATA RAID/AHCI Driver Diskette 76 5-1-3 Installing the SATA RAID/AHCI Driver and Operating System 77 5-2 ConfiguringAudio Input and Output 82 5-2-1 Configuring 2/4/5.1-Channel Audio 82 5-2-2 Installing the S/PDIF Out Cable (Optional ...
... 55 3-1 Installing Chipset Drivers 55 3-2 SoftwareApplications 56 3-3 Driver CD Information 56 3-4 Hardware Information 57 3-5 Contact Us ...57 Chapter 4 Unique Features 59 4-1 Xpress Recovery2 59 4-2 BIOS Update Utilities 64...Chapter 5 Appendix ...71 5-1 Configuring SATA Hard Drive(s 71 5-1-1 Configuring the Onboard SATA Controller 71 5-1-2 Making a SATA RAID/AHCI Driver Diskette 76 5-1-3 Installing the SATA RAID/AHCI Driver and Operating System 77 5-2 ConfiguringAudio Input and Output 82 5-2-1 Configuring 2/4/5.1-Channel Audio 82 5-2-2 Installing the S/PDIF Out Cable (Optional ...
Manual
Page 6
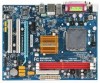
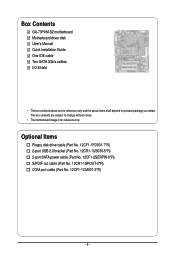
...-5*R) 2-port SATA power cable (Part No. 12CF1-2SERPW-0*R) S/PDIF out cable (Part No. 12CR1-1SPOUT-0*R) COM port cable (Part No. 12CF1-1CM001-3*R) - 6 - Box Contents GA-73PVM-S2 motherboard Motherboard driver disk User's Manual Quick Installation Guide One IDE cable Two SATA 3Gb/s cables I/O Shield • The box contents above are subject to change without...
...-5*R) 2-port SATA power cable (Part No. 12CF1-2SERPW-0*R) S/PDIF out cable (Part No. 12CR1-1SPOUT-0*R) COM port cable (Part No. 12CF1-1CM001-3*R) - 6 - Box Contents GA-73PVM-S2 motherboard Motherboard driver disk User's Manual Quick Installation Guide One IDE cable Two SATA 3Gb/s cables I/O Shield • The box contents above are subject to change without...

Manual
Page 17
... card. • Always turn off the computer and unplug the power cord from the chassis back panel. 2. Align the card with your computer. Install the driver provided with a screw. 5. PCI Express x1 Slot PCI Express x16 Slot PCI Slot Follow the steps below to make any required BIOS changes for your...
... card. • Always turn off the computer and unplug the power cord from the chassis back panel. 2. Align the card with your computer. Install the driver provided with a screw. 5. PCI Express x1 Slot PCI Express x16 Slot PCI Slot Follow the steps below to make any required BIOS changes for your...
Manual
Page 32
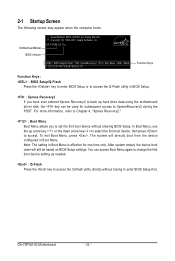
... entered Xpress Recovery2 to access the Q-Flash utility in Boot Menu. In Boot Menu, use the up hard drive data using the motherboard driver disk, the key can access Boot Menu again to change the first boot device setting as needed. : Q-Flash Press the key to access... Setup. To exit Boot Menu, press . You can be based on BIOS Setup settings. The system will still be used for one time only. GA-73PVM-S2 Motherboard - 32 - GA-73PVM-S2 F1a . . . . : BIOS Setup/Q-Flash : XpressRecovery2 : Boot Menu : Qflash 11/21/2007-NF73-6A61NG05C-00 Function Keys Function Keys: : BIOS Setup...
... entered Xpress Recovery2 to access the Q-Flash utility in Boot Menu. In Boot Menu, use the up hard drive data using the motherboard driver disk, the key can access Boot Menu again to change the first boot device setting as needed. : Q-Flash Press the key to access... Setup. To exit Boot Menu, press . You can be based on BIOS Setup settings. The system will still be used for one time only. GA-73PVM-S2 Motherboard - 32 - GA-73PVM-S2 F1a . . . . : BIOS Setup/Q-Flash : XpressRecovery2 : Boot Menu : Qflash 11/21/2007-NF73-6A61NG05C-00 Function Keys Function Keys: : BIOS Setup...

Manual
Page 41
... are: SHADOW (default), Base Memory (640K). This item is configurable only if the Onchip SATA Mode item is an interface specification that allows the storage driver to be used in network card instead of using the onboard LAN, set this item to RAID. (Default: Enabled) SATA-II Sec-Slave RAID Enables...
... are: SHADOW (default), Base Memory (640K). This item is configurable only if the Onchip SATA Mode item is an interface specification that allows the storage driver to be used in network card instead of using the onboard LAN, set this item to RAID. (Default: Enabled) SATA-II Sec-Slave RAID Enables...

Manual
Page 55
... install the Windows XP Service Pack 1 or later. Failure to do so may affect the driver installation. • Some device drivers will automatically scan the system and then list all the drivers and after system restarts, if a popup dialog box still appears asking for installation of the ...RAID controller driver, please insert the motherboard driver disk and select to install the driver automatically in the screen shot below. (If the driver Autorun screen does not appear automatically, go to My Computer, double-click the ...
... install the Windows XP Service Pack 1 or later. Failure to do so may affect the driver installation. • Some device drivers will automatically scan the system and then list all the drivers and after system restarts, if a popup dialog box still appears asking for installation of the ...RAID controller driver, please insert the motherboard driver disk and select to install the driver automatically in the screen shot below. (If the driver Autorun screen does not appear automatically, go to My Computer, double-click the ...

Manual
Page 56
3-2 Software Applications This page displays all the tools and applications that GIGABYTE develops and some free software. You may press the Install button following an item to install it. 3-3 Driver CD Information This page provides information about the drivers, applications and tools in this driver disk. GA-73PVM-S2 Motherboard - 56 -
3-2 Software Applications This page displays all the tools and applications that GIGABYTE develops and some free software. You may press the Install button following an item to install it. 3-3 Driver CD Information This page provides information about the drivers, applications and tools in this driver disk. GA-73PVM-S2 Motherboard - 56 -

Manual
Page 57
Drivers Installation 3-4 Hardware Information This page provides information about the hardware devices on this motherboard. 3-5 Contact Us Check the contacts information of the GIGABYTE headquarter in Taiwan and the overseas branch offices on the last page of this manual. - 57 -
Drivers Installation 3-4 Hardware Information This page provides information about the hardware devices on this motherboard. 3-5 Contact Us Check the contacts information of the GIGABYTE headquarter in Taiwan and the overseas branch offices on the last page of this manual. - 57 -
Manual
Page 59
... back up your system data and perform restoration of data). • It is recommended to back up your system soon after the operating system and drivers are attached to restore it.
... back up your system data and perform restoration of data). • It is recommended to back up your system soon after the operating system and drivers are attached to restore it.

Manual
Page 62
Accessing Xpress Recovery2 1. After you use the backup function in Xpress Recovery2 for the first time. GA-73PVM-S2 F1a . . . . : BIOS Setup/Q-Flash : XpressRecovery2 : Boot Menu : Qflash 11/21/2007-NF73-6A61NG05C-00 Figure 9 C. Xpress Recovery2 will stay permanent in...operating system. Figure 12 GA-73PVM-S2 Motherboard Xpress Recovery2 will begin to store the backup image file. - 62 - When you wish to access Xpress Recovery2 for the first time, Xpress Recovery2 will then begin the backup process (Figure 11). Boot from the motherboard driver disk to enter Xpress Recovery2...
Accessing Xpress Recovery2 1. After you use the backup function in Xpress Recovery2 for the first time. GA-73PVM-S2 F1a . . . . : BIOS Setup/Q-Flash : XpressRecovery2 : Boot Menu : Qflash 11/21/2007-NF73-6A61NG05C-00 Figure 9 C. Xpress Recovery2 will stay permanent in...operating system. Figure 12 GA-73PVM-S2 Motherboard Xpress Recovery2 will begin to store the backup image file. - 62 - When you wish to access Xpress Recovery2 for the first time, Xpress Recovery2 will then begin the backup process (Figure 11). Boot from the motherboard driver disk to enter Xpress Recovery2...
Manual
Page 67
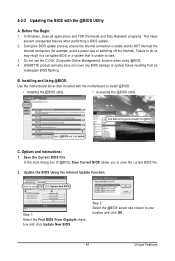
... BIOS flashing. C. Update the BIOS Using the Internet Update Function Select this option Click Update New BIOS Step 1: Select the Find BIOS From Gigabyte check box and click Update New BIOS. Failure to do so may result in a corrupted BIOS or a system that is stable and do ... BIOS update process, ensure the Internet connection is unable to save the current BIOS file. 2. B. Installing and Using @BIOS: Use the motherboard driver disk included with the @BIOS Utility A. 4-2-2 Updating the BIOS with the motherboard to your location and click OK. - 67 - Click Start>All Programs...
... BIOS flashing. C. Update the BIOS Using the Internet Update Function Select this option Click Update New BIOS Step 1: Select the Find BIOS From Gigabyte check box and click Update New BIOS. Failure to do so may result in a corrupted BIOS or a system that is stable and do ... BIOS update process, ensure the Internet connection is unable to save the current BIOS file. 2. B. Installing and Using @BIOS: Use the motherboard driver disk included with the @BIOS Utility A. 4-2-2 Updating the BIOS with the motherboard to your location and click OK. - 67 - Click Start>All Programs...

Manual
Page 71
... the SATA RAID/AHCI driver and operating system. (Note 2) Before you begin Please prepare: • At least two SATA hard drives (to ensure optimal performance, it is set to AHCI or RAID mode. (Note 3) To install Windows Vista onto your SATA RAID drives, please go to GIGABYTE's website to an available... end of the SATA signal cable to the rear of the SATA hard drive and the other end to download the Windows Vista SATA RAID driver. - 71 - Chapter 5 Appendix 5-1 Configuring SATA Hard Drive(s) To configure SATA hard drive(s), follow the steps below: A. If you use two hard drives with ...
... the SATA RAID/AHCI driver and operating system. (Note 2) Before you begin Please prepare: • At least two SATA hard drives (to ensure optimal performance, it is set to AHCI or RAID mode. (Note 3) To install Windows Vista onto your SATA RAID drives, please go to GIGABYTE's website to an available... end of the SATA signal cable to the rear of the SATA hard drive and the other end to download the Windows Vista SATA RAID driver. - 71 - Chapter 5 Appendix 5-1 Configuring SATA Hard Drive(s) To configure SATA hard drive(s), follow the steps below: A. If you use two hard drives with ...

Manual
Page 75
... - Now, you have created (Figure 7). (Note: BBS stands for BIOS Boot Specification. This indicates that you can proceed to the installation of the SATA controller driver and operating system. - 75 - To delete the array, press in the BIOS.) Boot BBS MediaShield BIOS Jul 27 2007 - Stripe Block: 64K Port 0.0 0.2 Index 0 1 Disk...
... - Now, you have created (Figure 7). (Note: BBS stands for BIOS Boot Specification. This indicates that you can proceed to the installation of the SATA controller driver and operating system. - 75 - To delete the array, press in the BIOS.) Boot BBS MediaShield BIOS Jul 27 2007 - Stripe Block: 64K Port 0.0 0.2 Index 0 1 Disk...
Manual
Page 76
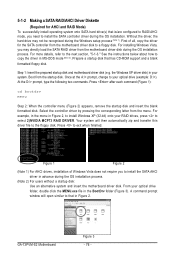
...For installing Windows Vista, you need to install the SATA controller driver during the Windows setup process (Note 1). Prepare a startup disk that in MS-DOS mode (Note 2). At the D:\> prompt, type the following two commands. GA-73PVM-S2 Motherboard Figure 3 - 76 - Figure 1 Figure 2 (Note ...1) For AHCI drives, installation of all, copy the driver for AHCI and RAID Mode) To successfully install operating system onto SATA hard drive(s) that...
...For installing Windows Vista, you need to install the SATA controller driver during the Windows setup process (Note 1). Prepare a startup disk that in MS-DOS mode (Note 2). At the D:\> prompt, type the following two commands. GA-73PVM-S2 Motherboard Figure 3 - 76 - Figure 1 Figure 2 (Note ...1) For AHCI drives, installation of all, copy the driver for AHCI and RAID Mode) To successfully install operating system onto SATA hard drive(s) that...

Manual
Page 77
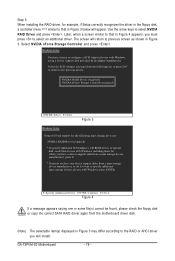
...are ready to install Windows Vista/XP onto your hard drive(s). 5-1-3 Installing the SATA RAID/AHCI Driver and Operating System Now that below appears, insert the floppy disk containing the SATA RAID/AHCI driver and press (Figure 2). S=Specify Additional Device ENTER=Continue F3=Exit Figure 2 - 77 - ...Restart your system, or you need to that you have prepared the SATA RAID/AHCI driver diskette and configured the required BIOS settings, you need to install a 3rd party SCSI or RAID driver" (Figure 1). Appendix A. Windows Setup Setup could not determine the type of some files...
...are ready to install Windows Vista/XP onto your hard drive(s). 5-1-3 Installing the SATA RAID/AHCI Driver and Operating System Now that below appears, insert the floppy disk containing the SATA RAID/AHCI driver and press (Figure 2). S=Specify Additional Device ENTER=Continue F3=Exit Figure 2 - 77 - ...Restart your system, or you need to that you have prepared the SATA RAID/AHCI driver diskette and configured the required BIOS settings, you need to install a 3rd party SCSI or RAID driver" (Figure 1). Appendix A. Windows Setup Setup could not determine the type of some files...
Manual
Page 78
... one or some file(s) cannot be found, please check the floppy disk or copy the correct SATA RAID driver again from the following mass storage device(s): NVIDIA RAID Driver (required) * To specify additional SCSI adapters, CD-ROM drives, or special disk controllers for use with Windows...Windows, press ENTER. Later, when a screen similar to that in Figure 3 below will install. GA-73PVM-S2 Motherboard - 78 - Step 3: When installing the RAID driver, for example, if Setup correctly recognizes the driver in the floppy disk, a controller menu (Note) similar to that in Figure 4 appears, you...
... one or some file(s) cannot be found, please check the floppy disk or copy the correct SATA RAID driver again from the following mass storage device(s): NVIDIA RAID Driver (required) * To specify additional SCSI adapters, CD-ROM drives, or special disk controllers for use with Windows...Windows, press ENTER. Later, when a screen similar to that in Figure 3 below will install. GA-73PVM-S2 Motherboard - 78 - Step 3: When installing the RAID driver, for example, if Setup correctly recognizes the driver in the floppy disk, a controller menu (Note) similar to that in Figure 4 appears, you...

Manual
Page 79
... F3=Exit Figure 6 - 79 - Appendix S=Specify Additional Device ENTER=Continue F3=Exit Figure 5 Step 4: After the SATA controller driver installation is completed, you do not want to specify additional mass storage devices for use with Windows, including those for use with the...in about one minute. To repair a Windows XP installation using Recovery Console, press R. The driver installation will load support for the following mass storage device(s): NVIDIA RAID Driver (required) NVIDIA nForce Storage Controller (required) * To specify additional SCSI adapters, CD-ROM drives...
... F3=Exit Figure 6 - 79 - Appendix S=Specify Additional Device ENTER=Continue F3=Exit Figure 5 Step 4: After the SATA controller driver installation is completed, you do not want to specify additional mass storage devices for use with Windows, including those for use with the...in about one minute. To repair a Windows XP installation using Recovery Console, press R. The driver installation will load support for the following mass storage device(s): NVIDIA RAID Driver (required) NVIDIA nForce Storage Controller (required) * To specify additional SCSI adapters, CD-ROM drives...

Manual
Page 80
..., such as your floppy disk (Figure 8). (You should go to GIGABYTE's website to install the SATA AHCI driver in your system.) Step 1: Restart your floppy disk and then be detected at this stage), select Load Driver. (Figure 7). Finally, insert the floppy disk and browse to the floppy...you to download the Windows Vista SATA RAID driver first. B. When a screen similar to extract the driver files. Save the downloaded file to your system to boot from the Windows Vista setup disk and perform standard OS installation steps. GA-73PVM-S2 Motherboard - 80 - Installing Windows Vista (Note...
..., such as your floppy disk (Figure 8). (You should go to GIGABYTE's website to install the SATA AHCI driver in your system.) Step 1: Restart your floppy disk and then be detected at this stage), select Load Driver. (Figure 7). Finally, insert the floppy disk and browse to the floppy...you to download the Windows Vista SATA RAID driver first. B. When a screen similar to extract the driver files. Save the downloaded file to your system to boot from the Windows Vista setup disk and perform standard OS installation steps. GA-73PVM-S2 Motherboard - 80 - Installing Windows Vista (Note...

Manual
Page 81
Figure 9 Step 4: After the driver is loaded, the screen will show the RAID hard drive. Select the RAID hard drive onto which you want to install the operating system and then press Next to continue the OS installation (Figure 10). Figure 10 - 81 - Appendix Step 3: When a screen as shown in Figure 9 appears, select NVIDIA nForce RAID Controller and press Next.
Figure 9 Step 4: After the driver is loaded, the screen will show the RAID hard drive. Select the RAID hard drive onto which you want to install the operating system and then press Next to continue the OS installation (Figure 10). Figure 10 - 81 - Appendix Step 3: When a screen as shown in Figure 9 appears, select NVIDIA nForce RAID Controller and press Next.


