
Owner's Manual
Page 1
Safe-T-Beam® Safety Reverse System Must be Installed and the Force Controls MUST be installed prior to close door. Having Difficulty? Need Help? PwPrellweeaaadwssy.eegwchehanalevileneucscMo:amo1ll-dpi8nea0gln0.iyn-.3fco5or-...AC POWERED SCREW DRIVE OPENERS Table of Contents Warranty Information 2 Safety Information 3 Safety Features 3 Important Installation Instructions 3 Pre-Installation Checklist 4-6 Adjustments 7-8 Programming the Remote Control 9 Installing lightbulb and lens 9 Scheduled Maintenance 10 Troubleshooting Guide 10-11 Wiring Diagram 12 Parts Lists and ...
Safe-T-Beam® Safety Reverse System Must be Installed and the Force Controls MUST be installed prior to close door. Having Difficulty? Need Help? PwPrellweeaaadwssy.eegwchehanalevileneucscMo:amo1ll-dpi8nea0gln0.iyn-.3fco5or-...AC POWERED SCREW DRIVE OPENERS Table of Contents Warranty Information 2 Safety Information 3 Safety Features 3 Important Installation Instructions 3 Pre-Installation Checklist 4-6 Adjustments 7-8 Programming the Remote Control 9 Installing lightbulb and lens 9 Scheduled Maintenance 10 Troubleshooting Guide 10-11 Wiring Diagram 12 Parts Lists and ...
Owner's Manual
Page 2
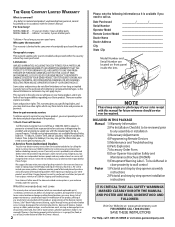
... will not reimburse you or other parts. INCLUDED IN THIS PACKAGE Manual 1) Warranty Information 2) Pre Installation Checklist to be required. INCONVENIENCE; LOSS OF USE OF YOUR GENIE PRODUCT OR PROPERTY DAMAGE CAUSED BY YOUR GENIE PRODUCT OR ITS FAILURE TO WORK; OR ANY DAMAGES RESULTING FROM MISUSE OR MODIFICATION OF YOUR...
... will not reimburse you or other parts. INCLUDED IN THIS PACKAGE Manual 1) Warranty Information 2) Pre Installation Checklist to be required. INCONVENIENCE; LOSS OF USE OF YOUR GENIE PRODUCT OR PROPERTY DAMAGE CAUSED BY YOUR GENIE PRODUCT OR ITS FAILURE TO WORK; OR ANY DAMAGES RESULTING FROM MISUSE OR MODIFICATION OF YOUR...
Owner's Manual
Page 3
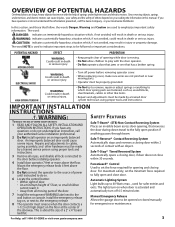
...death or serious injury. Important Installation Instructions WARNING: Safety Features To reduce the risk of a 2" x 4" board laid flat. If you have any questions or do not understand an instruction, call your local Genie Distributor. Mount the emergency release knob ...;instructions. WARNING: Could result in death or serious injury. • Turn off 4.5 minutes later. or your authorized Genie installation professional. If you have questions or do so. Repairs and adjustments to 60 Watts max. , used to do not...
...death or serious injury. Important Installation Instructions WARNING: Safety Features To reduce the risk of a 2" x 4" board laid flat. If you have any questions or do not understand an instruction, call your local Genie Distributor. Mount the emergency release knob ...;instructions. WARNING: Could result in death or serious injury. • Turn off 4.5 minutes later. or your authorized Genie installation professional. If you have questions or do so. Repairs and adjustments to 60 Watts max. , used to do not...
Owner's Manual
Page 4
...not solid), door (including door frame) must be needed to install in most garages and connect to most garage doors. Contact a Genie Factory Authorized Dealer or dealer of Header Bracket will be needed ) before installing Opener. Make a note of your garage door for repairs and ... This Opener is 8'-0", you purchased is a sectional or a onepiece door for any additional items you have it adjusted by a Genie Factory Authorized Dealer. Pre-Installation Checklist This Opener includes parts and supplies needed to install Opener into your garage and connect to your garage door.
...not solid), door (including door frame) must be needed to install in most garages and connect to most garage doors. Contact a Genie Factory Authorized Dealer or dealer of Header Bracket will be needed ) before installing Opener. Make a note of your garage door for repairs and ... This Opener is 8'-0", you purchased is a sectional or a onepiece door for any additional items you have it adjusted by a Genie Factory Authorized Dealer. Pre-Installation Checklist This Opener includes parts and supplies needed to install Opener into your garage and connect to your garage door.
Owner's Manual
Page 5
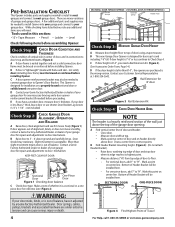
...! If the ceiling in place of doors: - Not all types and styles of Power Cord. (See Assembly and Installation Poster.) NOTE Permanent wiring must be installed by a trained professional. For Help, call 1-800-35-GENIE or visit www.geniecompany.com Source Sensor Safe-T-Beam® Mounting Bracket Figure 7 Mounting Safe-T-Beam® Components...
...! If the ceiling in place of doors: - Not all types and styles of Power Cord. (See Assembly and Installation Poster.) NOTE Permanent wiring must be installed by a trained professional. For Help, call 1-800-35-GENIE or visit www.geniecompany.com Source Sensor Safe-T-Beam® Mounting Bracket Figure 7 Mounting Safe-T-Beam® Components...

Owner's Manual
Page 6
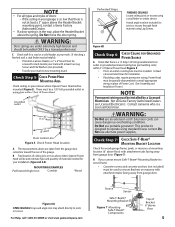
... properly may cause severe injury or death. 6 When possible use the Emergency Release only when the door is highly recommended to install a Genie Emergency Release Kit (GER-2). NO ONE SHOULD CROSS THE PATH OF A MOVING DOOR. 4 NEVER GO UNDER A STOPPED, PARTIALLY OPEN... DOOR. 5 Test Opener monthly. Have a Genie Factory Authorized Dealer make repairs to make installation easier: • Slotted and phillips screw-driver bits • Stud finder • Sheet-metal cutting snips Ch e c k S ...
... properly may cause severe injury or death. 6 When possible use the Emergency Release only when the door is highly recommended to install a Genie Emergency Release Kit (GER-2). NO ONE SHOULD CROSS THE PATH OF A MOVING DOOR. 4 NEVER GO UNDER A STOPPED, PARTIALLY OPEN... DOOR. 5 Test Opener monthly. Have a Genie Factory Authorized Dealer make repairs to make installation easier: • Slotted and phillips screw-driver bits • Stud finder • Sheet-metal cutting snips Ch e c k S ...
Owner's Manual
Page 9
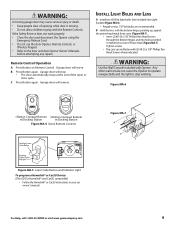
... Car2U compatible) • Follow the Homelink® or Car2U instructions in metal front cover of Power Head (Figure MA-7). Install Light Bulbs and Lens A Install two 60 Watt light bulbs (not included) into holes provided in your car owner's manual. WARNING: Use the Wall Console... included with (2) #8-32 x 3/8" Phillips Pan Head Screws where indicated. Figure MA-7 For Help, call 1-800-35-GENIE or visit www.geniecompany...
... Car2U compatible) • Follow the Homelink® or Car2U instructions in metal front cover of Power Head (Figure MA-7). Install Light Bulbs and Lens A Install two 60 Watt light bulbs (not included) into holes provided in your car owner's manual. WARNING: Use the Wall Console... included with (2) #8-32 x 3/8" Phillips Pan Head Screws where indicated. Figure MA-7 For Help, call 1-800-35-GENIE or visit www.geniecompany...

Owner's Manual
Page 11
...door 1. Check Force Setting (page 7 & 8). Check operation of Coupler. Check Open Force adjustment (see Install Carriage Assembly -INSTALLATION POSTER). Disconnect Wires connecting Wall Console to operate Opener. 3. Until a replacement Wall Console can cut insulation ...and short Wires) for service, or contact Customer Service at 1-800-35-GENIE. 3. Door starts up 1....
...door 1. Check Force Setting (page 7 & 8). Check operation of Coupler. Check Open Force adjustment (see Install Carriage Assembly -INSTALLATION POSTER). Disconnect Wires connecting Wall Console to operate Opener. 3. Until a replacement Wall Console can cut insulation ...and short Wires) for service, or contact Customer Service at 1-800-35-GENIE. 3. Door starts up 1....


