User Manual (English (English))
Page 1
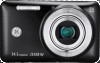
User Manual imagination at work GE Digital Camera Smart Series : J1458W Getting Started Basic Operation Camera Function Controls Playback Using the Menus Camera Connectivity Appendix EN
User Manual imagination at work GE Digital Camera Smart Series : J1458W Getting Started Basic Operation Camera Function Controls Playback Using the Menus Camera Connectivity Appendix EN
User Manual (English (English))
Page 3
... place, moisture may condense inside a closed car in summer. • In a place where the camera is subject to recognize pictures when the camera is suggested that are stored in the autogenerated folder in your digital camera before turning the camera again. To edit image data, please copy the image data to deform, disassemble or modify...
... place, moisture may condense inside a closed car in summer. • In a place where the camera is subject to recognize pictures when the camera is suggested that are stored in the autogenerated folder in your digital camera before turning the camera again. To edit image data, please copy the image data to deform, disassemble or modify...
User Manual (English (English))
Page 4
... Company. Improper handling may damage the product. • Turn the camera off before using this manual are used for future reference. All rights reserved. Safety Information Please read this GE digital camera. BEFORE YOU START Preface Thank you for purchasing this manual carefully and... keep it in a safe place for identification purposes only and are properties of battery that comes with the camera. Trademarks All trademarks mentioned in...
... Company. Improper handling may damage the product. • Turn the camera off before using this manual are used for future reference. All rights reserved. Safety Information Please read this GE digital camera. BEFORE YOU START Preface Thank you for purchasing this manual carefully and... keep it in a safe place for identification purposes only and are properties of battery that comes with the camera. Trademarks All trademarks mentioned in...
User Manual (English (English))
Page 5
... contents of time. • Do not use your GE digital camera. Symbols used in this manual Throughout this manual are used to help you locate information quickly and easily: Indicates useful information to consider. To clean, wipe the camera with instructions on how to use abrasive cleansers, alcohol-...expose the lens to direct sunlight for extended periods. • Download all pictures and remove the batteries from the camera if you are going to store the camera for long periods of this manual, the following symbols are accurate, however General Imaging Company reserves the right to...
... contents of time. • Do not use your GE digital camera. Symbols used in this manual Throughout this manual are used to help you locate information quickly and easily: Indicates useful information to consider. To clean, wipe the camera with instructions on how to use abrasive cleansers, alcohol-...expose the lens to direct sunlight for extended periods. • Download all pictures and remove the batteries from the camera if you are going to store the camera for long periods of this manual, the following symbols are accurate, however General Imaging Company reserves the right to...
User Manual (English (English))
Page 9
... 66 Connecting to a PictBridge Compatible Printer 67 Setting the USB Mode 67 Connecting the Camera and Printer 68 Using the PictBridge Menu 69 Print with Date 69 Print without Date 70 Print Index 71 Print DPOF (Digital Print Order Format 72 Exit 72 APPENDICES 73 Specifications 73 Error Messages 77 Troubleshooting 79
... 66 Connecting to a PictBridge Compatible Printer 67 Setting the USB Mode 67 Connecting the Camera and Printer 68 Using the PictBridge Menu 69 Print with Date 69 Print without Date 70 Print Index 71 Print DPOF (Digital Print Order Format 72 Exit 72 APPENDICES 73 Specifications 73 Error Messages 77 Troubleshooting 79
User Manual (English (English))
Page 34
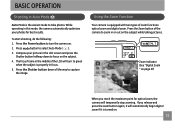
...you release and press the zoom button again, it will automatically begin digital zoom if it is turned on . 2. Zoom indicator (See "Digital Zoom " on the subject. 4. Compose your photos for optical zoom, the camera will turn the camera on . 31 If you reach the maximum point for best results....capture the image. Press mode button to take photos. Press the Zoom button of zoom functions: optical zoom and digital zoom. While operating in this mode, the camera automatically optimizes your picture in the LCD screen and press the Shutter button halfway down all the way to green...
...you release and press the zoom button again, it will automatically begin digital zoom if it is turned on . 2. Zoom indicator (See "Digital Zoom " on the subject. 4. Compose your photos for optical zoom, the camera will turn the camera on . 31 If you reach the maximum point for best results....capture the image. Press mode button to take photos. Press the Zoom button of zoom functions: optical zoom and digital zoom. While operating in this mode, the camera automatically optimizes your picture in the LCD screen and press the Shutter button halfway down all the way to green...
User Manual (English (English))
Page 70
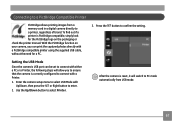
...correctly configured to connect with either a PC or a Printer, the following steps will switch to PC mode automatically from a memory card in a digital camera directly to a printer, regardless of brand. With the PictBridge function on the packaging or check the printer manual. Enter the... PictBridge compatible printer using the supplied USB cable, without the need for the PictBridge logo on your camera, you to ensure that the camera is PictBridge compatible, simply look for a PC. 3. After the camera is reset, it will allow you can be set to connect with a Printer. 1. Use the ...
...correctly configured to connect with either a PC or a Printer, the following steps will switch to PC mode automatically from a memory card in a digital camera directly to a printer, regardless of brand. With the PictBridge function on the packaging or check the printer manual. Enter the... PictBridge compatible printer using the supplied USB cable, without the need for the PictBridge logo on your camera, you to ensure that the camera is PictBridge compatible, simply look for a PC. 3. After the camera is reset, it will allow you can be set to connect with a Printer. 1. Use the ...
User Manual (English (English))
Page 75
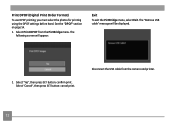
The following screen will be displayed. 2. Select "Yes", then press SET button: confirm print. Select Print DPOF from the camera and printer. 72 Print DPOF (Digital Print Order Format) To use DPOF printing, you must select the photos for printing using the DPOF settings before hand. See the "DPOF" section on page 54. 1. The "Remove USB cable" message will appear: Exit To exit the PictBridge menu, select Exit. Disconnect the USB cable from the PictBridge menu. Select "Cancel", then press SET button: cancel print.
The following screen will be displayed. 2. Select "Yes", then press SET button: confirm print. Select Print DPOF from the camera and printer. 72 Print DPOF (Digital Print Order Format) To use DPOF printing, you must select the photos for printing using the DPOF settings before hand. See the "DPOF" section on page 54. 1. The "Remove USB cable" message will appear: Exit To exit the PictBridge menu, select Exit. Disconnect the USB cable from the PictBridge menu. Select "Cancel", then press SET button: cancel print.


