8512680 - Component Replacement Manual
Page 5
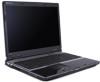
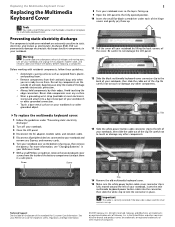
... Technical Support See the label on your notebook, open the DVD drive, insert the Windows DVD, close the DVD drive, then restart your keyboard and follow the on-screen instructions. If your notebook does not use RAID and the drive you replaced was not the C drive, complete any... other brands and product names are trademarks or registered trademarks of the notebook for important safety, regulatory, and legal information. © 2007 Gateway, Inc. Gateway and eMachines are replacing, then remove it. 13 Remove the bracket from CD or DVD" appears, press any Express cards. in Step 12...
... Technical Support See the label on your notebook, open the DVD drive, insert the Windows DVD, close the DVD drive, then restart your keyboard and follow the on-screen instructions. If your notebook does not use RAID and the drive you replaced was not the C drive, complete any... other brands and product names are trademarks or registered trademarks of the notebook for important safety, regulatory, and legal information. © 2007 Gateway, Inc. Gateway and eMachines are replacing, then remove it. 13 Remove the bracket from CD or DVD" appears, press any Express cards. in Step 12...
8512680 - Component Replacement Manual
Page 6
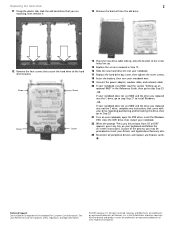
... floors, plastic, and packing foam. • Remove components from the cover or notebook. 12 With a small Phillips screwdriver, remove the five keyboard screws and put them in a safe place. Before working with notebook components, follow these guidelines: • Avoid static-causing surfaces such as...notebook are trademarks or registered trademarks of the notebook for important safety, regulatory, and legal information. © 2007 Gateway, Inc. Caution Depending on the keyboard cover type, the cover may be connected to not damage the LCD panel. All other brands and product names ...
... floors, plastic, and packing foam. • Remove components from the cover or notebook. 12 With a small Phillips screwdriver, remove the five keyboard screws and put them in a safe place. Before working with notebook components, follow these guidelines: • Avoid static-causing surfaces such as...notebook are trademarks or registered trademarks of the notebook for important safety, regulatory, and legal information. © 2007 Gateway, Inc. Caution Depending on the keyboard cover type, the cover may be connected to not damage the LCD panel. All other brands and product names ...
8512680 - Component Replacement Manual
Page 7
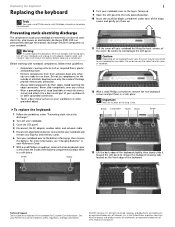
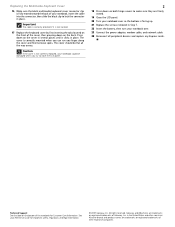
...first inserting the tabs located on the front of the notebook for important safety, regulatory, and legal information. © 2007 Gateway, Inc. Clip 15 Place the new keyboard keys-down until it is fully moved toward the back of their corresponding slots. Press down on both hinge covers to make...for Customer Care Information. Technical Support See the label on the bottom of the cover, then pressing down on the keyboard keys along the cover and find no loose spots. Gateway and eMachines are firmly seated. 22 Close the LCD panel. 23 Turn your notebook over . 26 Connect the ...
...first inserting the tabs located on the front of the notebook for important safety, regulatory, and legal information. © 2007 Gateway, Inc. Clip 15 Place the new keyboard keys-down until it is fully moved toward the back of their corresponding slots. Press down on both hinge covers to make...for Customer Care Information. Technical Support See the label on the bottom of the cover, then pressing down on the keyboard keys along the cover and find no loose spots. Gateway and eMachines are firmly seated. 22 Close the LCD panel. 23 Turn your notebook over . 26 Connect the ...
8512680 - Component Replacement Manual
Page 10
...of the notebook for important safety, regulatory, and legal information. © 2007 Gateway, Inc. Never slide components over any other components. Be careful to not damage the LCD panel. 12 Slide the black multimedia keyboard cover connector clip to use them up . 9 Open the LCD panel to replace... then slide the white clip to touch or damage any Express and memory cards. 6 Turn your notebook. Gateway and eMachines are up , then remove the battery. Clip 14 Remove the old multimedia keyboard cover. 15 Make sure the white power button cable cover connector clip is facing up .
...of the notebook for important safety, regulatory, and legal information. © 2007 Gateway, Inc. Never slide components over any other components. Be careful to not damage the LCD panel. 12 Slide the black multimedia keyboard cover connector clip to use them up . 9 Open the LCD panel to replace... then slide the white clip to touch or damage any Express and memory cards. 6 Turn your notebook. Gateway and eMachines are up , then remove the battery. Clip 14 Remove the old multimedia keyboard cover. 15 Make sure the white power button cable cover connector clip is facing up .
8512680 - Component Replacement Manual
Page 11
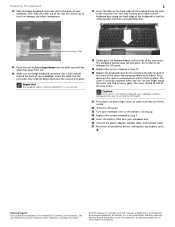
...18 Press down on the back. Technical Support See the label on the cover in several places until it is not twisted. 17 Replace the keyboard cover by first inserting the tabs located on the front of the cover, then pressing down on the bottom of the notebook for important safety...are trademarks or registered trademarks of Gateway, Inc. Important The cable is correctly oriented if it clicks in Step 7. 22 Insert the battery, then turn your notebook over so the bottom is facing up. 21 Replace the screws removed in place. Replacing the Multimedia Keyboard Cover 16 Make sure the ...
...18 Press down on the back. Technical Support See the label on the cover in several places until it is not twisted. 17 Replace the keyboard cover by first inserting the tabs located on the front of the cover, then pressing down on the bottom of the notebook for important safety...are trademarks or registered trademarks of Gateway, Inc. Important The cable is correctly oriented if it clicks in Step 7. 22 Insert the battery, then turn your notebook over so the bottom is facing up. 21 Replace the screws removed in place. Replacing the Multimedia Keyboard Cover 16 Make sure the ...
8513072 - Gateway Notebook Reference Guide R1
Page 3
... 1: About This Reference 1 About this guide 2 Accessing your online User Guide 2 Gateway contact information 2 Contacting Gateway Customer Care 2 Gateway model and serial number 2 Microsoft Certificate of Authenticity 3 For more information 3 Chapter 2: Checking Out Your Notebook . . . . . 5 Front 6 Left 7 Right 8 Back 9 Bottom 10 Keyboard area 11 LCD panel 12 Chapter 3: Setting Up and Getting Started . . 13... your notebook 19 Waking up your notebook 21 Turning off your notebook 21 Restarting (rebooting) your notebook 22 Using the status indicators 23 Using the keyboard 24 i
... 1: About This Reference 1 About this guide 2 Accessing your online User Guide 2 Gateway contact information 2 Contacting Gateway Customer Care 2 Gateway model and serial number 2 Microsoft Certificate of Authenticity 3 For more information 3 Chapter 2: Checking Out Your Notebook . . . . . 5 Front 6 Left 7 Right 8 Back 9 Bottom 10 Keyboard area 11 LCD panel 12 Chapter 3: Setting Up and Getting Started . . 13... your notebook 19 Waking up your notebook 21 Turning off your notebook 21 Restarting (rebooting) your notebook 22 Using the status indicators 23 Using the keyboard 24 i

8513072 - Gateway Notebook Reference Guide R1
Page 5
www.gateway.com Connecting an IEEE 1394 device 61 Viewing the display on a projector, monitor, or television . 62 Adjusting the display properties 64 Using the projector or ... Power 81 Additional tips 81 Chapter 7: Maintaining Your Notebook . . . . . 83 Caring for your notebook 84 Cleaning your notebook 84 Cleaning the exterior 85 Cleaning the keyboard 85 Cleaning the notebook screen 85 Maintaining the battery 86 Storing batteries 86 Cleaning CDs or DVDs 87 iii
www.gateway.com Connecting an IEEE 1394 device 61 Viewing the display on a projector, monitor, or television . 62 Adjusting the display properties 64 Using the projector or ... Power 81 Additional tips 81 Chapter 7: Maintaining Your Notebook . . . . . 83 Caring for your notebook 84 Cleaning your notebook 84 Cleaning the exterior 85 Cleaning the keyboard 85 Cleaning the notebook screen 85 Maintaining the battery 86 Storing batteries 86 Cleaning CDs or DVDs 87 iii
8513072 - Gateway Notebook Reference Guide R1
Page 6
... Diskette drive (external 113 Display 114 DVD drives 115 Ethernet 117 Express Cards 117 File management 117 Fingerprint reader 118 Hard drive 118 Internet 119 Keyboard 120 Media Center 121 Memory 124 Memory card reader 125 Modem (cable or DSL 125 Modem (dial-up 125 Mouse 128 Networks (wired 129 Networks...
... Diskette drive (external 113 Display 114 DVD drives 115 Ethernet 117 Express Cards 117 File management 117 Fingerprint reader 118 Hard drive 118 Internet 119 Keyboard 120 Media Center 121 Memory 124 Memory card reader 125 Modem (cable or DSL 125 Modem (dial-up 125 Mouse 128 Networks (wired 129 Networks...

8513072 - Gateway Notebook Reference Guide R1
Page 15
... so air vents are blocked, the notebook may overheat resulting in unexpected shutdown or permanent damage to the notebook. Left www.gateway.com Kensington lock slot USB ports Ventilation fan DVD drive Component Icon Description Kensington™ lock slot Secure your notebook, examine the... on page 50. 7 USB ports Ventilation fan DVD drive Plug USB devices (such as a diskette drive, flash drive, printer, scanner, camera, keyboard, or mouse) into this slot. If the air vents are not obstructed. Helps cool internal components. For more information, see "Using the DVD ...
... so air vents are blocked, the notebook may overheat resulting in unexpected shutdown or permanent damage to the notebook. Left www.gateway.com Kensington lock slot USB ports Ventilation fan DVD drive Component Icon Description Kensington™ lock slot Secure your notebook, examine the... on page 50. 7 USB ports Ventilation fan DVD drive Plug USB devices (such as a diskette drive, flash drive, printer, scanner, camera, keyboard, or mouse) into this slot. If the air vents are not obstructed. Helps cool internal components. For more information, see "Using the DVD ...
8513072 - Gateway Notebook Reference Guide R1
Page 16
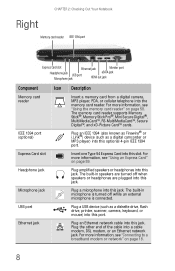
..." on page 58. Plug an IEEE 1394 (also known as Firewire® or i.Link®) device (such as a diskette drive, flash drive, printer, scanner, camera, keyboard, or mouse) into this slot. Plug an Ethernet network cable into this jack. CHAPTER 2: Checking Out Your Notebook Right Memory card reader IEEE 1394 port...
..." on page 58. Plug an IEEE 1394 (also known as Firewire® or i.Link®) device (such as a diskette drive, flash drive, printer, scanner, camera, keyboard, or mouse) into this slot. Plug an Ethernet network cable into this jack. CHAPTER 2: Checking Out Your Notebook Right Memory card reader IEEE 1394 port...
8513072 - Gateway Notebook Reference Guide R1
Page 19
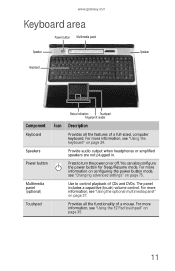
...button for Sleep/Resume mode. For more information, see "Using the EZ Pad touchpad" on page 24. For more information, see "Using the keyboard" on page 35. 11 Power button Press to control playback of CDs and DVDs. Multimedia panel (optional) Use to turn the power on page...button mode, see "Using the optional multimedia panel" on or off. For more information, see "Changing advanced settings" on page 75. www.gateway.com Keyboard area Power button Multimedia panel Speaker Speaker Keyboard Status indicators Touchpad Fingerprint reader Component Icon Description...
...button for Sleep/Resume mode. For more information, see "Using the EZ Pad touchpad" on page 24. For more information, see "Using the keyboard" on page 35. 11 Power button Press to control playback of CDs and DVDs. Multimedia panel (optional) Use to turn the power on page...button mode, see "Using the optional multimedia panel" on or off. For more information, see "Changing advanced settings" on page 75. www.gateway.com Keyboard area Power button Multimedia panel Speaker Speaker Keyboard Status indicators Touchpad Fingerprint reader Component Icon Description...
8513072 - Gateway Notebook Reference Guide R1
Page 20
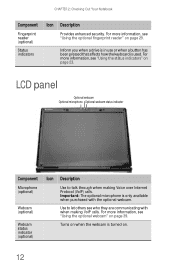
... information, see "Using the status indicators" on . 12 Inform you when a drive is in use or when a button has been pressed that affects how the keyboard is only available when purchased with when making Voice over Internet Protocol (VoIP) calls. Turns on when the webcam is turned on page 23. LCD...
... information, see "Using the status indicators" on . 12 Inform you when a drive is in use or when a button has been pressed that affects how the keyboard is only available when purchased with when making Voice over Internet Protocol (VoIP) calls. Turns on when the webcam is turned on page 23. LCD...
8513072 - Gateway Notebook Reference Guide R1
Page 21
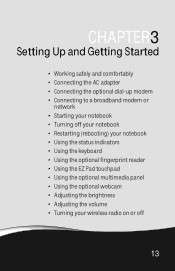
... modem or network • Starting your notebook • Turning off your notebook • Restarting (rebooting) your notebook • Using the status indicators • Using the keyboard • Using the optional fingerprint reader • Using the EZ Pad touchpad • Using the optional multimedia panel • Using the optional webcam • Adjusting...
... modem or network • Starting your notebook • Turning off your notebook • Restarting (rebooting) your notebook • Using the status indicators • Using the keyboard • Using the optional fingerprint reader • Using the EZ Pad touchpad • Using the optional multimedia panel • Using the optional webcam • Adjusting...
8513072 - Gateway Notebook Reference Guide R1
Page 22
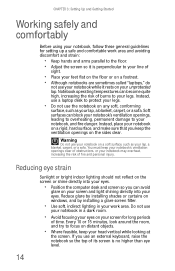
... of sight. • Place your feet flat on the floor or on a footrest. • Although notebooks are sometimes called "laptops," do not use an external keyboard, raise the notebook so the top of burns to your lap, a blanket, carpet, or a sofa. Every 10 or 15 minutes, look around the room, and...
... of sight. • Place your feet flat on the floor or on a footrest. • Although notebooks are sometimes called "laptops," do not use an external keyboard, raise the notebook so the top of burns to your lap, a blanket, carpet, or a sofa. Every 10 or 15 minutes, look around the room, and...
8513072 - Gateway Notebook Reference Guide R1
Page 23
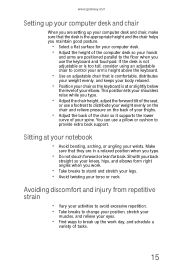
...arching, or angling your wrists. Make sure that is comfortable, distributes your weight evenly, and keeps your body relaxed. • Position your chair so the keyboard is the appropriate height and the chair helps you maintain good posture. • Select a flat surface for your computer desk. • Adjust the height of... relieve pressure on the back of your thighs. • Adjust the back of the chair so it supports the lower curve of your elbow. www.gateway.com Setting up your computer desk and chair When you are setting up the work . • Take breaks to stand and stretch your legs. ...
...arching, or angling your wrists. Make sure that is comfortable, distributes your weight evenly, and keeps your body relaxed. • Position your chair so the keyboard is the appropriate height and the chair helps you maintain good posture. • Select a flat surface for your computer desk. • Adjust the height of... relieve pressure on the back of your thighs. • Adjust the back of the chair so it supports the lower curve of your elbow. www.gateway.com Setting up your computer desk and chair When you are setting up the work . • Take breaks to stand and stretch your legs. ...

8513072 - Gateway Notebook Reference Guide R1
Page 28
..., follow the on any peripheral devices, such as printers, scanners, and speakers. CHAPTER 3: Setting Up and Getting Started 2 Press the power button located above the keyboard. From that came with each device for its setup instructions. 5 To open the main menu, click (Start). Tip See the documentation that menu, you are...
..., follow the on any peripheral devices, such as printers, scanners, and speakers. CHAPTER 3: Setting Up and Getting Started 2 Press the power button located above the keyboard. From that came with each device for its setup instructions. 5 To open the main menu, click (Start). Tip See the documentation that menu, you are...

8513072 - Gateway Notebook Reference Guide R1
Page 30
... turn off immediately, complete the following steps until the notebook turns off . The notebook turns off, then turns on your notebook does not respond to keyboard, touchpad, or mouse input, you may have to normal operation, you cannot use the Shut Down option in the top-right corner of the Windows...
... turn off immediately, complete the following steps until the notebook turns off . The notebook turns off, then turns on your notebook does not respond to keyboard, touchpad, or mouse input, you may have to normal operation, you cannot use the Shut Down option in the top-right corner of the Windows...
8513072 - Gateway Notebook Reference Guide R1
Page 31
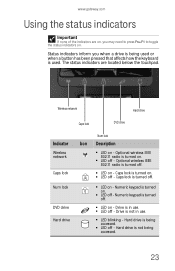
....11 radio is turned off - Numeric keypad is turned on - Hard drive is being used or when a button has been pressed that affects how the keyboard is not in use . ■ LED blinking - A ■ LED off - Drive is used. Optional wireless IEEE 802.11 radio is being accessed. &#...9632; LED off . ■ LED on - The status indicators are on, you when a drive is turned off - www.gateway.com Using the status indicators Important If none of the indicators are located below the touchpad. Status indicators inform you may need to press FN...
....11 radio is turned off - Numeric keypad is turned on - Hard drive is being used or when a button has been pressed that affects how the keyboard is not in use . ■ LED blinking - A ■ LED off - Drive is used. Optional wireless IEEE 802.11 radio is being accessed. &#...9632; LED off . ■ LED on - The status indicators are on, you when a drive is turned off - www.gateway.com Using the status indicators Important If none of the indicators are located below the touchpad. Status indicators inform you may need to press FN...
8513072 - Gateway Notebook Reference Guide R1
Page 32
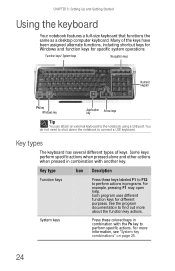
... program documentation to perform specific actions. CHAPTER 3: Setting Up and Getting Started Using the keyboard Your notebook features a full-size keyboard that functions the same as a desktop computer keyboard. System keys Press these keys labeled F1 to F12 to perform actions in programs. For...System keys Navigation keys Numeric keypad FN key Windows key Application key Arrow keys Tip You can attach an external keyboard to connect a USB keyboard. Each program uses different function keys for specific system operations. Some keys perform specific actions when pressed alone ...
... program documentation to perform specific actions. CHAPTER 3: Setting Up and Getting Started Using the keyboard Your notebook features a full-size keyboard that functions the same as a desktop computer keyboard. System keys Press these keys labeled F1 to F12 to perform actions in programs. For...System keys Navigation keys Numeric keypad FN key Windows key Application key Arrow keys Tip You can attach an external keyboard to connect a USB keyboard. Each program uses different function keys for specific system operations. Some keys perform specific actions when pressed alone ...
8513072 - Gateway Notebook Reference Guide R1
Page 50
... about using an Internet chat service, see "Using the Windows Mobility Center" in the Camera Assistant. For more information, see "System key combinations" on the keyboard. Adjusting the volume You can use the volume control to the desired screen brightness. Adjusting the brightness To adjust screen brightness: • Use the increase...
... about using an Internet chat service, see "Using the Windows Mobility Center" in the Camera Assistant. For more information, see "System key combinations" on the keyboard. Adjusting the volume You can use the volume control to the desired screen brightness. Adjusting the brightness To adjust screen brightness: • Use the increase...


