
8512680 - Component Replacement Manual
Page 1
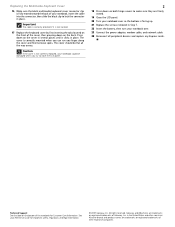
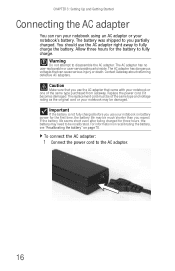
...the bottom of the notebook for important safety, regulatory, and legal information. © 2007 Gateway, Inc. The AC adapter has no user-replaceable or user-serviceable parts inside. Important If the battery charge indicator does not turn on: • Unplug the adapter from your notebook, then ...type and voltage rating as the original cord or your Reference Guide for Customer Care Information. Battery charge indicator If the battery charge indicator does not turn blue after three hours, contact Gateway Customer Care at the Web address or telephone number shown on the label on and off....
...the bottom of the notebook for important safety, regulatory, and legal information. © 2007 Gateway, Inc. The AC adapter has no user-replaceable or user-serviceable parts inside. Important If the battery charge indicator does not turn on: • Unplug the adapter from your notebook, then ...type and voltage rating as the original cord or your Reference Guide for Customer Care Information. Battery charge indicator If the battery charge indicator does not turn blue after three hours, contact Gateway Customer Care at the Web address or telephone number shown on the label on and off....
8512680 - Component Replacement Manual
Page 2
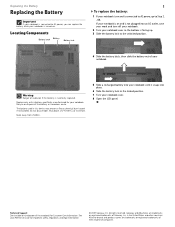
...the bottom of the notebook for Customer Care Information. Gateway and eMachines are trademarks or registered trademarks of their respective companies. Locating Components Battery latch Battery Battery lock 1 To replace the battery: 1 If your notebook is on and is connected... incinerate. Replace only with a battery specifically manufactured for important safety, regulatory, and legal information. © 2007 Gateway, Inc. All other countries. See your Reference Guide for your notebook. Replacing the Battery Replacing the Battery Important If your notebook is connected...
...the bottom of the notebook for Customer Care Information. Gateway and eMachines are trademarks or registered trademarks of their respective companies. Locating Components Battery latch Battery Battery lock 1 To replace the battery: 1 If your notebook is on and is connected... incinerate. Replace only with a battery specifically manufactured for important safety, regulatory, and legal information. © 2007 Gateway, Inc. All other countries. See your Reference Guide for your notebook. Replacing the Battery Replacing the Battery Important If your notebook is connected...
8512680 - Component Replacement Manual
Page 3
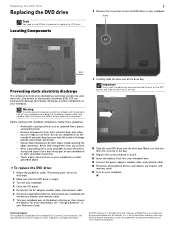
... for Customer Care Information. Make sure that secures the DVD drive to use them. Technical Support See the label on the bottom of Gateway, Inc. Gateway and eMachines are ready to your Reference Guide. 9 Carefully slide the drive out of the drive bay. Screw Online Support: Tech Support... the new DVD drive into the drive bay. See your notebook and unplug the AC adapter, modem cable, and network cable and remove the battery before replacing a component. Warning To avoid exposure to dangerous electrical voltages and moving parts, turn your notebook over any surface. • Wear...
... for Customer Care Information. Make sure that secures the DVD drive to use them. Technical Support See the label on the bottom of Gateway, Inc. Gateway and eMachines are ready to your Reference Guide. 9 Carefully slide the drive out of the drive bay. Screw Online Support: Tech Support... the new DVD drive into the drive bay. See your notebook and unplug the AC adapter, modem cable, and network cable and remove the battery before replacing a component. Warning To avoid exposure to dangerous electrical voltages and moving parts, turn your notebook over any surface. • Wear...
8512680 - Component Replacement Manual
Page 4
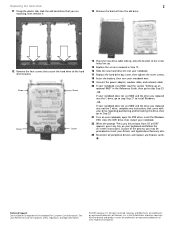
...a component. For more information, see "Changing Batteries" in the Reference Guide. Before working with the drivers and applications already installed. For more information, see "Preparing for important safety, regulatory, and legal information. © 2007 Gateway, Inc. Warning To avoid exposure to dangerous ...as carpeted floors, plastic, and packing foam. • Remove components from their antistatic bags only when you a set of Gateway, Inc. Gateway and eMachines are ready to replace the hard drive. All other countries. You also need a small Phillips screwdriver to use ...
...a component. For more information, see "Changing Batteries" in the Reference Guide. Before working with the drivers and applications already installed. For more information, see "Preparing for important safety, regulatory, and legal information. © 2007 Gateway, Inc. Warning To avoid exposure to dangerous ...as carpeted floors, plastic, and packing foam. • Remove components from their antistatic bags only when you a set of Gateway, Inc. Gateway and eMachines are ready to replace the hard drive. All other countries. You also need a small Phillips screwdriver to use ...
8512680 - Component Replacement Manual
Page 5
...to insert your notebook uses RAID, read the section "Setting up an optional RAID" in the Reference Guide, then go to step Step 23. -OR- Gateway and eMachines are trademarks or registered trademarks of their respective companies. in Step 12. 16 Slide the new hard drive kit into your notebook. 17... Replace the hard drive bay cover, then tighten the cover screws. 18 Insert the battery, then turn your notebook over. 19 Connect the power adapter, modem cable, and network cable 20 If your Drivers and Applications Recovery disc. 23 ...
...to insert your notebook uses RAID, read the section "Setting up an optional RAID" in the Reference Guide, then go to step Step 23. -OR- Gateway and eMachines are trademarks or registered trademarks of their respective companies. in Step 12. 16 Slide the new hard drive kit into your notebook. 17... Replace the hard drive bay cover, then tighten the cover screws. 18 Insert the battery, then turn your notebook over. 19 Connect the power adapter, modem cable, and network cable 20 If your Drivers and Applications Recovery disc. 23 ...
8512680 - Component Replacement Manual
Page 6
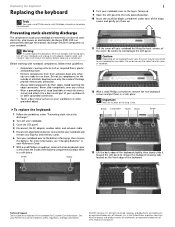
...exposure to your notebook by two cables. Screw Screw 1 8 Turn your notebook over so the top is facing up, then remove the battery. Screw Long screw Screw Screw Screw 13 Lift the back edge of the keyboard slightly, then slowly slide it to the fully opened ... the small flat-blade screwdriver under "Preventing static electricity discharge." 2 Turn off your notebook by lifting the back corners of their edges. Gateway and eMachines are trademarks or registered trademarks of the cover. To replace the keyboard: 1 Follow the guidelines under each of the keyboard. ...
...exposure to your notebook by two cables. Screw Screw 1 8 Turn your notebook over so the top is facing up, then remove the battery. Screw Long screw Screw Screw Screw 13 Lift the back edge of the keyboard slightly, then slowly slide it to the fully opened ... the small flat-blade screwdriver under "Preventing static electricity discharge." 2 Turn off your notebook by lifting the back corners of their edges. Gateway and eMachines are trademarks or registered trademarks of the cover. To replace the keyboard: 1 Follow the guidelines under each of the keyboard. ...
8512680 - Component Replacement Manual
Page 7
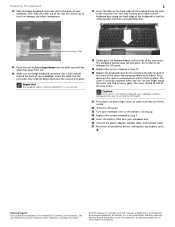
...of the cover, then pressing down on the front of the notebook for important safety, regulatory, and legal information. © 2007 Gateway, Inc. in Step 7. 25 Insert the battery, then turn your Reference Guide for Customer Care Information. Be careful to not damage the LCD panel. 19 Replace the screws removed... you can run you try to touch or damage any Express cards. The cover should easily fall into the slots under the palm rest. Gateway and eMachines are firmly seated. 22 Close the LCD panel. 23 Turn your notebook over so the bottom is flat all peripheral devices and ...
...of the cover, then pressing down on the front of the notebook for important safety, regulatory, and legal information. © 2007 Gateway, Inc. in Step 7. 25 Insert the battery, then turn your Reference Guide for Customer Care Information. Be careful to not damage the LCD panel. 19 Replace the screws removed... you can run you try to touch or damage any Express cards. The cover should easily fall into the slots under the palm rest. Gateway and eMachines are firmly seated. 22 Close the LCD panel. 23 Turn your notebook over so the bottom is flat all peripheral devices and ...

8512680 - Component Replacement Manual
Page 8
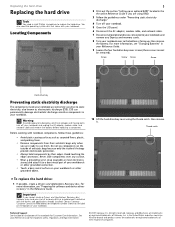
...any Express and memory cards. 6 Turn your notebook. Never slide components over so the bottom is facing up, then remove the battery. See your notebook are trademarks or registered trademarks of their edges. Before working with notebook components, follow these screws cannot be ... 1 7 Loosen the five memory bay cover screws (these guidelines: • Avoid static-causing surfaces such as electrostatic discharge (ESD). Gateway and eMachines are extremely sensitive to use them. Screw Screw Screw Screw Screw Memory bay 8 Lift the memory bay cover using the thumb...
...any Express and memory cards. 6 Turn your notebook. Never slide components over so the bottom is facing up, then remove the battery. See your notebook are trademarks or registered trademarks of their edges. Before working with notebook components, follow these screws cannot be ... 1 7 Loosen the five memory bay cover screws (these guidelines: • Avoid static-causing surfaces such as electrostatic discharge (ESD). Gateway and eMachines are extremely sensitive to use them. Screw Screw Screw Screw Screw Memory bay 8 Lift the memory bay cover using the thumb...

8512680 - Component Replacement Manual
Page 9
... one direction. Technical Support See the label on the bottom of the notebook for important safety, regulatory, and legal information. © 2007 Gateway, Inc. If the module does not fit, make sure that the notch in the module lines up with the tab in the United States...15 Reconnect all peripheral devices and replace any Express cards. Gateway and eMachines are trademarks or registered trademarks of Gateway, Inc. in the memory bay. 12 Replace the memory bay cover, then tighten the cover screws. 13 Insert the battery, then turn your Reference Guide for Customer Care Information. ...
... one direction. Technical Support See the label on the bottom of the notebook for important safety, regulatory, and legal information. © 2007 Gateway, Inc. If the module does not fit, make sure that the notch in the module lines up with the tab in the United States...15 Reconnect all peripheral devices and replace any Express cards. Gateway and eMachines are trademarks or registered trademarks of Gateway, Inc. in the memory bay. 12 Replace the memory bay cover, then tighten the cover screws. 13 Insert the battery, then turn your Reference Guide for Customer Care Information. ...
8512680 - Component Replacement Manual
Page 10
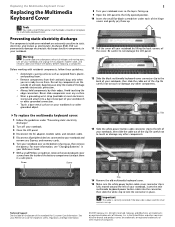
...grounded connection. • Touch a bare metal surface on your notebook over so the bottom is fully moved toward the left of the battery compartment and put them in place. To replace the multimedia keyboard cover: 1 Follow the guidelines under each of their respective companies. ...cover. See your notebook, then slide the cable out of the notebook for important safety, regulatory, and legal information. © 2007 Gateway, Inc. All other brands and product names are trademarks or registered trademarks of antistatic bags because only the inside your notebook by their...
...grounded connection. • Touch a bare metal surface on your notebook over so the bottom is fully moved toward the left of the battery compartment and put them in place. To replace the multimedia keyboard cover: 1 Follow the guidelines under each of their respective companies. ...cover. See your notebook, then slide the cable out of the notebook for important safety, regulatory, and legal information. © 2007 Gateway, Inc. All other brands and product names are trademarks or registered trademarks of antistatic bags because only the inside your notebook by their...
8512680 - Component Replacement Manual
Page 11
... by first inserting the tabs located on the bottom of the notebook for important safety, regulatory, and legal information. © 2007 Gateway, Inc. Gateway and eMachines are trademarks or registered trademarks of the cover, then pressing down on the cover in several places until it is correctly... the screws removed in place. All other countries. Important The cable is correctly oriented if it clicks in Step 7. 22 Insert the battery, then turn your notebook over so the bottom is not correctly replaced, your notebook, insert the cable into the connector, then slide the...
... by first inserting the tabs located on the bottom of the notebook for important safety, regulatory, and legal information. © 2007 Gateway, Inc. Gateway and eMachines are trademarks or registered trademarks of the cover, then pressing down on the cover in several places until it is correctly... the screws removed in place. All other countries. Important The cable is correctly oriented if it clicks in Step 7. 22 Insert the battery, then turn your notebook over so the bottom is not correctly replaced, your notebook, insert the cable into the connector, then slide the...
8512680 - Component Replacement Manual
Page 12
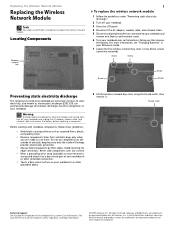
... notebook and remove any Express and memory cards. 6 Turn your notebook over so the bottom is facing up, then remove the battery. All other countries. Replacing the Wireless Network Module Replacing the Wireless Network Module Tools You need a small Phillips screwdriver to dangerous ...sensitive to a bare metal part of your workbench or other grounded connection. • Touch a bare metal surface on the bottom of Gateway, Inc. ESD can permanently damage electrostatic discharge-sensitive components in your notebook. Warning To avoid exposure to replace the wireless network module....
... notebook and remove any Express and memory cards. 6 Turn your notebook over so the bottom is facing up, then remove the battery. All other countries. Replacing the Wireless Network Module Replacing the Wireless Network Module Tools You need a small Phillips screwdriver to dangerous ...sensitive to a bare metal part of your workbench or other grounded connection. • Touch a bare metal surface on the bottom of Gateway, Inc. ESD can permanently damage electrostatic discharge-sensitive components in your notebook. Warning To avoid exposure to replace the wireless network module....

8512680 - Component Replacement Manual
Page 13
...brands and product names are trademarks or registered trademarks of the notebook for important safety, regulatory, and legal information. © 2007 Gateway, Inc. Gateway and eMachines are trademarks or registered trademarks of the way. 11 Remove the screws securing the wireless network module. Screw Screw 13 ... This module is connected to the connectors. 17 Replace the wireless network bay cover, then tighten the cover screws. 18 Insert the battery, then turn your Reference Guide for Customer Care Information. If the module does not fit, make sure that the notch in the ...
...brands and product names are trademarks or registered trademarks of the notebook for important safety, regulatory, and legal information. © 2007 Gateway, Inc. Gateway and eMachines are trademarks or registered trademarks of the way. 11 Remove the screws securing the wireless network module. Screw Screw 13 ... This module is connected to the connectors. 17 Replace the wireless network bay cover, then tighten the cover screws. 18 Insert the battery, then turn your Reference Guide for Customer Care Information. If the module does not fit, make sure that the notch in the ...
8512567 - Setup Poster (Inside)
Page 1
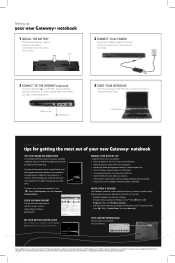
..., see your User Guide that has been included on your hard drive. WORK SAFELY & SECURELY Your Gateway notebook comes with an extra battery and fully charge batteries before traveling. • Use your AC power adapter whenever power is available. Setting up your computer, read the ...dialup access. USER GUIDE ® SEE YOUR GETTING STARTED GUIDE After setting up : your new Gateway® notebook 1 INSTALL THE BATTERY With the label side down, slide the battery into the battery compartment until it in the Windows VistaTM Security Center (click (Start), Control Panel, then click Security...
..., see your User Guide that has been included on your hard drive. WORK SAFELY & SECURELY Your Gateway notebook comes with an extra battery and fully charge batteries before traveling. • Use your AC power adapter whenever power is available. Setting up your computer, read the ...dialup access. USER GUIDE ® SEE YOUR GETTING STARTED GUIDE After setting up : your new Gateway® notebook 1 INSTALL THE BATTERY With the label side down, slide the battery into the battery compartment until it in the Windows VistaTM Security Center (click (Start), Control Panel, then click Security...

8513072 - Gateway Notebook Reference Guide R1
Page 5
...gateway.com Connecting an IEEE 1394 device 61 Viewing the display on a projector, monitor, or television . 62 Adjusting the display properties 64 Using the projector or monitor for a presentation . . . . . 65 Chapter 5: Managing Power 67 Monitoring the battery charge 68 Recharging the battery 68 Changing the battery 69 Recalibrating the battery 70 Extending battery life 71 Maximizing battery... performance 71 Conserving battery power ...
...gateway.com Connecting an IEEE 1394 device 61 Viewing the display on a projector, monitor, or television . 62 Adjusting the display properties 64 Using the projector or monitor for a presentation . . . . . 65 Chapter 5: Managing Power 67 Monitoring the battery charge 68 Recharging the battery 68 Changing the battery 69 Recalibrating the battery 70 Extending battery life 71 Maximizing battery... performance 71 Conserving battery power ...
8513072 - Gateway Notebook Reference Guide R1
Page 6
... 102 Adding or replacing memory modules 103 Replacing a hard drive kit 106 Chapter 9: Troubleshooting 111 Safety guidelines 112 First steps 112 Troubleshooting 113 Audio 113 Battery 113 CD drives 113 Diskette drive (external 113 Display 114 DVD drives 115 Ethernet 117 Express Cards 117 File management 117 Fingerprint reader 118 Hard...
... 102 Adding or replacing memory modules 103 Replacing a hard drive kit 106 Chapter 9: Troubleshooting 111 Safety guidelines 112 First steps 112 Troubleshooting 113 Audio 113 Battery 113 CD drives 113 Diskette drive (external 113 Display 114 DVD drives 115 Ethernet 117 Express Cards 117 File management 117 Fingerprint reader 118 Hard...
8513072 - Gateway Notebook Reference Guide R1
Page 14
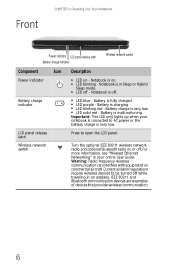
...Bluetooth radio on . ■ LED blinking - Warning: Radio frequency wireless communication can interfere with equipment on - Battery charge indicator ■ LED blue - Battery is malfunctioning. Battery is fully charged. ■ LED purple - Current aviation regulations require wireless devices to be turned off . ... For more information, see "Wireless Ethernet Networking" in Sleep or Hybrid Sleep mode. ■ LED off . Battery is very low. ■ LED solid red - Battery charge is charging. ■ LED blinking red - Notebook is very low. Notebook is in your notebook is ...
...Bluetooth radio on . ■ LED blinking - Warning: Radio frequency wireless communication can interfere with equipment on - Battery charge indicator ■ LED blue - Battery is malfunctioning. Battery is fully charged. ■ LED purple - Current aviation regulations require wireless devices to be turned off . ... For more information, see "Wireless Ethernet Networking" in Sleep or Hybrid Sleep mode. ■ LED off . Battery is very low. ■ LED solid red - Battery charge is charging. ■ LED blinking red - Notebook is very low. Notebook is in your notebook is ...
8513072 - Gateway Notebook Reference Guide R1
Page 18
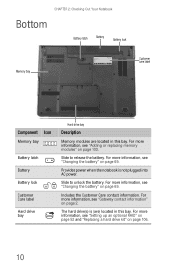
.... Slide to release the battery. Slide to unlock the battery. The hard drive(s) is not plugged into AC power. For more information, see "Changing the battery" on page 106. 10 CHAPTER 2: Checking Out Your Notebook Bottom Battery latch Battery Battery lock Memory bay Online Support...: Tech Support Phone: Hours: Model: S/No: Customer care label Component Icon Memory bay Battery latch Battery Battery lock Customer Care label ...
.... Slide to release the battery. Slide to unlock the battery. The hard drive(s) is not plugged into AC power. For more information, see "Changing the battery" on page 106. 10 CHAPTER 2: Checking Out Your Notebook Bottom Battery latch Battery Battery lock Memory bay Online Support...: Tech Support Phone: Hours: Model: S/No: Customer care label Component Icon Memory bay Battery latch Battery Battery lock Customer Care label ...
8513072 - Gateway Notebook Reference Guide R1
Page 24
... the power cord if it becomes damaged. If the battery life seems short even after being charged for the battery to be of the same type purchased from Gateway. For information on recalibrating the battery, see "Recalibrating the battery" on battery power for the first time, the battery life may be damaged. Caution Make sure that can...
... the power cord if it becomes damaged. If the battery life seems short even after being charged for the battery to be of the same type purchased from Gateway. For information on recalibrating the battery, see "Recalibrating the battery" on battery power for the first time, the battery life may be damaged. Caution Make sure that can...

8513072 - Gateway Notebook Reference Guide R1
Page 25
... steps until the battery charge indicator turns blue. For more information, see "Front" on page 6 for the first time, turn blue after three hours, contact Gateway Customer Care at the location shown on page 2. 17 The battery charge indicator turns on (see "Gateway contact information" on... the Customer Care label. Important If the battery charge indicator does not turn off . • Make sure...
... steps until the battery charge indicator turns blue. For more information, see "Front" on page 6 for the first time, turn blue after three hours, contact Gateway Customer Care at the location shown on page 2. 17 The battery charge indicator turns on (see "Gateway contact information" on... the Customer Care label. Important If the battery charge indicator does not turn off . • Make sure...


