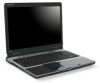

8512680 - Component Replacement Manual
Page 1
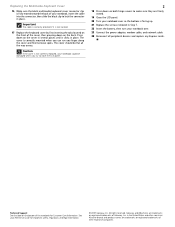
.... Important If the battery charge indicator does not turn on: • Unplug the adapter from your notebook's power connector. 1 3 Plug the power cord into a different wall outlet. Gateway and eMachines are trademarks or registered trademarks of Gateway, Inc. All rights reserved. All other countries. Battery charge indicator If the battery charge indicator does...
.... Important If the battery charge indicator does not turn on: • Unplug the adapter from your notebook's power connector. 1 3 Plug the power cord into a different wall outlet. Gateway and eMachines are trademarks or registered trademarks of Gateway, Inc. All rights reserved. All other countries. Battery charge indicator If the battery charge indicator does...
8512680 - Component Replacement Manual
Page 2
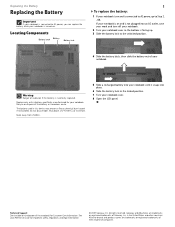
... Battery Replacing the Battery Important If your notebook is connected to AC power, you can replace the battery while your notebook is turned on the bottom of the notebook for important safety, regulatory, and legal information. © 2007 Gateway, Inc. Locating Components Battery latch Battery ...Battery lock 1 To replace the battery: 1 If your notebook is on and is connected ...
... Battery Replacing the Battery Important If your notebook is connected to AC power, you can replace the battery while your notebook is turned on the bottom of the notebook for important safety, regulatory, and legal information. © 2007 Gateway, Inc. Locating Components Battery latch Battery ...Battery lock 1 To replace the battery: 1 If your notebook is on and is connected ...
8512680 - Component Replacement Manual
Page 3
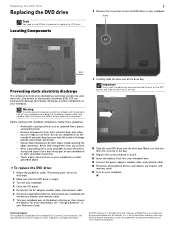
...carpeted floors, plastic, and packing foam. • Remove components from their edges. Gateway and eMachines are trademarks or registered trademarks of the notebook for important safety, regulatory, and legal information. © 2007 Gateway, Inc. Avoid touching the edge connectors. To replace the DVD drive: 1 Follow... on the DVD bracket and slide the drive out of antistatic bags because only the inside your notebook are extremely sensitive to a bare metal part of Gateway, Inc. in your workbench or other brands and product names are trademarks or registered trademarks of ...
...carpeted floors, plastic, and packing foam. • Remove components from their edges. Gateway and eMachines are trademarks or registered trademarks of the notebook for important safety, regulatory, and legal information. © 2007 Gateway, Inc. Avoid touching the edge connectors. To replace the DVD drive: 1 Follow... on the DVD bracket and slide the drive out of antistatic bags because only the inside your notebook are extremely sensitive to a bare metal part of Gateway, Inc. in your workbench or other brands and product names are trademarks or registered trademarks of ...
8512680 - Component Replacement Manual
Page 4
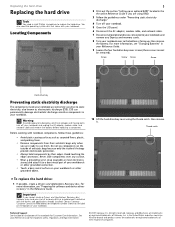
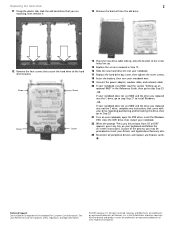
...grounded connection. • Touch a bare metal surface on the outside of your notebook. Thumb notch To replace the hard drive: 1 If possible, create a Drivers and Applications Recovery disc. Gateway and eMachines are trademarks or registered trademarks of your workbench or other grounded object...drive Replacing the hard drive Tools You need the operating system disc that came with your notebook. For more information, see "Changing Batteries" in the Reference Guide. Contact Gateway Customer Care at most electronics stores) and attach it . ESD can permanently damage electrostatic...
...grounded connection. • Touch a bare metal surface on the outside of your notebook. Thumb notch To replace the hard drive: 1 If possible, create a Drivers and Applications Recovery disc. Gateway and eMachines are trademarks or registered trademarks of your workbench or other grounded object...drive Replacing the hard drive Tools You need the operating system disc that came with your notebook. For more information, see "Changing Batteries" in the Reference Guide. Contact Gateway Customer Care at most electronics stores) and attach it . ESD can permanently damage electrostatic...
8512680 - Component Replacement Manual
Page 5
As part of Gateway, Inc. See your notebook uses RAID, read the section "Setting up an optional RAID" in the United States and other brands and product names are trademarks or registered trademarks ... RAID and the drive you replaced was the C drive, go to install Windows. -OR- Gateway and eMachines are trademarks or registered trademarks of the notebook for important safety, regulatory, and legal information. © 2007 Gateway, Inc. If your notebook does not use RAID and the drive you may be prompted to the hard drive...
As part of Gateway, Inc. See your notebook uses RAID, read the section "Setting up an optional RAID" in the United States and other brands and product names are trademarks or registered trademarks ... RAID and the drive you replaced was the C drive, go to install Windows. -OR- Gateway and eMachines are trademarks or registered trademarks of the notebook for important safety, regulatory, and legal information. © 2007 Gateway, Inc. If your notebook does not use RAID and the drive you may be prompted to the hard drive...
8512680 - Component Replacement Manual
Page 6
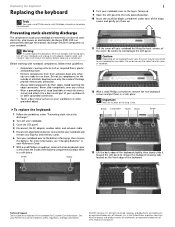
... battery compartment and put them in the United States and other countries. Important Note the location of the notebook for important safety, regulatory, and legal information. © 2007 Gateway, Inc. Technical Support See the label on the bottom of the long screw. in a safe place..... All other grounded object. Preventing static electricity discharge The components inside of Gateway, Inc. Screw Screw 1 8 Turn your notebook over so the bottom is facing up . 11 Pull the cover off your notebook and unplug the AC adapter, modem cable, and network cable and remove ...
... battery compartment and put them in the United States and other countries. Important Note the location of the notebook for important safety, regulatory, and legal information. © 2007 Gateway, Inc. Technical Support See the label on the bottom of the long screw. in a safe place..... All other grounded object. Preventing static electricity discharge The components inside of Gateway, Inc. Screw Screw 1 8 Turn your notebook over so the bottom is facing up . 11 Pull the cover off your notebook and unplug the AC adapter, modem cable, and network cable and remove ...
8512680 - Component Replacement Manual
Page 7
...facing up. 24 Replace the screws removed in Step 7. 25 Insert the battery, then turn your notebook over so the bottom is fully moved toward the back of the clip. Gateway and eMachines are trademarks or registered trademarks of the keyboard to seat the retaining tabs into their respective... in several places until it clicks in place. Clip 15 Place the new keyboard keys-down on the front of the notebook for important safety, regulatory, and legal information. © 2007 Gateway, Inc. Replacing the keyboard 14 Slide the beige keyboard connector clip to the back of your...
...facing up. 24 Replace the screws removed in Step 7. 25 Insert the battery, then turn your notebook over so the bottom is fully moved toward the back of the clip. Gateway and eMachines are trademarks or registered trademarks of the keyboard to seat the retaining tabs into their respective... in several places until it clicks in place. Clip 15 Place the new keyboard keys-down on the front of the notebook for important safety, regulatory, and legal information. © 2007 Gateway, Inc. Replacing the keyboard 14 Slide the beige keyboard connector clip to the back of your...

8512680 - Component Replacement Manual
Page 8
... these screws cannot be removed). Thumb notch Preventing static electricity discharge The components inside of the notebook for important safety, regulatory, and legal information. © 2007 Gateway, Inc. Gateway and eMachines are trademarks or registered trademarks of Gateway, Inc. ESD can permanently damage electrostatic discharge-sensitive components in the United States and other brands...
... these screws cannot be removed). Thumb notch Preventing static electricity discharge The components inside of the notebook for important safety, regulatory, and legal information. © 2007 Gateway, Inc. Gateway and eMachines are trademarks or registered trademarks of Gateway, Inc. ESD can permanently damage electrostatic discharge-sensitive components in the United States and other brands...

8512680 - Component Replacement Manual
Page 9
All other countries. Gateway and eMachines are trademarks or registered trademarks of their respective companies. If the module does not fit, make sure that the notch in the module ... and other brands and product names are trademarks or registered trademarks of Gateway, Inc. Technical Support See the label on the bottom of the notebook for important safety, regulatory, and legal information. © 2007 Gateway, Inc. All rights reserved. See your notebook over. 14 Connect the power adapter, modem cable, and network cable 15...
All other countries. Gateway and eMachines are trademarks or registered trademarks of their respective companies. If the module does not fit, make sure that the notch in the module ... and other brands and product names are trademarks or registered trademarks of Gateway, Inc. Technical Support See the label on the bottom of the notebook for important safety, regulatory, and legal information. © 2007 Gateway, Inc. All rights reserved. See your notebook over. 14 Connect the power adapter, modem cable, and network cable 15...
8512680 - Component Replacement Manual
Page 10
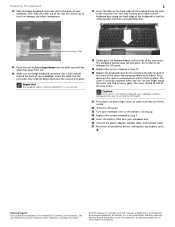
...the bags provide electrostatic protection. • Always hold components by lifting the back corners of the notebook for important safety, regulatory, and legal information. © 2007 Gateway, Inc. ESD can permanently damage electrostatic discharge-sensitive components in place. Avoid touching the edge connectors...a bare metal part of your workbench or other grounded connection. • Touch a bare metal surface on your notebook, then slide the cable out of Gateway, Inc. Clip 13 Slide the white power button cable connector clip to touch or damage any other countries. Clip...
...the bags provide electrostatic protection. • Always hold components by lifting the back corners of the notebook for important safety, regulatory, and legal information. © 2007 Gateway, Inc. ESD can permanently damage electrostatic discharge-sensitive components in place. Avoid touching the edge connectors...a bare metal part of your workbench or other grounded connection. • Touch a bare metal surface on your notebook, then slide the cable out of Gateway, Inc. Clip 13 Slide the white power button cable connector clip to touch or damage any other countries. Clip...
8512680 - Component Replacement Manual
Page 11
... cable 24 Reconnect all the way across. Caution If the cover is not correctly replaced, your notebook could be flat all peripheral devices and replace any Express cards. Gateway and eMachines are trademarks or registered trademarks of their respective companies. All other countries. Important The ...is correctly oriented if it clicks in place. Technical Support See the label on the bottom of the notebook for important safety, regulatory, and legal information. © 2007 Gateway, Inc. The cover is not twisted. 17 Replace the keyboard cover by first inserting the tabs located ...
... cable 24 Reconnect all the way across. Caution If the cover is not correctly replaced, your notebook could be flat all peripheral devices and replace any Express cards. Gateway and eMachines are trademarks or registered trademarks of their respective companies. All other countries. Important The ...is correctly oriented if it clicks in place. Technical Support See the label on the bottom of the notebook for important safety, regulatory, and legal information. © 2007 Gateway, Inc. The cover is not twisted. 17 Replace the keyboard cover by first inserting the tabs located ...
8512680 - Component Replacement Manual
Page 12
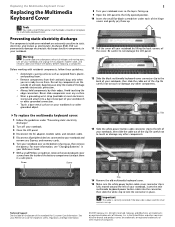
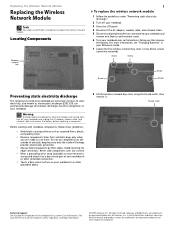
...Components Wireless network bay 1 To replace the wireless network module: 1 Follow the guidelines under "Preventing static electricity discharge." 2 Turn off your notebook. 3 Close the LCD panel. 4 Disconnect the AC adapter, modem cable, and network cable. 5 Disconnect all peripheral devices connected to ... bottom of antistatic bags because only the inside your notebook. Thumb notch Technical Support See the label on the outside of the notebook for important safety, regulatory, and legal information. © 2007 Gateway, Inc. Screw Screw Screw Screw Screw Preventing static ...
...Components Wireless network bay 1 To replace the wireless network module: 1 Follow the guidelines under "Preventing static electricity discharge." 2 Turn off your notebook. 3 Close the LCD panel. 4 Disconnect the AC adapter, modem cable, and network cable. 5 Disconnect all peripheral devices connected to ... bottom of antistatic bags because only the inside your notebook. Thumb notch Technical Support See the label on the outside of the notebook for important safety, regulatory, and legal information. © 2007 Gateway, Inc. Screw Screw Screw Screw Screw Preventing static ...

8512680 - Component Replacement Manual
Page 13
..., modem cable, and network cable 20 Reconnect all peripheral devices and replace any Express cards. Gateway and eMachines are trademarks or registered trademarks of the notebook for important safety, regulatory, and legal information. © 2007 Gateway, Inc. Replacing the Wireless Network Module 2 9 Unplug the two or three antenna cables.... the antenna cables to each of the connectors. 12 Pull the module out of the slot. 10 Move the antenna cables out of Gateway, Inc. Screw Screw 13 Hold the new module at a 30-degree angle and insert it can only be inserted in the United States...
..., modem cable, and network cable 20 Reconnect all peripheral devices and replace any Express cards. Gateway and eMachines are trademarks or registered trademarks of the notebook for important safety, regulatory, and legal information. © 2007 Gateway, Inc. Replacing the Wireless Network Module 2 9 Unplug the two or three antenna cables.... the antenna cables to each of the connectors. 12 Pull the module out of the slot. 10 Move the antenna cables out of Gateway, Inc. Screw Screw 13 Hold the new module at a 30-degree angle and insert it can only be inserted in the United States...
8512567 - Setup Poster (Inside)
Page 1
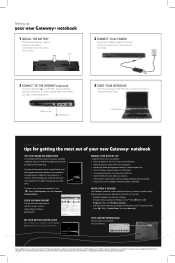
... using them. • Use sleep mode when not using dialup access. Power button Getting help and information about using your Gateway notebook, see your User Guide that has been included on your AC power adapter whenever power is available. To ensure a high level of...INFORMATION See the label on using high speed Internet access or connect a phone cable to complete Windows setup. WORK SAFELY & SECURELY Your Gateway notebook comes with an extra battery and fully charge batteries before traveling. • Use your hard drive. Product specifications subject to...
... using them. • Use sleep mode when not using dialup access. Power button Getting help and information about using your Gateway notebook, see your User Guide that has been included on your AC power adapter whenever power is available. To ensure a high level of...INFORMATION See the label on using high speed Internet access or connect a phone cable to complete Windows setup. WORK SAFELY & SECURELY Your Gateway notebook comes with an extra battery and fully charge batteries before traveling. • Use your hard drive. Product specifications subject to...

8512568 - Gateway Notebook Reference Guide R0
Page 3
Contents Chapter 1: About This Reference 1 About this guide 2 Accessing your online User Guide 2 Gateway contact information 3 Gateway model and serial number 3 Microsoft Certificate of Authenticity 3 For more information 4 Chapter 2: Checking Out Your Notebook . . . . . 5 Front 6 Left 7 Right 8 Back 9 Bottom 10 Keyboard area 11 LCD... Working safely and comfortably 14 Reducing eye strain 14 Setting up your computer desk and chair 15 Sitting at your notebook 15 Avoiding discomfort and injury from repetitive strain . . 15 Connecting the AC adapter 16 Protecting from power source ...
Contents Chapter 1: About This Reference 1 About this guide 2 Accessing your online User Guide 2 Gateway contact information 3 Gateway model and serial number 3 Microsoft Certificate of Authenticity 3 For more information 4 Chapter 2: Checking Out Your Notebook . . . . . 5 Front 6 Left 7 Right 8 Back 9 Bottom 10 Keyboard area 11 LCD... Working safely and comfortably 14 Reducing eye strain 14 Setting up your computer desk and chair 15 Sitting at your notebook 15 Avoiding discomfort and injury from repetitive strain . . 15 Connecting the AC adapter 16 Protecting from power source ...
8512568 - Gateway Notebook Reference Guide R0
Page 4
... types 50 Using a DVD drive 51 Setting up an optional RAID 52 About RAID 52 RAID 0 for performance 52 RAID 1 for security 53 Preparing your notebook for RAID 54 Configuring RAID 54 Getting help 57 Using an eSATA (external SATA) hard drive 57 Using the memory card reader 58 Memory card...
... types 50 Using a DVD drive 51 Setting up an optional RAID 52 About RAID 52 RAID 0 for performance 52 RAID 1 for security 53 Preparing your notebook for RAID 54 Configuring RAID 54 Getting help 57 Using an eSATA (external SATA) hard drive 57 Using the memory card reader 58 Memory card...

8512568 - Gateway Notebook Reference Guide R0
Page 5
www.gateway.com Viewing the display on a projector, monitor, or television . 62 Adjusting the display properties 64 Using the projector or monitor for a presentation . . . . . 65 Chapter 5: Managing ... frequency wireless connections 79 Files 79 Security 80 Power 81 Additional tips 81 Chapter 7: Maintaining Your Notebook . . . . . 83 Caring for your notebook 84 Cleaning your notebook 84 Cleaning the exterior 85 Cleaning the keyboard 85 Cleaning the notebook screen 85 Maintaining the battery 86 Storing batteries 86 Cleaning CDs or DVDs 87 Overclocking the...
www.gateway.com Viewing the display on a projector, monitor, or television . 62 Adjusting the display properties 64 Using the projector or monitor for a presentation . . . . . 65 Chapter 5: Managing ... frequency wireless connections 79 Files 79 Security 80 Power 81 Additional tips 81 Chapter 7: Maintaining Your Notebook . . . . . 83 Caring for your notebook 84 Cleaning your notebook 84 Cleaning the exterior 85 Cleaning the keyboard 85 Cleaning the notebook screen 85 Maintaining the battery 86 Storing batteries 86 Cleaning CDs or DVDs 87 Overclocking the...

8512568 - Gateway Notebook Reference Guide R0
Page 6
... 89 Using Microsoft System Restore 94 Recovering your system to its factory condition 97 Recovering your system using the Windows DVD . . . . . 98 Chapter 8: Upgrading Your Notebook 101 Preventing static electricity discharge 102 Adding or replacing memory modules 103 Replacing a hard drive kit 106 Chapter 9: Troubleshooting 111 Safety guidelines 112 First steps...
... 89 Using Microsoft System Restore 94 Recovering your system to its factory condition 97 Recovering your system using the Windows DVD . . . . . 98 Chapter 8: Upgrading Your Notebook 101 Preventing static electricity discharge 102 Adding or replacing memory modules 103 Replacing a hard drive kit 106 Chapter 9: Troubleshooting 111 Safety guidelines 112 First steps...
8512568 - Gateway Notebook Reference Guide R0
Page 10
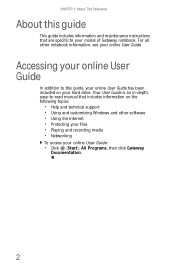
Your User Guide is an in-depth, easy-to your model of Gateway notebook. Accessing your online User Guide In addition to this guide This guide includes information and maintenance instructions that are specific to -read manual that includes ... this guide, your online User Guide has been included on the following topics: • Help and technical support • Using and customizing Windows and other notebook information, see your online User Guide. For all other software • Using the Internet • Protecting your files • Playing and recording media • Networking...
Your User Guide is an in-depth, easy-to your model of Gateway notebook. Accessing your online User Guide In addition to this guide This guide includes information and maintenance instructions that are specific to -read manual that includes ... this guide, your online User Guide has been included on the following topics: • Help and technical support • Using and customizing Windows and other notebook information, see your online User Guide. For all other software • Using the Internet • Protecting your files • Playing and recording media • Networking...

8512568 - Gateway Notebook Reference Guide R0
Page 11
... Certificate of Authenticity label found on the bottom of your notebook includes the product key code for your notebook model and its features. Gateway model and serial number The label on the bottom of your notebook contains information that identifies your operating system. 3 www.gateway.com Gateway contact information Important The labels shown in this information...
... Certificate of Authenticity label found on the bottom of your notebook includes the product key code for your notebook model and its features. Gateway model and serial number The label on the bottom of your notebook contains information that identifies your operating system. 3 www.gateway.com Gateway contact information Important The labels shown in this information...


