8511369 - Gateway Notebook Hardware Reference
Page 3
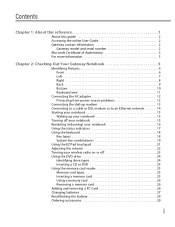
Contents Chapter 1: About this reference 1 About this guide 2 Accessing the online User Guide 2 Gateway contact information 2 Gateway model and serial number 2 Microsoft Certificate of Authenticity 3 For more information 3 Chapter 2: Checking Out Your Gateway Notebook 5 Identifying features 6 Front 6 Left 7 Right 8 Back 9 Bottom 10 Keyboard area 11 Connecting the AC adapter 12 Protecting from power source problems...
Contents Chapter 1: About this reference 1 About this guide 2 Accessing the online User Guide 2 Gateway contact information 2 Gateway model and serial number 2 Microsoft Certificate of Authenticity 3 For more information 3 Chapter 2: Checking Out Your Gateway Notebook 5 Identifying features 6 Front 6 Left 7 Right 8 Back 9 Bottom 10 Keyboard area 11 Connecting the AC adapter 12 Protecting from power source problems...
8511369 - Gateway Notebook Hardware Reference
Page 6
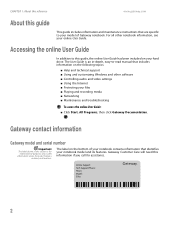
...label on your online User Guide. CHAPTER 1: About this reference www.gateway.com About this guide This guide includes information and maintenance instructions that identifies your notebook model and its features. Gateway Customer Care will need this section is an in this information if ...■ Maintenance and troubleshooting To access the online User Guide: ■ Click Start, All Programs, then click Gateway Documentation. Online Support: Tech Support Phone: Hours: Model: S/No: 2 Accessing the online User Guide In addition to this guide, the online User Guide has been ...
...label on your online User Guide. CHAPTER 1: About this reference www.gateway.com About this guide This guide includes information and maintenance instructions that identifies your notebook model and its features. Gateway Customer Care will need this section is an in this information if ...■ Maintenance and troubleshooting To access the online User Guide: ■ Click Start, All Programs, then click Gateway Documentation. Online Support: Tech Support Phone: Hours: Model: S/No: 2 Accessing the online User Guide In addition to this guide, the online User Guide has been ...
8511369 - Gateway Notebook Hardware Reference
Page 14
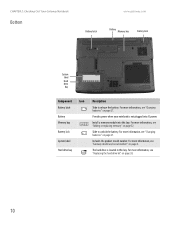
... is not plugged into this bay. For more information, see "Adding or replacing memory" on page 32. For more information, see "Gateway model and serial number" on page 38. 10 For more information, see "Replacing the hard drive kit" on page 2. For more information,... see "Changing batteries" on page 27. Includes the product model number. CHAPTER 2: Checking Out Your Gateway Notebook Bottom www.gateway.com Battery latch Battery Memory bay Battery lock System label Hard drive bay Component Icon Battery latch Battery Memory...
... is not plugged into this bay. For more information, see "Adding or replacing memory" on page 32. For more information, see "Gateway model and serial number" on page 38. 10 For more information, see "Replacing the hard drive kit" on page 2. For more information,... see "Changing batteries" on page 27. Includes the product model number. CHAPTER 2: Checking Out Your Gateway Notebook Bottom www.gateway.com Battery latch Battery Memory bay Battery lock System label Hard drive bay Component Icon Battery latch Battery Memory...
8511369 - Gateway Notebook Hardware Reference
Page 37
Be careful not to lift the memory bay cover, then remove it. Depending on your model, not all peripheral devices and remove any PC cards. 5 Turn your notebook over so the bottom is marked with a K. Screw Screw Screw Screw Keyboard screw ... "Changing batteries" on the end of the cover opposite of the thumb notch. 33 Adding or replacing memory 4 Disconnect all screws may be removed). www.gateway.com Tips & Tricks The keyboard screw hole is facing up, then remove the battery.
Be careful not to lift the memory bay cover, then remove it. Depending on your model, not all peripheral devices and remove any PC cards. 5 Turn your notebook over so the bottom is marked with a K. Screw Screw Screw Screw Keyboard screw ... "Changing batteries" on the end of the cover opposite of the thumb notch. 33 Adding or replacing memory 4 Disconnect all screws may be removed). www.gateway.com Tips & Tricks The keyboard screw hole is facing up, then remove the battery.

8511369 - Gateway Notebook Hardware Reference
Page 40
... picture, then loosen the remaining six captive screws (these screws cannot be captive. 7 Remove the keyboard screw shown in a safe place. Screw 10 Turn your model, not all screws may be removed). Screw Screw Screw Screw Keyboard screw Screw Screw 8 Use the thumb notch to break off the tabs located on... cover opposite of the thumb notch. 9 With a small Phillips screwdriver, remove the DVD drive screw, then put it . CHAPTER 3: Maintaining and Upgrading Your Notebook www.gateway.com Tips & Tricks The keyboard screw hole is facing up. 36
... picture, then loosen the remaining six captive screws (these screws cannot be captive. 7 Remove the keyboard screw shown in a safe place. Screw 10 Turn your model, not all screws may be removed). Screw Screw Screw Screw Keyboard screw Screw Screw 8 Use the thumb notch to break off the tabs located on... cover opposite of the thumb notch. 9 With a small Phillips screwdriver, remove the DVD drive screw, then put it . CHAPTER 3: Maintaining and Upgrading Your Notebook www.gateway.com Tips & Tricks The keyboard screw hole is facing up. 36

8511369 - Gateway Notebook Hardware Reference
Page 47
www.gateway.com Replacing the keyboard Tips & Tricks Depending on the end of the cover opposite of the thumb notch. 16 Loosen the mini-PCI bay cover screw (this screw cannot be removed). Screw Screw Screw Screw Screw Screw 15 Use the thumb notch to break off the tabs located on your model, not all screws may be captive. 14 Close the LCD panel, turn your notebook over so the bottom is facing up, then loosen the six memory bay cover screws (these screws cannot be removed), then remove the mini-PCI bay cover. 43 Be careful not to lift the memory bay cover, then remove it.
www.gateway.com Replacing the keyboard Tips & Tricks Depending on the end of the cover opposite of the thumb notch. 16 Loosen the mini-PCI bay cover screw (this screw cannot be removed). Screw Screw Screw Screw Screw Screw 15 Use the thumb notch to break off the tabs located on your model, not all screws may be captive. 14 Close the LCD panel, turn your notebook over so the bottom is facing up, then loosen the six memory bay cover screws (these screws cannot be removed), then remove the mini-PCI bay cover. 43 Be careful not to lift the memory bay cover, then remove it.

8511369 - Gateway Notebook Hardware Reference
Page 64
...22 finding specifications 3 Firewire port 8 Fn key 19 folders opening 22 function keys 18 G Gateway model number 2, 10 serial number 2, 3 Support 3 H hard drive bay 10 indicator 17 installing ... connecting 18 features 18 locating 11 replacing 40 USB port 8 keys application 18 60 www.gateway.com arrow 18 battery status 19 brightness 20 directional 18 Fn 19 function 18 LCD brightness ...card reader locating 8 memory card types supported 25 using 25 microphone jack 6 Microsoft Certificate of Authenticity 3 model number 2 modem cable 14 connecting DSL 14 jack 8, 13 monitor port 9 13, 14 mouse USB ...
...22 finding specifications 3 Firewire port 8 Fn key 19 folders opening 22 function keys 18 G Gateway model number 2, 10 serial number 2, 3 Support 3 H hard drive bay 10 indicator 17 installing ... connecting 18 features 18 locating 11 replacing 40 USB port 8 keys application 18 60 www.gateway.com arrow 18 battery status 19 brightness 20 directional 18 Fn 19 function 18 LCD brightness ...card reader locating 8 memory card types supported 25 using 25 microphone jack 6 Microsoft Certificate of Authenticity 3 model number 2 modem cable 14 connecting DSL 14 jack 8, 13 monitor port 9 13, 14 mouse USB ...

8511264 - User Guide Gateway Notebook
Page 59
...terminals. Be ready to claim your notebook as soon as it passes through the x-ray machine in security checkpoints. ■ Write down your notebook model number and serial number in case of ownership or a merchandise passport when you leave. It automatically gathers information about emergency travel internationally. ■ Check... your notebook and accessories. ■ Whoever sits next to your notebook is lost or damaged. 51 BigFix monitors your notebook display. www.gateway.com Traveling securely BigFix Your notebook may ask you by flashing the blue taskbar icon.
...terminals. Be ready to claim your notebook as soon as it passes through the x-ray machine in security checkpoints. ■ Write down your notebook model number and serial number in case of ownership or a merchandise passport when you leave. It automatically gathers information about emergency travel internationally. ■ Check... your notebook and accessories. ■ Whoever sits next to your notebook is lost or damaged. 51 BigFix monitors your notebook display. www.gateway.com Traveling securely BigFix Your notebook may ask you by flashing the blue taskbar icon.

8511264 - User Guide Gateway Notebook
Page 107
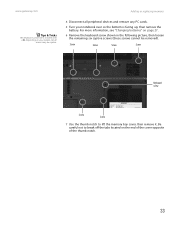
... button in the Wizard. SecureEasySetup is working , contact your Internet service provider. SecureEasySetup Your notebook may be activated. www.gateway.com Setting up your wireless network Setting up your wireless network Setting up your wireless network involves three steps: 1 Make ... network sends and receives information through radio waves. This means that your broadband connection is a program that Gateway has already installed on select notebook models that your Start menu, then follow when you change anything about installing it also. Click the SecureEasySetup icon...
... button in the Wizard. SecureEasySetup is working , contact your Internet service provider. SecureEasySetup Your notebook may be activated. www.gateway.com Setting up your wireless network Setting up your wireless network Setting up your wireless network involves three steps: 1 Make ... network sends and receives information through radio waves. This means that your broadband connection is a program that Gateway has already installed on select notebook models that your Start menu, then follow when you change anything about installing it also. Click the SecureEasySetup icon...
8511264 - User Guide Gateway Notebook
Page 153
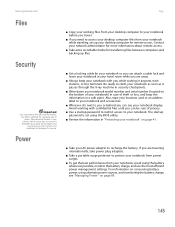
www.gateway.com Files Security Important Use a password that you can remember, but that is set up files. ■ Get a locking cable for your notebook model number and serial number (located on conserving battery power, using the battery whenever possible, monitor the battery charge, and use the most efficient power management ... backing up your notebook as soon as it passes through the X-ray machine in case of privacy. ■ Use a startup password to restrict access to Gateway for remote access. Be ready to claim your desktop computer for service.
www.gateway.com Files Security Important Use a password that you can remember, but that is set up files. ■ Get a locking cable for your notebook model number and serial number (located on conserving battery power, using the battery whenever possible, monitor the battery charge, and use the most efficient power management ... backing up your notebook as soon as it passes through the X-ray machine in case of privacy. ■ Use a startup password to restrict access to Gateway for remote access. Be ready to claim your desktop computer for service.
8511264 - User Guide Gateway Notebook
Page 164
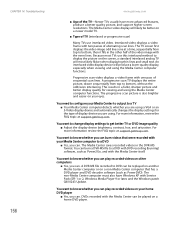
...automatically changes the display settings for viewing and using the Media Center computer functions. For more information, review the FAQ topic at support.gateway.com. The TV screen first displays the video image odd lines one pass of display device you can . You need to configure...burning) software, such as PowerDVD). A progressive scan TV displays the entire picture, drawn sequentially from top to DVD can play recorded videos on a newer model TV. ■ Type of the video image with Service Pack (SP) 1 or 2, Windows Media Player 9 or later, and the Windows patch ...
...automatically changes the display settings for viewing and using the Media Center computer functions. For more information, review the FAQ topic at support.gateway.com. The TV screen first displays the video image odd lines one pass of display device you can . You need to configure...burning) software, such as PowerDVD). A progressive scan TV displays the entire picture, drawn sequentially from top to DVD can play recorded videos on a newer model TV. ■ Type of the video image with Service Pack (SP) 1 or 2, Windows Media Player 9 or later, and the Windows patch ...
8511264 - User Guide Gateway Notebook
Page 183
www.gateway.com Index I i.Link port 54, 72 IEEE 1394 port 54, 72 IEEE 802.11 using while traveling 144 Inkball 11 installing devices 54, 149 digital ... 109 Internet Explorer 36 Outlook 36 Outlook Express 36 Windows Media Player 65 Windows Movie Maker 72 Wordpad 21 MIDI file 65 minimize button 10 model number 145 modem cable 37 dial-up 36, 144 DSL 37 international adapter 144 troubleshooting 157 monitor adding external 55 changing resolution 119 cleaning 133...
www.gateway.com Index I i.Link port 54, 72 IEEE 1394 port 54, 72 IEEE 802.11 using while traveling 144 Inkball 11 installing devices 54, 149 digital ... 109 Internet Explorer 36 Outlook 36 Outlook Express 36 Windows Media Player 65 Windows Movie Maker 72 Wordpad 21 MIDI file 65 minimize button 10 model number 145 modem cable 37 dial-up 36, 144 DSL 37 international adapter 144 troubleshooting 157 monitor adding external 55 changing resolution 119 cleaning 133...


