

8511418 - Component Replacement Manual
Page 5
...8226; Touch a bare metal surface on your notebook over so the bottom is attached to replace the hard drive. Important If you cannot create a Drivers and Applications Recovery disc, Gateway may send you are trademarks or registered trademarks of the cover. All rights reserved. You need a ...small Phillips screwdriver to the back of their edges. To replace the hard drive kit: 1 If possible, create a Drivers and Applications Recovery disc. www.gateway.com © 2006 Gateway, Inc. All other countries. Do not lay components on the bottom of antistatic bags because...
...8226; Touch a bare metal surface on your notebook over so the bottom is attached to replace the hard drive. Important If you cannot create a Drivers and Applications Recovery disc, Gateway may send you are trademarks or registered trademarks of the cover. All rights reserved. You need a ...small Phillips screwdriver to the back of their edges. To replace the hard drive kit: 1 If possible, create a Drivers and Applications Recovery disc. www.gateway.com © 2006 Gateway, Inc. All other countries. Do not lay components on the bottom of antistatic bags because...

8511418 - Component Replacement Manual
Page 6
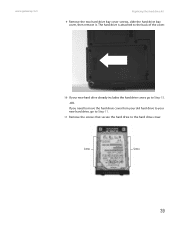
...companies. Replacing the Hard Drive Kit 10 Place the new drive, label side up, onto the cover so the screw holes line up. 11 Replace the four screws that secure the hard drive to you from the old drive. Gateway and eMachines are trademarks or registered trademarks of Gateway, Inc. 8 ...Remove the four screws that secure the cover to the drive. 12 Slide the new hard drive kit into your notebook, then replace the ...
...companies. Replacing the Hard Drive Kit 10 Place the new drive, label side up, onto the cover so the screw holes line up. 11 Replace the four screws that secure the hard drive to you from the old drive. Gateway and eMachines are trademarks or registered trademarks of Gateway, Inc. 8 ...Remove the four screws that secure the cover to the drive. 12 Slide the new hard drive kit into your notebook, then replace the ...
8511180 - Hardware Reference Gateway Notebook
Page 4
Contents www.gateway.com Chapter 3: Maintaining and Upgrading Your Notebook 31 Preventing static electricity discharge 32 Adding or replacing memory 32 Replacing the DVD drive 35 Replacing the hard drive kit 38 Replacing the keyboard 40 Removing the keyboard 40 Installing the keyboard 43 Appendix A: Safety, Regulatory, and Legal Information 45 Important safety information 46...
Contents www.gateway.com Chapter 3: Maintaining and Upgrading Your Notebook 31 Preventing static electricity discharge 32 Adding or replacing memory 32 Replacing the DVD drive 35 Replacing the hard drive kit 38 Replacing the keyboard 40 Removing the keyboard 40 Installing the keyboard 43 Appendix A: Safety, Regulatory, and Legal Information 45 Important safety information 46...

8511180 - Hardware Reference Gateway Notebook
Page 6
... information on the following topics: ■ Help and technical support ■ Using and customizing Windows and other notebook information, see your hard drive. The label on your online User Guide. Gateway Customer Care will need this information if you call for informational purposes only. The User Guide is for assistance. Label information varies...
... information on the following topics: ■ Help and technical support ■ Using and customizing Windows and other notebook information, see your hard drive. The label on your online User Guide. Gateway Customer Care will need this information if you call for informational purposes only. The User Guide is for assistance. Label information varies...
8511180 - Hardware Reference Gateway Notebook
Page 14
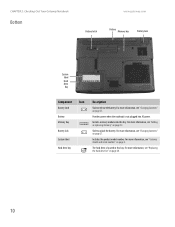
..." on page 38. 10 Battery lock Slide to release the battery. Hard drive bay The hard drive is not plugged into this bay. For more information, see "Changing batteries" on page 32. Battery Provides power when the notebook ..." on page 2. For more information, see "Gateway model and serial number" on page 27. Memory bay Install a memory module into AC power. CHAPTER 2: Checking Out Your Gateway Notebook Bottom www.gateway.com Battery latch Battery Memory bay Battery lock System label Hard drive bay Component Icon Description Battery latch Slide to unlock...
..." on page 38. 10 Battery lock Slide to release the battery. Hard drive bay The hard drive is not plugged into this bay. For more information, see "Changing batteries" on page 32. Battery Provides power when the notebook ..." on page 2. For more information, see "Gateway model and serial number" on page 27. Memory bay Install a memory module into AC power. CHAPTER 2: Checking Out Your Gateway Notebook Bottom www.gateway.com Battery latch Battery Memory bay Battery lock System label Hard drive bay Component Icon Description Battery latch Slide to unlock...
8511180 - Hardware Reference Gateway Notebook
Page 21
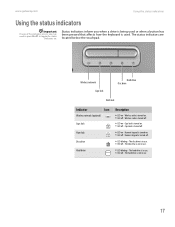
...Numeric keypad is turned on . ■ LED off - Numeric keypad is in use . ■ LED off . ■ LED on - The disc drive is turned off - The hard drive is turned on . ■ LED off . ■ LED blinking - Wireless radio is not in use . 17 Wireless radio is in use . &#...off . ■ LED on - The hard drive is turned off - Caps lock is not in use . ■ LED blinking - The disc drive is turned off - Status indicators inform you may need to press FN+F1 to toggle the status indicators on - www.gateway.com Using the status indicators Using the ...
...Numeric keypad is turned on . ■ LED off - Numeric keypad is in use . ■ LED off . ■ LED on - The disc drive is turned off - The hard drive is turned on . ■ LED off . ■ LED blinking - Wireless radio is not in use . 17 Wireless radio is in use . &#...off . ■ LED on - The hard drive is turned off - Caps lock is not in use . ■ LED blinking - The disc drive is turned off - Status indicators inform you may need to press FN+F1 to toggle the status indicators on - www.gateway.com Using the status indicators Using the ...
8511180 - Hardware Reference Gateway Notebook
Page 35
CHAPTER 3 Maintaining and Upgrading Your Notebook • Adding or replacing memory • Replacing the DVD drive • Replacing the hard drive • Replacing the keyboard 31
CHAPTER 3 Maintaining and Upgrading Your Notebook • Adding or replacing memory • Replacing the DVD drive • Replacing the hard drive • Replacing the keyboard 31
8511180 - Hardware Reference Gateway Notebook
Page 42
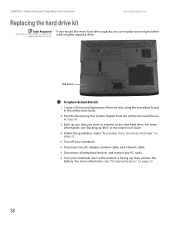
... data you can replace your original drive with a higher-capacity drive. For more hard drive capacity, you want to transfer to replace the hard drive kit. CHAPTER 3: Maintaining and Upgrading Your Notebook www.gateway.com Replacing the hard drive kit Tools Required You need a small Phillips screwdriver to the new hard drive. Hard drive kit To replace the hard drive kit: 1 Create a Drivers and Applications...
... data you can replace your original drive with a higher-capacity drive. For more hard drive capacity, you want to transfer to replace the hard drive kit. CHAPTER 3: Maintaining and Upgrading Your Notebook www.gateway.com Replacing the hard drive kit Tools Required You need a small Phillips screwdriver to the new hard drive. Hard drive kit To replace the hard drive kit: 1 Create a Drivers and Applications...
8511180 - Hardware Reference Gateway Notebook
Page 43
www.gateway.com Replacing the hard drive kit 9 Remove the two hard drive bay cover screws, slide the hard drive bay cover, then remove it. The hard drive is attached to the back of the cover. 10 If your new hard drive, go to the hard drive cover. If you need to move the hard drive cover from your old hard drive to your new hard drive already includes the hard drive cover, go to Step 11. 11 Remove the screws that secure the hard drive to Step 15. -OR- Screws Screws 39
www.gateway.com Replacing the hard drive kit 9 Remove the two hard drive bay cover screws, slide the hard drive bay cover, then remove it. The hard drive is attached to the back of the cover. 10 If your new hard drive, go to the hard drive cover. If you need to move the hard drive cover from your old hard drive to your new hard drive already includes the hard drive cover, go to Step 11. 11 Remove the screws that secure the hard drive to Step 15. -OR- Screws Screws 39
8511180 - Hardware Reference Gateway Notebook
Page 44
Tools Required You need a small Phillips and a small flat-blade screwdriver to the drive. 15 Slide the new hard drive kit into your notebook, then replace the cover screws. 16 Insert the battery, then turn your notebook over. 17 Connect the power adapter, modem cable, ... the keyboard Important Replace the keyboard only with a similar keyboard obtained from the old drive. If your keyboard becomes damaged, you printed in Step 2. www.gateway.com 13 Insert the new drive label side up onto the cover so the screw holes line up. 14 Replace the screws that secure the cover to...
Tools Required You need a small Phillips and a small flat-blade screwdriver to the drive. 15 Slide the new hard drive kit into your notebook, then replace the cover screws. 16 Insert the battery, then turn your notebook over. 17 Connect the power adapter, modem cable, ... the keyboard Important Replace the keyboard only with a similar keyboard obtained from the old drive. If your keyboard becomes damaged, you printed in Step 2. www.gateway.com 13 Insert the new drive label side up onto the cover so the screw holes line up. 14 Replace the screws that secure the cover to...
8511180 - Hardware Reference Gateway Notebook
Page 61
... 27 charge indicator 6 charging 12 installing 27 latch 10 locating 10 purchasing 30 recalibrating 29 recharging 12 release latch 10 replacing 27 bays battery 27 hard drive 10 memory 10, 32 BIOS Setup utility 29 brightness adjusting 19 brightness keys 20 C cable lock 7 cable modem 14 Caps Lock indicator 17 cards inserting...
... 27 charge indicator 6 charging 12 installing 27 latch 10 locating 10 purchasing 30 recalibrating 29 recharging 12 release latch 10 replacing 27 bays battery 27 hard drive 10 memory 10, 32 BIOS Setup utility 29 brightness adjusting 19 brightness keys 20 C cable lock 7 cable modem 14 Caps Lock indicator 17 cards inserting...
8511180 - Hardware Reference Gateway Notebook
Page 62
..., 19 folders opening 22 function keys 18 G Gateway model number 2, 10 serial number 2, 3 Support 3 H hard drive bay 10 indicator 17 installing 38 replacing 38 headphone jack 6 hot-swapping 26 I i.Link port 8 IEEE 1394 port 8 indicators See status indicators inkjet printer 30 installing battery 27 DVD drive 35 hard drive 38 keyboard 40 memory 32 PC Card...
..., 19 folders opening 22 function keys 18 G Gateway model number 2, 10 serial number 2, 3 Support 3 H hard drive bay 10 indicator 17 installing 38 replacing 38 headphone jack 6 hot-swapping 26 I i.Link port 8 IEEE 1394 port 8 indicators See status indicators inkjet printer 30 installing battery 27 DVD drive 35 hard drive 38 keyboard 40 memory 32 PC Card...
8511180 - Hardware Reference Gateway Notebook
Page 63
www.gateway.com Index status box 19 status indicator 6 turning off notebook 15 turning on notebook 15 printer inkjet 30 laser 30 USB port 8 programs closing unresponsive ... 6 jack 6 specifications 3 Standby mode 15, 19 system key 19 starting notebook 15 programs 22 static electricity 32 status indicators battery charge 6 Caps Lock 17 drive activity 17 hard drive 17 location 11 numeric keypad 17 Pad Lock 17 power 6 toggle on or off 19 Support getting specifications 3 surge protector 13 Suspend 19 S-Video...
www.gateway.com Index status box 19 status indicator 6 turning off notebook 15 turning on notebook 15 printer inkjet 30 laser 30 USB port 8 programs closing unresponsive ... 6 jack 6 specifications 3 Standby mode 15, 19 system key 19 starting notebook 15 programs 22 static electricity 32 status indicators battery charge 6 Caps Lock 17 drive activity 17 hard drive 17 location 11 numeric keypad 17 Pad Lock 17 power 6 toggle on or off 19 Support getting specifications 3 surge protector 13 Suspend 19 S-Video...

8511264 - User Guide Gateway Notebook
Page 3
Contents Chapter 1: Getting Help 1 Thank you for purchasing our notebook 2 Gateway Web site 2 Using Support 3 Help and Support 4 Searching for a topic 4 Getting help in Media Center 5 BigFix 6 Online help 6 ...items 10 Using Windows XP Tablet PC 2005 11 Using Tablet PC extensions 11 Working with files and folders 14 Viewing drives 14 Creating folders 15 Copying and moving files and folders 16 Deleting files and folders 17 Browsing for files and folders... files and software 31 Recovering your system using Microsoft System Restore 32 Recovering your system from the hard drive 33 i
Contents Chapter 1: Getting Help 1 Thank you for purchasing our notebook 2 Gateway Web site 2 Using Support 3 Help and Support 4 Searching for a topic 4 Getting help in Media Center 5 BigFix 6 Online help 6 ...items 10 Using Windows XP Tablet PC 2005 11 Using Tablet PC extensions 11 Working with files and folders 14 Viewing drives 14 Creating folders 15 Copying and moving files and folders 16 Deleting files and folders 17 Browsing for files and folders... files and software 31 Recovering your system using Microsoft System Restore 32 Recovering your system from the hard drive 33 i
8511264 - User Guide Gateway Notebook
Page 4
Contents www.gateway.com Chapter 4: Using the Internet 35 Learning about the Internet 36 Setting up an Internet account 37 Accessing your Internet account 37 Using the World ... your notebook 41 Hardware security 42 Kensington lock slot 42 CompuTrace 42 Data security 43 Trusted Platform Module (TPM 43 Computrace 43 Notebook startup and hard drive password 43 Windows XP user accounts 43 Protecting your notebook from viruses 44 Using McAfee SecurityCenter 45 Using Windows XP Security Center 48 Security updates...
Contents www.gateway.com Chapter 4: Using the Internet 35 Learning about the Internet 36 Setting up an Internet account 37 Accessing your Internet account 37 Using the World ... your notebook 41 Hardware security 42 Kensington lock slot 42 CompuTrace 42 Data security 43 Trusted Platform Module (TPM 43 Computrace 43 Notebook startup and hard drive password 43 Windows XP user accounts 43 Protecting your notebook from viruses 44 Using McAfee SecurityCenter 45 Using Windows XP Security Center 48 Security updates...

8511264 - User Guide Gateway Notebook
Page 6
Contents www.gateway.com Adding devices to your network 107 Adding a desktop computer to your network 107 Adding a printer to your network 107 Chapter 10: Sending and Receiving ... Your Notebook 131 Caring for your notebook 132 Cleaning your notebook 132 Protecting your notebook from viruses 133 Updating Windows 134 Using BigFix 134 Managing hard drive space 135 Checking hard drive space 135 Deleting unnecessary files 136 Checking the hard drive for errors 136 Defragmenting the hard drive 137 Backing up files 138 iv
Contents www.gateway.com Adding devices to your network 107 Adding a desktop computer to your network 107 Adding a printer to your network 107 Chapter 10: Sending and Receiving ... Your Notebook 131 Caring for your notebook 132 Cleaning your notebook 132 Protecting your notebook from viruses 133 Updating Windows 134 Using BigFix 134 Managing hard drive space 135 Checking hard drive space 135 Deleting unnecessary files 136 Checking the hard drive for errors 136 Defragmenting the hard drive 137 Backing up files 138 iv
8511264 - User Guide Gateway Notebook
Page 7
www.gateway.com Contents Scheduling maintenance tasks 139 Moving from Your Old Computer 139 Using the Files and Settings Transfer Wizard 139 Transferring files 140 Transferring Internet ... tips 146 Chapter 14: Troubleshooting 147 Safety guidelines 148 First steps 148 Troubleshooting 148 Audio 148 Battery 148 CD drives 148 Device installation 149 Diskette drive 149 Display 150 DVD drives 151 File management 152 Hard drive 153 Internet 153 Keyboard 154 Media Center 155 Memory 157 Memory card reader 157 Modem (cable or DSL...
www.gateway.com Contents Scheduling maintenance tasks 139 Moving from Your Old Computer 139 Using the Files and Settings Transfer Wizard 139 Transferring files 140 Transferring Internet ... tips 146 Chapter 14: Troubleshooting 147 Safety guidelines 148 First steps 148 Troubleshooting 148 Audio 148 Battery 148 CD drives 148 Device installation 149 Diskette drive 149 Display 150 DVD drives 151 File management 152 Hard drive 153 Internet 153 Keyboard 154 Media Center 155 Memory 157 Memory card reader 157 Modem (cable or DSL...

8511264 - User Guide Gateway Notebook
Page 22
CHAPTER 2: Using Windows XP www.gateway.com Using speech recognition The tablet PC is designed to suit your notebook: ■ Click Start, then click My Computer on page 127. A notebook almost always has more drives such as you would reorganize and throw away information in the ...microphone. ■ To modify the speech recognition function, see "Adjusting the Tablet PC Input Panel Settings" on the Start menu. Hard drives Diskette Disc drive drive 14 Type the keyword files and folders in a file cabinet. Working with files and folders You can store these files in ...
CHAPTER 2: Using Windows XP www.gateway.com Using speech recognition The tablet PC is designed to suit your notebook: ■ Click Start, then click My Computer on page 127. A notebook almost always has more drives such as you would reorganize and throw away information in the ...microphone. ■ To modify the speech recognition function, see "Adjusting the Tablet PC Input Panel Settings" on the Start menu. Hard drives Diskette Disc drive drive 14 Type the keyword files and folders in a file cabinet. Working with files and folders You can store these files in ...
8511264 - User Guide Gateway Notebook
Page 23
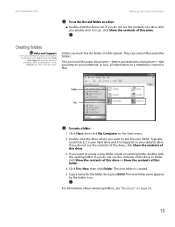
...gateway.com Working with files and folders To see the files and folders on page 24. 15 The new folder is stored in files. In fact, all information on a notebook is created. 5 Type a name for the folder, then press ENTER. If you do not see the contents of the drive... New, then click Folder. Folders Files To create a folder: 1 Click Start, then click My Computer on your diskette drive. Typically, Local Disk (C:) is your hard drive and 3½ Floppy (A:) is your notebook. Creating folders Help and Support For more information about renaming folders, see the contents...
...gateway.com Working with files and folders To see the files and folders on page 24. 15 The new folder is stored in files. In fact, all information on a notebook is created. 5 Type a name for the folder, then press ENTER. If you do not see the contents of the drive... New, then click Folder. Folders Files To create a folder: 1 Click Start, then click My Computer on your diskette drive. Typically, Local Disk (C:) is your hard drive and 3½ Floppy (A:) is your notebook. Creating folders Help and Support For more information about renaming folders, see the contents...
8511264 - User Guide Gateway Notebook
Page 27
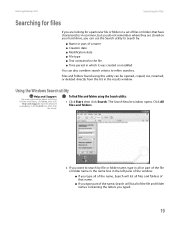
www.gateway.com Searching for files Searching for files If you are looking for files and folders, click Start, then click Help and Support. Using the Windows ... file or folder or a set of files or folders that have characteristics in common, but you do not remember where they are stored on your hard drive, you can use the Search utility to search by file or folder name, type in all or part of the file or folder name in...
www.gateway.com Searching for files Searching for files If you are looking for files and folders, click Start, then click Help and Support. Using the Windows ... file or folder or a set of files or folders that have characteristics in common, but you do not remember where they are stored on your hard drive, you can use the Search utility to search by file or folder name, type in all or part of the file or folder name in...

