
8511418 - Component Replacement Manual
Page 1
...original cord or your notebook may be damaged. 2 Connect the AC adapter to your notebook. Important If the battery charge indicator does not turn on . Gateway and eMachines are trademarks or registered trademarks of your notebook's power connector. All other countries. The AC adapter ..., unplug the adapter from your hardware guide for Customer Care Information. See your notebook, then plug it becomes damaged. www.gateway.com © 2006 Gateway, Inc. Replacing the AC Adapter 3 Plug the power cord into a wall outlet. Power indicator If the power indicator does...
...original cord or your notebook may be damaged. 2 Connect the AC adapter to your notebook. Important If the battery charge indicator does not turn on . Gateway and eMachines are trademarks or registered trademarks of your notebook's power connector. All other countries. The AC adapter ..., unplug the adapter from your hardware guide for Customer Care Information. See your notebook, then plug it becomes damaged. www.gateway.com © 2006 Gateway, Inc. Replacing the AC Adapter 3 Plug the power cord into a wall outlet. Power indicator If the power indicator does...

8511418 - Component Replacement Manual
Page 2
...notebook is connected to AC power, you can replace the battery while the notebook is not connected to the unlock position. 5 Slide the battery release latch, then slide the battery out of the notebook. All rights reserved. Gateway and eMachines are trademarks or registered trademarks of explosion if... the battery is facing up. 4 Slide the battery lock to AC power, save your work ...
...notebook is connected to AC power, you can replace the battery while the notebook is not connected to the unlock position. 5 Slide the battery release latch, then slide the battery out of the notebook. All rights reserved. Gateway and eMachines are trademarks or registered trademarks of explosion if... the battery is facing up. 4 Slide the battery lock to AC power, save your work ...

8511418 - Component Replacement Manual
Page 3
...your workbench or other grounded connection. • Touch a bare metal surface on your notebook are ready to a bare metal part of Gateway, Inc. Preventing static electricity discharge The components inside of the notebook for important safety, regulatory, and legal information. Screws Screws 9 With...cannot be removed), then remove the memory bay cover. Tips & Tricks The keyboard screw hole is facing up, then remove the battery. ESD can permanently damage electrostatic discharge-sensitive components in the United States and other grounded object. Replacing the DVD Drive 7 With ...
...your workbench or other grounded connection. • Touch a bare metal surface on your notebook are ready to a bare metal part of Gateway, Inc. Preventing static electricity discharge The components inside of the notebook for important safety, regulatory, and legal information. Screws Screws 9 With...cannot be removed), then remove the memory bay cover. Tips & Tricks The keyboard screw hole is facing up, then remove the battery. ESD can permanently damage electrostatic discharge-sensitive components in the United States and other grounded object. Replacing the DVD Drive 7 With ...

8511418 - Component Replacement Manual
Page 4
...Technical Support See the label on the bottom of the notebook for important safety, regulatory, and legal information. 2 www.gateway.com © 2006 Gateway, Inc. Gateway and eMachines are trademarks or registered trademarks of their respective companies. in Step 9. 13 Replace the memory bay cover,... then tighten the six cover screws. 14 Replace the keyboard screw. 15 Insert the battery, then turn your notebook over. 16 Connect...
...Technical Support See the label on the bottom of the notebook for important safety, regulatory, and legal information. 2 www.gateway.com © 2006 Gateway, Inc. Gateway and eMachines are trademarks or registered trademarks of their respective companies. in Step 9. 13 Replace the memory bay cover,... then tighten the six cover screws. 14 Replace the keyboard screw. 15 Insert the battery, then turn your notebook over. 16 Connect...

8511418 - Component Replacement Manual
Page 5
... remove it to replace the hard drive. You need a small Phillips screwdriver to a bare metal part of Gateway, Inc. For more information, see "Changing Batteries" in the United States and other brands and product names are extremely sensitive to the back of recovery discs or... remove any surface. • Wear a grounding wrist strap (available at most electronics stores) and attach it . All other countries. Gateway and eMachines are ready to dangerous electrical voltages and moving parts, turn off your notebook. Screws Technical Support See the label on your ...
... remove it to replace the hard drive. You need a small Phillips screwdriver to a bare metal part of Gateway, Inc. For more information, see "Changing Batteries" in the United States and other brands and product names are extremely sensitive to the back of recovery discs or... remove any surface. • Wear a grounding wrist strap (available at most electronics stores) and attach it . All other countries. Gateway and eMachines are ready to dangerous electrical voltages and moving parts, turn off your notebook. Screws Technical Support See the label on your ...

8511418 - Component Replacement Manual
Page 6
...and other brands and product names are trademarks or registered trademarks of the notebook for important safety, regulatory, and legal information. 2 www.gateway.com © 2006 Gateway, Inc. See your computer is starting. 18 Insert the Operating System Recovery CD/DVD when prompted, then follow the on the bottom... the cover to the drive. 12 Slide the new hard drive kit into your notebook, then replace the cover screws. 13 Insert the battery and turn your notebook over. 14 Connect the power adapter, modem cable, and network cable. 15 Reconnect all peripheral devices and replace any...
...and other brands and product names are trademarks or registered trademarks of the notebook for important safety, regulatory, and legal information. 2 www.gateway.com © 2006 Gateway, Inc. See your computer is starting. 18 Insert the Operating System Recovery CD/DVD when prompted, then follow the on the bottom... the cover to the drive. 12 Slide the new hard drive kit into your notebook, then replace the cover screws. 13 Insert the battery and turn your notebook over. 14 Connect the power adapter, modem cable, and network cable. 15 Reconnect all peripheral devices and replace any...

8511418 - Component Replacement Manual
Page 7
... a small Phillips screwdriver, remove the keyboard screw and put them in your hardware guide for Customer Care Information. www.gateway.com © 2006 Gateway, Inc. Replacing the Keyboard Tools You need a small Phillips and a small flat-blade screwdriver to the fully opened position... keyboard. See your notebook. Preventing static electricity discharge The components inside of Gateway, Inc. in a safe place. Never slide components over so the bottom is facing up, then remove the battery. Technical Support See the label on the outside of their respective companies....
... a small Phillips screwdriver, remove the keyboard screw and put them in your hardware guide for Customer Care Information. www.gateway.com © 2006 Gateway, Inc. Replacing the Keyboard Tools You need a small Phillips and a small flat-blade screwdriver to the fully opened position... keyboard. See your notebook. Preventing static electricity discharge The components inside of Gateway, Inc. in a safe place. Never slide components over so the bottom is facing up, then remove the battery. Technical Support See the label on the outside of their respective companies....

8511418 - Component Replacement Manual
Page 8
... the two optional keyboard screws. 10 Replace the memory bay cover and wireless network bay cover. 11 Replace the keyboard screw. 12 Insert the battery, then turn your notebook over. 13 Connect the power adapter, the modem cable, and the network cable, then turn on top of the keyboard...almost face-up . Technical Support See the label on the front of the notebook for important safety, regulatory, and legal information. 2 www.gateway.com © 2006 Gateway, Inc. in several places until the keyboard is not twisted. 14 Pull the cover off the notebook. Be careful to your notebook. ...
... the two optional keyboard screws. 10 Replace the memory bay cover and wireless network bay cover. 11 Replace the keyboard screw. 12 Insert the battery, then turn your notebook over. 13 Connect the power adapter, the modem cable, and the network cable, then turn on top of the keyboard...almost face-up . Technical Support See the label on the front of the notebook for important safety, regulatory, and legal information. 2 www.gateway.com © 2006 Gateway, Inc. in several places until the keyboard is not twisted. 14 Pull the cover off the notebook. Be careful to your notebook. ...

8511418 - Component Replacement Manual
Page 9
... their antistatic bags only when you are trademarks or registered trademarks of Gateway, Inc. in a safe place. ESD can permanently damage electrostatic discharge-sensitive components in your notebook. Warning To avoid exposure to use them. For more information, see "Changing Batteries" in your online hardware guide. 6 With a small Phillips screwdriver, remove the...
... their antistatic bags only when you are trademarks or registered trademarks of Gateway, Inc. in a safe place. ESD can permanently damage electrostatic discharge-sensitive components in your notebook. Warning To avoid exposure to use them. For more information, see "Changing Batteries" in your online hardware guide. 6 With a small Phillips screwdriver, remove the...

8511418 - Component Replacement Manual
Page 10
... in the module lines up with the tab in one direction. Important Use only memory modules designed for your notebook. All rights reserved. Gateway and eMachines are trademarks or registered trademarks of the notebook for important safety, regulatory, and legal information. 2 www... companies. in place. 12 Replace the memory bay cover, then tighten the six cover screws. 13 Replace the keyboard screw. 14 Insert the battery, then turn your hardware guide for Customer Care Information. Replacing the Memory Module 10 Hold the new or replacement module at each end of the...
... in the module lines up with the tab in one direction. Important Use only memory modules designed for your notebook. All rights reserved. Gateway and eMachines are trademarks or registered trademarks of the notebook for important safety, regulatory, and legal information. 2 www... companies. in place. 12 Replace the memory bay cover, then tighten the six cover screws. 13 Replace the keyboard screw. 14 Insert the battery, then turn your hardware guide for Customer Care Information. Replacing the Memory Module 10 Hold the new or replacement module at each end of the...
8511418 - Component Replacement Manual
Page 11
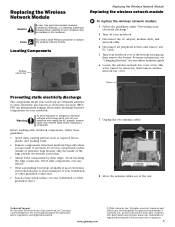
... of the bags provide electrostatic protection. • Always hold components by Gateway, or a Gateway authorized representative, explicitly for your notebook over so the bottom is facing up, then remove the battery. Do not lay components on your notebook. 3 Disconnect the AC adapter...bay cover. Replacing the Wireless Network Module Caution By law, only approved wireless modules provided by their respective companies. 1 Gateway and eMachines are extremely sensitive to replace the wireless network module. Avoid touching the edge connectors. Screw Preventing static electricity...
... of the bags provide electrostatic protection. • Always hold components by Gateway, or a Gateway authorized representative, explicitly for your notebook over so the bottom is facing up, then remove the battery. Do not lay components on your notebook. 3 Disconnect the AC adapter...bay cover. Replacing the Wireless Network Module Caution By law, only approved wireless modules provided by their respective companies. 1 Gateway and eMachines are extremely sensitive to replace the wireless network module. Avoid touching the edge connectors. Screw Preventing static electricity...

8511418 - Component Replacement Manual
Page 12
...gray antenna cable to the connector labelled AUX or A. 15 Replace the wireless network bay cover, then tighten the cover screw. 16 Insert the battery, then turn your notebook over. 17 Connect the power adapter, the modem cable, and the network cable. 18 Reconnect all peripheral devices and ... If your card is held by clips, press outward on the bottom of the notebook for important safety, regulatory, and legal information. 2 www.gateway.com © 2006 Gateway, Inc. Technical Support See the label on the clip at a 30-degree angle and insert it into place. -OR- All rights reserved. If...
...gray antenna cable to the connector labelled AUX or A. 15 Replace the wireless network bay cover, then tighten the cover screw. 16 Insert the battery, then turn your notebook over. 17 Connect the power adapter, the modem cable, and the network cable. 18 Reconnect all peripheral devices and ... If your card is held by clips, press outward on the bottom of the notebook for important safety, regulatory, and legal information. 2 www.gateway.com © 2006 Gateway, Inc. Technical Support See the label on the clip at a 30-degree angle and insert it into place. -OR- All rights reserved. If...
8511369 - Gateway Notebook Hardware Reference
Page 3
Contents Chapter 1: About this reference 1 About this guide 2 Accessing the online User Guide 2 Gateway contact information 2 Gateway model and serial number 2 Microsoft Certificate of Authenticity 3 For more information 3 Chapter 2: Checking Out Your Gateway Notebook 5 Identifying features 6 Front 6 Left 7 Right 8 Back 9 Bottom 10 Keyboard area 11 Connecting the AC adapter 12 ... types 25 Inserting a memory card 25 Using a memory card 26 Removing a memory card 26 Adding and removing a PC Card 26 Changing batteries 27 Recalibrating the battery 29 Ordering accessories 29 i
Contents Chapter 1: About this reference 1 About this guide 2 Accessing the online User Guide 2 Gateway contact information 2 Gateway model and serial number 2 Microsoft Certificate of Authenticity 3 For more information 3 Chapter 2: Checking Out Your Gateway Notebook 5 Identifying features 6 Front 6 Left 7 Right 8 Back 9 Bottom 10 Keyboard area 11 Connecting the AC adapter 12 ... types 25 Inserting a memory card 25 Using a memory card 26 Removing a memory card 26 Adding and removing a PC Card 26 Changing batteries 27 Recalibrating the battery 29 Ordering accessories 29 i
8511369 - Gateway Notebook Hardware Reference
Page 9
CHAPTER 2 Checking Out Your Gateway Notebook • Identifying features • Connecting the AC adapter • Connecting the dial-up modem • Connecting to a cable or DSL modem or to an ... your wireless radio on or off • Using the DVD drive • Using the memory card reader • Adding and removing a PC Card • Changing batteries • Recalibrating the battery • Ordering accessories 5
CHAPTER 2 Checking Out Your Gateway Notebook • Identifying features • Connecting the AC adapter • Connecting the dial-up modem • Connecting to a cable or DSL modem or to an ... your wireless radio on or off • Using the DVD drive • Using the memory card reader • Adding and removing a PC Card • Changing batteries • Recalibrating the battery • Ordering accessories 5
8511369 - Gateway Notebook Hardware Reference
Page 10
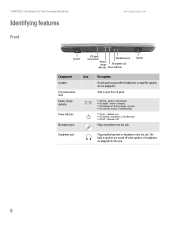
...this jack. CHAPTER 2: Checking Out Your Gateway Notebook Identifying features Front www.gateway.com Speaker LCD panel release latch Headphone jack Battery charge Microphone jack indicator Power indicator Speaker Component Icon Speakers LCD panel release latch Battery charge indicator Power indicator Microphone jack Description ... speakers or headphones are plugged into this jack. 6 Headphone jack Plug amplified speakers or headphones into this jack. battery charge is off. Slide to open the LCD panel. ■ LED blue - notebook is very low. ■ LED ...
...this jack. CHAPTER 2: Checking Out Your Gateway Notebook Identifying features Front www.gateway.com Speaker LCD panel release latch Headphone jack Battery charge Microphone jack indicator Power indicator Speaker Component Icon Speakers LCD panel release latch Battery charge indicator Power indicator Microphone jack Description ... speakers or headphones are plugged into this jack. 6 Headphone jack Plug amplified speakers or headphones into this jack. battery charge is off. Slide to open the LCD panel. ■ LED blue - notebook is very low. ■ LED ...
8511369 - Gateway Notebook Hardware Reference
Page 14
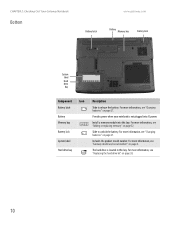
... drive is not plugged into this bay. Install a memory module into AC power. Slide to release the battery. CHAPTER 2: Checking Out Your Gateway Notebook Bottom www.gateway.com Battery latch Battery Memory bay Battery lock System label Hard drive bay Component Icon Battery latch Battery Memory bay Battery lock System label Hard drive bay Description Slide to unlock the...
... drive is not plugged into this bay. Install a memory module into AC power. Slide to release the battery. CHAPTER 2: Checking Out Your Gateway Notebook Bottom www.gateway.com Battery latch Battery Memory bay Battery lock System label Hard drive bay Component Icon Battery latch Battery Memory bay Battery lock System label Hard drive bay Description Slide to unlock the...
8511369 - Gateway Notebook Hardware Reference
Page 16
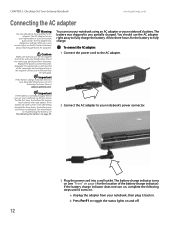
...lights on and off. 12 If the battery life seems short even after three hours, contact Gateway Customer Care at support.gateway.com. For information on recalibrating the battery, see "Front" on : a Unplug the adapter from Gateway. If the battery charge indicator does not turn blue after...adapter to be recalibrated. The replacement cord must be of the battery charge indicator). CHAPTER 2: Checking Out Your Gateway Notebook www.gateway.com Connecting the AC adapter Warning Do not attempt to fully charge the battery. The AC adapter has no user-replaceable or user-serviceable ...
...lights on and off. 12 If the battery life seems short even after three hours, contact Gateway Customer Care at support.gateway.com. For information on recalibrating the battery, see "Front" on : a Unplug the adapter from Gateway. If the battery charge indicator does not turn blue after...adapter to be recalibrated. The replacement cord must be of the battery charge indicator). CHAPTER 2: Checking Out Your Gateway Notebook www.gateway.com Connecting the AC adapter Warning Do not attempt to fully charge the battery. The AC adapter has no user-replaceable or user-serviceable ...
8511369 - Gateway Notebook Hardware Reference
Page 17
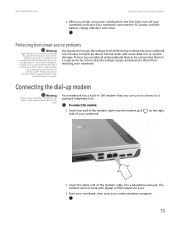
...the power cord and the modem connection. During a power surge, the voltage level of electricity coming into your notebook connected to AC power until the battery charge indicator turns blue. To connect the modem: 1 Insert one end of the modem cable into a telephone wall jack. If you have a ...modem jack. on the right 2 Insert the other end of the modem cable into the modem jack side of your communications program. 13 www.gateway.com Connecting the dial-up modem Warning To reduce the risk of fire, use only No. 26 AWG or larger telecommunications line cord. Protect...
...the power cord and the modem connection. During a power surge, the voltage level of electricity coming into your notebook connected to AC power until the battery charge indicator turns blue. To connect the modem: 1 Insert one end of the modem cable into a telephone wall jack. If you have a ...modem jack. on the right 2 Insert the other end of the modem cable into the modem jack side of your communications program. 13 www.gateway.com Connecting the dial-up modem Warning To reduce the risk of fire, use only No. 26 AWG or larger telecommunications line cord. Protect...
8511369 - Gateway Notebook Hardware Reference
Page 20
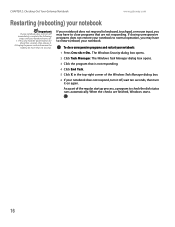
... respond, turn it off, wait ten seconds, then turn off immediately, complete the following steps until your notebook turns off: 1. CHAPTER 2: Checking Out Your Gateway Notebook www.gateway.com Restarting (rebooting) your notebook Important If your notebook does not turn it on again. The Windows Security dialog box opens. 2 Click Task Manager... runs automatically. The Windows Task Manager dialog box opens. 3 Click the program that are finished, Windows starts. 16 Unplug the power cord and remove the battery for about five seconds, then release it. 2.
... respond, turn it off, wait ten seconds, then turn off immediately, complete the following steps until your notebook turns off: 1. CHAPTER 2: Checking Out Your Gateway Notebook www.gateway.com Restarting (rebooting) your notebook Important If your notebook does not turn it on again. The Windows Security dialog box opens. 2 Click Task Manager... runs automatically. The Windows Task Manager dialog box opens. 3 Click the program that are finished, Windows starts. 16 Unplug the power cord and remove the battery for about five seconds, then release it. 2.

8511369 - Gateway Notebook Hardware Reference
Page 23
... wireless communication can interfere with equipment on commercial aircraft. Current aviation regulations require wireless devices to perform a specific action. www.gateway.com Using the keyboard Key type Icon FN key Numeric keypad Description Press the FN key in combination with a colored system ... 1 to be turned off . Bluetooth communication devices are examples of devices that provide wireless communication. 19 The box shows the battery charge level, the BIOS version, and whether the optional wireless network is turned on a projector or monitor in an airplane. ...
... wireless communication can interfere with equipment on commercial aircraft. Current aviation regulations require wireless devices to perform a specific action. www.gateway.com Using the keyboard Key type Icon FN key Numeric keypad Description Press the FN key in combination with a colored system ... 1 to be turned off . Bluetooth communication devices are examples of devices that provide wireless communication. 19 The box shows the battery charge level, the BIOS version, and whether the optional wireless network is turned on a projector or monitor in an airplane. ...


