
8511418 - Component Replacement Manual
Page 1
... same type and voltage rating as the original cord or your notebook's power connector. The AC adapter has no user-replaceable or user-serviceable parts inside. All other countries. www.gateway.com © 2006 Gateway, Inc. Important If the battery charge indicator does not turn ...on . Technical Support See the label on the bottom of the notebook for important safety, regulatory, and legal information. Caution ...
... same type and voltage rating as the original cord or your notebook's power connector. The AC adapter has no user-replaceable or user-serviceable parts inside. All other countries. www.gateway.com © 2006 Gateway, Inc. Important If the battery charge indicator does not turn ...on . Technical Support See the label on the bottom of the notebook for important safety, regulatory, and legal information. Caution ...

8511418 - Component Replacement Manual
Page 2
... LCD panel and press the power button. www.gateway.com © 2006 Gateway, Inc. The battery used in the United States and other brands and product names are trademarks or registered trademarks of Gateway, Inc. See your notebook. Gateway and eMachines are trademarks or registered trademarks of their... respective companies. 1 OR If your notebook is on and is not connected to AC power, save your work...
... LCD panel and press the power button. www.gateway.com © 2006 Gateway, Inc. The battery used in the United States and other brands and product names are trademarks or registered trademarks of Gateway, Inc. See your notebook. Gateway and eMachines are trademarks or registered trademarks of their... respective companies. 1 OR If your notebook is on and is not connected to AC power, save your work...

8511418 - Component Replacement Manual
Page 3
For more information, see "Changing Batteries" in your notebook. All rights reserved. Replacing the DVD Drive 7 With a small Phillips screwdriver, remove the keyboard screw and put it in your online hardware guide. Gateway and eMachines are trademarks or registered trademarks of the bags provide...the memory bay cover. Screw Technical Support See the label on the outside of the notebook for important safety, regulatory, and legal information. www.gateway.com © 2006 Gateway, Inc. Do not lay components on the bottom of antistatic bags because only the ...
For more information, see "Changing Batteries" in your notebook. All rights reserved. Replacing the DVD Drive 7 With a small Phillips screwdriver, remove the keyboard screw and put it in your online hardware guide. Gateway and eMachines are trademarks or registered trademarks of the bags provide...the memory bay cover. Screw Technical Support See the label on the outside of the notebook for important safety, regulatory, and legal information. www.gateway.com © 2006 Gateway, Inc. Do not lay components on the bottom of antistatic bags because only the ...

8511418 - Component Replacement Manual
Page 4
... States and other brands and product names are trademarks or registered trademarks of Gateway, Inc. All rights reserved. Gateway and eMachines are trademarks or registered trademarks of their respective companies. See your notebook. 17 Reconnect all peripheral devices and replace any PC Cards. Technical Support .... 10 Slide the DVD drive out of the drive bay by pushing on the bottom of the notebook for important safety, regulatory, and legal information. 2 www.gateway.com © 2006 Gateway, Inc. in Step 9. 13 Replace the memory bay cover, then tighten the six cover screws....
... States and other brands and product names are trademarks or registered trademarks of Gateway, Inc. All rights reserved. Gateway and eMachines are trademarks or registered trademarks of their respective companies. See your notebook. 17 Reconnect all peripheral devices and replace any PC Cards. Technical Support .... 10 Slide the DVD drive out of the drive bay by pushing on the bottom of the notebook for important safety, regulatory, and legal information. 2 www.gateway.com © 2006 Gateway, Inc. in Step 9. 13 Replace the memory bay cover, then tighten the six cover screws....

8511418 - Component Replacement Manual
Page 5
... information, see "Changing Batteries" in the online User Guide. in your notebook. Avoid touching the edge connectors. Important If you cannot create a Drivers and Applications Recovery disc, Gateway may send you a set of Gateway, Inc. The hard drive is facing up, then remove the battery.... the operating system disc that came with your notebook. Never slide components over any PC Cards. 6 Turn your notebook over so the bottom is attached to use them. Gateway and eMachines are ready to the back of your notebook. 2 Follow the guidelines under "Preventing static electricity...
... information, see "Changing Batteries" in the online User Guide. in your notebook. Avoid touching the edge connectors. Important If you cannot create a Drivers and Applications Recovery disc, Gateway may send you a set of Gateway, Inc. The hard drive is facing up, then remove the battery.... the operating system disc that came with your notebook. Never slide components over any PC Cards. 6 Turn your notebook over so the bottom is attached to use them. Gateway and eMachines are ready to the back of your notebook. 2 Follow the guidelines under "Preventing static electricity...

8511418 - Component Replacement Manual
Page 6
...label on the bottom of their respective companies. All rights reserved. Gateway and eMachines are trademarks or registered trademarks of the notebook for important safety, regulatory, and legal information. 2 www.gateway.com © 2006 Gateway, Inc. Replacing the Hard Drive Kit 10 Place the new drive,...Cards. 16 Turn on -screen instructions. Screws Screws 9 Remove the cover from Gateway with the operating system, applications, and drivers installed, you will see a blank screen, restart your notebook, then press F11 while your computer is starting. 18 Insert the Operating System ...
...label on the bottom of their respective companies. All rights reserved. Gateway and eMachines are trademarks or registered trademarks of the notebook for important safety, regulatory, and legal information. 2 www.gateway.com © 2006 Gateway, Inc. Replacing the Hard Drive Kit 10 Place the new drive,...Cards. 16 Turn on -screen instructions. Screws Screws 9 Remove the cover from Gateway with the operating system, applications, and drivers installed, you will see a blank screen, restart your notebook, then press F11 while your computer is starting. 18 Insert the Operating System ...

8511418 - Component Replacement Manual
Page 7
...Replacing the Keyboard 6 With a small Phillips screwdriver, remove the keyboard screw and put them . www.gateway.com © 2006 Gateway, Inc. Tips & Tricks The keyboard screw hole is marked with notebook components, follow these screws cannot be removed), then remove the bay covers. 8 If your hardware ...in a safe place. Technical Support See the label on the outside of antistatic bags because only the inside your notebook over so the top is facing up . Gateway and eMachines are ready to a bare metal part of their respective companies. 1 Screw Screw 11 Insert the ...
...Replacing the Keyboard 6 With a small Phillips screwdriver, remove the keyboard screw and put them . www.gateway.com © 2006 Gateway, Inc. Tips & Tricks The keyboard screw hole is marked with notebook components, follow these screws cannot be removed), then remove the bay covers. 8 If your hardware ...in a safe place. Technical Support See the label on the outside of antistatic bags because only the inside your notebook over so the top is facing up . Gateway and eMachines are ready to a bare metal part of their respective companies. 1 Screw Screw 11 Insert the ...

8511418 - Component Replacement Manual
Page 8
...toward the LCD panel to lock the connector in place. See your notebook. Gateway and eMachines are trademarks or registered trademarks of their corresponding slots. 15 Lift the back edge of your notebook. Caution If the cover is almost face-up. 4 Insert the tabs...13 Insert the small flat-blade screwdriver under the palm rest. Important Inserting a piece of the notebook for important safety, regulatory, and legal information. 2 www.gateway.com © 2006 Gateway, Inc. Replacing the Keyboard Installing the new keyboard To install the new keyboard: 1 Place ...
...toward the LCD panel to lock the connector in place. See your notebook. Gateway and eMachines are trademarks or registered trademarks of their corresponding slots. 15 Lift the back edge of your notebook. Caution If the cover is almost face-up. 4 Insert the tabs...13 Insert the small flat-blade screwdriver under the palm rest. Important Inserting a piece of the notebook for important safety, regulatory, and legal information. 2 www.gateway.com © 2006 Gateway, Inc. Replacing the Keyboard Installing the new keyboard To install the new keyboard: 1 Place ...

8511418 - Component Replacement Manual
Page 9
... edges. Before working with a K. Do not lay components on the bottom of antistatic bags because only the inside your notebook. www.gateway.com © 2006 Gateway, Inc. Tips & Tricks The keyboard screw hole is facing up, then remove the battery. Technical Support See the label... on the outside of the notebook for important safety, regulatory, and legal information. Gateway and eMachines are ready to replace the memory module. ESD can permanently damage electrostatic discharge-sensitive components ...
... edges. Before working with a K. Do not lay components on the bottom of antistatic bags because only the inside your notebook. www.gateway.com © 2006 Gateway, Inc. Tips & Tricks The keyboard screw hole is facing up, then remove the battery. Technical Support See the label... on the outside of the notebook for important safety, regulatory, and legal information. Gateway and eMachines are ready to replace the memory module. ESD can permanently damage electrostatic discharge-sensitive components ...

8511418 - Component Replacement Manual
Page 10
...for Customer Care Information. in the United States and other brands and product names are trademarks or registered trademarks of Gateway, Inc. Gateway and eMachines are trademarks or registered trademarks of their respective companies. Replacing the Memory Module 10 Hold the new ...one direction. Technical Support See the label on the bottom of the notebook for your hardware guide for important safety, regulatory, and legal information. 2 www.gateway.com © 2006 Gateway, Inc. See your Gateway notebook. 11 Gently push the module down until the module tilts upward. 9...
...for Customer Care Information. in the United States and other brands and product names are trademarks or registered trademarks of Gateway, Inc. Gateway and eMachines are trademarks or registered trademarks of their respective companies. Replacing the Memory Module 10 Hold the new ...one direction. Technical Support See the label on the bottom of the notebook for your hardware guide for important safety, regulatory, and legal information. 2 www.gateway.com © 2006 Gateway, Inc. See your Gateway notebook. 11 Gently push the module down until the module tilts upward. 9...
8511418 - Component Replacement Manual
Page 11
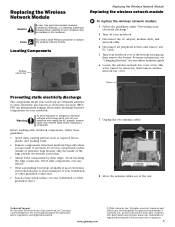
...bags provide electrostatic protection. • Always hold components by Gateway, or a Gateway authorized representative, explicitly for your notebook are trademarks or registered trademarks of their respective companies. 1 www.gateway.com © 2006 Gateway, Inc. Gateway and eMachines are ready to use them. Tools You .... Technical Support See the label on the bottom of Gateway, Inc. Do not lay components on your notebook. See your online hardware guide. 6 Loosen the wireless network bay cover screw (this notebook. Never slide components over so the bottom is facing ...
...bags provide electrostatic protection. • Always hold components by Gateway, or a Gateway authorized representative, explicitly for your notebook are trademarks or registered trademarks of their respective companies. 1 www.gateway.com © 2006 Gateway, Inc. Gateway and eMachines are ready to use them. Tools You .... Technical Support See the label on the bottom of Gateway, Inc. Do not lay components on your notebook. See your online hardware guide. 6 Loosen the wireless network bay cover screw (this notebook. Never slide components over so the bottom is facing ...

8511418 - Component Replacement Manual
Page 12
...module slot. 12 Move the antenna wires out of the way. 13 If your card is held by clips, press outward on your notebook. Gateway and eMachines are trademarks or registered trademarks of the module until it clicks into the empty slot. All rights reserved. Screw 11 Hold...module tilts upward. in one direction. Replacing the Wireless Network Module 10 Pull the module out of the notebook for important safety, regulatory, and legal information. 2 www.gateway.com © 2006 Gateway, Inc. If your hardware guide for Customer Care Information. See your card is keyed so it into ...
...module slot. 12 Move the antenna wires out of the way. 13 If your card is held by clips, press outward on your notebook. Gateway and eMachines are trademarks or registered trademarks of the module until it clicks into the empty slot. All rights reserved. Screw 11 Hold...module tilts upward. in one direction. Replacing the Wireless Network Module 10 Pull the module out of the notebook for important safety, regulatory, and legal information. 2 www.gateway.com © 2006 Gateway, Inc. If your hardware guide for Customer Care Information. See your card is keyed so it into ...
8511369 - Gateway Notebook Hardware Reference
Page 1
HARDWARE REFERENCE Gateway Notebook
HARDWARE REFERENCE Gateway Notebook
8511369 - Gateway Notebook Hardware Reference
Page 3
Contents Chapter 1: About this reference 1 About this guide 2 Accessing the online User Guide 2 Gateway contact information 2 Gateway model and serial number 2 Microsoft Certificate of Authenticity 3 For more information 3 Chapter 2: Checking Out Your Gateway Notebook 5 Identifying features 6 Front 6 Left 7 Right 8 Back 9 Bottom 10 Keyboard area 11 Connecting the AC adapter 12 Protecting from power source problems...
Contents Chapter 1: About this reference 1 About this guide 2 Accessing the online User Guide 2 Gateway contact information 2 Gateway model and serial number 2 Microsoft Certificate of Authenticity 3 For more information 3 Chapter 2: Checking Out Your Gateway Notebook 5 Identifying features 6 Front 6 Left 7 Right 8 Back 9 Bottom 10 Keyboard area 11 Connecting the AC adapter 12 Protecting from power source problems...
8511369 - Gateway Notebook Hardware Reference
Page 4
Contents www.gateway.com Chapter 3: Maintaining and Upgrading Your Notebook 31 Preventing static electricity discharge 32 Adding or replacing memory 32 Replacing the DVD drive 35 Replacing the hard drive kit 38 Replacing the keyboard 40 Removing the keyboard 40 Installing the keyboard 45 Appendix A: Safety, Regulatory, and Legal Information 47 Index 59 ii
Contents www.gateway.com Chapter 3: Maintaining and Upgrading Your Notebook 31 Preventing static electricity discharge 32 Adding or replacing memory 32 Replacing the DVD drive 35 Replacing the hard drive kit 38 Replacing the keyboard 40 Removing the keyboard 40 Installing the keyboard 45 Appendix A: Safety, Regulatory, and Legal Information 47 Index 59 ii
8511369 - Gateway Notebook Hardware Reference
Page 6
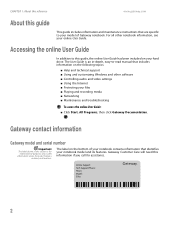
...on the following topics: ■ Help and technical support ■ Using and customizing Windows and other notebook information, see your notebook model and its features. Gateway contact information Gateway model and serial number Important The label shown in -depth, easy-to this section is an in... this guide, the online User Guide has been included on the bottom of Gateway notebook. Online Support: Tech Support Phone: Hours: Model: S/No: 2 CHAPTER 1: About this reference www.gateway.com About this information if you call for informational purposes only. For all other ...
...on the following topics: ■ Help and technical support ■ Using and customizing Windows and other notebook information, see your notebook model and its features. Gateway contact information Gateway model and serial number Important The label shown in -depth, easy-to this section is an in... this guide, the online User Guide has been included on the bottom of Gateway notebook. Online Support: Tech Support Phone: Hours: Model: S/No: 2 CHAPTER 1: About this reference www.gateway.com About this information if you call for informational purposes only. For all other ...
8511369 - Gateway Notebook Hardware Reference
Page 7
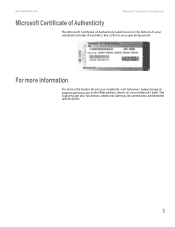
www.gateway.com Microsoft Certificate of Authenticity Microsoft Certificate of Authenticity The Microsoft Certificate of Authenticity label found on your operating system. For more information For more information about your notebook, visit Gateway's Support page at support.gateway.com or the Web address shown on the bottom of your notebook includes the product key code for your notebook's label. The Support page also has links to additional Gateway documentation and detailed specifications. 3
www.gateway.com Microsoft Certificate of Authenticity Microsoft Certificate of Authenticity The Microsoft Certificate of Authenticity label found on your operating system. For more information For more information about your notebook, visit Gateway's Support page at support.gateway.com or the Web address shown on the bottom of your notebook includes the product key code for your notebook's label. The Support page also has links to additional Gateway documentation and detailed specifications. 3
8511369 - Gateway Notebook Hardware Reference
Page 9
CHAPTER 2 Checking Out Your Gateway Notebook • Identifying features • Connecting the AC adapter • Connecting the dial-up modem • Connecting to a cable or DSL modem or to an Ethernet network • Starting your notebook • Turning off your notebook • Restarting (rebooting) your notebook • Using the status indicators • Using the keyboard •...
CHAPTER 2 Checking Out Your Gateway Notebook • Identifying features • Connecting the AC adapter • Connecting the dial-up modem • Connecting to a cable or DSL modem or to an Ethernet network • Starting your notebook • Turning off your notebook • Restarting (rebooting) your notebook • Using the status indicators • Using the keyboard •...
8511369 - Gateway Notebook Hardware Reference
Page 10
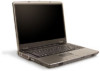
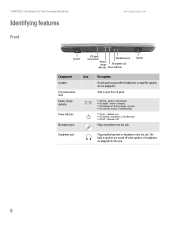
...LED blue - battery charge is charging. ■ LED blinking red - Headphone jack Plug amplified speakers or headphones into this jack. notebook is in speakers are turned off - The built-in Standby mode. ■ LED off when speakers or headphones are not plugged in.... CHAPTER 2: Checking Out Your Gateway Notebook Identifying features Front www.gateway.com Speaker LCD panel release latch Headphone jack Battery charge Microphone jack indicator Power indicator Speaker Component Icon Speakers ...
...LED blue - battery charge is charging. ■ LED blinking red - Headphone jack Plug amplified speakers or headphones into this jack. notebook is in speakers are turned off - The built-in Standby mode. ■ LED off when speakers or headphones are not plugged in.... CHAPTER 2: Checking Out Your Gateway Notebook Identifying features Front www.gateway.com Speaker LCD panel release latch Headphone jack Battery charge Microphone jack indicator Power indicator Speaker Component Icon Speakers ...
8511369 - Gateway Notebook Hardware Reference
Page 11
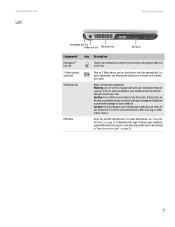
... Insert CDs or DVDs into this slot. For more information, see "Using the DVD drive" on a television in unexpected shutdown or permanent damage to your notebook. www.gateway.com Left Identifying features Kensington lock slot S-Video out jack Ventilation fan DVD drive Component Icon Description Kensington™ lock slot Secure your...
... Insert CDs or DVDs into this slot. For more information, see "Using the DVD drive" on a television in unexpected shutdown or permanent damage to your notebook. www.gateway.com Left Identifying features Kensington lock slot S-Video out jack Ventilation fan DVD drive Component Icon Description Kensington™ lock slot Secure your...


