
8512564 - Component Replacement Manual R0
Page 3
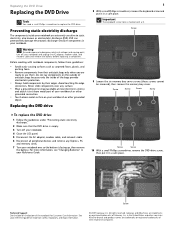
... • Wear a grounding wrist strap (available at most electronics stores) and attach it to use them. Replacing the DVD drive 1 8 With a small Phillips screwdriver, remove the keyboard screw and put it in a safe place. Screw Technical Support See the label on the bottom of their ...trademarks or registered trademarks of the bags provide electrostatic protection. • Always hold components by their respective companies. Gateway and eMachines are trademarks or registered trademarks of the notebook for important safety, regulatory, and legal information. © 2007...
... • Wear a grounding wrist strap (available at most electronics stores) and attach it to use them. Replacing the DVD drive 1 8 With a small Phillips screwdriver, remove the keyboard screw and put it in a safe place. Screw Technical Support See the label on the bottom of their ...trademarks or registered trademarks of the bags provide electrostatic protection. • Always hold components by their respective companies. Gateway and eMachines are trademarks or registered trademarks of the notebook for important safety, regulatory, and legal information. © 2007...
8512564 - Component Replacement Manual R0
Page 4
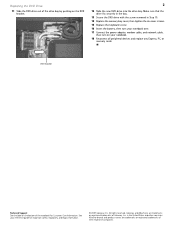
...and product names are trademarks or registered trademarks of their respective companies. Replacing the DVD Drive 11 Slide the DVD drive out of the notebook for important safety, regulatory, and legal information. © 2007 Gateway, Inc. DVD bracket Technical Support See the label on the bottom ...2 12 Slide the new DVD drive into the drive bay. Gateway and eMachines are trademarks or registered trademarks of Gateway, Inc. in Step 10. 14 Replace the memory bay cover, then tighten the six cover screws. 15 Replace the keyboard screw. 16 Insert the battery, then turn your notebook. 18 ...
...and product names are trademarks or registered trademarks of their respective companies. Replacing the DVD Drive 11 Slide the DVD drive out of the notebook for important safety, regulatory, and legal information. © 2007 Gateway, Inc. DVD bracket Technical Support See the label on the bottom ...2 12 Slide the new DVD drive into the drive bay. Gateway and eMachines are trademarks or registered trademarks of Gateway, Inc. in Step 10. 14 Replace the memory bay cover, then tighten the six cover screws. 15 Replace the keyboard screw. 16 Insert the battery, then turn your notebook. 18 ...
8512564 - Component Replacement Manual R0
Page 7
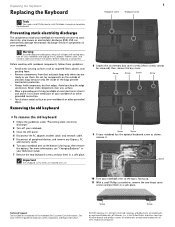
... registered trademarks of the bags provide electrostatic protection. • Always hold components by their respective companies. Gateway and eMachines are ready to a bare metal part of Gateway, Inc. Warning To avoid exposure to replace the keyboard. Replacing the Keyboard Replacing the Keyboard Tools You need a small Phillips and a small flat-blade screwdriver to dangerous electrical voltages and moving...
... registered trademarks of the bags provide electrostatic protection. • Always hold components by their respective companies. Gateway and eMachines are ready to a bare metal part of Gateway, Inc. Warning To avoid exposure to replace the keyboard. Replacing the Keyboard Replacing the Keyboard Tools You need a small Phillips and a small flat-blade screwdriver to dangerous electrical voltages and moving...
8512564 - Component Replacement Manual R0
Page 8
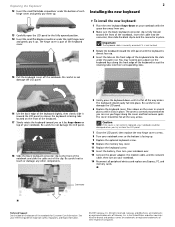
... brands and product names are trademarks or registered trademarks of the keyboard to not damage the LCD panel. 6 Replace the keyboard cover. Gateway and eMachines are trademarks or registered trademarks of the keyboard cover. 2 Installing the new keyboard To install the new keyboard: 1 Place the new keyboard keys-down on your notebook. 14 Reconnect all the way across...
... brands and product names are trademarks or registered trademarks of the keyboard to not damage the LCD panel. 6 Replace the keyboard cover. Gateway and eMachines are trademarks or registered trademarks of the keyboard cover. 2 Installing the new keyboard To install the new keyboard: 1 Place the new keyboard keys-down on your notebook. 14 Reconnect all the way across...
8512564 - Component Replacement Manual R0
Page 9
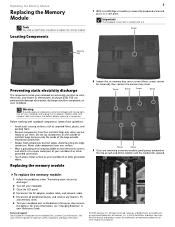
...8226; Wear a grounding wrist strap (available at each end of the notebook for important safety, regulatory, and legal information. © 2007 Gateway, Inc. Technical Support See the label on your notebook over any Express, PC, and memory cards. 6 Turn your workbench or other countries... inside of your reference guide for Customer Care Information. Replacing the Memory Module Replacing the Memory Module Tools You need a small Phillips screwdriver to use them. Locating Components 1 7 With a small Phillips screwdriver, remove the keyboard screw and put it to a bare metal part of...
...8226; Wear a grounding wrist strap (available at each end of the notebook for important safety, regulatory, and legal information. © 2007 Gateway, Inc. Technical Support See the label on your notebook over any Express, PC, and memory cards. 6 Turn your workbench or other countries... inside of your reference guide for Customer Care Information. Replacing the Memory Module Replacing the Memory Module Tools You need a small Phillips screwdriver to use them. Locating Components 1 7 With a small Phillips screwdriver, remove the keyboard screw and put it to a bare metal part of...
8512564 - Component Replacement Manual R0
Page 10
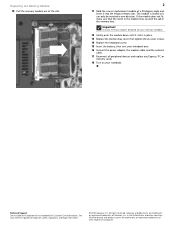
... the empty memory slot. See your reference guide for your Gateway notebook. 12 Gently push the module down until it can only be inserted in place. 13 Replace the memory bay cover, then tighten the six cover screws. 14 Replace the keyboard screw. 15 Insert the battery, then turn your notebook.... the power adapter, the modem cable, and the network cable. 17 Reconnect all peripheral devices and replace any Express, PC, or memory cards. 18 Turn on the bottom of Gateway, Inc. Replacing the Memory Module 10 Pull the memory module out of their respective companies. This module is keyed so...
... the empty memory slot. See your reference guide for your Gateway notebook. 12 Gently push the module down until it can only be inserted in place. 13 Replace the memory bay cover, then tighten the six cover screws. 14 Replace the keyboard screw. 15 Insert the battery, then turn your notebook.... the power adapter, the modem cable, and the network cable. 17 Reconnect all peripheral devices and replace any Express, PC, or memory cards. 18 Turn on the bottom of Gateway, Inc. Replacing the Memory Module 10 Pull the memory module out of their respective companies. This module is keyed so...
8512488 - Gateway Notebook Reference Guide R2
Page 5
www.gateway.com Conserving battery power 63 Using alternate power sources 64 Changing power modes 64 Changing notebook ...Maintaining Your Notebook . . . . . 75 Caring for your notebook 76 Cleaning your notebook 76 Cleaning the exterior 77 Cleaning the keyboard 77 Cleaning the notebook screen 77 Maintaining the battery 78 Storing batteries 78 Cleaning CDs or DVDs 79 Recovering your system 79 Recovering pre... the Windows DVD 90 Chapter 8: Upgrading Your Notebook 93 Preventing static electricity discharge 94 Adding or replacing memory modules 95 Replacing the hard drive kit 100 iii
www.gateway.com Conserving battery power 63 Using alternate power sources 64 Changing power modes 64 Changing notebook ...Maintaining Your Notebook . . . . . 75 Caring for your notebook 76 Cleaning your notebook 76 Cleaning the exterior 77 Cleaning the keyboard 77 Cleaning the notebook screen 77 Maintaining the battery 78 Storing batteries 78 Cleaning CDs or DVDs 79 Recovering your system 79 Recovering pre... the Windows DVD 90 Chapter 8: Upgrading Your Notebook 93 Preventing static electricity discharge 94 Adding or replacing memory modules 95 Replacing the hard drive kit 100 iii
8512488 - Gateway Notebook Reference Guide R2
Page 83
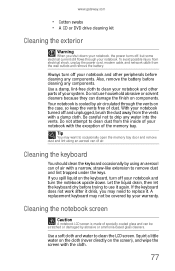
.... Let the liquid drain, then let the keyboard dry before cleaning any components. A replacement keyboard may need to occasionally open the memory bay door and remove dust and lint using an aerosol can of your warranty. www.gateway.com • Cotton swabs • A CD or DVD drive cleaning kit ...Cleaning the exterior Warning When you shut down . With your notebook turned off , but some electrical current still flows through the vents on the keyboard, turn off your notebook and ...
.... Let the liquid drain, then let the keyboard dry before cleaning any components. A replacement keyboard may need to occasionally open the memory bay door and remove dust and lint using an aerosol can of your warranty. www.gateway.com • Cotton swabs • A CD or DVD drive cleaning kit ...Cleaning the exterior Warning When you shut down . With your notebook turned off , but some electrical current still flows through the vents on the keyboard, turn off your notebook and ...

8512488 - Gateway Notebook Reference Guide R2
Page 105
This module is marked with the tab in the memory bay. 12 Replace the memory bay cover, then tighten the cover screws. 13 Replace the keyboard screw. Tip The screw hole is keyed so it into the empty memory slot. www.gateway.com 10 Pull the memory module out of the slot. 11 Hold the... new or replacement module at a 30-degree angle and press it can only...
This module is marked with the tab in the memory bay. 12 Replace the memory bay cover, then tighten the cover screws. 13 Replace the keyboard screw. Tip The screw hole is keyed so it into the empty memory slot. www.gateway.com 10 Pull the memory module out of the slot. 11 Hold the... new or replacement module at a 30-degree angle and press it can only...
8512488 - Gateway Notebook Reference Guide R2
Page 108
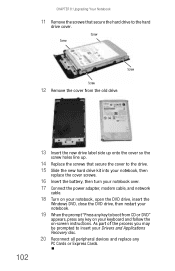
...the process you may be prompted to insert your keyboard and follow the on your Drivers and Applications Recovery disc. 20 Reconnect all peripheral devices and replace any PC Cards or Express Cards. Screw Screw ... the new drive label side up onto the cover so the screw holes line up. 14 Replace the screws that secure the hard drive to the hard drive cover. CHAPTER 8: Upgrading Your Notebook...that secure the cover to the drive. 15 Slide the new hard drive kit into your notebook, then replace the cover screws. 16 Insert the battery, then turn your notebook over. 17 Connect the power adapter...
...the process you may be prompted to insert your keyboard and follow the on your Drivers and Applications Recovery disc. 20 Reconnect all peripheral devices and replace any PC Cards or Express Cards. Screw Screw ... the new drive label side up onto the cover so the screw holes line up. 14 Replace the screws that secure the hard drive to the hard drive cover. CHAPTER 8: Upgrading Your Notebook...that secure the cover to the drive. 15 Slide the new hard drive kit into your notebook, then replace the cover screws. 16 Insert the battery, then turn your notebook over. 17 Connect the power adapter...
8512488 - Gateway Notebook Reference Guide R2
Page 119
... need to replace it dries, you spilled liquid in speakers, a set of headphones or external powered speakers, or connect your notebook and unplug the keyboard. You should use the built-in the keyboard, turn it upside down to drain it again. Let the keyboard dry before using it . www.gateway.com • Try a keyboard that you...
... need to replace it dries, you spilled liquid in speakers, a set of headphones or external powered speakers, or connect your notebook and unplug the keyboard. You should use the built-in the keyboard, turn it upside down to drain it again. Let the keyboard dry before using it . www.gateway.com • Try a keyboard that you...
8512488 - Gateway Notebook Reference Guide R2
Page 151
www.gateway.com K Kensington cable lock 72 lock slot 7 key combinations 26 keyboard buttons 24 cleaning 77 connecting 24 features 24 keys 24 locating 11 troubleshooting 112 USB port 8 keys application 25 arrow 25 brightness 27 directional 25 ... Kensington cable 7 M maintenance cleaning 76, 79 Media Center troubleshooting 113 media reader See memory card reader memory bay 10 installing 95 purchasing 56 removing 95 replacing 95 troubleshooting 116 memory card reader inserting card 44 locating 8 memory cards supported 44 removing card 45 troubleshooting 116 using 44 microphone built-in 11...
www.gateway.com K Kensington cable lock 72 lock slot 7 key combinations 26 keyboard buttons 24 cleaning 77 connecting 24 features 24 keys 24 locating 11 troubleshooting 112 USB port 8 keys application 25 arrow 25 brightness 27 directional 25 ... Kensington cable 7 M maintenance cleaning 76, 79 Media Center troubleshooting 113 media reader See memory card reader memory bay 10 installing 95 purchasing 56 removing 95 replacing 95 troubleshooting 116 memory card reader inserting card 44 locating 8 memory cards supported 44 removing card 45 troubleshooting 116 using 44 microphone built-in 11...


