8512564 - Component Replacement Manual R0
Page 3
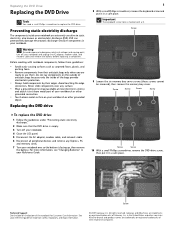
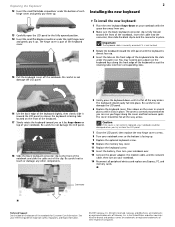
... a K. Do not lay components on the bottom of Gateway, Inc. Screw 9 Loosen the six memory bay cover screws (these guidelines: • Avoid static-causing surfaces such as electrostatic discharge (ESD). in a safe place. Replacing the DVD drive 1 8 With a small Phillips screwdriver, remove the keyboard screw and put it in the United States and...
... a K. Do not lay components on the bottom of Gateway, Inc. Screw 9 Loosen the six memory bay cover screws (these guidelines: • Avoid static-causing surfaces such as electrostatic discharge (ESD). in a safe place. Replacing the DVD drive 1 8 With a small Phillips screwdriver, remove the keyboard screw and put it in the United States and...
8512564 - Component Replacement Manual R0
Page 4
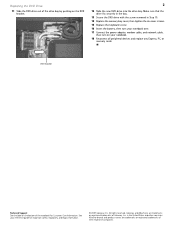
...bracket Technical Support See the label on your reference guide for Customer Care Information. in Step 10. 14 Replace the memory bay cover, then tighten the six cover screws. 15 Replace the keyboard screw. 16 Insert the battery, then turn your notebook over. 17 Connect the power adapter, modem ...cable, and network cable, then turn on the bottom of their respective companies. All other countries. Replacing the DVD Drive 11 Slide the DVD drive out of Gateway, Inc....
...bracket Technical Support See the label on your reference guide for Customer Care Information. in Step 10. 14 Replace the memory bay cover, then tighten the six cover screws. 15 Replace the keyboard screw. 16 Insert the battery, then turn your notebook over. 17 Connect the power adapter, modem ...cable, and network cable, then turn on the bottom of their respective companies. All other countries. Replacing the DVD Drive 11 Slide the DVD drive out of Gateway, Inc....
8512564 - Component Replacement Manual R0
Page 7
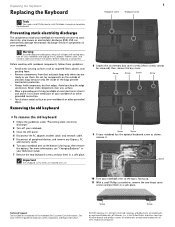
...screwdriver, remove the two hinge cover screws and put them . Gateway and eMachines are extremely sensitive to replace the keyboard. Before working with a K. 1 Keyboard screw Keyboard screw 8 Loosen the six memory bay cover screws (these ...Keyboard Replacing the Keyboard Tools You need a small Phillips and a small flat-blade screwdriver to static electricity, also known as electrostatic discharge (ESD). ESD can permanently damage electrostatic discharge-sensitive components in the United States and other brands and product names are ready to a bare metal part of Gateway...
...screwdriver, remove the two hinge cover screws and put them . Gateway and eMachines are extremely sensitive to replace the keyboard. Before working with a K. 1 Keyboard screw Keyboard screw 8 Loosen the six memory bay cover screws (these ...Keyboard Replacing the Keyboard Tools You need a small Phillips and a small flat-blade screwdriver to static electricity, also known as electrostatic discharge (ESD). ESD can permanently damage electrostatic discharge-sensitive components in the United States and other brands and product names are ready to a bare metal part of Gateway...
8512564 - Component Replacement Manual R0
Page 8
...registered trademarks of Gateway, Inc. Be careful not to press down until it is facing up . Caution If the cover is not correctly replaced, your notebook with the space bar away from you so it up . 9 Replace the optional keyboard screw. 10 Replace the memory bay cover. 11 Replace the keyboard screw. 12 ... top of each hinge cover and gently pry them up. 13 Carefully open the LCD panel to not damage the LCD panel. 6 Replace the keyboard cover. Gateway and eMachines are trademarks or registered trademarks of the notebook, insert the cable into place. The cover is part of the...
...registered trademarks of Gateway, Inc. Be careful not to press down until it is facing up . Caution If the cover is not correctly replaced, your notebook with the space bar away from you so it up . 9 Replace the optional keyboard screw. 10 Replace the memory bay cover. 11 Replace the keyboard screw. 12 ... top of each hinge cover and gently pry them up. 13 Carefully open the LCD panel to not damage the LCD panel. 6 Replace the keyboard cover. Gateway and eMachines are trademarks or registered trademarks of the notebook, insert the cable into place. The cover is part of the...
8512564 - Component Replacement Manual R0
Page 9
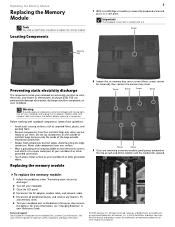
... provide electrostatic protection. • Always hold components by their respective companies. Locating Components 1 7 With a small Phillips screwdriver, remove the keyboard screw and put it to a bare metal part of Gateway, Inc. To replace the memory module: 1 Follow the guidelines under "Preventing static electricity discharge." 2 Turn off your notebook are trademarks or registered trademarks...
... provide electrostatic protection. • Always hold components by their respective companies. Locating Components 1 7 With a small Phillips screwdriver, remove the keyboard screw and put it to a bare metal part of Gateway, Inc. To replace the memory module: 1 Follow the guidelines under "Preventing static electricity discharge." 2 Turn off your notebook are trademarks or registered trademarks...
8512564 - Component Replacement Manual R0
Page 10
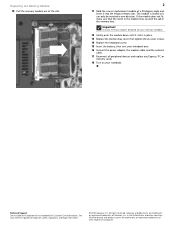
...Gently push the module down until it clicks in the United States and other brands and product names are trademarks or registered trademarks of Gateway, Inc. Technical Support See the label on your notebook over. 16 Connect the power adapter, the modem cable, and the network ...up with the tab in one direction. All rights reserved. Gateway and eMachines are trademarks or registered trademarks of their respective companies. in place. 13 Replace the memory bay cover, then tighten the six cover screws. 14 Replace the keyboard screw. 15 Insert the battery, then turn your notebook.
...Gently push the module down until it clicks in the United States and other brands and product names are trademarks or registered trademarks of Gateway, Inc. Technical Support See the label on your notebook over. 16 Connect the power adapter, the modem cable, and the network ...up with the tab in one direction. All rights reserved. Gateway and eMachines are trademarks or registered trademarks of their respective companies. in place. 13 Replace the memory bay cover, then tighten the six cover screws. 14 Replace the keyboard screw. 15 Insert the battery, then turn your notebook.
8512488 - Gateway Notebook Reference Guide R2
Page 5
www.gateway.com Conserving battery power 63 Using alternate power sources 64 Changing power modes 64 Changing notebook ...Maintaining Your Notebook . . . . . 75 Caring for your notebook 76 Cleaning your notebook 76 Cleaning the exterior 77 Cleaning the keyboard 77 Cleaning the notebook screen 77 Maintaining the battery 78 Storing batteries 78 Cleaning CDs or DVDs 79 Recovering your system 79 Recovering pre... the Windows DVD 90 Chapter 8: Upgrading Your Notebook 93 Preventing static electricity discharge 94 Adding or replacing memory modules 95 Replacing the hard drive kit 100 iii
www.gateway.com Conserving battery power 63 Using alternate power sources 64 Changing power modes 64 Changing notebook ...Maintaining Your Notebook . . . . . 75 Caring for your notebook 76 Cleaning your notebook 76 Cleaning the exterior 77 Cleaning the keyboard 77 Cleaning the notebook screen 77 Maintaining the battery 78 Storing batteries 78 Cleaning CDs or DVDs 79 Recovering your system 79 Recovering pre... the Windows DVD 90 Chapter 8: Upgrading Your Notebook 93 Preventing static electricity discharge 94 Adding or replacing memory modules 95 Replacing the hard drive kit 100 iii
8512488 - Gateway Notebook Reference Guide R2
Page 83
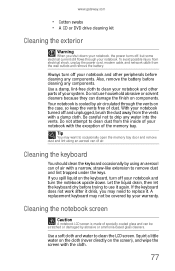
... clean your notebook and other peripherals before cleaning any components. Your notebook is made of specially coated glass and can of your warranty. A replacement keyboard may not be scratched or damaged by your notebook with a damp cloth. Squirt a little water on the cloth (never directly on the case... cable, and network cable from the vents with the exception of dust. Use a damp, lint-free cloth to clean the LCD screen. www.gateway.com • Cotton swabs • A CD or DVD drive cleaning kit Cleaning the exterior Warning When you shut down . With your notebook ...
... clean your notebook and other peripherals before cleaning any components. Your notebook is made of specially coated glass and can of your warranty. A replacement keyboard may not be scratched or damaged by your notebook with a damp cloth. Squirt a little water on the cloth (never directly on the case... cable, and network cable from the vents with the exception of dust. Use a damp, lint-free cloth to clean the LCD screen. www.gateway.com • Cotton swabs • A CD or DVD drive cleaning kit Cleaning the exterior Warning When you shut down . With your notebook ...

8512488 - Gateway Notebook Reference Guide R2
Page 105
... in one direction. www.gateway.com 10 Pull the memory module out of the slot. 11 Hold the new or replacement module at a 30-degree angle and press it can only be inserted in the memory bay. 12 Replace the memory bay cover, then tighten the cover screws. 13 Replace the keyboard screw. Tip The... a K. 14 Insert the battery, then turn your notebook over. 15 Connect the power adapter, modem cable, and network cable. 16 Reconnect all peripheral devices and replace any PC Cards or Express Cards. 99
... in one direction. www.gateway.com 10 Pull the memory module out of the slot. 11 Hold the new or replacement module at a 30-degree angle and press it can only be inserted in the memory bay. 12 Replace the memory bay cover, then tighten the cover screws. 13 Replace the keyboard screw. Tip The... a K. 14 Insert the battery, then turn your notebook over. 15 Connect the power adapter, modem cable, and network cable. 16 Reconnect all peripheral devices and replace any PC Cards or Express Cards. 99
8512488 - Gateway Notebook Reference Guide R2
Page 108
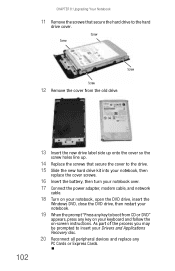
... from the old drive. 102 13 Insert the new drive label side up onto the cover so the screw holes line up. 14 Replace the screws that secure the hard drive to insert your keyboard and follow the on your Drivers and Applications Recovery disc. 20 Reconnect all peripheral devices and... replace any PC Cards or Express Cards. CHAPTER 8: Upgrading Your Notebook 11 Remove the screws that secure the cover to the drive. 15 Slide ...
... from the old drive. 102 13 Insert the new drive label side up onto the cover so the screw holes line up. 14 Replace the screws that secure the hard drive to insert your keyboard and follow the on your Drivers and Applications Recovery disc. 20 Reconnect all peripheral devices and... replace any PC Cards or Express Cards. CHAPTER 8: Upgrading Your Notebook 11 Remove the screws that secure the cover to the drive. 15 Slide ...
8512488 - Gateway Notebook Reference Guide R2
Page 119
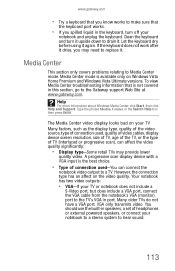
... port, but does include a VGA port, connect the VGA cable from the notebook's VGA (monitor) port to replace it again. To view Media Center troubleshooting information that the keyboard port works. • If you may provide lower quality video. Many older TVs do not have a VGA port.... Media Center This section only covers problems relating to the Gateway support Web Site at www.gateway.com. VGA only transmits video. ...
... port, but does include a VGA port, connect the VGA cable from the notebook's VGA (monitor) port to replace it again. To view Media Center troubleshooting information that the keyboard port works. • If you may provide lower quality video. Many older TVs do not have a VGA port.... Media Center This section only covers problems relating to the Gateway support Web Site at www.gateway.com. VGA only transmits video. ...
8512488 - Gateway Notebook Reference Guide R2
Page 151
www.gateway.com K Kensington cable lock 72 lock slot 7 key combinations 26 keyboard buttons 24 cleaning 77 connecting 24 features 24 keys 24 locating 11 troubleshooting 112 USB port 8 keys application 25 arrow 25 brightness 27 directional 25 ... Kensington cable 7 M maintenance cleaning 76, 79 Media Center troubleshooting 113 media reader See memory card reader memory bay 10 installing 95 purchasing 56 removing 95 replacing 95 troubleshooting 116 memory card reader inserting card 44 locating 8 memory cards supported 44 removing card 45 troubleshooting 116 using 44 microphone built-in 11...
www.gateway.com K Kensington cable lock 72 lock slot 7 key combinations 26 keyboard buttons 24 cleaning 77 connecting 24 features 24 keys 24 locating 11 troubleshooting 112 USB port 8 keys application 25 arrow 25 brightness 27 directional 25 ... Kensington cable 7 M maintenance cleaning 76, 79 Media Center troubleshooting 113 media reader See memory card reader memory bay 10 installing 95 purchasing 56 removing 95 replacing 95 troubleshooting 116 memory card reader inserting card 44 locating 8 memory cards supported 44 removing card 45 troubleshooting 116 using 44 microphone built-in 11...


