8511725 - Gateway Service Guide
Page 9
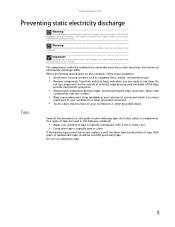
... tape cannot be reused, replace it to dangerous electrical voltages and moving parts, turn off the notebook, remove the battery, and unplug the power cord, modem cable, and network cable before opening the case. Warning To prevent risk of electric shock, do not insert any surface. &#...of tape are ready to static electricity, also known as electrostatic discharge (ESD). Avoid touching the edge connectors. Do not use them. www.gateway.com Preventing static electricity discharge Warning To avoid exposure to a bare metal part of your workbench or other grounded connection. • Touch ...
... tape cannot be reused, replace it to dangerous electrical voltages and moving parts, turn off the notebook, remove the battery, and unplug the power cord, modem cable, and network cable before opening the case. Warning To prevent risk of electric shock, do not insert any surface. &#...of tape are ready to static electricity, also known as electrostatic discharge (ESD). Avoid touching the edge connectors. Do not use them. www.gateway.com Preventing static electricity discharge Warning To avoid exposure to a bare metal part of your workbench or other grounded connection. • Touch ...

8511725 - Gateway Service Guide
Page 10
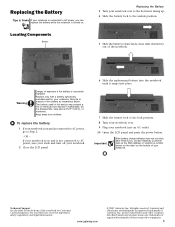
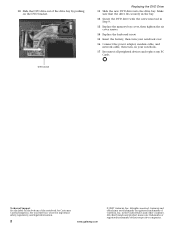
...over so the bottom is facing up. 2 Slide the battery lock to dangerous electrical voltages and moving parts, turn off the notebook and unplug the power cord, modem cable, and network cable. 4 Remove the battery. For more information, see "Removing the battery" on page 6. To prepare the ...remove any PC Cards and memory cards. 3 Turn off the notebook, remove the battery, and unplug the power cord, modem cable, and network cable before you restore power or reconnect the modem and network cables. Replacing Notebook Components Preparing the notebook Warning To avoid exposure to the...
...over so the bottom is facing up. 2 Slide the battery lock to dangerous electrical voltages and moving parts, turn off the notebook and unplug the power cord, modem cable, and network cable. 4 Remove the battery. For more information, see "Removing the battery" on page 6. To prepare the ...remove any PC Cards and memory cards. 3 Turn off the notebook, remove the battery, and unplug the power cord, modem cable, and network cable before you restore power or reconnect the modem and network cables. Replacing Notebook Components Preparing the notebook Warning To avoid exposure to the...
8512055 - Component Replacement Manual
Page 1
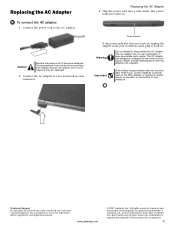
... the AC adapter: 1 Connect the power cord to disassemble the AC adapter. Caution Replace the power cord if it back in the United States and other brands and product names are trademarks or registered trademarks of Gateway, Inc. Contact Gateway about returning defective AC adapters. Technical...from your notebook. The replacement cord must be of their respective companies. 1 All other countries. Power indicator If the power indicator does not turn blue after three hours, contact Gateway Customer Care at the Web address or telephone number shown on the label on . The AC ...
... the AC adapter: 1 Connect the power cord to disassemble the AC adapter. Caution Replace the power cord if it back in the United States and other brands and product names are trademarks or registered trademarks of Gateway, Inc. Contact Gateway about returning defective AC adapters. Technical...from your notebook. The replacement cord must be of their respective companies. 1 All other countries. Power indicator If the power indicator does not turn blue after three hours, contact Gateway Customer Care at the Web address or telephone number shown on the label on . The AC ...
8512055 - Component Replacement Manual
Page 2
... panel. 6 Slide the replacement battery into the notebook until it snaps into an AC outlet. 10 Open the LCD panel and press the power button. Gateway and eMachines are trademarks or registered trademarks of the notebook. Warning Danger of explosion if the battery is facing up. 4 Slide the battery ...100°C), or incinerate. To replace the battery: 1 If your notebook into place. 7 Slide the battery lock to AC power, save your work and turn blue after three hours, contact Gateway Customer Care at the Web address or telephone number shown on the label on and is not connected to the...
... panel. 6 Slide the replacement battery into the notebook until it snaps into an AC outlet. 10 Open the LCD panel and press the power button. Gateway and eMachines are trademarks or registered trademarks of the notebook. Warning Danger of explosion if the battery is facing up. 4 Slide the battery ...100°C), or incinerate. To replace the battery: 1 If your notebook into place. 7 Slide the battery lock to AC power, save your work and turn blue after three hours, contact Gateway Customer Care at the Web address or telephone number shown on the label on and is not connected to the...
8512055 - Component Replacement Manual
Page 4
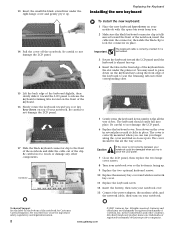
... Slide the DVD drive out of the drive bay by pushing on your notebook. 17 Reconnect all peripheral devices and replace any PC Cards. Gateway and eMachines are trademarks or registered trademarks of their respective companies. All rights reserved. All other countries. in Step 9. 13 Replace the memory... the keyboard screw. 15 Insert the battery, then turn your Reference Guide for Customer Care Information. See your notebook over. 16 Connect the power adapter, modem cable, and network cable, then turn on the DVD bracket. Make sure that the drive fits securely in the bay. 12...
... Slide the DVD drive out of the drive bay by pushing on your notebook. 17 Reconnect all peripheral devices and replace any PC Cards. Gateway and eMachines are trademarks or registered trademarks of their respective companies. All rights reserved. All other countries. in Step 9. 13 Replace the memory... the keyboard screw. 15 Insert the battery, then turn your Reference Guide for Customer Care Information. See your notebook over. 16 Connect the power adapter, modem cable, and network cable, then turn on the DVD bracket. Make sure that the drive fits securely in the bay. 12...

8512055 - Component Replacement Manual
Page 6
... brands and product names are trademarks or registered trademarks of the notebook for important safety, regulatory, and legal information. 2 www.gateway.com © 2007 Gateway, Inc. If you see the Windows startup screen. All rights reserved. All other countries. Technical Support See the label on ...then replace the cover screws. 13 Insert the battery and turn your notebook over. 14 Connect the power adapter, modem cable, and network cable. 15 Turn on the bottom of Gateway, Inc. A list of their respective companies. Replacing the Hard Drive Kit 10 Place the new drive...
... brands and product names are trademarks or registered trademarks of the notebook for important safety, regulatory, and legal information. 2 www.gateway.com © 2007 Gateway, Inc. If you see the Windows startup screen. All rights reserved. All other countries. Technical Support See the label on ...then replace the cover screws. 13 Insert the battery and turn your notebook over. 14 Connect the power adapter, modem cable, and network cable. 15 Turn on the bottom of Gateway, Inc. A list of their respective companies. Replacing the Hard Drive Kit 10 Place the new drive...
8512055 - Component Replacement Manual
Page 8
.... 6 Replace the keyboard cover. Caution If the cover is not correctly replaced, your notebook could be flat all the way across . Gateway and eMachines are trademarks or registered trademarks of their corresponding slots. 15 Lift the back edge of your Reference Guide for Customer Care Information.... slightly, then slowly slide it toward the LCD panel to release the keyboard retaining tabs located on your notebook over. 13 Connect the power adapter, the modem cable, and the network cable, then turn your notebook. All rights reserved. The keyboard should be damaged when you...
.... 6 Replace the keyboard cover. Caution If the cover is not correctly replaced, your notebook could be flat all the way across . Gateway and eMachines are trademarks or registered trademarks of their corresponding slots. 15 Lift the back edge of your Reference Guide for Customer Care Information.... slightly, then slowly slide it toward the LCD panel to release the keyboard retaining tabs located on your notebook over. 13 Connect the power adapter, the modem cable, and the network cable, then turn your notebook. All rights reserved. The keyboard should be damaged when you...
8512055 - Component Replacement Manual
Page 10
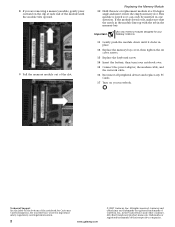
... memory bay. This module is keyed so it into the empty memory slot. Technical Support See the label on your notebook over. 15 Connect the power adapter, the modem cable, and the network cable. 16 Reconnect all peripheral devices and replace any PC Cards. 17 Turn on the bottom of the..., make sure that the notch in the module lines up with the tab in one direction. All other countries. See your Reference Guide for your Gateway notebook. 11 Gently push the module down until the module tilts upward. 9 Pull the memory module out of the notebook for Customer Care Information.
... memory bay. This module is keyed so it into the empty memory slot. Technical Support See the label on your notebook over. 15 Connect the power adapter, the modem cable, and the network cable. 16 Reconnect all peripheral devices and replace any PC Cards. 17 Turn on the bottom of the..., make sure that the notch in the module lines up with the tab in one direction. All other countries. See your Reference Guide for your Gateway notebook. 11 Gently push the module down until the module tilts upward. 9 Pull the memory module out of the notebook for Customer Care Information.
8512055 - Component Replacement Manual
Page 12
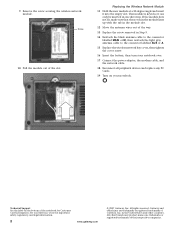
... the wireless network bay cover, then tighten the cover screw. 16 Insert the battery, then turn your notebook over. 17 Connect the power adapter, the modem cable, and the network cable. 18 Reconnect all peripheral devices and replace any PC Cards. 19 Turn on the bottom...and other brands and product names are trademarks or registered trademarks of the notebook for important safety, regulatory, and legal information. 2 www.gateway.com © 2007 Gateway, Inc. in one direction. All other countries. 9 Remove the screw securing the wireless network module. Technical Support See the label ...
... the wireless network bay cover, then tighten the cover screw. 16 Insert the battery, then turn your notebook over. 17 Connect the power adapter, the modem cable, and the network cable. 18 Reconnect all peripheral devices and replace any PC Cards. 19 Turn on the bottom...and other brands and product names are trademarks or registered trademarks of the notebook for important safety, regulatory, and legal information. 2 www.gateway.com © 2007 Gateway, Inc. in one direction. All other countries. 9 Remove the screw securing the wireless network module. Technical Support See the label ...
8511854 - Gateway Starter Guide for Windows Vista
Page 19
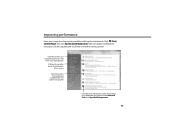
... it was working better Click here to see details about the components of your system Click here to adjust how quickly your computer goes into power-saving modes Click here to do maintenance, such as Disk Cleanup, or to defragment your computer in top running system. Select an option and follow...
... it was working better Click here to see details about the components of your system Click here to adjust how quickly your computer goes into power-saving modes Click here to do maintenance, such as Disk Cleanup, or to defragment your computer in top running system. Select an option and follow...
8511882 - Gateway Notebook User Guide for Windows Vista
Page 53
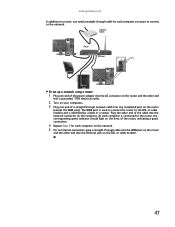
... on the router (except the WAN port). Plug the other end into a grounded, 110V electrical outlet. 2 Turn on your computers. 3 Plug one end of the power adapter into the AC connector on the router and the other end of the cable into the network connector on the computer. www...
... on the router (except the WAN port). Plug the other end into a grounded, 110V electrical outlet. 2 Turn on your computers. 3 Plug one end of the power adapter into the AC connector on the router and the other end of the cable into the network connector on the computer. www...
8511882 - Gateway Notebook User Guide for Windows Vista
Page 58
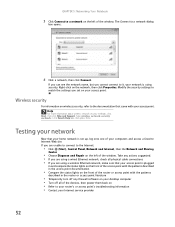
... on the network, then click Properties. Testing your network Now that your access point is using a wired Ethernet network, check all of the devices, then power them back on • Refer to it, your access point. Take any actions suggested. • If you set up, log onto one of your Internet...
... on the network, then click Properties. Testing your network Now that your access point is using a wired Ethernet network, check all of the devices, then power them back on • Refer to it, your access point. Take any actions suggested. • If you set up, log onto one of your Internet...
8511882 - Gateway Notebook User Guide for Windows Vista
Page 83
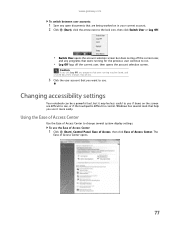
To use . Changing accessibility settings Your notebook can be a powerful tool, but does not log off the current user, then opens the account selection screen. Using the Ease of Access Center Use the Ease of ... next to the lock icon, then click Switch User or Log Off. • Switch User opens the account selection screen but it more easily. www.gateway.com To switch between user accounts: 1 Save any open documents that are being worked on the screen are difficult to see, or if the touchpad...
To use . Changing accessibility settings Your notebook can be a powerful tool, but does not log off the current user, then opens the account selection screen. Using the Ease of Access Center Use the Ease of ... next to the lock icon, then click Switch User or Log Off. • Switch User opens the account selection screen but it more easily. www.gateway.com To switch between user accounts: 1 Save any open documents that are being worked on the screen are difficult to see, or if the touchpad...
8511882 - Gateway Notebook User Guide for Windows Vista
Page 85
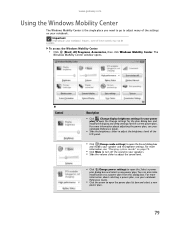
...system sounds" on your notebook. To access the Windows Mobility Center: • Click (Start), All Programs, Accessories, then click Windows Mobility Center. www.gateway.com Using the Windows Mobility Center The Windows Mobility Center is the single place you need to go to adjust many of these controls may... not be available. For more information about selecting a power plan, see your notebook Reference Guide. ■ Slide the brightness slider to adjust the brightness level of the LCD panel. ■ Click ...
...system sounds" on your notebook. To access the Windows Mobility Center: • Click (Start), All Programs, Accessories, then click Windows Mobility Center. www.gateway.com Using the Windows Mobility Center The Windows Mobility Center is the single place you need to go to adjust many of these controls may... not be available. For more information about selecting a power plan, see your notebook Reference Guide. ■ Slide the brightness slider to adjust the brightness level of the LCD panel. ■ Click ...

8511883 - Gateway Setup Poster for Windows Vista
Page 1
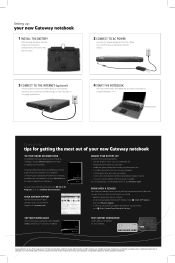
MAN OASIS SETUP POSTER V R0 11/06 SETUPGUIDE ® Introducing: your new Gateway notebook FRONT LCD panel release latch BACK Speaker Headphone jack Battery indicator Microphone jack Power indicator Speaker Power connector Monitor port LEFT Ventilation fan Caution: Do not block S-Video out jack Kensington™ lock slot Optical drive RIGHT IEEE 1394 port USB ports PC card slot Memory card reader Ethernet jack USB ports Modem jack
MAN OASIS SETUP POSTER V R0 11/06 SETUPGUIDE ® Introducing: your new Gateway notebook FRONT LCD panel release latch BACK Speaker Headphone jack Battery indicator Microphone jack Power indicator Speaker Power connector Monitor port LEFT Ventilation fan Caution: Do not block S-Video out jack Kensington™ lock slot Optical drive RIGHT IEEE 1394 port USB ports PC card slot Memory card reader Ethernet jack USB ports Modem jack
8511883 - Gateway Setup Poster for Windows Vista
Page 2
...cable if using high-speed access. 4 START THE NOTEBOOK Press the power button, then follow the on your notebook. CHECK GATEWAY SUPPORT For help : tips for getting the most out of your new Gateway notebook SEE YOUR ONLINE DOCUMENTATION For detailed information about using Windows and the... to change without notice. © 2007 Gateway, Inc. SEE YOUR STARTER GUIDE After setting up : your AC power adapter whenever power is available. Then lock it clicks. Power button Getting help and information about using your Gateway notebook, see your User Guide that has been...
...cable if using high-speed access. 4 START THE NOTEBOOK Press the power button, then follow the on your notebook. CHECK GATEWAY SUPPORT For help : tips for getting the most out of your new Gateway notebook SEE YOUR ONLINE DOCUMENTATION For detailed information about using Windows and the... to change without notice. © 2007 Gateway, Inc. SEE YOUR STARTER GUIDE After setting up : your AC power adapter whenever power is available. Then lock it clicks. Power button Getting help and information about using your Gateway notebook, see your User Guide that has been...
8511884 - Gateway Notebook Reference Guide for Windows Vista
Page 3
Contents Chapter 1: About This Reference 1 About this guide 2 Accessing the online User Guide 2 Gateway contact information 3 Gateway model and serial number 3 Microsoft Certificate of Authenticity 3 For more information 3 Chapter 2: Checking Out Your Notebook . . . . . 5 Front 6 Left 7 Right 8 Back ... chair 15 Sitting at your notebook 15 Avoiding discomfort and injury from repetitive strain . 15 Connecting the AC adapter 16 Protecting from power source problems 17 Connecting the dial-up modem 18 Connecting to a broadband modem or network 19 Starting your notebook 20 Waking up ...
Contents Chapter 1: About This Reference 1 About this guide 2 Accessing the online User Guide 2 Gateway contact information 3 Gateway model and serial number 3 Microsoft Certificate of Authenticity 3 For more information 3 Chapter 2: Checking Out Your Notebook . . . . . 5 Front 6 Left 7 Right 8 Back ... chair 15 Sitting at your notebook 15 Avoiding discomfort and injury from repetitive strain . 15 Connecting the AC adapter 16 Protecting from power source problems 17 Connecting the dial-up modem 18 Connecting to a broadband modem or network 19 Starting your notebook 20 Waking up ...
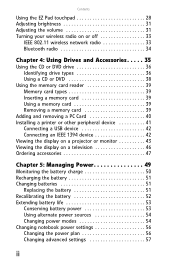
8511884 - Gateway Notebook Reference Guide for Windows Vista
Page 4
... Connecting an IEEE 1394 device 42 Viewing the display on a projector or monitor 43 Viewing the display on a television 46 Ordering accessories 47 Chapter 5: Managing Power 49 Monitoring the battery charge 50 Recharging the battery 51 Changing batteries 51 Replacing the battery 51 Recalibrating the battery 52 Extending battery life 53...
... Connecting an IEEE 1394 device 42 Viewing the display on a projector or monitor 43 Viewing the display on a television 46 Ordering accessories 47 Chapter 5: Managing Power 49 Monitoring the battery charge 50 Recharging the battery 51 Changing batteries 51 Replacing the battery 51 Recalibrating the battery 52 Extending battery life 53...
8511884 - Gateway Notebook Reference Guide for Windows Vista
Page 5
www.gateway.com Chapter 6: Traveling with Your Notebook . . . 59 Packing your notebook 60 Traveling by air 60 Dial-up modem 60 Radio frequency wireless connections 61 Files 61 Security 62 Power 63 Additional tips 64 Chapter 7: Maintaining Your Notebook . . . . . 65 Caring for your notebook 66 Cleaning your notebook 67 Cleaning the exterior 67...
www.gateway.com Chapter 6: Traveling with Your Notebook . . . 59 Packing your notebook 60 Traveling by air 60 Dial-up modem 60 Radio frequency wireless connections 61 Files 61 Security 62 Power 63 Additional tips 64 Chapter 7: Maintaining Your Notebook . . . . . 65 Caring for your notebook 66 Cleaning your notebook 67 Cleaning the exterior 67...

8511884 - Gateway Notebook Reference Guide for Windows Vista
Page 6
Contents Ethernet 87 File management 88 Hard drive 88 Internet 89 Keyboard 90 Media Center 91 Memory 94 Memory card reader 95 Modem (cable or DSL 95 Modem (dial-up 95 Mouse 99 Networks (wired 99 Networks (wireless 101 Passwords 103 PC Cards 103 Pointing device 104 Power 104 Printer 105 Sound 106 Status indicators 106 Touchpad 107 Video 107 Telephone support 108 Before calling Gateway Customer Care 108 Appendix A: Legal Information 109 Index 119 iv
Contents Ethernet 87 File management 88 Hard drive 88 Internet 89 Keyboard 90 Media Center 91 Memory 94 Memory card reader 95 Modem (cable or DSL 95 Modem (dial-up 95 Mouse 99 Networks (wired 99 Networks (wireless 101 Passwords 103 PC Cards 103 Pointing device 104 Power 104 Printer 105 Sound 106 Status indicators 106 Touchpad 107 Video 107 Telephone support 108 Before calling Gateway Customer Care 108 Appendix A: Legal Information 109 Index 119 iv


