
8512488 - Gateway Notebook Reference Guide R2
Page 4
... 48 Connecting a USB device 48 Connecting an IEEE 1394 device 49 Viewing the display on a projector or monitor 50 Adjusting the display properties 51 Using the projector or monitor for a presentation . . . . 53 Viewing the display on a television 54 Adjusting the television display settings 55 Ordering accessories 56 Chapter 5: Managing Power 59 Monitoring the battery...
... 48 Connecting a USB device 48 Connecting an IEEE 1394 device 49 Viewing the display on a projector or monitor 50 Adjusting the display properties 51 Using the projector or monitor for a presentation . . . . 53 Viewing the display on a television 54 Adjusting the television display settings 55 Ordering accessories 56 Chapter 5: Managing Power 59 Monitoring the battery...
8512488 - Gateway Notebook Reference Guide R2
Page 6
Contents Chapter 9: Troubleshooting 103 Safety guidelines 104 First steps 104 Troubleshooting 105 Audio 105 Battery 105 CD drives 105 Diskette drive (external 105 Display 106 DVD drives 107 Ethernet 109 Express Cards 109 File management 110 Hard drive 110 Internet 111 Keyboard 112 Media Center 113 Memory 116 Memory ... (wireless 122 Passwords 124 PC Cards 124 Power 125 Printer 125 Sound 127 Status indicators 127 Touchpad 127 Video 128 Telephone support 128 Before calling Gateway Customer Care 128 Appendix A: Legal Information 131 Index 141 iv
Contents Chapter 9: Troubleshooting 103 Safety guidelines 104 First steps 104 Troubleshooting 105 Audio 105 Battery 105 CD drives 105 Diskette drive (external 105 Display 106 DVD drives 107 Ethernet 109 Express Cards 109 File management 110 Hard drive 110 Internet 111 Keyboard 112 Media Center 113 Memory 116 Memory ... (wireless 122 Passwords 124 PC Cards 124 Power 125 Printer 125 Sound 127 Status indicators 127 Touchpad 127 Video 128 Telephone support 128 Before calling Gateway Customer Care 128 Appendix A: Legal Information 131 Index 141 iv

8512488 - Gateway Notebook Reference Guide R2
Page 13
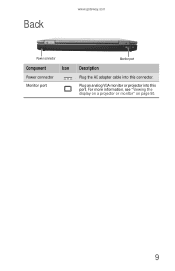
Left www.gateway.com Kensington lock slot S-Video out jack Ventilation fan CD or DVD drive Component Icon Description Kensington™ lock slot Secure your notebook to an object by connecting a Kensington cable lock to those listed in "Identifying drive types" on page 42. 7 For more information, see "Viewing the display on a television...
Left www.gateway.com Kensington lock slot S-Video out jack Ventilation fan CD or DVD drive Component Icon Description Kensington™ lock slot Secure your notebook to an object by connecting a Kensington cable lock to those listed in "Identifying drive types" on page 42. 7 For more information, see "Viewing the display on a television...
8512488 - Gateway Notebook Reference Guide R2
Page 15
For more information, see "Viewing the display on a projector or monitor" on page 50. 9 Back www.gateway.com Power connector Component Icon Power connector Monitor port Monitor port Description Plug the AC adapter cable into this connector. Plug an analog VGA monitor or projector into this port.
For more information, see "Viewing the display on a projector or monitor" on page 50. 9 Back www.gateway.com Power connector Component Icon Power connector Monitor port Monitor port Description Plug the AC adapter cable into this connector. Plug an analog VGA monitor or projector into this port.

8512488 - Gateway Notebook Reference Guide R2
Page 32
... and Getting Started System key combinations When you press the FN key and a system key at the same time For more information, see "Viewing the display on a projector or monitor" on page 50. Toggle the status indicators on page 23. For more information, see "Using the status indicators" on... in the following order: ■ The LCD ■ An external monitor or projector (a monitor or projector must be turned off . Toggle the notebook display in an airplane. Press the power button to be plugged into the monitor port on or off. Press and hold To... FN, then press this...
... and Getting Started System key combinations When you press the FN key and a system key at the same time For more information, see "Viewing the display on a projector or monitor" on page 50. Toggle the status indicators on page 23. For more information, see "Using the status indicators" on... in the following order: ■ The LCD ■ An external monitor or projector (a monitor or projector must be turned off . Toggle the notebook display in an airplane. Press the power button to be plugged into the monitor port on or off. Press and hold To... FN, then press this...

8512488 - Gateway Notebook Reference Guide R2
Page 33
... DVD chapter. Increase volume. Stop playing the CD or DVD. Increase the brightness of the display. Skip back one CD track or DVD chapter. Decrease the brightness of the display. Press a third time to return the display to decrease the brightness below the normal lowest brightness setting. Important: Using this system key... Increase... bright sunlight. Press a second time to the normal brightness setting. Use this feature in -+ bright lighting situations, such as outside in dim lighting situations. www.gateway.com Press and hold To...
... DVD chapter. Increase volume. Stop playing the CD or DVD. Increase the brightness of the display. Skip back one CD track or DVD chapter. Decrease the brightness of the display. Press a third time to return the display to decrease the brightness below the normal lowest brightness setting. Important: Using this system key... Increase... bright sunlight. Press a second time to the normal brightness setting. Use this feature in -+ bright lighting situations, such as outside in dim lighting situations. www.gateway.com Press and hold To...

8512488 - Gateway Notebook Reference Guide R2
Page 47
CHAPTER4 Using Drives and Accessories • Using the CD or DVD drive • Using the memory card reader • Adding and removing a PC Card or Express Card • Installing a printer or other peripheral device • Viewing the display on a projector or monitor • Viewing the display on a television • Ordering accessories 41
CHAPTER4 Using Drives and Accessories • Using the CD or DVD drive • Using the memory card reader • Adding and removing a PC Card or Express Card • Installing a printer or other peripheral device • Viewing the display on a projector or monitor • Viewing the display on a television • Ordering accessories 41

8512488 - Gateway Notebook Reference Guide R2
Page 56
CHAPTER 4: Using Drives and Accessories 2 Connect the other end of the VGA cable to your notebook. Viewing the display on your monitor (VGA) port. To use a projector or monitor 1 Turn off your notebook. 2 Connect one end of the cable to the IEEE 1394 port ... a projector or monitor You can use your notebook for giving presentations by connecting an external monitor or projector to the monitor or projector. 50 Simultaneous display lets you control the presentation from your notebook at the same time as you face your online User Guide. Tip For more information about editing...
CHAPTER 4: Using Drives and Accessories 2 Connect the other end of the VGA cable to your notebook. Viewing the display on your monitor (VGA) port. To use a projector or monitor 1 Turn off your notebook. 2 Connect one end of the cable to the IEEE 1394 port ... a projector or monitor You can use your notebook for giving presentations by connecting an external monitor or projector to the monitor or projector. 50 Simultaneous display lets you control the presentation from your notebook at the same time as you face your online User Guide. Tip For more information about editing...

8512488 - Gateway Notebook Reference Guide R2
Page 57
...'s power cord into the monitor port on your notebook. 4 Turn on your notebook may turn it on. Windows recognizes the new hardware and the New Display Detected dialog box opens. 6 Select the options for the projector or monitor, then click OK. 7 Press FN+F4 to switch between viewing the... the VGA cable into an AC power source and turn off the LCD panel, but will not enter Sleep mode. Adjusting the display properties If the image on both the LCD panel and the projector or monitor. www.gateway.com 3 Plug the other end of your notebook desktop, you should adjust the...
...'s power cord into the monitor port on your notebook. 4 Turn on your notebook may turn it on. Windows recognizes the new hardware and the New Display Detected dialog box opens. 6 Select the options for the projector or monitor, then click OK. 7 Press FN+F4 to switch between viewing the... the VGA cable into an AC power source and turn off the LCD panel, but will not enter Sleep mode. Adjusting the display properties If the image on both the LCD panel and the projector or monitor. www.gateway.com 3 Plug the other end of your notebook desktop, you should adjust the...

8512488 - Gateway Notebook Reference Guide R2
Page 58
...6 To use the monitor or projector as an extension of your desktop (increasing the size of your online User Guide. 2 Click (Change display settings). The Display Settings dialog box opens. 3 Click monitor 2. 4 Adjust properties such as Resolution or Colors if necessary. 5 To use the monitor or ...projector as a "mirror" (duplicate) of the notebook display (both displays have the same content), click to position it the same way the physical monitor is arranged on a projector or monitor: 1 Click (Start), ...
...6 To use the monitor or projector as an extension of your desktop (increasing the size of your online User Guide. 2 Click (Change display settings). The Display Settings dialog box opens. 3 Click monitor 2. 4 Adjust properties such as Resolution or Colors if necessary. 5 To use the monitor or ...projector as a "mirror" (duplicate) of the notebook display (both displays have the same content), click to position it the same way the physical monitor is arranged on a projector or monitor: 1 Click (Start), ...

8512488 - Gateway Notebook Reference Guide R2
Page 60
CHAPTER 4: Using Drives and Accessories Viewing the display on a television The optional S-Video out jack on your notebook lets you view your notebook. DVD playback to a stereo system using a standard S-Video cable. Use ... a television screen using the headphone jack to the optional S-Video out jack on your notebook. 2 Connect the other external video device) before starting your notebook display on external video by copyright protection software. Important Audio is not transmitted through an S-Video out jack. To view your notebook...
CHAPTER 4: Using Drives and Accessories Viewing the display on a television The optional S-Video out jack on your notebook lets you view your notebook. DVD playback to a stereo system using a standard S-Video cable. Use ... a television screen using the headphone jack to the optional S-Video out jack on your notebook. 2 Connect the other external video device) before starting your notebook display on external video by copyright protection software. Important Audio is not transmitted through an S-Video out jack. To view your notebook...
8512488 - Gateway Notebook Reference Guide R2
Page 61
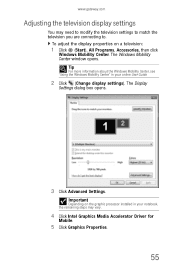
..., see "Using the Windows Mobility Center" in your online User Guide. 2 Click (Change display settings). The Windows Mobility Center window opens. www.gateway.com Adjusting the television display settings You may vary. 4 Click Intel Graphics Media Accelerator Driver for Mobile. 5 Click Graphics... Properties. 55 To adjust the display properties on the graphic processor installed in your ...
..., see "Using the Windows Mobility Center" in your online User Guide. 2 Click (Change display settings). The Windows Mobility Center window opens. www.gateway.com Adjusting the television display settings You may vary. 4 Click Intel Graphics Media Accelerator Driver for Mobile. 5 Click Graphics... Properties. 55 To adjust the display properties on the graphic processor installed in your ...

8512488 - Gateway Notebook Reference Guide R2
Page 66
...and mobile processor technologies to provide an exceptional balance of performance and portability. CHAPTER 5: Managing Power Monitoring the battery charge Your new Gateway notebook is connected to recalibrate the battery. Tip For more information about recalibrating the battery, see "Front" on page 62. Recharging... the battery The battery recharges while it is installed and your battery charge indicator displays what looks like an inaccurate charge, you with maximum performance when plugged into AC power balanced with optimized battery life when on ...
...and mobile processor technologies to provide an exceptional balance of performance and portability. CHAPTER 5: Managing Power Monitoring the battery charge Your new Gateway notebook is connected to recalibrate the battery. Tip For more information about recalibrating the battery, see "Front" on page 62. Recharging... the battery The battery recharges while it is installed and your battery charge indicator displays what looks like an inaccurate charge, you with maximum performance when plugged into AC power balanced with optimized battery life when on ...

8512488 - Gateway Notebook Reference Guide R2
Page 68
... the recalibration has finished, the message "Press [Esc] key to maintain the accuracy of the battery gauge. The battery charge indicator now displays an accurate battery charge. You should also recalibrate the battery periodically to exit" appears. 7 Press ESC. CHAPTER 5: Managing Power 6 Slide...process takes several hours. Important If, after completing this procedure, the battery charge indicator still does not show an accurate charge, contact Gateway Customer Care at the location shown on page 2. 62 The battery recalibration process begins and a screen opens showing you must start the ...
... the recalibration has finished, the message "Press [Esc] key to maintain the accuracy of the battery gauge. The battery charge indicator now displays an accurate battery charge. You should also recalibrate the battery periodically to exit" appears. 7 Press ESC. CHAPTER 5: Managing Power 6 Slide...process takes several hours. Important If, after completing this procedure, the battery charge indicator still does not show an accurate charge, contact Gateway Customer Care at the location shown on page 2. 62 The battery recalibration process begins and a screen opens showing you must start the ...
8512488 - Gateway Notebook Reference Guide R2
Page 69
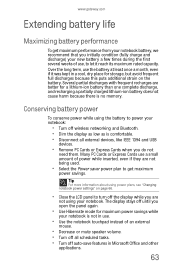
...if it reach its maximum rated capacity. Conserving battery power To conserve power while using the battery to power your notebook. www.gateway.com Extending battery life Maximizing battery performance To get maximum power savings. Several partial discharges with frequent recharges are not using your ...notebook: • Turn off wireless networking and Bluetooth. • Dim the display as low as is comfortable. • Disconnect all scheduled tasks. • Turn off auto-save features in a cool, dry place ...
...if it reach its maximum rated capacity. Conserving battery power To conserve power while using the battery to power your notebook. www.gateway.com Extending battery life Maximizing battery performance To get maximum power savings. Several partial discharges with frequent recharges are not using your ...notebook: • Turn off wireless networking and Bluetooth. • Dim the display as low as is comfortable. • Disconnect all scheduled tasks. • Turn off auto-save features in a cool, dry place ...
8512488 - Gateway Notebook Reference Guide R2
Page 70
.... • If traveling internationally, take a single-plug surge protector. • If you will have access to an EmPower™ in large areas such as the display and drives, turn on taking your notebook, it switches to lengthen the life of your notebook completely off . • Hibernate - (also called save to disk...
.... • If traveling internationally, take a single-plug surge protector. • If you will have access to an EmPower™ in large areas such as the display and drives, turn on taking your notebook, it switches to lengthen the life of your notebook completely off . • Hibernate - (also called save to disk...
8512488 - Gateway Notebook Reference Guide R2
Page 71
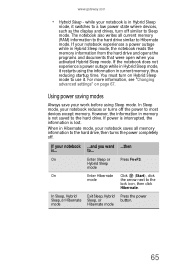
... while in memory is lost. However, the information in Hybrid Sleep mode, it switches to a low power state where devices, such as the display and drives, turn on page 67. If power is interrupted, the information is not saved to Sleep mode. Hybrid Sleep mode On Enter Hibernate ...Enter Sleep or Press FN+F3. In Sleep mode, your notebook saves all current memory (RAM) information to the hard drive similar to ... www.gateway.com • Hybrid Sleep - Using power saving modes Always save your notebook experiences a power outage while in Hybrid Sleep mode, the notebook reads the...
... while in memory is lost. However, the information in Hybrid Sleep mode, it switches to a low power state where devices, such as the display and drives, turn on page 67. If power is interrupted, the information is not saved to Sleep mode. Hybrid Sleep mode On Enter Hibernate ...Enter Sleep or Press FN+F3. In Sleep mode, your notebook saves all current memory (RAM) information to the hard drive similar to ... www.gateway.com • Hybrid Sleep - Using power saving modes Always save your notebook experiences a power outage while in Hybrid Sleep mode, the notebook reads the...

8512488 - Gateway Notebook Reference Guide R2
Page 72
... Center window opens. 66 This power plan sacrifices battery life in order to gain performance. Your programs may not last as long as when the display or hard drive is the default power plan which balances performance and battery life. • Power saver - You can change the function of your notebook...
... Center window opens. 66 This power plan sacrifices battery life in order to gain performance. Your programs may not last as long as when the display or hard drive is the default power plan which balances performance and battery life. • Power saver - You can change the function of your notebook...

8512488 - Gateway Notebook Reference Guide R2
Page 78
... press ENTER. 72 CHAPTER 6: Traveling with Your Notebook Security • Get a locking cable for someone else to guess. To create a startup password: 1 Restart your notebook display. You do not need to enter at startup. Avoid working with you can attach a cable lock and leave your notebook in your hotel room while... must return your notebook to your notebook with confidential files until you can be sure of privacy. • Use a startup password to restrict access to Gateway for service. Be ready to you or behind you can see a startup screen, press F2.
... press ENTER. 72 CHAPTER 6: Traveling with Your Notebook Security • Get a locking cable for someone else to guess. To create a startup password: 1 Restart your notebook display. You do not need to enter at startup. Avoid working with you can attach a cable lock and leave your notebook in your hotel room while... must return your notebook to your notebook with confidential files until you can be sure of privacy. • Use a startup password to restrict access to Gateway for service. Be ready to you or behind you can see a startup screen, press F2.
8512488 - Gateway Notebook Reference Guide R2
Page 112
CHAPTER 9: Troubleshooting You see a "Non-system disk," "NTLDR is missing," or "Disk error" error message • Eject the diskette from the Display Settings dialog box. Make sure that the diskette you are IBM-compatible. If errors are detected and corrected, try again. • Not all ...the hard drive for errors" in the upper-right corner of the diskette down (unprotected). • The diskette may be read by the diskette drive. Display The screen is lit continuously • Remove the diskette from the drive. You see an "Access Denied" or "Write protect" error message • ...
CHAPTER 9: Troubleshooting You see a "Non-system disk," "NTLDR is missing," or "Disk error" error message • Eject the diskette from the Display Settings dialog box. Make sure that the diskette you are IBM-compatible. If errors are detected and corrected, try again. • Not all ...the hard drive for errors" in the upper-right corner of the diskette down (unprotected). • The diskette may be read by the diskette drive. Display The screen is lit continuously • Remove the diskette from the drive. You see an "Access Denied" or "Write protect" error message • ...


