
8511725 - Gateway Service Guide
Page 60
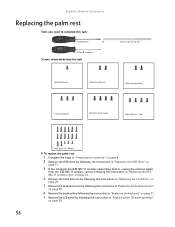
... 1 black (DVD drive) 2 black (hard drive kit) 2 black (keyboard cover) 1-3 black (keyboard) 4 black (LCD panel hinges) 4 black (palm rest - Phillips #0 screwdriver Screws removed during this task: Flat-blade driver - top) 17 black (palm rest - bottom) To replace the palm rest: 1 Complete the steps in "Preparing the notebook" on page 6. 2 Remove the DVD drive by following the instructions in "Replacing the DVD drive" on page 11. 3 If the notebook has IEEE 802.11 wireless networking built in, unplug the antenna cables from...
... 1 black (DVD drive) 2 black (hard drive kit) 2 black (keyboard cover) 1-3 black (keyboard) 4 black (LCD panel hinges) 4 black (palm rest - Phillips #0 screwdriver Screws removed during this task: Flat-blade driver - top) 17 black (palm rest - bottom) To replace the palm rest: 1 Complete the steps in "Preparing the notebook" on page 6. 2 Remove the DVD drive by following the instructions in "Replacing the DVD drive" on page 11. 3 If the notebook has IEEE 802.11 wireless networking built in, unplug the antenna cables from...
8511725 - Gateway Service Guide
Page 63
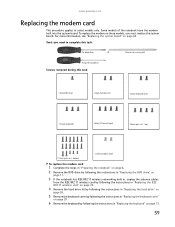
... task: 1 black (DVD drive) 2 black (hard drive kit) 2 black (keyboard cover) 1-3 black (keyboard) 4 black (LCD panel hinges) 4 black (palm rest - Tools you must replace the system board. bottom) 2 chrome (modem card) To replace the modem card: 1 Complete the steps in "Preparing the notebook" on page 6. 2 Remove the DVD drive by following the instructions in "Replacing the DVD drive" on page 11. 3 If the notebook has IEEE 802.11 wireless networking built in, unplug the antenna cables from the IEEE 802.11 wireless card by...
... task: 1 black (DVD drive) 2 black (hard drive kit) 2 black (keyboard cover) 1-3 black (keyboard) 4 black (LCD panel hinges) 4 black (palm rest - Tools you must replace the system board. bottom) 2 chrome (modem card) To replace the modem card: 1 Complete the steps in "Preparing the notebook" on page 6. 2 Remove the DVD drive by following the instructions in "Replacing the DVD drive" on page 11. 3 If the notebook has IEEE 802.11 wireless networking built in, unplug the antenna cables from the IEEE 802.11 wireless card by...

8511725 - Gateway Service Guide
Page 66
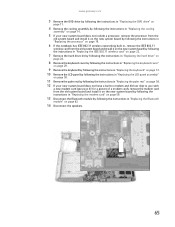
... the instructions in "Replacing the DVD drive" on page 11. 3 If the notebook has IEEE 802.11 wireless networking built in, unplug the antenna cables from the IEEE 802.11 wireless card by following the instructions in "Replacing the IEEE 802.11 wireless card" on page 22. 4 Remove the hard drive kit by following the instructions in "Replacing the hard drive" on page 26. 5 Remove the keyboard cover by following the instructions in "Replacing the keyboard cover" on...
... the instructions in "Replacing the DVD drive" on page 11. 3 If the notebook has IEEE 802.11 wireless networking built in, unplug the antenna cables from the IEEE 802.11 wireless card by following the instructions in "Replacing the IEEE 802.11 wireless card" on page 22. 4 Remove the hard drive kit by following the instructions in "Replacing the hard drive" on page 26. 5 Remove the keyboard cover by following the instructions in "Replacing the keyboard cover" on...
8511725 - Gateway Service Guide
Page 69
... notebook has IEEE 802.11 wireless networking built in, remove the IEEE 802.11 wireless card from the old system board and install it on the new system board by following the instructions in "Replacing the IEEE 802.11 wireless card" on page 22. 7 Remove the hard drive kit by following the instructions in "Replacing the hard drive" on page 26. 8 Remove the keyboard cover by following the instructions in "Replacing the keyboard cover" on page 29. 9 Remove the keyboard...
... notebook has IEEE 802.11 wireless networking built in, remove the IEEE 802.11 wireless card from the old system board and install it on the new system board by following the instructions in "Replacing the IEEE 802.11 wireless card" on page 22. 7 Remove the hard drive kit by following the instructions in "Replacing the hard drive" on page 26. 8 Remove the keyboard cover by following the instructions in "Replacing the keyboard cover" on page 29. 9 Remove the keyboard...
8512055 - Component Replacement Manual
Page 3
... your notebook over any PC Cards. 6 Turn your Reference Guide for Customer Care Information. Screw 8 Loosen the six memory bay cover screws (these guidelines: • Avoid static-causing surfaces such as electrostatic discharge (ESD). Warning To avoid exposure to dangerous electrical voltages and moving parts, turn off your notebook. 4 Disconnect the AC adapter, modem cable, and network cable. 5 Disconnect all peripheral devices and remove any...
... your notebook over any PC Cards. 6 Turn your Reference Guide for Customer Care Information. Screw 8 Loosen the six memory bay cover screws (these guidelines: • Avoid static-causing surfaces such as electrostatic discharge (ESD). Warning To avoid exposure to dangerous electrical voltages and moving parts, turn off your notebook. 4 Disconnect the AC adapter, modem cable, and network cable. 5 Disconnect all peripheral devices and remove any...

8512055 - Component Replacement Manual
Page 6
... screen, insert the Windows DVD into your notebook, then replace the cover screws. 13 Insert the battery and turn your notebook over. 14 Connect the power adapter, modem cable, and network cable. 15 Turn on -screen instructions. 19 After Windows is completely re-installed, use the software and driver recovery discs you created to recover your notebook. 17 When the prompt "Press any key to boot from CD or DVD" appears, press any PC Cards. Screws Screws 9 Remove the cover from the old drive. in...
... screen, insert the Windows DVD into your notebook, then replace the cover screws. 13 Insert the battery and turn your notebook over. 14 Connect the power adapter, modem cable, and network cable. 15 Turn on -screen instructions. 19 After Windows is completely re-installed, use the software and driver recovery discs you created to recover your notebook. 17 When the prompt "Press any key to boot from CD or DVD" appears, press any PC Cards. Screws Screws 9 Remove the cover from the old drive. in...
8512488 - Gateway Notebook Reference Guide R2
Page 5
... 77 Cleaning the keyboard 77 Cleaning the notebook screen 77 Maintaining the battery 78 Storing batteries 78 Cleaning CDs or DVDs 79 Recovering your system 79 Recovering pre-installed software and drivers 80 Using Microsoft System Restore 86 Recovering your system to its factory condition 89 Recovering your system using the Windows DVD 90 Chapter 8: Upgrading Your Notebook 93 Preventing static electricity discharge 94 Adding or replacing memory modules 95 Replacing the hard drive kit 100 iii
... 77 Cleaning the keyboard 77 Cleaning the notebook screen 77 Maintaining the battery 78 Storing batteries 78 Cleaning CDs or DVDs 79 Recovering your system 79 Recovering pre-installed software and drivers 80 Using Microsoft System Restore 86 Recovering your system to its factory condition 89 Recovering your system using the Windows DVD 90 Chapter 8: Upgrading Your Notebook 93 Preventing static electricity discharge 94 Adding or replacing memory modules 95 Replacing the hard drive kit 100 iii

8512488 - Gateway Notebook Reference Guide R2
Page 49
... in the tray, make sure that help control DVD title exports and help reduce illegal disc distribution. If you place a single-sided disc in until it is 4. The regional code on your notebook, manually eject the disc by your DVD drive's regional code must match. Important When you do not want to turn on your DVD drive is determined by inserting an opened paper clip into...
... in the tray, make sure that help control DVD title exports and help reduce illegal disc distribution. If you place a single-sided disc in until it is 4. The regional code on your notebook, manually eject the disc by your DVD drive's regional code must match. Important When you do not want to turn on your DVD drive is determined by inserting an opened paper clip into...

8512488 - Gateway Notebook Reference Guide R2
Page 78
... set using the BIOS utility. The BIOS Setup utility opens. 2 Open the Security menu, highlight Set Supervisor Password, then press ENTER and follow the instructions. Important You must return your notebook display. To create a startup password: 1 Restart your notebook with confidential files until you use the BIOS Setup utility. 3 Highlight Set User Password, then press ENTER and follow the instructions. As soon as it was put in Sleep mode. 4 Highlight Password on boot, then press ENTER. 72 Important You must set the user (startup) password. You do not need...
... set using the BIOS utility. The BIOS Setup utility opens. 2 Open the Security menu, highlight Set Supervisor Password, then press ENTER and follow the instructions. Important You must return your notebook display. To create a startup password: 1 Restart your notebook with confidential files until you use the BIOS Setup utility. 3 Highlight Set User Password, then press ENTER and follow the instructions. As soon as it was put in Sleep mode. 4 Highlight Password on boot, then press ENTER. 72 Important You must set the user (startup) password. You do not need...
8512488 - Gateway Notebook Reference Guide R2
Page 87
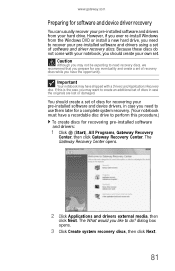
... would you need to recover your pre-installed software and drivers using a set of discs for recovering your own set of software and driver recovery discs. www.gateway.com Preparing for software and device driver recovery You can usually recover your pre-installed software and drivers from the Windows DVD or install a new hard drive, you have the opportunity. dialog box opens. 3 Click Create system recovery discs, then click Next. 81 If this procedure.) To create discs for recovering pre-installed software and drivers: 1 Click (Start), All Programs, Gateway Recovery Center, then...
... would you need to recover your pre-installed software and drivers using a set of discs for recovering your own set of software and driver recovery discs. www.gateway.com Preparing for software and device driver recovery You can usually recover your pre-installed software and drivers from the Windows DVD or install a new hard drive, you have the opportunity. dialog box opens. 3 Click Create system recovery discs, then click Next. 81 If this procedure.) To create discs for recovering pre-installed software and drivers: 1 Click (Start), All Programs, Gateway Recovery Center, then...

8512488 - Gateway Notebook Reference Guide R2
Page 114
... headphone jack, see "Adjusting the volume" on page 79. For more information, see "Recovering pre-installed software and drivers" on page 42. • Shut down and restart your notebook. • Reinstall the audio device drivers. For more information, see "Identifying drive types" on page 80. You may be experiencing some temporary memory problems. Shut down and restart your notebook. • Clean the DVD. For instructions on your notebook. •...
... headphone jack, see "Adjusting the volume" on page 79. For more information, see "Recovering pre-installed software and drivers" on page 42. • Shut down and restart your notebook. • Reinstall the audio device drivers. For more information, see "Identifying drive types" on page 80. You may be experiencing some temporary memory problems. Shut down and restart your notebook. • Clean the DVD. For instructions on your notebook. •...

8512488 - Gateway Notebook Reference Guide R2
Page 117
..., then reconnect and open the browser. If you are unable to browse the Internet • This problem can occur when you have typed a URL (Web address) incorrectly, you have a problem with your Internet service provider (ISP) is set up correctly. Remove it, firmly reinsert it, then restart your network jack, see "Right" on page 8. • Make sure that the hard drive is plugged into...
..., then reconnect and open the browser. If you are unable to browse the Internet • This problem can occur when you have typed a URL (Web address) incorrectly, you have a problem with your Internet service provider (ISP) is set up correctly. Remove it, firmly reinsert it, then restart your network jack, see "Right" on page 8. • Make sure that the hard drive is plugged into...
8512488 - Gateway Notebook Reference Guide R2
Page 125
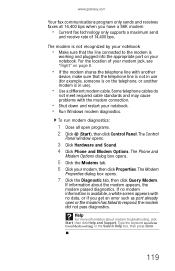
... the appropriate port on the telephone, or another device, make sure that the line connected to respond, the modem did not pass diagnostics. The Control Panel window opens. 3 Click Hardware and Sound. 4 Click Phone and Modem Options. Help For more information about the modem appears, the modem passed diagnostics. Some telephone cables do not meet required cable standards and may cause problems with no...
... the appropriate port on the telephone, or another device, make sure that the line connected to respond, the modem did not pass diagnostics. The Control Panel window opens. 3 Click Hardware and Sound. 4 Click Phone and Modem Options. Help For more information about the modem appears, the modem passed diagnostics. Some telephone cables do not meet required cable standards and may cause problems with no...
8512488 - Gateway Notebook Reference Guide R2
Page 131
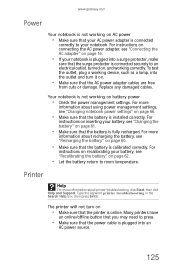
... notebook. For more information about using power management settings, see "Changing notebook power settings" on • Make sure that the printer is online. Many printers have an online/offline button that you may need to an electrical outlet, turned on . • Make sure that the AC power adapter cables are free from cuts or damage. www.gateway.com Power Your notebook is not working on AC power • Make sure that your AC power adapter is connected...
... notebook. For more information about using power management settings, see "Changing notebook power settings" on • Make sure that the printer is online. Many printers have an online/offline button that you may need to an electrical outlet, turned on . • Make sure that the AC power adapter cables are free from cuts or damage. www.gateway.com Power Your notebook is not working on AC power • Make sure that your AC power adapter is connected...
8512488 - Gateway Notebook Reference Guide R2
Page 132
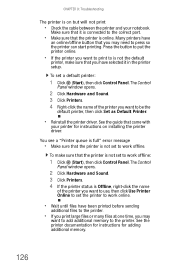
... may want to use, then click Use Printer Online to set to is not the default printer, make sure that it in the printer setup. The Control Panel window opens. 2 Click Hardware and Sound. 3 Click Printers. 4 If the printer status is Offline, right-click the name of the printer you want to work offline: 1 Click (Start), then click Control Panel. See the guide that you want to...
... may want to use, then click Use Printer Online to set to is not the default printer, make sure that it in the printer setup. The Control Panel window opens. 2 Click Hardware and Sound. 3 Click Printers. 4 If the printer status is Offline, right-click the name of the printer you want to work offline: 1 Click (Start), then click Control Panel. See the guide that you want to...
8512488 - Gateway Notebook Reference Guide R2
Page 150
... 45 installing 45 removing 45 slot 45 troubleshooting 109 external monitor 9, 26 EZ Pad touchpad See touchpad F fan 7 faxes troubleshooting 119 files opening 30 transferring 71 troubleshooting 110 Firewire port 8, 48 Fn key 25, 26 folders opening 30 function keys 24 G Gateway contact information 2 model number 3 serial number 3 Support 3 Gateway Recovery Center re-installing drivers 83 re-installing programs 83 re-installing software 83 H hard drive bay 10 indicator 23 installing 100 purchasing 56 replacing 100 troubleshooting 110 headphone jack 6 Help button 33 Hibernate mode 21, 64 hot...
... 45 installing 45 removing 45 slot 45 troubleshooting 109 external monitor 9, 26 EZ Pad touchpad See touchpad F fan 7 faxes troubleshooting 119 files opening 30 transferring 71 troubleshooting 110 Firewire port 8, 48 Fn key 25, 26 folders opening 30 function keys 24 G Gateway contact information 2 model number 3 serial number 3 Support 3 Gateway Recovery Center re-installing drivers 83 re-installing programs 83 re-installing software 83 H hard drive bay 10 indicator 23 installing 100 purchasing 56 replacing 100 troubleshooting 110 headphone jack 6 Help button 33 Hibernate mode 21, 64 hot...
8512488 - Gateway Notebook Reference Guide R2
Page 151
... of Authenticity 3 model number 2 serial number 2 laser printer 57 latch battery 10 LCD panel release 6 LCD panel cleaning 77 release latch 6 switching display 26 troubleshooting 106 LCD/CRT system key 26 line protector 70 line tester 70 lock cable 72 Kensington cable 7 M maintenance cleaning 76, 79 Media Center troubleshooting 113 media reader See memory card reader memory bay 10 installing 95 purchasing 56 removing 95 replacing 95 troubleshooting 116 memory card reader inserting card 44 locating 8 memory cards supported 44 removing card 45 troubleshooting 116 using 44 microphone built-in 11...
... of Authenticity 3 model number 2 serial number 2 laser printer 57 latch battery 10 LCD panel release 6 LCD panel cleaning 77 release latch 6 switching display 26 troubleshooting 106 LCD/CRT system key 26 line protector 70 line tester 70 lock cable 72 Kensington cable 7 M maintenance cleaning 76, 79 Media Center troubleshooting 113 media reader See memory card reader memory bay 10 installing 95 purchasing 56 removing 95 replacing 95 troubleshooting 116 memory card reader inserting card 44 locating 8 memory cards supported 44 removing card 45 troubleshooting 116 using 44 microphone built-in 11...
8512488 - Gateway Notebook Reference Guide R2
Page 153
... 66 Sleep mode 21, 26, 64 source problems 18 SpeedStep settings 66 status indicator 6 surge protector 18 troubleshooting 125 turning off notebook 21 turning on notebook 20 power adapters airplane 56 automobile 56 printer default 126 inkjet 57 installing 48 laser 57 troubleshooting 125 USB port 8 programs closing unresponsive 22 opening 30 recovery discs 81, 84 re-installing 80 projector adding 50 color quality 52 port 9 screen resolution 52 troubleshooting 128 using 26, 53 Properties button...
... 66 Sleep mode 21, 26, 64 source problems 18 SpeedStep settings 66 status indicator 6 surge protector 18 troubleshooting 125 turning off notebook 21 turning on notebook 20 power adapters airplane 56 automobile 56 printer default 126 inkjet 57 installing 48 laser 57 troubleshooting 125 USB port 8 programs closing unresponsive 22 opening 30 recovery discs 81, 84 re-installing 80 projector adding 50 color quality 52 port 9 screen resolution 52 troubleshooting 128 using 26, 53 Properties button...
8512488 - Gateway Notebook Reference Guide R2
Page 154
... Sleep mode 21, 26, 65 system key 26 Snapshot button 34 SO-DIMM See memory software recovery discs 81, 84 re-installing 80 sound adjusting 27, 28, 31, 36 controls 36 muting 28, 31, 36 troubleshooting 127 speakers built-in 6 jack 6 SpeedStep technology 66 Start camera button 33 starting notebook 20 programs 30 startup password 72 static electricity 94 status indicator wireless Ethernet 23 status indicators battery charge 6, 60 Caps Lock 23 CD drive 23 disc drive 23 drive activity 23 DVD drive 23 hard drive...
... Sleep mode 21, 26, 65 system key 26 Snapshot button 34 SO-DIMM See memory software recovery discs 81, 84 re-installing 80 sound adjusting 27, 28, 31, 36 controls 36 muting 28, 31, 36 troubleshooting 127 speakers built-in 6 jack 6 SpeedStep technology 66 Start camera button 33 starting notebook 20 programs 30 startup password 72 static electricity 94 status indicator wireless Ethernet 23 status indicators battery charge 6, 60 Caps Lock 23 CD drive 23 disc drive 23 drive activity 23 DVD drive 23 hard drive...
8511883 - Gateway Setup Poster for Windows Vista
Page 2
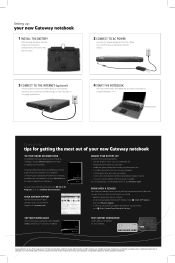
... notebook. • Use the optical drive only when you need to connect safely and securely. Setting up your computer, read the Starter Guide guide for tips on using high-speed access. 4 START THE NOTEBOOK Press the power button, then follow the on-screen instructions to complete Windows setup. WORK SAFELY & SECURELY Your Gateway notebook comes with an extra battery and fully charge batteries before traveling. • Use your AC power adapter whenever power is available. in the Windows Security Center (click (Start), Control Panel...
... notebook. • Use the optical drive only when you need to connect safely and securely. Setting up your computer, read the Starter Guide guide for tips on using high-speed access. 4 START THE NOTEBOOK Press the power button, then follow the on-screen instructions to complete Windows setup. WORK SAFELY & SECURELY Your Gateway notebook comes with an extra battery and fully charge batteries before traveling. • Use your AC power adapter whenever power is available. in the Windows Security Center (click (Start), Control Panel...


