8512564 - Component Replacement Manual R0
Page 3
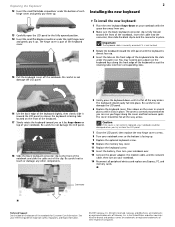
...a bare metal surface on your notebook. Before working with a K. Replacing the DVD drive 1 8 With a small Phillips screwdriver, remove the keyboard screw and put it in your workbench or other countries. See your notebook and unplug the AC adapter, modem cable, and network cable and remove.... Screw Technical Support See the label on the outside of antistatic bags because only the inside your Reference Guide. All rights reserved. Gateway and eMachines are ready to static electricity, also known as carpeted floors, plastic, and packing foam. • Remove components from their...
...a bare metal surface on your notebook. Before working with a K. Replacing the DVD drive 1 8 With a small Phillips screwdriver, remove the keyboard screw and put it in your workbench or other countries. See your notebook and unplug the AC adapter, modem cable, and network cable and remove.... Screw Technical Support See the label on the outside of antistatic bags because only the inside your Reference Guide. All rights reserved. Gateway and eMachines are ready to static electricity, also known as carpeted floors, plastic, and packing foam. • Remove components from their...
8512564 - Component Replacement Manual R0
Page 4
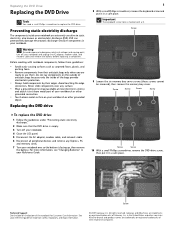
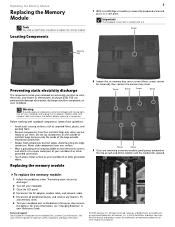
...any Express, PC, or memory cards. in Step 10. 14 Replace the memory bay cover, then tighten the six cover screws. 15 Replace the keyboard screw. 16 Insert the battery, then turn your notebook over. 17 Connect the power adapter, modem cable, and network cable, then turn on your... reference guide for Customer Care Information. All rights reserved. Gateway and eMachines are trademarks or registered trademarks of their respective companies. Replacing the DVD Drive 11 Slide the DVD drive out of the drive bay...
...any Express, PC, or memory cards. in Step 10. 14 Replace the memory bay cover, then tighten the six cover screws. 15 Replace the keyboard screw. 16 Insert the battery, then turn your notebook over. 17 Connect the power adapter, modem cable, and network cable, then turn on your... reference guide for Customer Care Information. All rights reserved. Gateway and eMachines are trademarks or registered trademarks of their respective companies. Replacing the DVD Drive 11 Slide the DVD drive out of the drive bay...
8512564 - Component Replacement Manual R0
Page 7
...strap (available at most electronics stores) and attach it . Important The keyboard screw holes are trademarks or registered trademarks of the notebook for important safety, regulatory, and legal information. © 2007 Gateway, Inc. Gateway and eMachines are marked with notebook components, follow these screws cannot be... remove the bay cover. Do not lay components on the bottom of Gateway, Inc. Never slide components over any Express, PC, and memory cards. 6 Turn your notebook has the optional keyboard screw as electrostatic discharge (ESD). Warning To avoid exposure to a bare...
...strap (available at most electronics stores) and attach it . Important The keyboard screw holes are trademarks or registered trademarks of the notebook for important safety, regulatory, and legal information. © 2007 Gateway, Inc. Gateway and eMachines are marked with notebook components, follow these screws cannot be... remove the bay cover. Do not lay components on the bottom of Gateway, Inc. Never slide components over any Express, PC, and memory cards. 6 Turn your notebook has the optional keyboard screw as electrostatic discharge (ESD). Warning To avoid exposure to a bare...
8512564 - Component Replacement Manual R0
Page 8
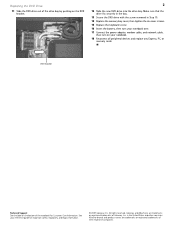
... cover and gently pry it up . 4 Insert the tabs on the front edge of the keyboard into the slots under the palm rest. Gateway and eMachines are trademarks or registered trademarks of Gateway, Inc. in place. See your notebook with the space bar away from you. 2 Make...memory cards. The cover should easily fall into their respective companies. The keyboard should be damaged when you finger along the front edge of the notebook for important safety, regulatory, and legal information. © 2007 Gateway, Inc. You may need to lock the connector in the United ...
... cover and gently pry it up . 4 Insert the tabs on the front edge of the keyboard into the slots under the palm rest. Gateway and eMachines are trademarks or registered trademarks of Gateway, Inc. in place. See your notebook with the space bar away from you. 2 Make...memory cards. The cover should easily fall into their respective companies. The keyboard should be damaged when you finger along the front edge of the notebook for important safety, regulatory, and legal information. © 2007 Gateway, Inc. You may need to lock the connector in the United ...
8512564 - Component Replacement Manual R0
Page 9
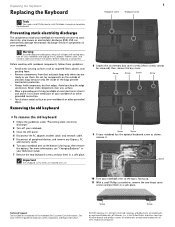
... and network cable and remove the battery before replacing a component. Gateway and eMachines are removing a memory module, gently press outward on the bottom of Gateway, Inc. Locating Components 1 7 With a small Phillips screwdriver, remove the keyboard screw and put it to use them. Before working with a...protection. • Always hold components by their respective companies. Warning To avoid exposure to replace the memory module. Important The keyboard screw hole is facing up, then remove the battery. Replacing the Memory Module Replacing the Memory Module Tools You need a...
... and network cable and remove the battery before replacing a component. Gateway and eMachines are removing a memory module, gently press outward on the bottom of Gateway, Inc. Locating Components 1 7 With a small Phillips screwdriver, remove the keyboard screw and put it to use them. Before working with a...protection. • Always hold components by their respective companies. Warning To avoid exposure to replace the memory module. Important The keyboard screw hole is facing up, then remove the battery. Replacing the Memory Module Replacing the Memory Module Tools You need a...
8512564 - Component Replacement Manual R0
Page 10
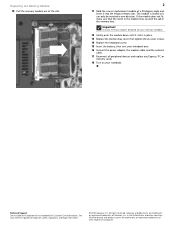
...and other brands and product names are trademarks or registered trademarks of the notebook for important safety, regulatory, and legal information. © 2007 Gateway, Inc. in one direction. All other countries. Technical Support See the label on your reference guide for Customer Care Information. All rights reserved...the module lines up with the tab in place. 13 Replace the memory bay cover, then tighten the six cover screws. 14 Replace the keyboard screw. 15 Insert the battery, then turn your notebook over. 16 Connect the power adapter, the modem cable, and the network cable....
...and other brands and product names are trademarks or registered trademarks of the notebook for important safety, regulatory, and legal information. © 2007 Gateway, Inc. in one direction. All other countries. Technical Support See the label on your reference guide for Customer Care Information. All rights reserved...the module lines up with the tab in place. 13 Replace the memory bay cover, then tighten the six cover screws. 14 Replace the keyboard screw. 15 Insert the battery, then turn your notebook over. 16 Connect the power adapter, the modem cable, and the network cable....
8512488 - Gateway Notebook Reference Guide R2
Page 3
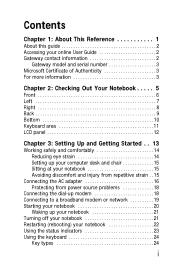
... Chapter 1: About This Reference 1 About this guide 2 Accessing your online User Guide 2 Gateway contact information 2 Gateway model and serial number 3 Microsoft Certificate of Authenticity 3 For more information 3 Chapter 2: Checking Out Your Notebook . . . . . 5 Front 6 Left 7 Right 8 Back 9 Bottom 10 Keyboard area 11 LCD panel 12 Chapter 3: Setting Up and Getting Started . . 13 Working safely...your notebook 20 Waking up your notebook 21 Turning off your notebook 21 Restarting (rebooting) your notebook 22 Using the status indicators 23 Using the keyboard 24 Key types 24 i
... Chapter 1: About This Reference 1 About this guide 2 Accessing your online User Guide 2 Gateway contact information 2 Gateway model and serial number 3 Microsoft Certificate of Authenticity 3 For more information 3 Chapter 2: Checking Out Your Notebook . . . . . 5 Front 6 Left 7 Right 8 Back 9 Bottom 10 Keyboard area 11 LCD panel 12 Chapter 3: Setting Up and Getting Started . . 13 Working safely...your notebook 20 Waking up your notebook 21 Turning off your notebook 21 Restarting (rebooting) your notebook 22 Using the status indicators 23 Using the keyboard 24 Key types 24 i
8512488 - Gateway Notebook Reference Guide R2
Page 5
www.gateway.com Conserving battery power 63 Using alternate power sources 64 Changing power modes 64 Changing notebook power settings 66 Changing the power plan 66 Changing ... Dial-up modem 70 Radio frequency wireless connections 71 Files 71 Security 72 Power 73 Additional tips 73 Chapter 7: Maintaining Your Notebook . . . . . 75 Caring for your notebook 76 Cleaning your notebook 76 Cleaning the exterior 77 Cleaning the keyboard 77 Cleaning the notebook screen 77 Maintaining the battery 78 Storing batteries 78 Cleaning...
www.gateway.com Conserving battery power 63 Using alternate power sources 64 Changing power modes 64 Changing notebook power settings 66 Changing the power plan 66 Changing ... Dial-up modem 70 Radio frequency wireless connections 71 Files 71 Security 72 Power 73 Additional tips 73 Chapter 7: Maintaining Your Notebook . . . . . 75 Caring for your notebook 76 Cleaning your notebook 76 Cleaning the exterior 77 Cleaning the keyboard 77 Cleaning the notebook screen 77 Maintaining the battery 78 Storing batteries 78 Cleaning...
8512488 - Gateway Notebook Reference Guide R2
Page 6
... CD drives 105 Diskette drive (external 105 Display 106 DVD drives 107 Ethernet 109 Express Cards 109 File management 110 Hard drive 110 Internet 111 Keyboard 112 Media Center 113 Memory 116 Memory card reader 116 Modem (cable or DSL 116 Modem (dial-up 117 Mouse 120 Networks (wired 121 Networks... (wireless 122 Passwords 124 PC Cards 124 Power 125 Printer 125 Sound 127 Status indicators 127 Touchpad 127 Video 128 Telephone support 128 Before calling Gateway Customer Care 128 Appendix A: Legal Information 131 Index 141 iv
... CD drives 105 Diskette drive (external 105 Display 106 DVD drives 107 Ethernet 109 Express Cards 109 File management 110 Hard drive 110 Internet 111 Keyboard 112 Media Center 113 Memory 116 Memory card reader 116 Modem (cable or DSL 116 Modem (dial-up 117 Mouse 120 Networks (wired 121 Networks... (wireless 122 Passwords 124 PC Cards 124 Power 125 Printer 125 Sound 127 Status indicators 127 Touchpad 127 Video 128 Telephone support 128 Before calling Gateway Customer Care 128 Appendix A: Legal Information 131 Index 141 iv
8512488 - Gateway Notebook Reference Guide R2
Page 14
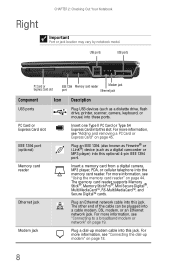
... Digital™ cards. Plug an IEEE 1394 (also known as Firewire® or i.Link®) device (such as a diskette drive, flash drive, printer, scanner, camera, keyboard, or mouse) into this slot. For more information, see "Using the memory card reader" on page 18. 8 Right CHAPTER 2: Checking Out Your Notebook Important Port...
... Digital™ cards. Plug an IEEE 1394 (also known as Firewire® or i.Link®) device (such as a diskette drive, flash drive, printer, scanner, camera, keyboard, or mouse) into this slot. For more information, see "Using the memory card reader" on page 18. 8 Right CHAPTER 2: Checking Out Your Notebook Important Port...
8512488 - Gateway Notebook Reference Guide R2
Page 17
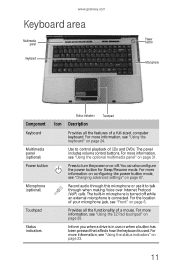
... of your microphone jack, see "Changing advanced settings" on page 31. Touchpad Provides all the features of a full-sized, computer keyboard. For more information, see "Using the optional multimedia panel" on page 67. You can also configure the power button for Sleep/... to turn the power on page 24. www.gateway.com Keyboard area Multimedia panel Keyboard Power button Microphone Status indicators Touchpad Component Icon Description Keyboard Provides all the functionality of a mouse. For more information, see "Using the keyboard" on or off while an external microphone is ...
... of your microphone jack, see "Changing advanced settings" on page 31. Touchpad Provides all the features of a full-sized, computer keyboard. For more information, see "Using the optional multimedia panel" on page 67. You can also configure the power button for Sleep/... to turn the power on page 24. www.gateway.com Keyboard area Multimedia panel Keyboard Power button Microphone Status indicators Touchpad Component Icon Description Keyboard Provides all the functionality of a mouse. For more information, see "Using the keyboard" on or off while an external microphone is ...

8512488 - Gateway Notebook Reference Guide R2
Page 19
CHAPTER3 Setting Up and Getting Started • Working safely and comfortably • Connecting the AC adapter • Connecting the dial-up modem • Connecting to a broadband modem or network • Starting your notebook • Turning off your notebook • Restarting (rebooting) your notebook • Using the status indicators • Using the keyboard • Using the EZ Pad touchpad • Using the optional multimedia panel • Using the optional webcam • Adjusting the brightness • Adjusting the volume • Turning your wireless radio on or off 13
CHAPTER3 Setting Up and Getting Started • Working safely and comfortably • Connecting the AC adapter • Connecting the dial-up modem • Connecting to a broadband modem or network • Starting your notebook • Turning off your notebook • Restarting (rebooting) your notebook • Using the status indicators • Using the keyboard • Using the EZ Pad touchpad • Using the optional multimedia panel • Using the optional webcam • Adjusting the brightness • Adjusting the volume • Turning your wireless radio on or off 13
8512488 - Gateway Notebook Reference Guide R2
Page 20
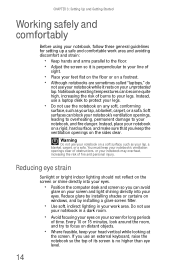
... you can avoid glare on the screen or shine directly into your eyes. • Position the computer desk and screen so you use an external keyboard, raise the notebook so the top of its screen is perpendicular to your notebook may overheat, increasing the risk of fire and personal injury. Soft...
... you can avoid glare on the screen or shine directly into your eyes. • Position the computer desk and screen so you use an external keyboard, raise the notebook so the top of its screen is perpendicular to your notebook may overheat, increasing the risk of fire and personal injury. Soft...
8512488 - Gateway Notebook Reference Guide R2
Page 21
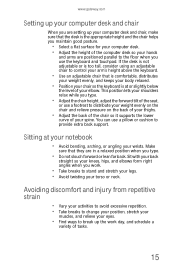
... a variety of tasks. 15 You can use a footrest to control your arm's height above the keyboard. • Use an adjustable chair that is comfortable, distributes your weight evenly, and keeps your body relaxed. &#...are in a relaxed position when you type. • Do not slouch forward or lean far back. www.gateway.com Setting up your computer desk and chair When you are setting up the work . • Take ...breaks to the floor when you use the keyboard and touchpad. If the desk is not adjustable or is too tall, consider using an adjustable chair ...
... a variety of tasks. 15 You can use a footrest to control your arm's height above the keyboard. • Use an adjustable chair that is comfortable, distributes your weight evenly, and keeps your body relaxed. &#...are in a relaxed position when you type. • Do not slouch forward or lean far back. www.gateway.com Setting up your computer desk and chair When you are setting up the work . • Take ...breaks to the floor when you use the keyboard and touchpad. If the desk is not adjustable or is too tall, consider using an adjustable chair ...

8512488 - Gateway Notebook Reference Guide R2
Page 26
To start your notebook: 1 Slide the latch on the front of your notebook, then lift the LCD panel. 2 Press the power button located above the keyboard. 20 Tip For more information about changing the power button mode, see "Installing a printer or other similar surface. Do not use the notebook on your ...
To start your notebook: 1 Slide the latch on the front of your notebook, then lift the LCD panel. 2 Press the power button located above the keyboard. 20 Tip For more information about changing the power button mode, see "Installing a printer or other similar surface. Do not use the notebook on your ...
8512488 - Gateway Notebook Reference Guide R2
Page 28
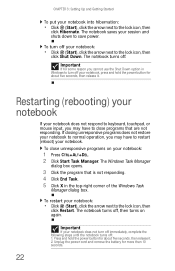
... five seconds, then release it . 2. CHAPTER 3: Setting Up and Getting Started To put your notebook into hibernation: • Click (Start), click the arrow next to keyboard, touchpad, or mouse input, you cannot use the Shut Down option in the top-right corner of the Windows Task Manager dialog box. Restarting (rebooting...
... five seconds, then release it . 2. CHAPTER 3: Setting Up and Getting Started To put your notebook into hibernation: • Click (Start), click the arrow next to keyboard, touchpad, or mouse input, you cannot use the Shut Down option in the top-right corner of the Windows Task Manager dialog box. Restarting (rebooting...

8512488 - Gateway Notebook Reference Guide R2
Page 29
... - Optional wireless IEEE 802.11 radio is used or when a button has been pressed that affects how the keyboard is turned off - Numeric keypad is turned 1 on - Hard drive ■ LED blinking - www.gateway.com Using the status indicators Important If none of the indicators are located below the touchpad. Wireless network...
... - Optional wireless IEEE 802.11 radio is used or when a button has been pressed that affects how the keyboard is turned off - Numeric keypad is turned 1 on - Hard drive ■ LED blinking - www.gateway.com Using the status indicators Important If none of the indicators are located below the touchpad. Wireless network...

8512488 - Gateway Notebook Reference Guide R2
Page 30
... keys/ System keys Numeric keypad Navigation keys FN key Windows key Arrow keys Application key Tip You can attach an external keyboard to find out more about the function key actions. 24 Some keys perform specific actions when pressed alone and other actions when ...these keys to perform actions in combination with another key. See the program documentation to the notebook using a USB port. Key types The keyboard has several different types of the keys have been assigned alternate functions, including shortcut keys for Windows, function keys for specific system operations, and...
... keys/ System keys Numeric keypad Navigation keys FN key Windows key Arrow keys Application key Tip You can attach an external keyboard to find out more about the function key actions. 24 Some keys perform specific actions when pressed alone and other actions when ...these keys to perform actions in combination with another key. See the program documentation to the notebook using a USB port. Key types The keyboard has several different types of the keys have been assigned alternate functions, including shortcut keys for Windows, function keys for specific system operations, and...

8512488 - Gateway Notebook Reference Guide R2
Page 41
Tip For more information, see "System key combinations" on the keyboard. The Windows Mobility Center window opens. Tip For more information about the Windows Mobility Center, see the help for that service. Slide the Brightness control to the desired screen brightness. www.gateway.com Tip For more information about using an Internet chat...
Tip For more information, see "System key combinations" on the keyboard. The Windows Mobility Center window opens. Tip For more information about the Windows Mobility Center, see the help for that service. Slide the Brightness control to the desired screen brightness. www.gateway.com Tip For more information about using an Internet chat...

8512488 - Gateway Notebook Reference Guide R2
Page 42
... overall volume of the speakers. -ORUse the mute and volume control buttons on the taskbar. To adjust the volume from Windows: 1 Click (Volume) on the keyboard. To adjust the overall volume level using hardware controls: • If you are using external speakers, turn the knob on the front of your online...
... overall volume of the speakers. -ORUse the mute and volume control buttons on the taskbar. To adjust the volume from Windows: 1 Click (Volume) on the keyboard. To adjust the overall volume level using hardware controls: • If you are using external speakers, turn the knob on the front of your online...


