8512216 - Gateway Notebook User Guide R1
Page 20
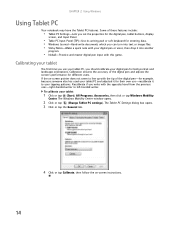
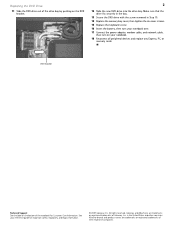
... the properties for the digital pen, tablet buttons, display screen, and Input Panel. • Table PC Input Panel (TIP)-Use its writing pad or soft keyboard for different users. Some of the digital pen and adjusts the screen's performance for entering data. • Windows Journal-Hand-write documents which you write...
... the properties for the digital pen, tablet buttons, display screen, and Input Panel. • Table PC Input Panel (TIP)-Use its writing pad or soft keyboard for different users. Some of the digital pen and adjusts the screen's performance for entering data. • Windows Journal-Hand-write documents which you write...
8512216 - Gateway Notebook User Guide R1
Page 21
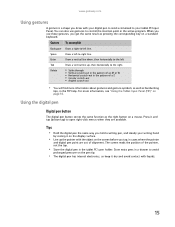
... resting it and tap (button-tap) to -right line. For more information about gestures and gesture symbols, as well as the right button on a standard keyboard. Press it on the display surface. • Line up , then horizontally to avoid prolonged pressure on page 16. Store extra pens in a drawer to...the active program. Tips • Hold the digital pen the same way you hold a writing pen, and steady your tablet PC Input Panel. www.gateway.com Using gestures A gesture is a shape you tap, in cases where the pointer and digital pen point are available. You can also use these gestures...
... resting it and tap (button-tap) to -right line. For more information about gestures and gesture symbols, as well as the right button on a standard keyboard. Press it on the display surface. • Line up , then horizontally to avoid prolonged pressure on page 16. Store extra pens in a drawer to...the active program. Tips • Hold the digital pen the same way you hold a writing pen, and steady your tablet PC Input Panel. www.gateway.com Using gestures A gesture is a shape you tap, in cases where the pointer and digital pen point are available. You can also use these gestures...
8512216 - Gateway Notebook User Guide R1
Page 22
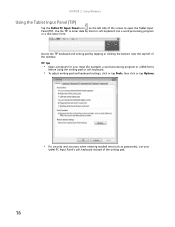
...PC Input Panel icon on the left of the writing pad. 16 Access the TIP keyboard and writing pad by tapping or clicking the buttons near the top left side of the screen ...to enter data by hand or soft keyboard into a word processing program or a text-entry form. TIP tips • Open a program for your... example, a word processing program or a Web form) before using the writing pad or soft keyboard. • To adjust writing pad and keyboard settings, click or tap Tools, then click or tap Options. • For security and accuracy...
...PC Input Panel icon on the left of the writing pad. 16 Access the TIP keyboard and writing pad by tapping or clicking the buttons near the top left side of the screen ...to enter data by hand or soft keyboard into a word processing program or a text-entry form. TIP tips • Open a program for your... example, a word processing program or a Web form) before using the writing pad or soft keyboard. • To adjust writing pad and keyboard settings, click or tap Tools, then click or tap Options. • For security and accuracy...
8512216 - Gateway Notebook User Guide R1
Page 25
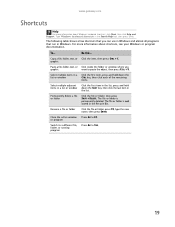
... a file, folder, text, or Click the item, then press CTRL + C. Click the file or folder, press F2, type the new name, then press ENTER. www.gateway.com Shortcuts Help For more information about Windows keyboard shortcuts, click Start, then click Help and Support. Type Windows...
... a file, folder, text, or Click the item, then press CTRL + C. Click the file or folder, press F2, type the new name, then press ENTER. www.gateway.com Shortcuts Help For more information about Windows keyboard shortcuts, click Start, then click Help and Support. Type Windows...

8512216 - Gateway Notebook User Guide R1
Page 50
... Center, click the X in the upper-right corner of the screen. 44 The Windows Media Center's main screen opens. 3 Use the arrow buttons on your keyboard to music, and view photos. Starting Windows Media Center To start Windows Media Center, the Welcome screen opens. 2 For the easiest setup, click Express setup...
... Center, click the X in the upper-right corner of the screen. 44 The Windows Media Center's main screen opens. 3 Use the arrow buttons on your keyboard to music, and view photos. Starting Windows Media Center To start Windows Media Center, the Welcome screen opens. 2 For the easiest setup, click Express setup...

8512216 - Gateway Notebook User Guide R1
Page 89
...following settings to start setting up microphone configures your microphone to create typed text from your mouse pointer. • Start On-Screen Keyboard displays a keyboard on -screen text. 83 The Speech Recognition Options window opens. 2 Click one of common voice commands. 3 You can then ...recognition. You can also use the Ease of Access, then click Speech Recognition Options. With a a built-in microphone on select Gateway notebooks) and configure Windows to work correctly with your notebook's settings for sounds Using voice recognition You can attach a microphone to your...
...following settings to start setting up microphone configures your microphone to create typed text from your mouse pointer. • Start On-Screen Keyboard displays a keyboard on -screen text. 83 The Speech Recognition Options window opens. 2 Click one of common voice commands. 3 You can then ...recognition. You can also use the Ease of Access, then click Speech Recognition Options. With a a built-in microphone on select Gateway notebooks) and configure Windows to work correctly with your notebook's settings for sounds Using voice recognition You can attach a microphone to your...
8512216 - Gateway Notebook User Guide R1
Page 102
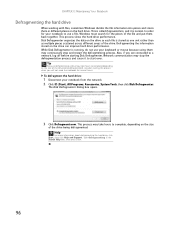
... on the size of the file and put them in the Search Help box, then press ENTER. 96 To defragment the hard drive: 1 Disconnect your keyboard or mouse because using them may stop and restart the defragmenting process. While Disk Defragmenter is normal. Also, if you will not need the notebook...
... on the size of the file and put them in the Search Help box, then press ENTER. 96 To defragment the hard drive: 1 Disconnect your keyboard or mouse because using them may stop and restart the defragmenting process. While Disk Defragmenter is normal. Also, if you will not need the notebook...
8512216 - Gateway Notebook User Guide R1
Page 108
... 96 G gadgets adding 75 configuring 75 configuring Sidebar 76 control panel 76 Sidebar 75 using 75 game access restricting 87 Gateway Web address 2 Web site 2 Gigabit Ethernet 46 H hard drive backing up files 97 checking for errors 95 checking for free space 93 defragmenting 96 deleting files and ...provider (ISP) 22 connecting to 23 disconnecting from 22 setting up account 22 IP address entering 52 ISP See Internet service provider K keyboard icon 16 keyboard shortcuts 19 L LCD panel using screen saver 74 links 23 M maintenance backing up files 97 checking for drive errors 95 checking hard...
... 96 G gadgets adding 75 configuring 75 configuring Sidebar 76 control panel 76 Sidebar 75 using 75 game access restricting 87 Gateway Web address 2 Web site 2 Gigabit Ethernet 46 H hard drive backing up files 97 checking for errors 95 checking for free space 93 defragmenting 96 deleting files and ...provider (ISP) 22 connecting to 23 disconnecting from 22 setting up account 22 IP address entering 52 ISP See Internet service provider K keyboard icon 16 keyboard shortcuts 19 L LCD panel using screen saver 74 links 23 M maintenance backing up files 97 checking for drive errors 95 checking hard...

8512216 - Gateway Notebook User Guide R1
Page 109
www.gateway.com programs 7 P parental controls 86 activity reports 89 blocking specific games 88 game ratings 87 Internet filtering... folders 54 printer 55 shortcuts adding to desktop 8 closing programs 19 closing windows 19 copying 19 deleting files and folders 19 keyboard 19 pasting 19 renaming files and folders 19 selecting adjacent items in list 19 selecting items in list 19 switching between files... 34 Web browser 22, 23 Web page 23 Web site 23 connecting to 24 downloading files 24 Gateway 2 window 8 close button 9 closing 9, 19 maximize button 9 menu bar 9 minimize button 9 title bar 8 103
www.gateway.com programs 7 P parental controls 86 activity reports 89 blocking specific games 88 game ratings 87 Internet filtering... folders 54 printer 55 shortcuts adding to desktop 8 closing programs 19 closing windows 19 copying 19 deleting files and folders 19 keyboard 19 pasting 19 renaming files and folders 19 selecting adjacent items in list 19 selecting items in list 19 switching between files... 34 Web browser 22, 23 Web page 23 Web site 23 connecting to 24 downloading files 24 Gateway 2 window 8 close button 9 closing 9, 19 maximize button 9 menu bar 9 minimize button 9 title bar 8 103
8512564 - Component Replacement Manual R0
Page 3
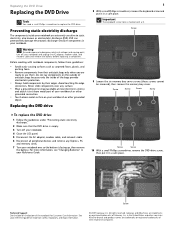
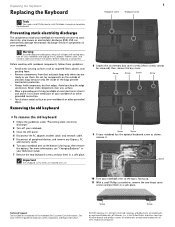
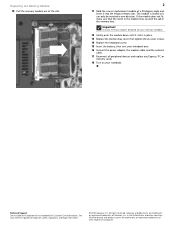
...a small Phillips screwdriver, remove the keyboard screw and put it to a bare metal part of their respective companies. Screw Screw 10 With a small Phillips screwdriver, remove the DVD drive screw, then put it in a safe place. Gateway and eMachines are trademarks or registered ...trademarks or registered trademarks of the notebook for important safety, regulatory, and legal information. © 2007 Gateway, Inc. All rights reserved. Important The keyboard screw hole is facing up, then remove the battery. Preventing static electricity discharge The components inside of...
...a small Phillips screwdriver, remove the keyboard screw and put it to a bare metal part of their respective companies. Screw Screw 10 With a small Phillips screwdriver, remove the DVD drive screw, then put it in a safe place. Gateway and eMachines are trademarks or registered ...trademarks or registered trademarks of the notebook for important safety, regulatory, and legal information. © 2007 Gateway, Inc. All rights reserved. Important The keyboard screw hole is facing up, then remove the battery. Preventing static electricity discharge The components inside of...
8512564 - Component Replacement Manual R0
Page 4
... Support See the label on the bottom of the drive bay by pushing on your reference guide for Customer Care Information. Gateway and eMachines are trademarks or registered trademarks of Gateway, Inc. Make sure that the drive fits securely in the bay. 13 Secure the DVD drive with the screw removed...PC, or memory cards. All rights reserved. in Step 10. 14 Replace the memory bay cover, then tighten the six cover screws. 15 Replace the keyboard screw. 16 Insert the battery, then turn your notebook over. 17 Connect the power adapter, modem cable, and network cable, then turn on the DVD...
... Support See the label on the bottom of the drive bay by pushing on your reference guide for Customer Care Information. Gateway and eMachines are trademarks or registered trademarks of Gateway, Inc. Make sure that the drive fits securely in the bay. 13 Secure the DVD drive with the screw removed...PC, or memory cards. All rights reserved. in Step 10. 14 Replace the memory bay cover, then tighten the six cover screws. 15 Replace the keyboard screw. 16 Insert the battery, then turn your notebook over. 17 Connect the power adapter, modem cable, and network cable, then turn on the DVD...
8512564 - Component Replacement Manual R0
Page 7
...before replacing a component. Warning To avoid exposure to a bare metal part of Gateway, Inc. Avoid touching the edge connectors. All rights reserved. ESD can permanently damage electrostatic discharge-sensitive components in a safe place. Before working with a K. 1 Keyboard screw Keyboard screw 8 Loosen the six memory bay cover screws (these guidelines: •..., remove the two hinge cover screws and put them in the United States and other grounded object. Screw 10 Turn your notebook. Gateway and eMachines are ready to replace the keyboard. in a safe place.
...before replacing a component. Warning To avoid exposure to a bare metal part of Gateway, Inc. Avoid touching the edge connectors. All rights reserved. ESD can permanently damage electrostatic discharge-sensitive components in a safe place. Before working with a K. 1 Keyboard screw Keyboard screw 8 Loosen the six memory bay cover screws (these guidelines: •..., remove the two hinge cover screws and put them in the United States and other grounded object. Screw 10 Turn your notebook. Gateway and eMachines are ready to replace the keyboard. in a safe place.
8512564 - Component Replacement Manual R0
Page 8
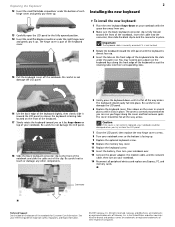
... front edge of the notebook for important safety, regulatory, and legal information. © 2007 Gateway, Inc. Connector Technical Support See the label on top of your notebook. Be careful not to not damage the LCD panel. 6 Replace the keyboard cover. The cover is correctly mounted when you can run you . 2 Make sure...
... front edge of the notebook for important safety, regulatory, and legal information. © 2007 Gateway, Inc. Connector Technical Support See the label on top of your notebook. Be careful not to not damage the LCD panel. 6 Replace the keyboard cover. The cover is correctly mounted when you can run you . 2 Make sure...
8512564 - Component Replacement Manual R0
Page 9
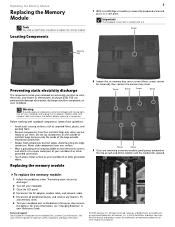
...cover. For more information, see "Changing Batteries" in your Reference Guide. Locating Components 1 7 With a small Phillips screwdriver, remove the keyboard screw and put it to use them. Replacing the memory module 8 Loosen the six memory bay cover screws (these guidelines: • ...Avoid static-causing surfaces such as electrostatic discharge (ESD). Gateway and eMachines are removing a memory module, gently press outward on the bottom of the bags provide electrostatic protection. • Always hold...
...cover. For more information, see "Changing Batteries" in your Reference Guide. Locating Components 1 7 With a small Phillips screwdriver, remove the keyboard screw and put it to use them. Replacing the memory module 8 Loosen the six memory bay cover screws (these guidelines: • ...Avoid static-causing surfaces such as electrostatic discharge (ESD). Gateway and eMachines are removing a memory module, gently press outward on the bottom of the bags provide electrostatic protection. • Always hold...
8512564 - Component Replacement Manual R0
Page 10
Important Use only memory modules designed for your Gateway notebook. 12 Gently push the module down until it can only be inserted in place. 13 Replace the memory bay cover, then tighten the six cover screws. 14 Replace the keyboard screw. 15 Insert the battery, then turn your notebook .... All rights reserved. All other countries. This module is keyed so it clicks in one direction. Gateway and eMachines are trademarks or registered trademarks of Gateway, Inc. in the memory bay. Replacing the Memory Module 10 Pull the memory module out of the notebook for Customer Care ...
Important Use only memory modules designed for your Gateway notebook. 12 Gently push the module down until it can only be inserted in place. 13 Replace the memory bay cover, then tighten the six cover screws. 14 Replace the keyboard screw. 15 Insert the battery, then turn your notebook .... All rights reserved. All other countries. This module is keyed so it clicks in one direction. Gateway and eMachines are trademarks or registered trademarks of Gateway, Inc. in the memory bay. Replacing the Memory Module 10 Pull the memory module out of the notebook for Customer Care ...
8512488 - Gateway Notebook Reference Guide R2
Page 3
... Chapter 1: About This Reference 1 About this guide 2 Accessing your online User Guide 2 Gateway contact information 2 Gateway model and serial number 3 Microsoft Certificate of Authenticity 3 For more information 3 Chapter 2: Checking Out Your Notebook . . . . . 5 Front 6 Left 7 Right 8 Back 9 Bottom 10 Keyboard area 11 LCD panel 12 Chapter 3: Setting Up and Getting Started . . 13 Working safely...your notebook 20 Waking up your notebook 21 Turning off your notebook 21 Restarting (rebooting) your notebook 22 Using the status indicators 23 Using the keyboard 24 Key types 24 i
... Chapter 1: About This Reference 1 About this guide 2 Accessing your online User Guide 2 Gateway contact information 2 Gateway model and serial number 3 Microsoft Certificate of Authenticity 3 For more information 3 Chapter 2: Checking Out Your Notebook . . . . . 5 Front 6 Left 7 Right 8 Back 9 Bottom 10 Keyboard area 11 LCD panel 12 Chapter 3: Setting Up and Getting Started . . 13 Working safely...your notebook 20 Waking up your notebook 21 Turning off your notebook 21 Restarting (rebooting) your notebook 22 Using the status indicators 23 Using the keyboard 24 Key types 24 i
8512488 - Gateway Notebook Reference Guide R2
Page 5
www.gateway.com Conserving battery power 63 Using alternate power sources 64 Changing power modes 64 Changing notebook power settings 66 Changing the power plan 66 Changing ... Power 73 Additional tips 73 Chapter 7: Maintaining Your Notebook . . . . . 75 Caring for your notebook 76 Cleaning your notebook 76 Cleaning the exterior 77 Cleaning the keyboard 77 Cleaning the notebook screen 77 Maintaining the battery 78 Storing batteries 78 Cleaning CDs or DVDs 79 Recovering your system 79 Recovering pre-installed...
www.gateway.com Conserving battery power 63 Using alternate power sources 64 Changing power modes 64 Changing notebook power settings 66 Changing the power plan 66 Changing ... Power 73 Additional tips 73 Chapter 7: Maintaining Your Notebook . . . . . 75 Caring for your notebook 76 Cleaning your notebook 76 Cleaning the exterior 77 Cleaning the keyboard 77 Cleaning the notebook screen 77 Maintaining the battery 78 Storing batteries 78 Cleaning CDs or DVDs 79 Recovering your system 79 Recovering pre-installed...
8512488 - Gateway Notebook Reference Guide R2
Page 6
... CD drives 105 Diskette drive (external 105 Display 106 DVD drives 107 Ethernet 109 Express Cards 109 File management 110 Hard drive 110 Internet 111 Keyboard 112 Media Center 113 Memory 116 Memory card reader 116 Modem (cable or DSL 116 Modem (dial-up 117 Mouse 120 Networks (wired 121 Networks... (wireless 122 Passwords 124 PC Cards 124 Power 125 Printer 125 Sound 127 Status indicators 127 Touchpad 127 Video 128 Telephone support 128 Before calling Gateway Customer Care 128 Appendix A: Legal Information 131 Index 141 iv
... CD drives 105 Diskette drive (external 105 Display 106 DVD drives 107 Ethernet 109 Express Cards 109 File management 110 Hard drive 110 Internet 111 Keyboard 112 Media Center 113 Memory 116 Memory card reader 116 Modem (cable or DSL 116 Modem (dial-up 117 Mouse 120 Networks (wired 121 Networks... (wireless 122 Passwords 124 PC Cards 124 Power 125 Printer 125 Sound 127 Status indicators 127 Touchpad 127 Video 128 Telephone support 128 Before calling Gateway Customer Care 128 Appendix A: Legal Information 131 Index 141 iv
8512488 - Gateway Notebook Reference Guide R2
Page 14
... Digital™ cards. Plug an IEEE 1394 (also known as Firewire® or i.Link®) device (such as a diskette drive, flash drive, printer, scanner, camera, keyboard, or mouse) into this jack. For more information, see "Connecting the dial-up modem cable into this optional 4-pin IEEE 1394 port. Insert one Type...
... Digital™ cards. Plug an IEEE 1394 (also known as Firewire® or i.Link®) device (such as a diskette drive, flash drive, printer, scanner, camera, keyboard, or mouse) into this jack. For more information, see "Connecting the dial-up modem cable into this optional 4-pin IEEE 1394 port. Insert one Type...
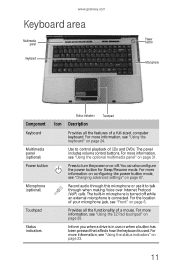
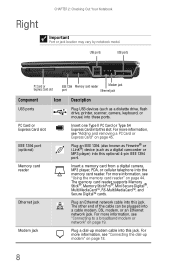
8512488 - Gateway Notebook Reference Guide R2
Page 17
...-in use it to talk through this microphone or use or when a button has been pressed that affects how the keyboard is connected. For the location of your microphone jack, see "Changing advanced settings" on page 28. Power button Press... includes volume control buttons. Touchpad Provides all the features of a full-sized, computer keyboard. www.gateway.com Keyboard area Multimedia panel Keyboard Power button Microphone Status indicators Touchpad Component Icon Description Keyboard Provides all the functionality of a mouse. For more information, see "Using the status...
...-in use it to talk through this microphone or use or when a button has been pressed that affects how the keyboard is connected. For the location of your microphone jack, see "Changing advanced settings" on page 28. Power button Press... includes volume control buttons. Touchpad Provides all the features of a full-sized, computer keyboard. www.gateway.com Keyboard area Multimedia panel Keyboard Power button Microphone Status indicators Touchpad Component Icon Description Keyboard Provides all the functionality of a mouse. For more information, see "Using the status...


