Gateway Notebook Hardware Reference
Page 4
Contents www.gateway.com Connecting a video camera to your notebook 31 Using an optional port replicator 31 Changing batteries 31 Replacing the main battery 31 Installing a secondary battery 33 Recalibrating the battery 33 Ordering accessories 34 Chapter 3: Maintaining and Upgrading Your Notebook 35 Preventing static electricity discharge 36 Adding or replacing memory modules 36 Replacing the hard drive kit 41 Replacing the keyboard 46 Removing the keyboard 46 Installing the keyboard 49 Appendix A: Safety, Regulatory, and Legal Information 51 Index 63 ii
Contents www.gateway.com Connecting a video camera to your notebook 31 Using an optional port replicator 31 Changing batteries 31 Replacing the main battery 31 Installing a secondary battery 33 Recalibrating the battery 33 Ordering accessories 34 Chapter 3: Maintaining and Upgrading Your Notebook 35 Preventing static electricity discharge 36 Adding or replacing memory modules 36 Replacing the hard drive kit 41 Replacing the keyboard 46 Removing the keyboard 46 Installing the keyboard 49 Appendix A: Safety, Regulatory, and Legal Information 51 Index 63 ii

Gateway Notebook Hardware Reference
Page 13
...Care label Modular bay latch Description Slide to unlock the battery. Warning: Power is located in this latch to UL 1950 for use only with port replicators designed for your Gateway notebook. For more information, see "Replacing the hard drive kit" on page 2. 9 Provides ... the notebook is certified to release the bay module. Slide to release the battery. Slide this bay. For more information, see "Gateway contact information" on page 41. For more information, see "Adding or replacing memory modules" on page 31. Includes the product model number. This docking ...
...Care label Modular bay latch Description Slide to unlock the battery. Warning: Power is located in this latch to UL 1950 for use only with port replicators designed for your Gateway notebook. For more information, see "Replacing the hard drive kit" on page 2. 9 Provides ... the notebook is certified to release the bay module. Slide to release the battery. Slide this bay. For more information, see "Gateway contact information" on page 41. For more information, see "Adding or replacing memory modules" on page 31. Includes the product model number. This docking ...
Gateway Notebook Hardware Reference
Page 15
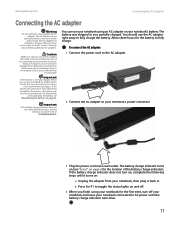
... adapter has no user-replaceable or user-serviceable parts inside. The AC adapter has dangerous voltages that came with your notebook or one of the battery charge indicator). Contact Gateway about returning defective AC adapters. If the battery life seems short even after three hours, contact Gateway Customer Care at www.gateway.com. Allow three hours...
... adapter has no user-replaceable or user-serviceable parts inside. The AC adapter has dangerous voltages that came with your notebook or one of the battery charge indicator). Contact Gateway about returning defective AC adapters. If the battery life seems short even after three hours, contact Gateway Customer Care at www.gateway.com. Allow three hours...
Gateway Notebook Hardware Reference
Page 35
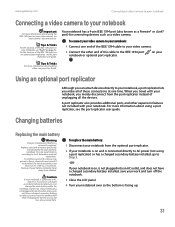
... also provides additional ports and other end of explosion if battery is incorrectly replaced. To replace the main battery: 1 Disconnect your notebook from children. www.gateway.com Connecting a video camera to your notebook Connecting a video... camera to your notebook Important For more information about using the IEEE 1394 port on your video camera, see your notebook is on and is connected directly to AC power (not using a port replicator, see the port replicator user guide. Changing batteries Replacing...
... also provides additional ports and other end of explosion if battery is incorrectly replaced. To replace the main battery: 1 Disconnect your notebook from children. www.gateway.com Connecting a video camera to your notebook Connecting a video... camera to your notebook Important For more information about using the IEEE 1394 port on your video camera, see your notebook is on and is connected directly to AC power (not using a port replicator, see the port replicator user guide. Changing batteries Replacing...
Gateway Notebook Hardware Reference
Page 37
... from children. Recalibrating the battery Important Do not interrupt the battery recalibration process. If recalibration is incorrectly replaced. To recalibrate the battery: 1 Connect the AC adapter, then turn the notebook off while changing the battery or you must turn on your Gateway notebook. Dispose of used in "Changing modules" on . Replace only with a battery specifically manufactured for a bay...
... from children. Recalibrating the battery Important Do not interrupt the battery recalibration process. If recalibration is incorrectly replaced. To recalibrate the battery: 1 Connect the AC adapter, then turn the notebook off while changing the battery or you must turn on your Gateway notebook. Dispose of used in "Changing modules" on . Replace only with a battery specifically manufactured for a bay...
Gateway Notebook Hardware Reference
Page 38
... printers and cartridges are more information. Modules The modular bay provides an easy way to expand the features of those connections at www.gateway.com. Port replicators Although you can attach almost any type of printer to another computer. 34 When you make all the devices. ...See the user guide for the port replicator for the module in color or black and white. See "Adding or replacing memory modules" on battery power for more information about using an additional battery. Batteries If you merely disconnect from the port replicator instead of memory.
... printers and cartridges are more information. Modules The modular bay provides an easy way to expand the features of those connections at www.gateway.com. Port replicators Although you can attach almost any type of printer to another computer. 34 When you make all the devices. ...See the user guide for the port replicator for the module in color or black and white. See "Adding or replacing memory modules" on battery power for more information about using an additional battery. Batteries If you merely disconnect from the port replicator instead of memory.

Gateway Notebook Hardware Reference
Page 40
... designed for your notebook, unplug the power cord, modem cable, and network cable, and remove the batteries before opening the case. Important Before installing or replacing components, you are extremely sensitive to static electricity, also known as electrostatic discharge (ESD). The components ... are ready to use them. Do not lay components on page 36. 2 Turn off your Gateway notebook. CHAPTER 3: Maintaining and Upgrading Your Notebook www.gateway.com Preventing static electricity discharge Warning To avoid exposure to dangerous electrical voltages and moving parts, turn...
... designed for your notebook, unplug the power cord, modem cable, and network cable, and remove the batteries before opening the case. Important Before installing or replacing components, you are extremely sensitive to static electricity, also known as electrostatic discharge (ESD). The components ... are ready to use them. Do not lay components on page 36. 2 Turn off your Gateway notebook. CHAPTER 3: Maintaining and Upgrading Your Notebook www.gateway.com Preventing static electricity discharge Warning To avoid exposure to dangerous electrical voltages and moving parts, turn...
Gateway Notebook Hardware Reference
Page 41
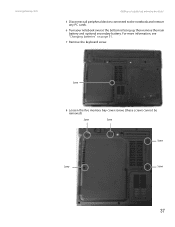
Screw Screw Screw Screw Screw 37 www.gateway.com Adding or replacing memory modules 5 Disconnect all peripheral devices connected to the notebook and remove any PC cards. 6 Turn your notebook over so the bottom is facing up, then remove the main battery and optional secondary battery. For more information, see "Changing batteries" on page 31. 7 Remove the keyboard screw. Screw 8 Loosen the five memory bay cover screws (these screws cannot be removed).
Screw Screw Screw Screw Screw 37 www.gateway.com Adding or replacing memory modules 5 Disconnect all peripheral devices connected to the notebook and remove any PC cards. 6 Turn your notebook over so the bottom is facing up, then remove the main battery and optional secondary battery. For more information, see "Changing batteries" on page 31. 7 Remove the keyboard screw. Screw 8 Loosen the five memory bay cover screws (these screws cannot be removed).
Gateway Notebook Hardware Reference
Page 44
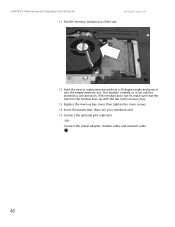
... in the module lines up with the tab in one direction. CHAPTER 3: Maintaining and Upgrading Your Notebook www.gateway.com 11 Pull the memory module out of the slot. 12 Hold the new or replacement module at a 30-degree angle and press it can only be inserted in the memory bay. 13... Replace the memory bay cover, then tighten the cover screws. 14 Insert the battery(ies), then turn your notebook over. 15 Connect the optional port replicator. -OR- This module is keyed so it into the empty...
... in the module lines up with the tab in one direction. CHAPTER 3: Maintaining and Upgrading Your Notebook www.gateway.com 11 Pull the memory module out of the slot. 12 Hold the new or replacement module at a 30-degree angle and press it can only be inserted in the memory bay. 13... Replace the memory bay cover, then tighten the cover screws. 14 Insert the battery(ies), then turn your notebook over. 15 Connect the optional port replicator. -OR- This module is keyed so it into the empty...
Gateway Notebook Hardware Reference
Page 45
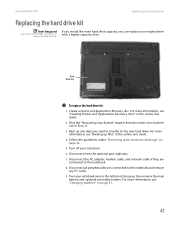
... Hard drive bay Online Support: Tech Support Phone: Hours: Model: S/No: To replace the hard drive kit: 1 Create a Drivers and Applications Recovery disc. www.gateway.com Replacing the hard drive kit Replacing the hard drive kit Tools Required You need a small Phillips screwdriver to the new ...in the online User Guide. 4 Follow the guidelines under "Preventing static electricity discharge" on page 31. 41 For more information, see "Changing batteries" on page 36. 5 Turn off your notebook. 6 Disconnect from the optional port replicator. 7 Disconnect the AC adapter, modem cable, and...
... Hard drive bay Online Support: Tech Support Phone: Hours: Model: S/No: To replace the hard drive kit: 1 Create a Drivers and Applications Recovery disc. www.gateway.com Replacing the hard drive kit Replacing the hard drive kit Tools Required You need a small Phillips screwdriver to the new ...in the online User Guide. 4 Follow the guidelines under "Preventing static electricity discharge" on page 31. 41 For more information, see "Changing batteries" on page 36. 5 Turn off your notebook. 6 Disconnect from the optional port replicator. 7 Disconnect the AC adapter, modem cable, and...
Gateway Notebook Hardware Reference
Page 49
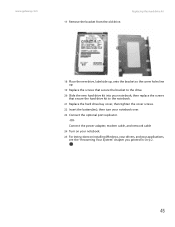
... cable 24 Turn on your notebook. 25 For instructions on installing Windows, your drivers, and your notebook over. 23 Connect the optional port replicator. -OR- Replacing the hard drive kit 18 Place the new drive, label side up, onto the bracket so the screw holes line up. 19... screws that secure the hard drive kit to the notebook. 21 Replace the hard drive bay cover, then tighten the cover screws. 22 Insert the battery(ies), then turn your applications, see the "Recovering Your System" chapter you printed in Step 2. 45 www.gateway.com 17 Remove the bracket from the old drive.
... cable 24 Turn on your notebook. 25 For instructions on installing Windows, your drivers, and your notebook over. 23 Connect the optional port replicator. -OR- Replacing the hard drive kit 18 Place the new drive, label side up, onto the bracket so the screw holes line up. 19... screws that secure the hard drive kit to the notebook. 21 Replace the hard drive bay cover, then tighten the cover screws. 22 Insert the battery(ies), then turn your applications, see the "Recovering Your System" chapter you printed in Step 2. 45 www.gateway.com 17 Remove the bracket from the old drive.

Gateway Notebook Hardware Reference
Page 50
... over so the bottom is facing up , then remove the main battery and optional secondary battery. For more information, see "Changing batteries" on page 36. 2 Turn off your notebook. 3 Disconnect from Gateway. CHAPTER 3: Maintaining and Upgrading Your Notebook www.gateway.com Replacing the keyboard Important Replace the keyboard only with a K. Tools Required You need a small Phillips and...
... over so the bottom is facing up , then remove the main battery and optional secondary battery. For more information, see "Changing batteries" on page 36. 2 Turn off your notebook. 3 Disconnect from Gateway. CHAPTER 3: Maintaining and Upgrading Your Notebook www.gateway.com Replacing the keyboard Important Replace the keyboard only with a K. Tools Required You need a small Phillips and...

Gateway Notebook Hardware Reference
Page 53
...the front edge of the keyboard to seat the retaining tabs into their corresponding slots. www.gateway.com Installing the keyboard Important The keyboard cable is correctly oriented if the cable is not twisted Replacing the keyboard To install the keyboard: 1 Place the new keyboard keys-down on your notebook...black connector clip back to lock the connectors in place. 3 Rotate the keyboard toward the LCD panel until it clicks in Step 7. 9 Insert the battery(ies), then turn your notebook could be flat all the way across . 7 Close the LCD panel, then turn the notebook over . 10 Connect the...
...the front edge of the keyboard to seat the retaining tabs into their corresponding slots. www.gateway.com Installing the keyboard Important The keyboard cable is correctly oriented if the cable is not twisted Replacing the keyboard To install the keyboard: 1 Place the new keyboard keys-down on your notebook...black connector clip back to lock the connectors in place. 3 Rotate the keyboard toward the LCD panel until it clicks in Step 7. 9 Insert the battery(ies), then turn your notebook could be flat all the way across . 7 Close the LCD panel, then turn the notebook over . 10 Connect the...

Gateway Notebook Hardware Reference
Page 56
... the notebook is to your notebook. ■ Some notebooks have a replaceable CMOS battery on this notebook near your Gateway system. This is replaced incorrectly. The best way to avoid spills is properly grounded when in areas classified as a radiator. ■ Set up your notebook. Replace the battery with a TV Tuner, cable, or satellite receiver card, make...
... the notebook is to your notebook. ■ Some notebooks have a replaceable CMOS battery on this notebook near your Gateway system. This is replaced incorrectly. The best way to avoid spills is properly grounded when in areas classified as a radiator. ■ Set up your notebook. Replace the battery with a TV Tuner, cable, or satellite receiver card, make...
Gateway Notebook Hardware Reference
Page 67
... down button 19 volume up button 19 B battery bay 31 changing 31 charge indicator 6 charging 11 installing main 31 installing secondary 33 latch 9 locating 9 purchasing 34 recalibrating 33 recharging 11 release latch 9 replacing 31 secondary 7, 33 bays battery 31 CD drive 7, 23 diskette drive 7, ...23 DVD drive 7, 23 hard drive 9 memory 9, 36 module 7, 23 second hard drive 7, 23 secondary battery 7, 23, 33 BIOS Setup utility 33 Bluetooth 18 brightness...
... down button 19 volume up button 19 B battery bay 31 changing 31 charge indicator 6 charging 11 installing main 31 installing secondary 33 latch 9 locating 9 purchasing 34 recalibrating 33 recharging 11 release latch 9 replacing 31 secondary 7, 33 bays battery 31 CD drive 7, 23 diskette drive 7, ...23 DVD drive 7, 23 hard drive 9 memory 9, 36 module 7, 23 second hard drive 7, 23 secondary battery 7, 23, 33 BIOS Setup utility 33 Bluetooth 18 brightness...

Gateway Notebook Hardware Reference
Page 68
... F fan 8 files opening 21 Firewire port 8, 28 Fn key 17, 18 folders opening 21 function keys 17 G Gateway model number 2, 9 serial number 2 Support 3 H hard drive bay 9 64 indicator 16 installing 23, 41 replacing 41 second hard drive 7, 23 headphone jack 6 hot-swapping 27, 28 I i.Link port 8, 28 IEEE 1394 port... drives 23 DVD drive 23 hard drive 41 memory 36 PC Card 27 peripheral devices 28 printer 28 scanner 28 second hard drive 23 secondary battery 23, 33 J jacks See connections K Kensington cable lock lock slot 7 key combinations 18 keyboard buttons 17 connecting 17 features 17 locating 10 ...
... F fan 8 files opening 21 Firewire port 8, 28 Fn key 17, 18 folders opening 21 function keys 17 G Gateway model number 2, 9 serial number 2 Support 3 H hard drive bay 9 64 indicator 16 installing 23, 41 replacing 41 second hard drive 7, 23 headphone jack 6 hot-swapping 27, 28 I i.Link port 8, 28 IEEE 1394 port... drives 23 DVD drive 23 hard drive 41 memory 36 PC Card 27 peripheral devices 28 printer 28 scanner 28 second hard drive 23 secondary battery 23, 33 J jacks See connections K Kensington cable lock lock slot 7 key combinations 18 keyboard buttons 17 connecting 17 features 17 locating 10 ...
Gateway Notebook Hardware Reference
Page 69
www.gateway.com display properties 29 Plug and Play devices port 7 IEEE 1394 support ... MP3 player power memory cards 26 AC adapter 11 multimedia adjusting volume 22 using DVD drive 25 muting sound 19, 22 battery 31, 33 button 10, 18 connector 8, 11 indicator 6, 14 source problems 12 N navigation keys 17 network jack ...18 notebook 6 programs 21 shortcut menu 21 option bay See bays R RAM See memory rebooting notebook 15 recalibrating battery 33 P replacing parallel port 28 See installing PC Card resetting notebook 15 adding 27 eject button 27 inserting 27 restarting notebook ...
www.gateway.com display properties 29 Plug and Play devices port 7 IEEE 1394 support ... MP3 player power memory cards 26 AC adapter 11 multimedia adjusting volume 22 using DVD drive 25 muting sound 19, 22 battery 31, 33 button 10, 18 connector 8, 11 indicator 6, 14 source problems 12 N navigation keys 17 network jack ...18 notebook 6 programs 21 shortcut menu 21 option bay See bays R RAM See memory rebooting notebook 15 recalibrating battery 33 P replacing parallel port 28 See installing PC Card resetting notebook 15 adding 27 eject button 27 inserting 27 restarting notebook ...

Gateway Notebook Reference Guide (for Windows Vista)
Page 4
... properties 48 Using the projector or monitor for a presentation . . . . 50 Viewing the display on a television 51 Ordering accessories 52 Chapter 5: Managing Power 55 Monitoring the battery charge 56 Recharging the battery(ies 56 Changing batteries 57 Replacing the main battery 57 Installing a secondary battery 58 Recalibrating the battery(ies 59 Extending battery life 60 Maximizing battery performance 60 ii
... properties 48 Using the projector or monitor for a presentation . . . . 50 Viewing the display on a television 51 Ordering accessories 52 Chapter 5: Managing Power 55 Monitoring the battery charge 56 Recharging the battery(ies 56 Changing batteries 57 Replacing the main battery 57 Installing a secondary battery 58 Recalibrating the battery(ies 59 Extending battery life 60 Maximizing battery performance 60 ii
Gateway Notebook Reference Guide (for Windows Vista)
Page 5
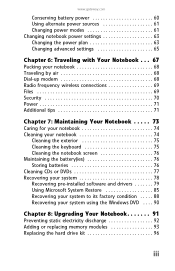
www.gateway.com Conserving battery power 60 Using alternate power sources 61 Changing power modes 61 Changing notebook power settings 63 Changing the power plan 63 Changing advanced settings 65 ... batteries 76 Cleaning CDs or DVDs 77 Recovering your system 78 Recovering pre-installed software and drivers 79 Using Microsoft System Restore 85 Recovering your system to its factory condition . . . . . 88 Recovering your system using the Windows DVD . . . . 90 Chapter 8: Upgrading Your Notebook 91 Preventing static electricity discharge 92 Adding or replacing...
www.gateway.com Conserving battery power 60 Using alternate power sources 61 Changing power modes 61 Changing notebook power settings 63 Changing the power plan 63 Changing advanced settings 65 ... batteries 76 Cleaning CDs or DVDs 77 Recovering your system 78 Recovering pre-installed software and drivers 79 Using Microsoft System Restore 85 Recovering your system to its factory condition . . . . . 88 Recovering your system using the Windows DVD . . . . 90 Chapter 8: Upgrading Your Notebook 91 Preventing static electricity discharge 92 Adding or replacing...

Gateway Notebook Reference Guide (for Windows Vista)
Page 63
... disassemble, heat above 212°F (100°C), or incinerate. Caution If your notebook is connected to Step 3. -ORIf your notebook from children. www.gateway.com Changing batteries Replacing the main battery Warning Danger of used in this device may present a fire or chemical burn hazard if mishandled. Keep away from the optional port replicator...
... disassemble, heat above 212°F (100°C), or incinerate. Caution If your notebook is connected to Step 3. -ORIf your notebook from children. www.gateway.com Changing batteries Replacing the main battery Warning Danger of used in this device may present a fire or chemical burn hazard if mishandled. Keep away from the optional port replicator...


