
8513031 - Gateway Notebook User Guide for Windows Vista R3
Page 19
...then drop it into another folder, and so on top of your search by the: • Name or part of folders to find the file or folder that you want to search through levels of a name • ..., display screen, and Input Panel. • Table PC Input Panel (TIP)-Use its writing pad or soft keyboard for files and folders A file or folder that you need . To browse for files and folders, click Start...Files and folders found using this game. 13 This is rarely right on . www.gateway.com Using advanced search options Search can find the file or folder you want. Type files and folders ...
...then drop it into another folder, and so on top of your search by the: • Name or part of folders to find the file or folder that you want to search through levels of a name • ..., display screen, and Input Panel. • Table PC Input Panel (TIP)-Use its writing pad or soft keyboard for files and folders A file or folder that you need . To browse for files and folders, click Start...Files and folders found using this game. 13 This is rarely right on . www.gateway.com Using advanced search options Search can find the file or folder you want. Type files and folders ...
8512949 - Component Replacement Manual R0
Page 6
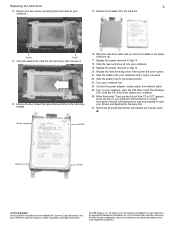
...close the DVD drive, then restart your notebook. 26 When the prompt "Press any key to boot from the old drive. As part of their respective companies. Gateway and eMachines are trademarks or registered trademarks of the process you may be prompted to insert your Reference Guide for Customer Care Information... the two screws connecting the hard drive to your notebook. 15 Remove the bracket from CD or DVD" appears, press any key on your keyboard and follow the on-screen instructions. All rights reserved. Screw Screw 13 Using the plastic tab, slide the old hard drive, then remove it...
...close the DVD drive, then restart your notebook. 26 When the prompt "Press any key to boot from the old drive. As part of their respective companies. Gateway and eMachines are trademarks or registered trademarks of the process you may be prompted to insert your Reference Guide for Customer Care Information... the two screws connecting the hard drive to your notebook. 15 Remove the bracket from CD or DVD" appears, press any key on your keyboard and follow the on-screen instructions. All rights reserved. Screw Screw 13 Using the plastic tab, slide the old hard drive, then remove it...
8512949 - Component Replacement Manual R0
Page 7
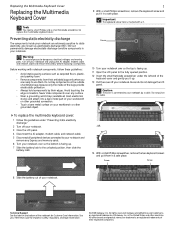
... foam. • Remove components from the cover or notebook. All other grounded object. 1 9 With a small Phillips screwdriver, remove the keyboard screw and put them . ESD can permanently damage electrostatic discharge-sensitive components in a safe place. Never slide components over any Express and memory.... 7 Slide the battery lock to a bare metal part of your workbench or other countries. Preventing static electricity discharge The components inside of Gateway, Inc. Screw Screw Technical Support See the label on the keyboard cover type, the cover may be connected to use ...
... foam. • Remove components from the cover or notebook. All other grounded object. 1 9 With a small Phillips screwdriver, remove the keyboard screw and put them . ESD can permanently damage electrostatic discharge-sensitive components in a safe place. Never slide components over any Express and memory.... 7 Slide the battery lock to a bare metal part of your workbench or other countries. Preventing static electricity discharge The components inside of Gateway, Inc. Screw Screw Technical Support See the label on the keyboard cover type, the cover may be connected to use ...
8512949 - Component Replacement Manual R0
Page 11
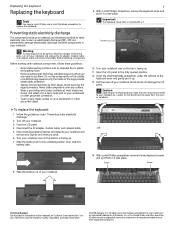
... Guide for Customer Care Information. See your workbench or other grounded object. 1 9 With a small Phillips screwdriver, remove the keyboard screw and put them . Gateway and eMachines are ready to the unlocked position, then slide the battery latch. -OR- 14 With a small Phillips screwdriver, ...-sensitive components in the United States and other brands and product names are extremely sensitive to dangerous electrical voltages and moving parts, turn off your notebook and unplug the AC adapter, modem cable, and network cable and remove the battery before replacing a...
... Guide for Customer Care Information. See your workbench or other grounded object. 1 9 With a small Phillips screwdriver, remove the keyboard screw and put them . Gateway and eMachines are ready to the unlocked position, then slide the battery latch. -OR- 14 With a small Phillips screwdriver, ...-sensitive components in the United States and other brands and product names are extremely sensitive to dangerous electrical voltages and moving parts, turn off your notebook and unplug the AC adapter, modem cable, and network cable and remove the battery before replacing a...
8513065 - Gateway Notebook Hardware Reference R1
Page 97
... with a damp cloth. Do not use it . Always turn the notebook upside down your notebook, the power turns off your notebook and other parts of your system. Use a damp, lint-free cloth to replace it again. Do not attempt to clean the LCD screen. Squirt a little...(never directly on the case, so keep the vents free of air. Cleaning the keyboard You should clean the keyboard occasionally by your notebook and other peripherals before cleaning any water into the vents. www.gateway.com • Cotton swabs • A DVD drive cleaning kit Cleaning the exterior Warning...
... with a damp cloth. Do not use it . Always turn the notebook upside down your notebook, the power turns off your notebook and other parts of your system. Use a damp, lint-free cloth to replace it again. Do not attempt to clean the LCD screen. Squirt a little...(never directly on the case, so keep the vents free of air. Cleaning the keyboard You should clean the keyboard occasionally by your notebook and other peripherals before cleaning any water into the vents. www.gateway.com • Cotton swabs • A DVD drive cleaning kit Cleaning the exterior Warning...
8513065 - Gateway Notebook Hardware Reference R1
Page 122
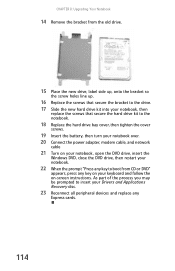
As part of the process you may be prompted to boot from CD or DVD" appears, press any key on -screen instructions. CHAPTER 8: Upgrading Your Notebook 14 ... the DVD drive, insert the Windows DVD, close the DVD drive, then restart your notebook. 22 When the prompt "Press any key to insert your keyboard and follow the on your Drivers and Applications Recovery disc. 23 Reconnect all peripheral devices and replace any Express cards. 114
As part of the process you may be prompted to boot from CD or DVD" appears, press any key on -screen instructions. CHAPTER 8: Upgrading Your Notebook 14 ... the DVD drive, insert the Windows DVD, close the DVD drive, then restart your notebook. 22 When the prompt "Press any key to insert your keyboard and follow the on your Drivers and Applications Recovery disc. 23 Reconnect all peripheral devices and replace any Express cards. 114


