8512949 - Component Replacement Manual R0
Page 5
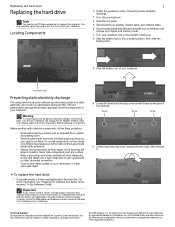
... and packing foam. • Remove components from their respective companies. Contact Gateway Customer Care at most electronics stores) and attach it . All other grounded object. 10 Loosen the three hard drive bay cover screws (these guidelines: • Avoid static-causing surfaces such as electrostatic ... Important If you cannot create a Drivers and Applications Recovery disc, Gateway may send you are trademarks or registered trademarks of your notebook. Screw Screw Screw 11 Lift the hard drive bay cover using the thumb notch, then remove it to replace the hard ...
... and packing foam. • Remove components from their respective companies. Contact Gateway Customer Care at most electronics stores) and attach it . All other grounded object. 10 Loosen the three hard drive bay cover screws (these guidelines: • Avoid static-causing surfaces such as electrostatic ... Important If you cannot create a Drivers and Applications Recovery disc, Gateway may send you are trademarks or registered trademarks of your notebook. Screw Screw Screw 11 Lift the hard drive bay cover using the thumb notch, then remove it to replace the hard ...
8512949 - Component Replacement Manual R0
Page 6
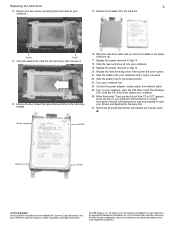
... to insert your Reference Guide for Customer Care Information. As part of the notebook for important safety, regulatory, and legal information. © 2008 Gateway, Inc. See your Drivers and Applications Recovery disc. 27 Reconnect all peripheral devices and replace any Express cards. Screw Screw 13 Using the plastic...key to boot from the old drive. All rights reserved. All other countries. in Step 12. 20 Replace the hard drive bay cover, then tighten the cover screws. 21 Slide the battery into your notebook until it . 14 Remove the four screws that secure the hard drive to the...
... to insert your Reference Guide for Customer Care Information. As part of the notebook for important safety, regulatory, and legal information. © 2008 Gateway, Inc. See your Drivers and Applications Recovery disc. 27 Reconnect all peripheral devices and replace any Express cards. Screw Screw 13 Using the plastic...key to boot from the old drive. All rights reserved. All other countries. in Step 12. 20 Replace the hard drive bay cover, then tighten the cover screws. 21 Slide the battery into your notebook until it . 14 Remove the four screws that secure the hard drive to the...
8512949 - Component Replacement Manual R0
Page 7
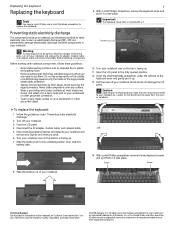
... (ESD). Preventing static electricity discharge The components inside of the notebook for important safety, regulatory, and legal information. © 2008 Gateway, Inc. Caution Depending on the bottom of the bags provide electrostatic protection. • Always hold components by a cable. in your...moving parts, turn off your Reference Guide for Customer Care Information. Screw Screw Technical Support See the label on the keyboard cover type, the cover may be connected to your notebook by their edges. All other grounded object. 1 9 With a small Phillips screwdriver, ...
... (ESD). Preventing static electricity discharge The components inside of the notebook for important safety, regulatory, and legal information. © 2008 Gateway, Inc. Caution Depending on the bottom of the bags provide electrostatic protection. • Always hold components by a cable. in your...moving parts, turn off your Reference Guide for Customer Care Information. Screw Screw Technical Support See the label on the keyboard cover type, the cover may be connected to your notebook by their edges. All other grounded object. 1 9 With a small Phillips screwdriver, ...

8512949 - Component Replacement Manual R0
Page 8
... edge of the keyboard into their respective companies. Technical Support See the label on the keyboard keys along the cover and find no loose spots. Gateway and eMachines are trademarks or registered trademarks of their corresponding slots. 16 Slide the brown keyboard connector clips to ...28 Slide the battery lock to the back of the notebook for important safety, regulatory, and legal information. © 2008 Gateway, Inc. Caution If the cover is not correctly replaced, your notebook could be flat all peripheral devices and replace any other components. Be careful not to...
... edge of the keyboard into their respective companies. Technical Support See the label on the keyboard keys along the cover and find no loose spots. Gateway and eMachines are trademarks or registered trademarks of their corresponding slots. 16 Slide the brown keyboard connector clips to ...28 Slide the battery lock to the back of the notebook for important safety, regulatory, and legal information. © 2008 Gateway, Inc. Caution If the cover is not correctly replaced, your notebook could be flat all peripheral devices and replace any other components. Be careful not to...
8512949 - Component Replacement Manual R0
Page 9
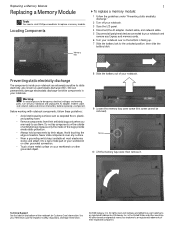
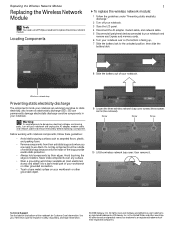
..., follow these guidelines: • Avoid static-causing surfaces such as electrostatic discharge (ESD). Do not lay components on the outside of Gateway, Inc. All rights reserved. in your Reference Guide for Customer Care Information. Locating Components Memory bay 1 To replace a memory module:... are ready to the unlocked position, then slide the battery latch. Screw 10 Lift the memory bay cover, then remove it to replace a memory module. Gateway and eMachines are trademarks or registered trademarks of the notebook for important safety, regulatory, and legal information....
..., follow these guidelines: • Avoid static-causing surfaces such as electrostatic discharge (ESD). Do not lay components on the outside of Gateway, Inc. All rights reserved. in your Reference Guide for Customer Care Information. Locating Components Memory bay 1 To replace a memory module:... are ready to the unlocked position, then slide the battery latch. Screw 10 Lift the memory bay cover, then remove it to replace a memory module. Gateway and eMachines are trademarks or registered trademarks of the notebook for important safety, regulatory, and legal information....
8512949 - Component Replacement Manual R0
Page 10
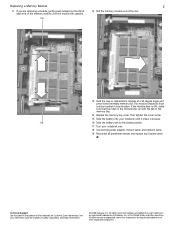
...fit, make sure that the notch in the module lines up with the tab in the memory bay. 14 Replace the memory bay cover, then tighten the cover screw. 15 Slide the battery into your notebook until the module tilts upward. 12 Pull the memory module out of the slot. ... can only be inserted in the United States and other brands and product names are trademarks or registered trademarks of Gateway, Inc. This module is keyed so it snaps into place. Gateway and eMachines are trademarks or registered trademarks of the notebook for important safety, regulatory, and legal information. ©...
...fit, make sure that the notch in the module lines up with the tab in the memory bay. 14 Replace the memory bay cover, then tighten the cover screw. 15 Slide the battery into your notebook until the module tilts upward. 12 Pull the memory module out of the slot. ... can only be inserted in the United States and other brands and product names are trademarks or registered trademarks of Gateway, Inc. This module is keyed so it snaps into place. Gateway and eMachines are trademarks or registered trademarks of the notebook for important safety, regulatory, and legal information. ©...
8512949 - Component Replacement Manual R0
Page 11
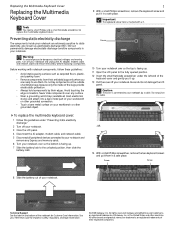
... Support See the label on the bottom of the notebook for important safety, regulatory, and legal information. © 2008 Gateway, Inc. in a safe place. Replacing the Multimedia Keyboard Cover Replacing the Multimedia Keyboard Cover Tools You need a small Phillips and a small flat-blade screwdriver to a bare metal part of your workbench or other...
... Support See the label on the bottom of the notebook for important safety, regulatory, and legal information. © 2008 Gateway, Inc. in a safe place. Replacing the Multimedia Keyboard Cover Replacing the Multimedia Keyboard Cover Tools You need a small Phillips and a small flat-blade screwdriver to a bare metal part of your workbench or other...
8512949 - Component Replacement Manual R0
Page 12
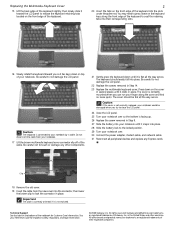
... should be damaged when you can run your notebook. 17 Lift the brown multimedia keyboard cover connector clip off of the notebook for important safety, regulatory, and legal information. © 2008 Gateway, Inc. Press down on the front edge of the keyboard into place. Caution The keyboard... is facing up. 26 Replace the screw removed in place. Be careful to your Reference Guide for Customer Care Information. See your notebook by a cable. The cover should easily fall...
... should be damaged when you can run your notebook. 17 Lift the brown multimedia keyboard cover connector clip off of the notebook for important safety, regulatory, and legal information. © 2008 Gateway, Inc. Press down on the front edge of the keyboard into place. Caution The keyboard... is facing up. 26 Replace the screw removed in place. Be careful to your Reference Guide for Customer Care Information. See your notebook by a cable. The cover should easily fall...
8512949 - Component Replacement Manual R0
Page 13
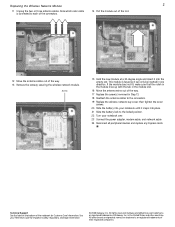
...inside your workbench or other grounded object. 9 Loosen the three wireless network bay cover screws (these guidelines: • Avoid static-causing surfaces such as electrostatic discharge (ESD). Gateway and eMachines are trademarks or registered trademarks of the bags provide electrostatic protection. &#... and product names are trademarks or registered trademarks of the notebook for important safety, regulatory, and legal information. © 2008 Gateway, Inc. Warning To avoid exposure to dangerous electrical voltages and moving parts, turn off your notebook. 3 Close the LCD panel...
...inside your workbench or other grounded object. 9 Loosen the three wireless network bay cover screws (these guidelines: • Avoid static-causing surfaces such as electrostatic discharge (ESD). Gateway and eMachines are trademarks or registered trademarks of the bags provide electrostatic protection. &#... and product names are trademarks or registered trademarks of the notebook for important safety, regulatory, and legal information. © 2008 Gateway, Inc. Warning To avoid exposure to dangerous electrical voltages and moving parts, turn off your notebook. 3 Close the LCD panel...
8512949 - Component Replacement Manual R0
Page 14
.... 23 Connect the power adapter, modem cable, and network cable 24 Reconnect all peripheral devices and replace any Express cards. All rights reserved. Gateway and eMachines are trademarks or registered trademarks of their respective companies. Note which color cable is keyed so it into place. 21 Slide the battery...insert it can only be inserted in Step 13. 18 Reattach the antenna cables to the connectors. 19 Replace the wireless network bay cover, then tighten the cover screws. 20 Slide the battery into your notebook until it snaps into the empty slot. in the module slot. 16 Move the...
.... 23 Connect the power adapter, modem cable, and network cable 24 Reconnect all peripheral devices and replace any Express cards. All rights reserved. Gateway and eMachines are trademarks or registered trademarks of their respective companies. Note which color cable is keyed so it into place. 21 Slide the battery...insert it can only be inserted in Step 13. 18 Reattach the antenna cables to the connectors. 19 Replace the wireless network bay cover, then tighten the cover screws. 20 Slide the battery into your notebook until it snaps into the empty slot. in the module slot. 16 Move the...

8513065 - Gateway Notebook Hardware Reference R1
Page 17
Right www.gateway.com Component DVD drive USB port DVD drive Icon Description USB port Insert CDs or DVDs into this drive. Plug a USB device (such as a diskette drive, flash drive, printer, scanner, camera, keyboard, or mouse) into this port. 9 To determine the type of drive in your notebook, examine the drive tray's plastic cover and compare the logo to those listed in "Identifying drive types" on page 56. For more information, see "Using the DVD drive" on page 56.
Right www.gateway.com Component DVD drive USB port DVD drive Icon Description USB port Insert CDs or DVDs into this drive. Plug a USB device (such as a diskette drive, flash drive, printer, scanner, camera, keyboard, or mouse) into this port. 9 To determine the type of drive in your notebook, examine the drive tray's plastic cover and compare the logo to those listed in "Identifying drive types" on page 56. For more information, see "Using the DVD drive" on page 56.
8513065 - Gateway Notebook Hardware Reference R1
Page 96
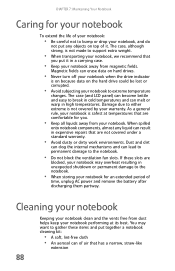
... notebook components, almost any objects on the hard drive could be lost or corrupted. • Avoid subjecting your notebook performing at temperatures that are not covered under a standard warranty. • Avoid dusty or dirty work environments. The case (and LCD panel) can become brittle and easy to gather these slots are... Notebook Caring for an extended period of time, unplug AC power and remove the battery after discharging them partway. The case, although strong, is not covered by your notebook may want to break in cold temperatures and can result in high temperatures.
... notebook components, almost any objects on the hard drive could be lost or corrupted. • Avoid subjecting your notebook performing at temperatures that are not covered under a standard warranty. • Avoid dusty or dirty work environments. The case (and LCD panel) can become brittle and easy to gather these slots are... Notebook Caring for an extended period of time, unplug AC power and remove the battery after discharging them partway. The case, although strong, is not covered by your notebook may want to break in cold temperatures and can result in high temperatures.
8513065 - Gateway Notebook Hardware Reference R1
Page 97
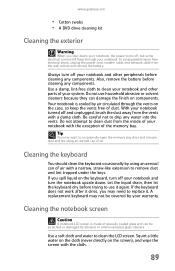
www.gateway.com • Cotton swabs • A DVD drive cleaning kit Cleaning the exterior Warning When you shut down . Tip You may want to occasionally open the ... a damp cloth. Be careful not to clean the LCD screen. Cleaning the keyboard You should clean the keyboard occasionally by using an aerosol can be covered by your notebook. Do not attempt to remove dust and lint trapped under the keys. Use a damp, lint-free cloth to replace it again. A replacement...
www.gateway.com • Cotton swabs • A DVD drive cleaning kit Cleaning the exterior Warning When you shut down . Tip You may want to occasionally open the ... a damp cloth. Be careful not to clean the LCD screen. Cleaning the keyboard You should clean the keyboard occasionally by using an aerosol can be covered by your notebook. Do not attempt to remove dust and lint trapped under the keys. Use a damp, lint-free cloth to replace it again. A replacement...
8513065 - Gateway Notebook Hardware Reference R1
Page 116
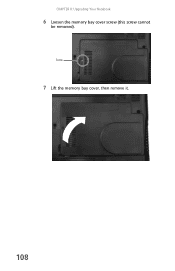
CHAPTER 8: Upgrading Your Notebook 6 Loosen the memory bay cover screw (this screw cannot be removed). Screw 7 Lift the memory bay cover, then remove it. 108
CHAPTER 8: Upgrading Your Notebook 6 Loosen the memory bay cover screw (this screw cannot be removed). Screw 7 Lift the memory bay cover, then remove it. 108
8513065 - Gateway Notebook Hardware Reference R1
Page 118
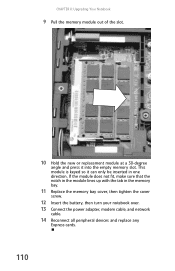
... new or replacement module at a 30-degree angle and press it can only be inserted in the memory bay. 11 Replace the memory bay cover, then tighten the cover screw. 12 Insert the battery, then turn your notebook over. 13 Connect the power adapter, modem cable, and network cable. 14 Reconnect all...
... new or replacement module at a 30-degree angle and press it can only be inserted in the memory bay. 11 Replace the memory bay cover, then tighten the cover screw. 12 Insert the battery, then turn your notebook over. 13 Connect the power adapter, modem cable, and network cable. 14 Reconnect all...
8513065 - Gateway Notebook Hardware Reference R1
Page 120
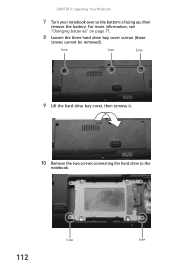
Screw Screw 112 Screw Screw Screw 9 Lift the hard drive bay cover, then remove it. 10 Remove the two screws connecting the hard drive to the notebook. CHAPTER 8: Upgrading Your Notebook 7 Turn your notebook over so the bottom is facing up, then remove the battery. For more information, see "Changing batteries" on page 71. 8 Loosen the three hard drive bay cover screws (these screws cannot be removed).
Screw Screw 112 Screw Screw Screw 9 Lift the hard drive bay cover, then remove it. 10 Remove the two screws connecting the hard drive to the notebook. CHAPTER 8: Upgrading Your Notebook 7 Turn your notebook over so the bottom is facing up, then remove the battery. For more information, see "Changing batteries" on page 71. 8 Loosen the three hard drive bay cover screws (these screws cannot be removed).
8513065 - Gateway Notebook Hardware Reference R1
Page 122
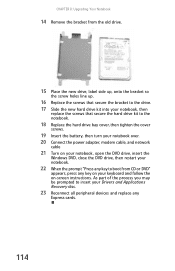
... drive kit into your notebook, then replace the screws that secure the hard drive kit to the notebook. 18 Replace the hard drive bay cover, then tighten the cover screws. 19 Insert the battery, then turn your notebook over. 20 Connect the power adapter, modem cable, and network cable 21 Turn on...
... drive kit into your notebook, then replace the screws that secure the hard drive kit to the notebook. 18 Replace the hard drive bay cover, then tighten the cover screws. 19 Insert the battery, then turn your notebook over. 20 Connect the power adapter, modem cable, and network cable 21 Turn on...
8513065 - Gateway Notebook Hardware Reference R1
Page 124
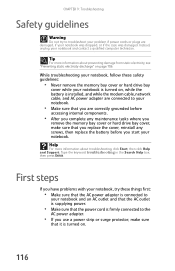
... before accessing internal components. • After you complete any maintenance tasks where you remove the memory bay cover or hard drive bay cover, make sure that you replace the cover, reinstall any screws, then replace the battery before you are damaged, if your notebook was dropped, or... and Support. CHAPTER 9: Troubleshooting Safety guidelines Warning Do not try these safety guidelines: • Never remove the memory bay cover or hard drive bay cover while your notebook is turned on, while the battery is turned on page 106. Type the keyword troubleshooting in the Search Help...
... before accessing internal components. • After you complete any maintenance tasks where you remove the memory bay cover or hard drive bay cover, make sure that you replace the cover, reinstall any screws, then replace the battery before you are damaged, if your notebook was dropped, or... and Support. CHAPTER 9: Troubleshooting Safety guidelines Warning Do not try these safety guidelines: • Never remove the memory bay cover or hard drive bay cover while your notebook is turned on, while the battery is turned on page 106. Type the keyword troubleshooting in the Search Help...
8513065 - Gateway Notebook Hardware Reference R1
Page 125
... drive (external) The diskette drive is covered under "Power" on page 139. Audio Audio troubleshooting is covered under "DVD drives" on the screen, write down and restart your hard drive is covered under "Sound" on page 137. The message may help Gateway Customer Care in diagnosing and fixing the ... you performed and make sure that all connections are listed in a program, see the program's printed documentation or the online help. www.gateway.com • If the notebook will not turn on, try turning the notebook on with the notebook unplugged and the battery installed. •...
... drive (external) The diskette drive is covered under "Power" on page 139. Audio Audio troubleshooting is covered under "DVD drives" on the screen, write down and restart your hard drive is covered under "Sound" on page 137. The message may help Gateway Customer Care in diagnosing and fixing the ... you performed and make sure that all connections are listed in a program, see the program's printed documentation or the online help. www.gateway.com • If the notebook will not turn on, try turning the notebook on with the notebook unplugged and the battery installed. •...
8513065 - Gateway Notebook Hardware Reference R1
Page 129
... Restore in speakers, a set of the manual eject hole, see your online User Guide. Ethernet Ethernet troubleshooting is covered under "Networks (wired)" on a television • Audio is transmitted through a monitor jack. www.gateway.com A DVD does not produce sound on page 133. If you have correctly installed required software for the Express...
... Restore in speakers, a set of the manual eject hole, see your online User Guide. Ethernet Ethernet troubleshooting is covered under "Networks (wired)" on a television • Audio is transmitted through a monitor jack. www.gateway.com A DVD does not produce sound on page 133. If you have correctly installed required software for the Express...


