8512949 - Component Replacement Manual R0
Page 1
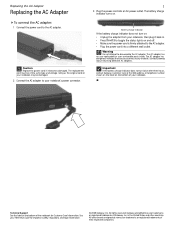
... label on and off. • Make sure the power cord is firmly attached to your notebook, then plug it becomes damaged. Gateway and eMachines are trademarks or registered trademarks of the same type and voltage rating as the original cord or your notebook may be damaged... has no user-replaceable or user-serviceable parts inside. Contact Gateway about returning defective AC adapters. All other countries. All rights reserved. Technical Support See the label on . The battery charge indicator turns on the bottom of Gateway, Inc. See your notebook. Caution Replace the power cord ...
... label on and off. • Make sure the power cord is firmly attached to your notebook, then plug it becomes damaged. Gateway and eMachines are trademarks or registered trademarks of the same type and voltage rating as the original cord or your notebook may be damaged... has no user-replaceable or user-serviceable parts inside. Contact Gateway about returning defective AC adapters. All other countries. All rights reserved. Technical Support See the label on . The battery charge indicator turns on the bottom of Gateway, Inc. See your notebook. Caution Replace the power cord ...
8512949 - Component Replacement Manual R0
Page 2
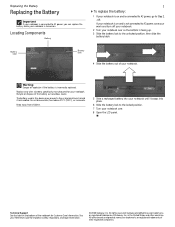
... registered trademarks of their respective companies. The battery used in the United States and other brands and product names are trademarks or registered trademarks of Gateway, Inc. Keep away from children. 5 Slide a recharged battery into your notebook until it snaps into place. 6 Slide the battery lock to the locked position. 7 Turn... for Customer Care Information. Battery latch Battery lock 4 Slide the battery out of the battery as hazardous waste. Recycle or dispose of your notebook. Technical Support See the label on .
... registered trademarks of their respective companies. The battery used in the United States and other brands and product names are trademarks or registered trademarks of Gateway, Inc. Keep away from children. 5 Slide a recharged battery into your notebook until it snaps into place. 6 Slide the battery lock to the locked position. 7 Turn... for Customer Care Information. Battery latch Battery lock 4 Slide the battery out of the battery as hazardous waste. Recycle or dispose of your notebook. Technical Support See the label on .
8512949 - Component Replacement Manual R0
Page 3
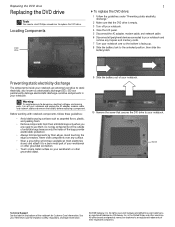
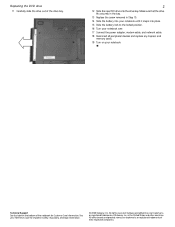
See your notebook. Gateway and eMachines are extremely sensitive to static electricity, also known as carpeted floors, plastic, and packing foam. • ... latch. Warning To avoid exposure to replace the DVD drive. Screw Technical Support See the label on the outside of the notebook for important safety, regulatory, and legal information. © 2008 Gateway, Inc. Do not lay components on the bottom of antistatic bags because only...." 2 Make sure that secures the DVD drive to use them. Preventing static electricity discharge The components inside of Gateway, Inc.
See your notebook. Gateway and eMachines are extremely sensitive to static electricity, also known as carpeted floors, plastic, and packing foam. • ... latch. Warning To avoid exposure to replace the DVD drive. Screw Technical Support See the label on the outside of the notebook for important safety, regulatory, and legal information. © 2008 Gateway, Inc. Do not lay components on the bottom of antistatic bags because only...." 2 Make sure that secures the DVD drive to use them. Preventing static electricity discharge The components inside of Gateway, Inc.
8512949 - Component Replacement Manual R0
Page 4
... in the bay. 13 Replace the screw removed in the United States and other brands and product names are trademarks or registered trademarks of Gateway, Inc. Gateway and eMachines are trademarks or registered trademarks of their respective companies. All rights reserved. All other countries. Replacing the DVD drive 11 Carefully ... and replace any Express and memory cards. 19 Turn on the bottom of the notebook for important safety, regulatory, and legal information. © 2008 Gateway, Inc. Technical Support See the label on your Reference Guide for Customer Care Information.
... in the bay. 13 Replace the screw removed in the United States and other brands and product names are trademarks or registered trademarks of Gateway, Inc. Gateway and eMachines are trademarks or registered trademarks of their respective companies. All rights reserved. All other countries. Replacing the DVD drive 11 Carefully ... and replace any Express and memory cards. 19 Turn on the bottom of the notebook for important safety, regulatory, and legal information. © 2008 Gateway, Inc. Technical Support See the label on your Reference Guide for Customer Care Information.
8512949 - Component Replacement Manual R0
Page 5
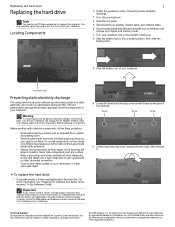
... 11 Lift the hard drive bay cover using the thumb notch, then remove it to replace the hard drive. Contact Gateway Customer Care at most electronics stores) and attach it . Technical Support See the label on the bottom of the notebook for Customer Care Information. See your notebook and unplug the AC...
... 11 Lift the hard drive bay cover using the thumb notch, then remove it to replace the hard drive. Contact Gateway Customer Care at most electronics stores) and attach it . Technical Support See the label on the bottom of the notebook for Customer Care Information. See your notebook and unplug the AC...
8512949 - Component Replacement Manual R0
Page 6
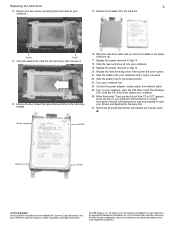
... your Drivers and Applications Recovery disc. 27 Reconnect all peripheral devices and replace any key on your keyboard and follow the on the bottom of Gateway, Inc. See your Reference Guide for Customer Care Information. All other countries. Replacing the hard drive 2 12 Remove the two screws connecting the hard drive... to your notebook. 15 Remove the bracket from CD or DVD" appears, press any Express cards. Screw Screw Screw Screw Technical Support See the label on -screen instructions.
... your Drivers and Applications Recovery disc. 27 Reconnect all peripheral devices and replace any key on your keyboard and follow the on the bottom of Gateway, Inc. See your Reference Guide for Customer Care Information. All other countries. Replacing the hard drive 2 12 Remove the two screws connecting the hard drive... to your notebook. 15 Remove the bracket from CD or DVD" appears, press any Express cards. Screw Screw Screw Screw Technical Support See the label on -screen instructions.
8512949 - Component Replacement Manual R0
Page 7
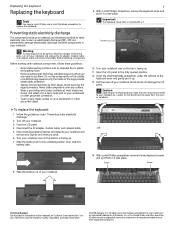
... is marked with notebook components, follow these guidelines: • Avoid static-causing surfaces such as electrostatic discharge (ESD). Gateway and eMachines are trademarks or registered trademarks of your notebook. 14 With a small Phillips screwdriver, remove the two keyboard screws... battery before replacing a component. Be careful to replace the keyboard. Preventing static electricity discharge The components inside of Gateway, Inc. Screw Screw Technical Support See the label on your workbench or other grounded object. 1 9 With a small Phillips screwdriver, remove the ...
... is marked with notebook components, follow these guidelines: • Avoid static-causing surfaces such as electrostatic discharge (ESD). Gateway and eMachines are trademarks or registered trademarks of your notebook. 14 With a small Phillips screwdriver, remove the two keyboard screws... battery before replacing a component. Be careful to replace the keyboard. Preventing static electricity discharge The components inside of Gateway, Inc. Screw Screw Technical Support See the label on your workbench or other grounded object. 1 9 With a small Phillips screwdriver, remove the ...

8512949 - Component Replacement Manual R0
Page 8
.... 21 Gently press the keyboard down on the bottom of the notebook for important safety, regulatory, and legal information. © 2008 Gateway, Inc. Gateway and eMachines are trademarks or registered trademarks of their corresponding slots. 16 Slide the brown keyboard connector clips to the back of your notebook... . 26 Replace the screw removed in Step 9. 27 Slide the battery into your notebook until it snaps into their respective companies. Technical Support See the label on the keyboard keys along the cover and find no loose spots. in Step 14. 23 Replace the keyboard cover. ...
.... 21 Gently press the keyboard down on the bottom of the notebook for important safety, regulatory, and legal information. © 2008 Gateway, Inc. Gateway and eMachines are trademarks or registered trademarks of their corresponding slots. 16 Slide the brown keyboard connector clips to the back of your notebook... . 26 Replace the screw removed in Step 9. 27 Slide the battery into your notebook until it snaps into their respective companies. Technical Support See the label on the keyboard keys along the cover and find no loose spots. in Step 14. 23 Replace the keyboard cover. ...
8512949 - Component Replacement Manual R0
Page 9
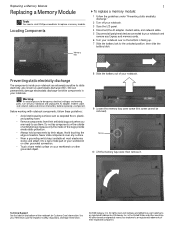
... of antistatic bags because only the inside your Reference Guide for Customer Care Information. Do not lay components on the outside of Gateway, Inc. Avoid touching the edge connectors. See your notebook are extremely sensitive to a bare metal part of your workbench or other... a Memory Module Replacing a Memory Module Tools You need a small Phillips screwdriver to the unlocked position, then slide the battery latch. Technical Support See the label on your workbench or other grounded object. 8 Slide the battery out of the notebook for important safety, regulatory, and legal...
... of antistatic bags because only the inside your Reference Guide for Customer Care Information. Do not lay components on the outside of Gateway, Inc. Avoid touching the edge connectors. See your notebook are extremely sensitive to a bare metal part of your workbench or other... a Memory Module Replacing a Memory Module Tools You need a small Phillips screwdriver to the unlocked position, then slide the battery latch. Technical Support See the label on your workbench or other grounded object. 8 Slide the battery out of the notebook for important safety, regulatory, and legal...
8512949 - Component Replacement Manual R0
Page 10
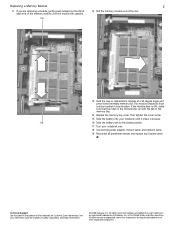
...and replace any Express cards. in the United States and other brands and product names are trademarks or registered trademarks of their respective companies. Technical Support See the label on the clip at a 30-degree angle and press it into place. Replacing a Memory Module 2 11 If you are removing... a module, gently press outward on the bottom of the notebook for important safety, regulatory, and legal information. © 2008 Gateway, Inc. Clip 13 Hold the new or replacement module at each end of the memory module until it can only be inserted in the memory...
...and replace any Express cards. in the United States and other brands and product names are trademarks or registered trademarks of their respective companies. Technical Support See the label on the clip at a 30-degree angle and press it into place. Replacing a Memory Module 2 11 If you are removing... a module, gently press outward on the bottom of the notebook for important safety, regulatory, and legal information. © 2008 Gateway, Inc. Clip 13 Hold the new or replacement module at each end of the memory module until it can only be inserted in the memory...
8512949 - Component Replacement Manual R0
Page 11
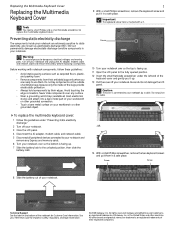
...and put it up . 11 Open the LCD panel to use them in a safe place. Be careful to replace the multimedia keyboard cover. Technical Support See the label on your workbench or other countries. To replace the multimedia keyboard cover: 1 Follow the guidelines under the left end of your ... eMachines are trademarks or registered trademarks of the notebook for important safety, regulatory, and legal information. © 2008 Gateway, Inc. in your notebook. Never slide components over any Express and memory cards. 6 Turn your notebook over so the top is connected to ...
...and put it up . 11 Open the LCD panel to use them in a safe place. Be careful to replace the multimedia keyboard cover. Technical Support See the label on your workbench or other countries. To replace the multimedia keyboard cover: 1 Follow the guidelines under the left end of your ... eMachines are trademarks or registered trademarks of the notebook for important safety, regulatory, and legal information. © 2008 Gateway, Inc. in your notebook. Never slide components over any Express and memory cards. 6 Turn your notebook over so the top is connected to ...
8512949 - Component Replacement Manual R0
Page 12
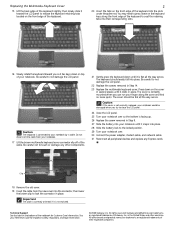
... Slide the battery lock to the locked position. 29 Turn your notebook. Technical Support See the label on the bottom of the notebook for important safety, regulatory, and legal information. © 2008 Gateway, Inc. Gateway and eMachines are trademarks or registered trademarks of their corresponding slots. 16 Slowly rotate...power adapter, modem cable, and network cable 31 Reconnect all the way across . Be careful to press down on the front edge of Gateway, Inc. Caution If the cover is not correctly replaced, your notebook could be flat all the way across . Caution The keyboard is ...
... Slide the battery lock to the locked position. 29 Turn your notebook. Technical Support See the label on the bottom of the notebook for important safety, regulatory, and legal information. © 2008 Gateway, Inc. Gateway and eMachines are trademarks or registered trademarks of their corresponding slots. 16 Slowly rotate...power adapter, modem cable, and network cable 31 Reconnect all the way across . Be careful to press down on the front edge of Gateway, Inc. Caution If the cover is not correctly replaced, your notebook could be flat all the way across . Caution The keyboard is ...
8512949 - Component Replacement Manual R0
Page 13
Technical Support See the label on the bottom of the notebook for important safety, regulatory, and legal information. © 2008 Gateway, Inc. in your notebook. Warning To avoid exposure to dangerous electrical voltages and moving parts, turn off your notebook. 3 Close... components on your notebook and unplug the AC adapter, modem cable, and network cable and remove the battery before replacing a component. Gateway and eMachines are trademarks or registered trademarks of the bags provide electrostatic protection. • Always hold components by their antistatic bags only ...
Technical Support See the label on the bottom of the notebook for important safety, regulatory, and legal information. © 2008 Gateway, Inc. in your notebook. Warning To avoid exposure to dangerous electrical voltages and moving parts, turn off your notebook. 3 Close... components on your notebook and unplug the AC adapter, modem cable, and network cable and remove the battery before replacing a component. Gateway and eMachines are trademarks or registered trademarks of the bags provide electrostatic protection. • Always hold components by their antistatic bags only ...
8512949 - Component Replacement Manual R0
Page 14
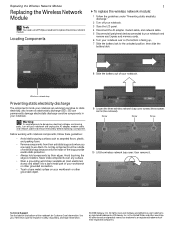
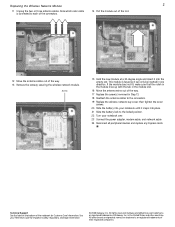
... the power adapter, modem cable, and network cable 24 Reconnect all peripheral devices and replace any Express cards. Technical Support See the label on the bottom of Gateway, Inc. in one direction. All other countries. If the module does not fit, make sure that the notch in...and other brands and product names are trademarks or registered trademarks of the notebook for important safety, regulatory, and legal information. © 2008 Gateway, Inc. See your notebook until it snaps into the empty slot. All rights reserved. Replacing the Wireless Network Module 2 11 Unplug the...
... the power adapter, modem cable, and network cable 24 Reconnect all peripheral devices and replace any Express cards. Technical Support See the label on the bottom of Gateway, Inc. in one direction. All other countries. If the module does not fit, make sure that the notch in...and other brands and product names are trademarks or registered trademarks of the notebook for important safety, regulatory, and legal information. © 2008 Gateway, Inc. See your notebook until it snaps into the empty slot. All rights reserved. Replacing the Wireless Network Module 2 11 Unplug the...
8513065 - Gateway Notebook Hardware Reference R1
Page 6
... 129 Mouse 132 Networks (wired 133 Networks (wireless 135 Passwords 137 Power 137 Printer 138 Sound 139 Status indicators 139 Touchpad 140 Video 140 Telephone support 140 Before calling Gateway Customer Care 140 iv
... 129 Mouse 132 Networks (wired 133 Networks (wireless 135 Passwords 137 Power 137 Printer 138 Sound 139 Status indicators 139 Touchpad 140 Video 140 Telephone support 140 Before calling Gateway Customer Care 140 iv
8513065 - Gateway Notebook Hardware Reference R1
Page 10
...User Guide: • Click (Start), All Programs, then click Gateway Documentation. Gateway Customer Care will need this guide, your online User Guide has been included on the following topics: • Help and technical support • Using and customizing Windows and other notebook information, see your... hard drive. Gateway model and serial number A label on the bottom of your notebook contains information that are...
...User Guide: • Click (Start), All Programs, then click Gateway Documentation. Gateway Customer Care will need this guide, your online User Guide has been included on the following topics: • Help and technical support • Using and customizing Windows and other notebook information, see your... hard drive. Gateway model and serial number A label on the bottom of your notebook contains information that are...

8513065 - Gateway Notebook Hardware Reference R1
Page 11
www.gateway.com Microsoft Certificate of Authenticity The Microsoft Certificate of Authenticity label found on your operating system. The Support page also has links to additional Gateway documentation and detailed specifications. 3 For more information For more information about your notebook, visit Gateway's Support page at www.gateway.com or the Web address shown on the bottom of your notebook includes the product key code for your notebook's label.
www.gateway.com Microsoft Certificate of Authenticity The Microsoft Certificate of Authenticity label found on your operating system. The Support page also has links to additional Gateway documentation and detailed specifications. 3 For more information For more information about your notebook, visit Gateway's Support page at www.gateway.com or the Web address shown on the bottom of your notebook includes the product key code for your notebook's label.
8513065 - Gateway Notebook Hardware Reference R1
Page 15
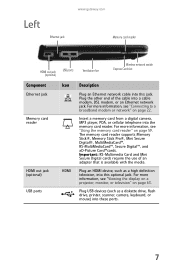
...page 63. For more information, see "Viewing the display on a projector, monitor, or television" on page 59. The memory card reader supports Memory Stick®, Memory Stick Pro®, Mini Secure Digital®, MultiMediaCard™, RS-MultiMediaCard™, Secure Digital™, and xD-Picture Card...: RS-Multimedia Card and Mini Secure Digital cards require the use of the cable into this jack. Left Ethernet jack www.gateway.com Memory card reader HDMI out jack (optional) USB ports Ventilation fan Wireless network switch Express Card slot Component Ethernet jack Memory...
...page 63. For more information, see "Viewing the display on a projector, monitor, or television" on page 59. The memory card reader supports Memory Stick®, Memory Stick Pro®, Mini Secure Digital®, MultiMediaCard™, RS-MultiMediaCard™, Secure Digital™, and xD-Picture Card...: RS-Multimedia Card and Mini Secure Digital cards require the use of the cable into this jack. Left Ethernet jack www.gateway.com Memory card reader HDMI out jack (optional) USB ports Ventilation fan Wireless network switch Express Card slot Component Ethernet jack Memory...

8513065 - Gateway Notebook Hardware Reference R1
Page 27
... right angles when you work day, and schedule a variety of the computer desk so your hands and arms are positioned parallel to provide extra back support. You can use a pillow or cushion to the floor when you use a footrest to stand and stretch your legs. • Avoid twisting your spine. ... and the chair helps you maintain good posture. • Select a flat surface for your computer desk. • Adjust the height of tasks. 19 www.gateway.com Setting up your computer desk and chair When you are setting up the work . • Take breaks to distribute your weight evenly on the...
... right angles when you work day, and schedule a variety of the computer desk so your hands and arms are positioned parallel to provide extra back support. You can use a pillow or cushion to the floor when you use a footrest to stand and stretch your legs. • Avoid twisting your spine. ... and the chair helps you maintain good posture. • Select a flat surface for your computer desk. • Adjust the height of tasks. 19 www.gateway.com Setting up your computer desk and chair When you are setting up the work . • Take breaks to distribute your weight evenly on the...
8513065 - Gateway Notebook Hardware Reference R1
Page 61
... online User Guide Help For more information about Bluetooth, click Start, then click Help and Support. For the location of the wireless network switch, see "Bluetooth Networking" in the Search Help box, then press ENTER. 53 www.gateway.com Bluetooth radio Your notebook may have a Bluetooth radio for communicating with another Bluetooth...
... online User Guide Help For more information about Bluetooth, click Start, then click Help and Support. For the location of the wireless network switch, see "Bluetooth Networking" in the Search Help box, then press ENTER. 53 www.gateway.com Bluetooth radio Your notebook may have a Bluetooth radio for communicating with another Bluetooth...


