8512149 - Gateway Notebook User Guide for Windows Vista
Page 105
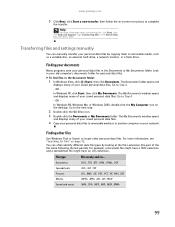
...2 Double-click the C:\ drive icon. 3 Double-click the Documents or My Documents folder. www.gateway.com 3 Click Next, click Start a new transfer, then follow the on your network. Finding... documents Many programs save your personal data files by looking at the file's extension (the part of your saved personal data files. 4 Copy your old computer's documents folder for files"...personal data files. Look in your personal data files to removable media or to another computer on -screen instructions to removable media, such as a writable disc, an external hard drive, a network location...
...2 Double-click the C:\ drive icon. 3 Double-click the Documents or My Documents folder. www.gateway.com 3 Click Next, click Start a new transfer, then follow the on your network. Finding... documents Many programs save your personal data files by looking at the file's extension (the part of your saved personal data files. 4 Copy your old computer's documents folder for files"...personal data files. Look in your personal data files to removable media or to another computer on -screen instructions to removable media, such as a writable disc, an external hard drive, a network location...
8512936 - Gateway Notebook Reference Guide R0
Page 50
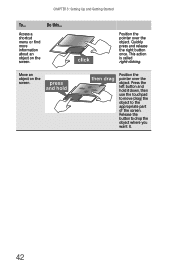
CHAPTER 3: Setting Up and Getting Started To... Move an object on the screen. This action is called right-clicking. Release the button to the appropriate part of the screen. Position the pointer over the object. Press the left button and hold it down, then use the touchpad to move (drag) the object to drop the object where you want it. 42 Position the pointer over the object. Quickly press and release the right button once. Access a shortcut menu or find more information about an object on the screen. Do this...
CHAPTER 3: Setting Up and Getting Started To... Move an object on the screen. This action is called right-clicking. Release the button to the appropriate part of the screen. Position the pointer over the object. Press the left button and hold it down, then use the touchpad to move (drag) the object to drop the object where you want it. 42 Position the pointer over the object. Quickly press and release the right button once. Access a shortcut menu or find more information about an object on the screen. Do this...
8512936 - Gateway Notebook Reference Guide R0
Page 97
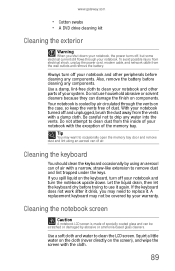
... or damaged by your system. Squirt a little water on the cloth (never directly on the case, so keep the vents free of your warranty. www.gateway.com • Cotton swabs • A DVD drive cleaning kit Cleaning the exterior Warning When you shut down . Do not use it . Let the ... finish on the keyboard, turn off your notebook and turn off your notebook and other parts of dust. With your notebook turned off , but some electrical current still flows through the vents on the screen), and wipe the screen with the exception of air with a damp cloth. Use a soft cloth and water...
... or damaged by your system. Squirt a little water on the cloth (never directly on the case, so keep the vents free of your warranty. www.gateway.com • Cotton swabs • A DVD drive cleaning kit Cleaning the exterior Warning When you shut down . Do not use it . Let the ... finish on the keyboard, turn off your notebook and turn off your notebook and other parts of dust. With your notebook turned off , but some electrical current still flows through the vents on the screen), and wipe the screen with the exception of air with a damp cloth. Use a soft cloth and water...
8512936 - Gateway Notebook Reference Guide R0
Page 122
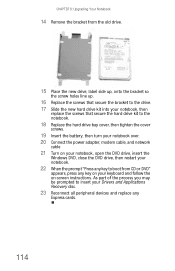
CHAPTER 8: Upgrading Your Notebook 14 Remove the bracket from CD or DVD" appears, press any Express cards. 114 As part of the process you may be prompted to boot from the old drive. 15 Place the new drive, label side up, onto the bracket so ... key to insert your keyboard and follow the on your Drivers and Applications Recovery disc. 23 Reconnect all peripheral devices and replace any key on -screen instructions.
CHAPTER 8: Upgrading Your Notebook 14 Remove the bracket from CD or DVD" appears, press any Express cards. 114 As part of the process you may be prompted to boot from the old drive. 15 Place the new drive, label side up, onto the bracket so ... key to insert your keyboard and follow the on your Drivers and Applications Recovery disc. 23 Reconnect all peripheral devices and replace any key on -screen instructions.
8512949 - Component Replacement Manual R0
Page 6
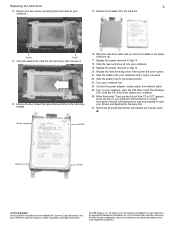
... Replace the screws removed in the United States and other brands and product names are trademarks or registered trademarks of Gateway, Inc. As part of the process you may be prompted to insert your Reference Guide for Customer Care Information. All rights reserved.... countries. Screw Screw Screw Screw Technical Support See the label on -screen instructions. See your Drivers and Applications Recovery disc. 27 Reconnect all peripheral devices and replace any Express cards. Gateway and eMachines are trademarks or registered trademarks of their respective companies. Replacing...
... Replace the screws removed in the United States and other brands and product names are trademarks or registered trademarks of Gateway, Inc. As part of the process you may be prompted to insert your Reference Guide for Customer Care Information. All rights reserved.... countries. Screw Screw Screw Screw Technical Support See the label on -screen instructions. See your Drivers and Applications Recovery disc. 27 Reconnect all peripheral devices and replace any Express cards. Gateway and eMachines are trademarks or registered trademarks of their respective companies. Replacing...


