
Service Guide
Page 7
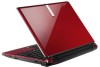
...Gateway Notebook tour 4 Front View 4 Closed Front View 5 Left View 5 Right View 6 Rear and Base View 7 Indicators 8 TouchPad Basics 9 Using the Keyboard 10 Lock Keys and embedded numeric keypad 10 Windows Keys 11...30 WinFlash Utility 32 Remove HDD/BIOS Password Utilities 33 Machine Disassembly and Replacement 35 Disassembly Requirements 35 Related Information 35 General Information 36 Pre-disassembly ...36 External Module Disassembly Process 37 External Modules Disassembly Flowchart 37 Removing the Battery Pack 38 Removing the Hard Disk Drive Module 39 Removing the DIMM ...
...Gateway Notebook tour 4 Front View 4 Closed Front View 5 Left View 5 Right View 6 Rear and Base View 7 Indicators 8 TouchPad Basics 9 Using the Keyboard 10 Lock Keys and embedded numeric keypad 10 Windows Keys 11...30 WinFlash Utility 32 Remove HDD/BIOS Password Utilities 33 Machine Disassembly and Replacement 35 Disassembly Requirements 35 Related Information 35 General Information 36 Pre-disassembly ...36 External Module Disassembly Process 37 External Modules Disassembly Flowchart 37 Removing the Battery Pack 38 Removing the Hard Disk Drive Module 39 Removing the DIMM ...

Service Guide
Page 8
... Procedure 93 Replacing the CPU 93 Replacing the Thermal Module 93 Replacing the RTC Battery 96 Replacing the Mainboard 96 Replacing the Hinge Wells 99 Replacing the LCD module 99 Replacing the LAN Board 101 Replacing the VGA Board 102 Replacing the Speaker Module 104 Replacing the LED Board 106 Replacing the Bluetooth Module 107 Replacing the Card Reader Board 108 Replacing the Button...
... Procedure 93 Replacing the CPU 93 Replacing the Thermal Module 93 Replacing the RTC Battery 96 Replacing the Mainboard 96 Replacing the Hinge Wells 99 Replacing the LCD module 99 Replacing the LAN Board 101 Replacing the VGA Board 102 Replacing the Speaker Module 104 Replacing the LED Board 106 Replacing the Bluetooth Module 107 Replacing the Card Reader Board 108 Replacing the Button...

Service Guide
Page 59
...Remove CRT Board Remove LAN Board Remove Mainboard Remove Bluetooth Module Remove LED Board Remove Button Board Remove LCD Module Remove Thermal Module Remove RTC Battery Remove Speaker Modue Remove CPU Screw List Step Upper Cover Hinge Cover Button Board I/O Board VGA Board LCD Module LED Board Speaker Module ... 3 49 Main Unit Disassembly Process IMPORTANT: Cable paths and positioning may not represent the final product color or configuration. During the removal and replacement of components, ensure all available cable channels and clips are used and that the cables are...
...Remove CRT Board Remove LAN Board Remove Mainboard Remove Bluetooth Module Remove LED Board Remove Button Board Remove LCD Module Remove Thermal Module Remove RTC Battery Remove Speaker Modue Remove CPU Screw List Step Upper Cover Hinge Cover Button Board I/O Board VGA Board LCD Module LED Board Speaker Module ... 3 49 Main Unit Disassembly Process IMPORTANT: Cable paths and positioning may not represent the final product color or configuration. During the removal and replacement of components, ensure all available cable channels and clips are used and that the cables are...

Service Guide
Page 106
Replacing the Mainboard 1. Insert the main board into the lower cover port-edge first. 96 Chapter 3 Disconnect the RTC Battery as shown. 2. Replacing the RTC Battery IMPORTANT: Follow local regulations for disposal of all batteries. 1. Turn the assembly and Mainboard onto its side and connect the mainboard to the VGA cable as shown. See "Removing the Mainboard" on page 72. 2.
Replacing the Mainboard 1. Insert the main board into the lower cover port-edge first. 96 Chapter 3 Disconnect the RTC Battery as shown. 2. Replacing the RTC Battery IMPORTANT: Follow local regulations for disposal of all batteries. 1. Turn the assembly and Mainboard onto its side and connect the mainboard to the VGA cable as shown. See "Removing the Mainboard" on page 72. 2.

Service Guide
Page 133
Turn the computer over. 2. Chapter 3 123 Slide and hold the battery release latch to the lock position. Slide the battery lock/unlock latch to the release position (1), then slide the battery pack into the main unit (2). 2 1 4. Replacing the Battery Pack 1. Slide the battery lock/unlock latch to the unlock position. 3.
Turn the computer over. 2. Chapter 3 123 Slide and hold the battery release latch to the lock position. Slide the battery lock/unlock latch to the release position (1), then slide the battery pack into the main unit (2). 2 1 4. Replacing the Battery Pack 1. Slide the battery lock/unlock latch to the unlock position. 3.

Service Guide
Page 136
... protectors between the computer and the outlet. 3. Do not replace non-defective FRUs: SSttaarrtt OK Check AC/Battery Power on OK Check Daughter/B & FFC Whether OK Swap AC /Battery NG to try OK Swap Daughter/B NG Re-plug PWR FFC Swap M/B Computer Shuts down Intermittently If... Information" on page 165. 126 Chapter 4 Plug the computer directly into a known good electrical outlet. 4. Remove all external and non-essential hardware connected to the computer that are not necessary to boot the computer to the computer and the electrical outlet. 2. Remove any recently installed software...
... protectors between the computer and the outlet. 3. Do not replace non-defective FRUs: SSttaarrtt OK Check AC/Battery Power on OK Check Daughter/B & FFC Whether OK Swap AC /Battery NG to try OK Swap Daughter/B NG Re-plug PWR FFC Swap M/B Computer Shuts down Intermittently If... Information" on page 165. 126 Chapter 4 Plug the computer directly into a known good electrical outlet. 4. Remove all external and non-essential hardware connected to the computer that are not necessary to boot the computer to the computer and the electrical outlet. 2. Remove any recently installed software...

Service Guide
Page 137
... removing the power cable and battery and holding down the power button for specific model procedures. 2. On this model). Connect an external monitor to No Power Power On ? No Replace external DDRAM module Replace the main board CPU Thermal Remove and Module properly No replace thermal connected? Make sure the computer has power by pressing...
... removing the power cable and battery and holding down the power button for specific model procedures. 2. On this model). Connect an external monitor to No Power Power On ? No Replace external DDRAM module Replace the main board CPU Thermal Remove and Module properly No replace thermal connected? Make sure the computer has power by pressing...
Service Guide
Page 138
... settings are no red Xs or yellow exclamation marks. • There are still lost, replace the cables. 4. If the computer boots correctly, add the devices one by one year old, replace the CMOS battery. 2. Reseat the memory modules. 7. Readjust if necessary. 6. Check the Device Manager to... determine that the computer is missing from the operating system DVD and follow the onscreen prompts. 11. Run the Windows Memory Diagnostic from...
... settings are no red Xs or yellow exclamation marks. • There are still lost, replace the cables. 4. If the computer boots correctly, add the devices one by one year old, replace the CMOS battery. 2. Reseat the memory modules. 7. Readjust if necessary. 6. Check the Device Manager to... determine that the computer is missing from the operating system DVD and follow the onscreen prompts. 11. Run the Windows Memory Diagnostic from...

Service Guide
Page 146
...replacement should be caused by the computer. Power-off the computer. 2. If any FRU. 3. If the problem does not recur, reconnect the removed devices one at the time of reasons that all of the following devices: • Non-Acer devices • Printer, mouse, and other external devices • Battery... pack • Hard disk drive • DIMM • CD-ROM/Diskette drive Module • PC Cards 4. Run the advanced diagnostic test for damage. NOTE: Verify that have nothing to do not replace any problems are supported by a ...
...replacement should be caused by the computer. Power-off the computer. 2. If any FRU. 3. If the problem does not recur, reconnect the removed devices one at the time of reasons that all of the following devices: • Non-Acer devices • Printer, mouse, and other external devices • Battery... pack • Hard disk drive • DIMM • CD-ROM/Diskette drive Module • PC Cards 4. Run the advanced diagnostic test for damage. NOTE: Verify that have nothing to do not replace any problems are supported by a ...

Service Guide
Page 177
Numerics 3G Cover Removing 121 A Antennas Removing 85 Replacing 87 B Battery Pack Removing 38, 123 BIOS ROM type 16 vendor 16 Version...107 Board Layout Top View 141 brightness hotkeys 12 Button Board Removing 56, 110 C Camera Board Removing 80 Replacing 91 caps lock on indicator 8 Card Reader Board Removing 61, 108 Common Problems 126 CPU Removing 77 Index...12 E Euro Key 13 External Module Disassembly Flowchart 37 F Features 1 FLASH Utility 29 Flash Utility 29 FRU (Field Replaceable Unit) List 147 H Hard Disk Drive Module Removing 39, 119 HDD Cover Removing 121 Hibernation mode hotkey 12 Hinge ...
Numerics 3G Cover Removing 121 A Antennas Removing 85 Replacing 87 B Battery Pack Removing 38, 123 BIOS ROM type 16 vendor 16 Version...107 Board Layout Top View 141 brightness hotkeys 12 Button Board Removing 56, 110 C Camera Board Removing 80 Replacing 91 caps lock on indicator 8 Card Reader Board Removing 61, 108 Common Problems 126 CPU Removing 77 Index...12 E Euro Key 13 External Module Disassembly Flowchart 37 F Features 1 FLASH Utility 29 Flash Utility 29 FRU (Field Replaceable Unit) List 147 H Hard Disk Drive Module Removing 39, 119 HDD Cover Removing 121 Hibernation mode hotkey 12 Hinge ...

Service Guide
Page 178
... Unit Disassembly Flowchart 49 Mainboard Removing 72, 96 media access on indicator 8 Memory Check 126 Memory Cover Removing 121 168 Microphone Removing 81 Replacing 90 Model Definition 156 N No Display Issue 127 num lock on indicator 8 O ODD Failure 135 Online Support Information 165 P Panel 4... left 4 PC Card 8 POST Codes Reference Tables 137 Power On Failure 126 R RTC Battery Removing 74 Replacing 74, 96 S Speaker Module Removing 63, 104 speakers hotkey 12 System Block Diagram 3 T Test Compatible Components 161 Thermal Module Removing 75,...
... Unit Disassembly Flowchart 49 Mainboard Removing 72, 96 media access on indicator 8 Memory Check 126 Memory Cover Removing 121 168 Microphone Removing 81 Replacing 90 Model Definition 156 N No Display Issue 127 num lock on indicator 8 O ODD Failure 135 Online Support Information 165 P Panel 4... left 4 PC Card 8 POST Codes Reference Tables 137 Power On Failure 126 R RTC Battery Removing 74 Replacing 74, 96 S Speaker Module Removing 63, 104 speakers hotkey 12 System Block Diagram 3 T Test Compatible Components 161 Thermal Module Removing 75,...


